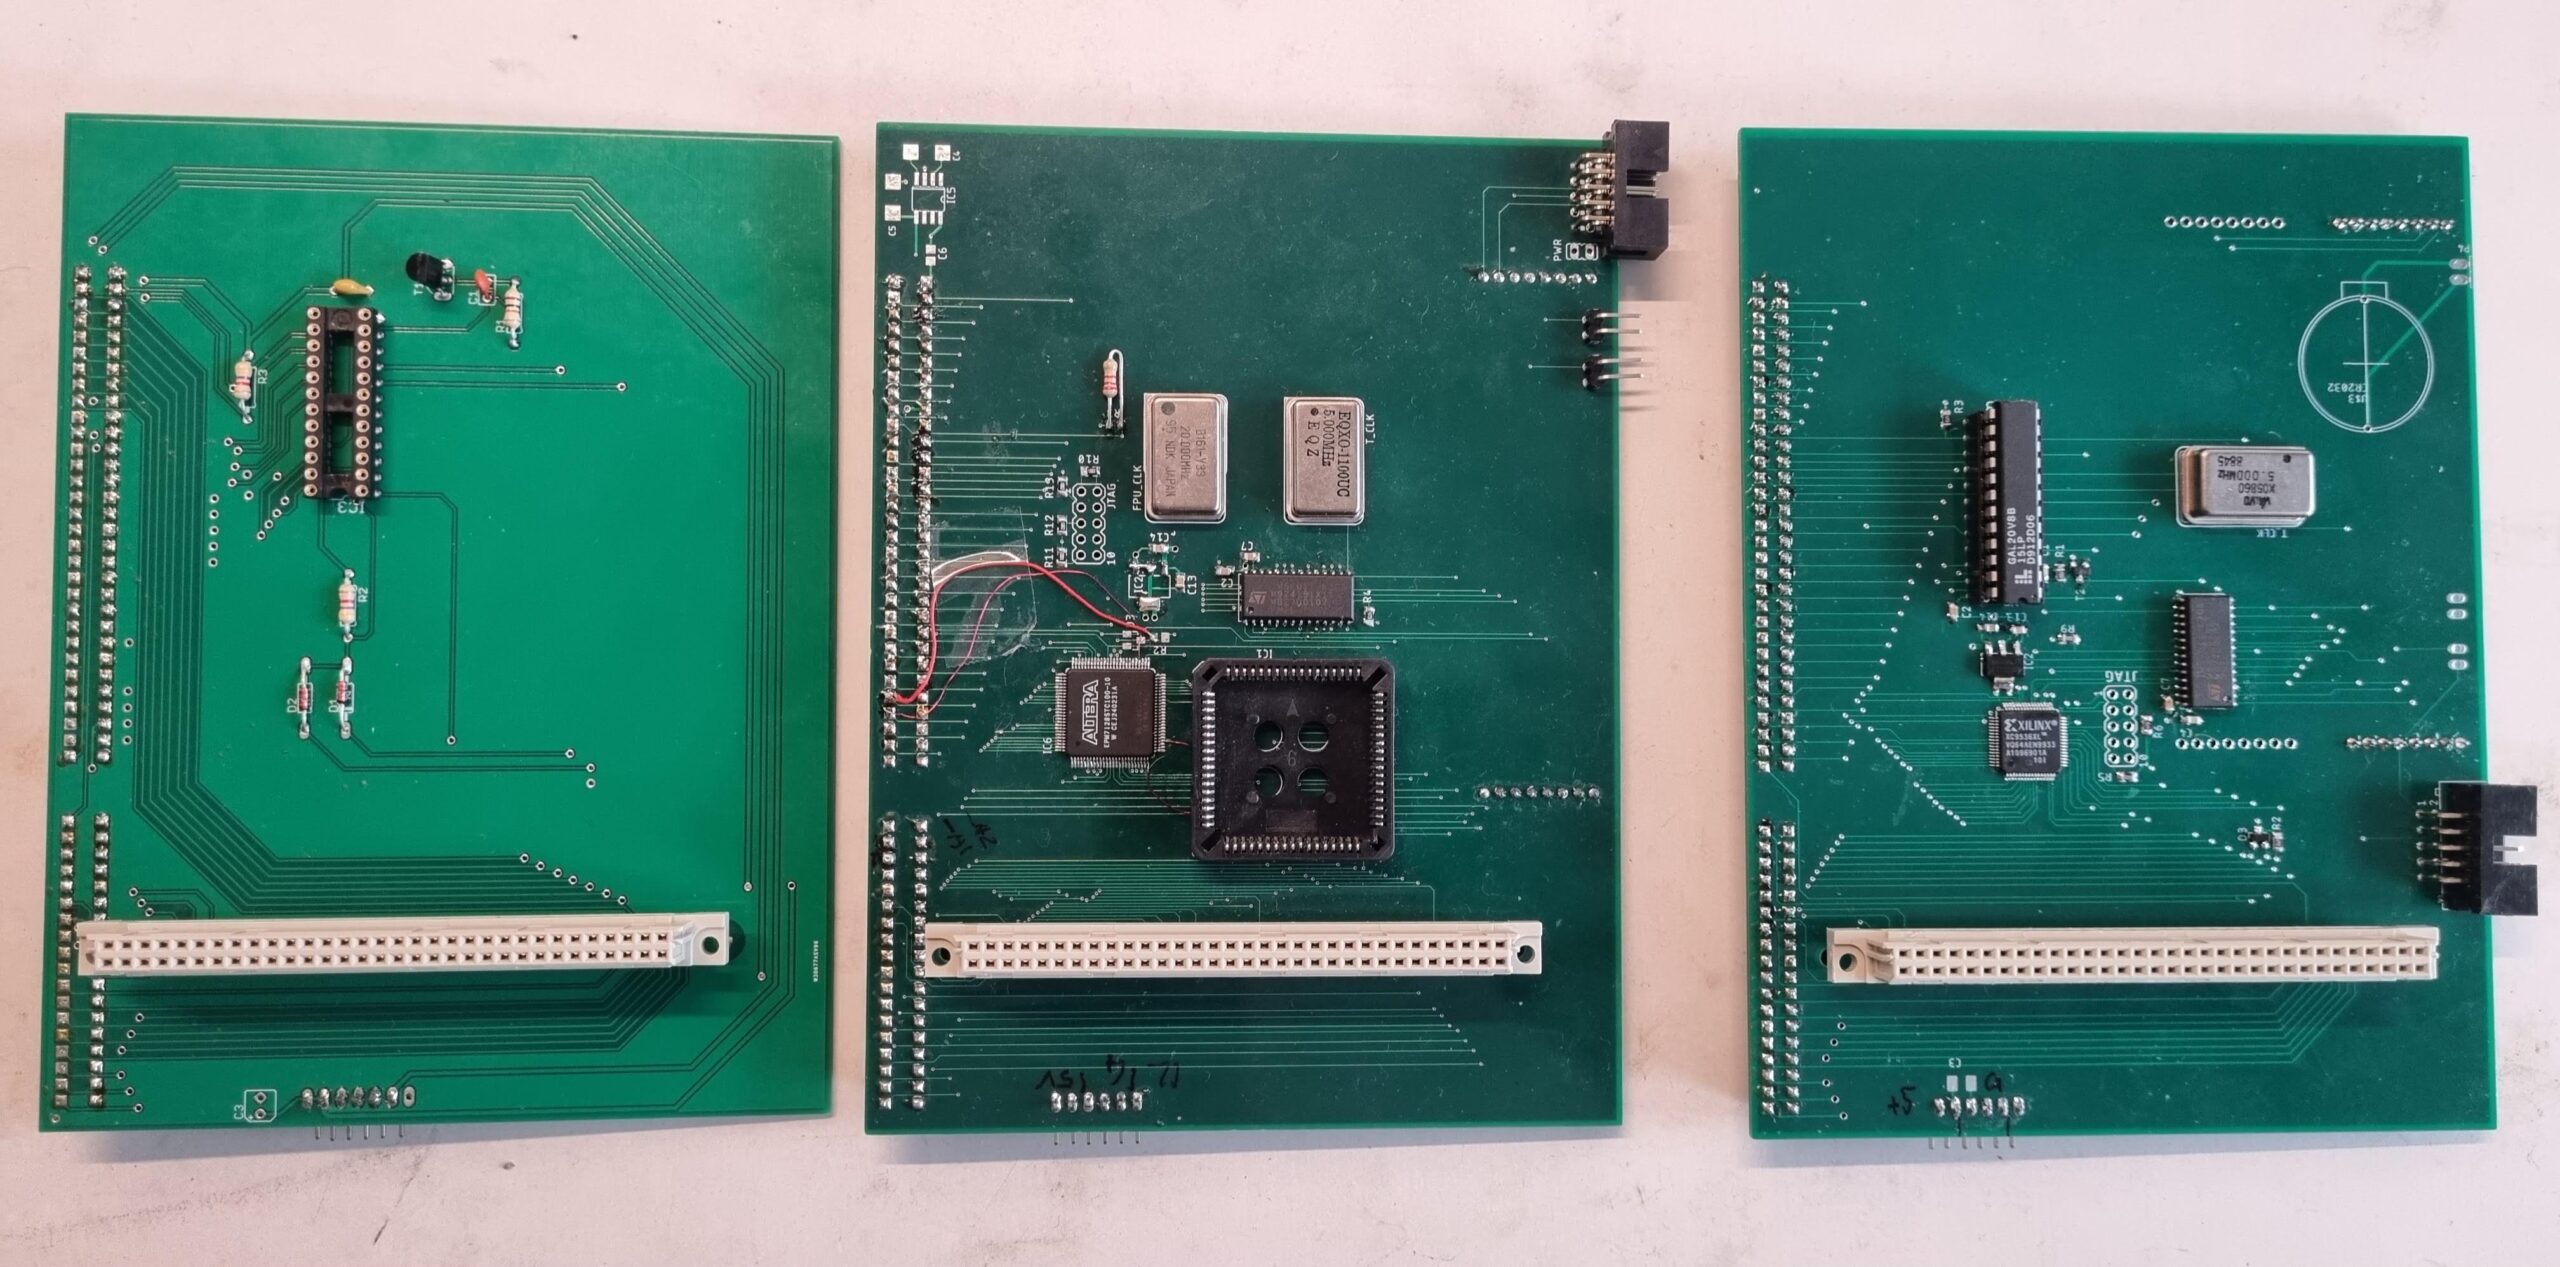
All posts by Axel

http://www.geekdot.com/about-me/

ATW800/2 FAQ

So you just got your ATW800/2 or you’re thinking about getting one and your brain is full of questions?
Before asking the team or posting into some forum, maybe the answer was already given… so check this FAQ first and safe yourself from being flamed or called a ‘noob’ 😅

👉 If you came to this page from some external page, I suggest to check out the ATW800/2 main-page first.

Then come back to this FAQ and if you still have questions, visit the ATW800/2 category in the GeekDot Wiki for more details.

Currently this FAQ has these sections:

General questions

Q: It seems you’re sold out. When will you start the next batch of cards?
A: Well, it’s an enthusiast project, not a real commercial product. So I (Axel) neither do warehousing nor will I build cards 5 days a week.
It’s a hobby and thus I do things when I’m up to it. It’s still a lot of work, even when having the cards populated with the basic parts in the PCB factory.
So all I can say is: Have patience, young padawan. I do my very best.

Q: Ok, I’m confused. How many versions will be available then?
A: There are two main variants: One for the Mega-ST expansion bus and one for the VME bus available in the Mega-STe and TT.
These variants are populated depending on what makes sense on the specific platform – all versions have the graphics part, i.e. Seurat and Absinth.
For the ATW800/2-VME card it will be basically just that. Most additional features are useless or redundant in an Atari Mega-STe or TT.
On the other hand the vanilla ATW800/2 for the Mega-ST comes with TOS ROMs, optional IDE drive, the clock-battery holder and an auxiliary power cable.

Both variants are equipped with a “real” Transputer interface, so you can plug in 2 Transputer Modules (aka TRAM) and/or connect a Transputer farm externally.

Q: What does the ATW800/2 cost?
A: Because the first batch showed that the population of the cards took way more time and work as assumed, we had to raise prices for the coming batches. Still, we think for the given features it’s still a steal:

Mega ST+T – 200€
VME+T – 190€

Q: Hey, I have an idea: What about adding [enter cool feature here] !?
A: Sorry, we had hard times to even hold ourselves back from feature-creep. Actually, we think the ATW800/2 has enough features already. Some maybe obvious  but not implemented functionalities are just handled better by already available devices .

Q: I’m an experienced electronics tinkerer. Can I just get the ATW800/2 as kit?
A: I’m sorry, but I won’t sell kits. I don’t have a proper assembly plan you could follow, not all parts a are packed in a way I could just throw them into a box (i.e. needs extra packaging, labeling etc) and most important: Those few DIY kits of other projects I’ve sent out in the past all became support issues and/or longer email threads no matter how experienced the recipients were.
So please settle for a build and fully tested card. It will save both of us plenty of time.

Q: This sucks! XYZ is way better than your crap!
A: Yes, you’re absolutely right. So please move on, there is nothing to see here.

Hardware

Q: How do firmware updates work?
A: Seurat (the FPGA) has to be updated via the USB-C connector on his piggy-board using the GoWIN Programming software (Registration required, Linux and Windows only but also works fine in VMs). See the ATW800/2 manual which has a dedicated chapter about this.

In the very rare event that Absinth (the CPLD) needs to be updated, one will need an Altera USB Blaster and the proper Software (part of Alteras/Intels Quartus II IDE, registration req’d… sorry.)
We’ll provide proper documentation should an update ever be necessary.

Q: I can’t get that damn IDE interface working!
A: Yes, that’s a known problem that many microSD cards are currently not working reliably with our IDE implementation.
On the Mega-ST make sure that you connected the ACSI-INT cable to the motherboard and set the IDE jumper.
VME cards need the most recent firmware (V1), a (retrofitted) set IDE jumper and HDDRIVER V12.6 and later. Still these machines cannot boot from this interface.
Uwe Seimet wrote a great FAQ article covering all questions concerning the ATW800/2 IDE interface and HDDRIVER.

Q: I just don’t get this Transputer thing. Is it needed to use the card? What is it anyhow?
A: Basically, a Transputer is/was a CPU like any other but with some twists. Firstly, it was very fast (for its time) and secondly you could easily connect many of them to increase computing power.
That said, no, you do not need a Transputer to use the ATW800/2… actually you will get one ‘for free’, because inside the FPGA is a synthetic Transputer already.

Q: So is the Transputer inside the ATW800/2 FPGA used as an graphics accelerator like in todays GPUs?
A: No, not really. Not out of the box. The Transputer is a separate CPU which happens to have shared access to the video buffer which your ATARI’s 68000/030 also accesses – by the way something which was not possible on the original ATW800.
That said, it is thinkable to write some code running on the synthetic Transputer which acts as firmware for (complex) graphics. So the ATARI sends graphic primitives like ‘gourand shaded plane from x,y to a,b’ and the Transputer would do the calculation and painting into VRAM. But that’s all theory until some brave soul writes it.

Q: Will it work with device XYZ and/or accelerator ABC?
A: We tested the ATW800/2 with peripherals we own ourselves. That’s probably 5% of the things ever made for the Atari ST/TT – so there won’t be a guarantee that a device we don’t own will perfectly work with the ATW800/2.
That said, we will depend on your feedback and are happy to support creators of other devices to make the ATW800/2 behaving well.

Check out the ATW800/2 wiki for a list of known working and non-working hardware.

Q: Regarding software compatibility, would you consider adding Blossom support? I mean Blossom hardware registers like blitter, screen resolutions etc.
A: No, we’re not doing anything Blossom’ish. There’s actually not much sense behind this for some reasons:

Nothing supported Blossom besides the Helios graphics/X11 driver.
The Atari-side of the ATW800 had no access to Blossom at all.
Developing VDI drivers for it requires reverse-engineering of hardware which we do not own
It’s simpler to start from scratch and add things as we need them.

So “Seurat”, the controller inside the FPGA is accessible by both, the Atari (VDI etc.) and the Transputer(s). Even at the same time(!) if this would make sense in some cases.
Seurat also has more possible video-modes than Blossom had with 1MB video RAM:

mode 0: 1280 by 960 pixels, 16 colors out of a palette of 4096
mode 1: 1024 by 768 pixels, 256 colors out of a palette of 16.7 million
mode 2: 640 by 480 pixels, 256 colors out of a palette of 16.7 million
mode 3: 512 by 480 pixels, 16.7 million colors

With 2MB video RAM Seurat can go from 320×200 up to 1600x1200x8. Bit depths are currently ranging from 1 to 16bit.
It also supports the original Atari modes like 640x400x1 and could do 640x200x2 and 320x200x4… even there’s not much sense behind this.

Q: I don’t have an HDMI display, what about good old analog VGA?
A: We had to decide how to use the limited space at the external edge of the card. So the onboard HDMI of the used FPGA board was a natural choice.
Sadly all Nano FPGAs provides just a “TMDS” signal which does not provide all features and needed signals a real HDMI source would deliver to external converters etc. This includes HDMI to VGA converters or power-injectors.

Q: I have no sound on my Mega-ST(e)! What did I do wrong?
A: The “HDMI” connector of the ATW800/2 only provides a TMDS video signal… no audio, sorry. You will need external speakers.
To get sound on the Mega-ST you have to connect to the onboard monitor connector (DIN-13 plug, pin-1 is audio-out).
There’s a nice “RGB to VGA video Adapter with AV RCA JACK” designed by Edoardo kinmami over here.
Also ePay has some adapter (cables), just search for “atari st vga” – some have a 3.5mm audio jack.
The Mega-STE and TT provide stereo RCA connectors in which you can plug speakers directly, while the TT also has an internal speaker, so if there’s no audio coming from, something else is broken in your machine.

Q: Why didn’t you just took a Raspberry Pi?
A: Have you read our goals? Please do so now. Thank you.

Q: Do I need a bigger power-supply?
A: It depends. If you’re still using the original power-supply of your Mega-ST this might be a good moment to replace it with something more recent.
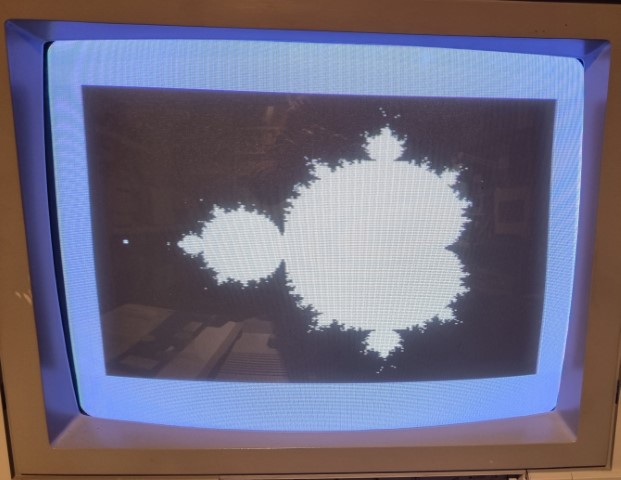
The ATW800/2 is not tremendously demanding. With one TRAM plugged into the board, calculating Mandelbrots and displaying them in 1024×786@8bit, a 4MB Mega-ST draws 1.65 amperes in total.

Q: I have a ATW800/2-VME and the pins of the FPGA (Seurat) are sticking out of the top! What happened?!
A: This is done by intention for various reasons, mainly efficiency and saving time. The VME card needs to by as flat as possible on the backside to fit into the Mega-STe/TT VME slot cage.
Also the FPGA piggy-back board needs to sit low on the card so the HDMI connector can be brought out to the back nicely. Soldering the connecting pins upside-down saved space on the underside of the card and the tedious work of clipping them down for me.
If you don’t like it, you can cut them with *proper* pincers while making sure you’re not cutting anything else! If you break it, your fault! Do not come to me complaining 😉

Q: Can I have the VHDL source-code, schematics or gerber files?
A: Sorry, this is not an open-source project. We have to cover quite some initial R&D costs and we actually don’t like those ePay copycats.
That said, we – the extraordinary transputer gentlemen – are open for personal request in which you can explain why you need those and if there’s a convincing reason, we might share what we have.

Q: I interested in the VME version, if I order the slot bezel, will it always be green? Can I get it in TT / Mega-STe gray instead?
A: No, the slot-cover does not come in “TT cream” but in what I’d call “grass green“. Why that?

Well, there’s nothing like a “TT cream” or “Mega-STe grey”… anymore. Actually, I guess every VME Atari in this world developed it’s own 50 shades of grey/yellow(is). I tried 3-4 different filament manufacturers and none of their filament fit my TT’s grey perfectly. Not to mention yours and Peter’s, Paul’s and Mary’s 😉

So I decided to go the other way and settle on a statement-color. The grass green is a nice, unobtrusive contrast. And it’s a kind of ATW800/2 trademark… it brings color into the grey Atari world 🌈

Q: Still, I want my VME slot cover in gray! Can I print the slot bezel myself?
A: Sure, just get the .STL/.3MF files here.

Software

Q: Does it work with [your favorite software package here]?
A: We tested a lot of well known & used software packages. Generally said, if your software is well programmed following the GEM guidelines, it should work fine.
“Dirty” stuff accessing the (video)hardware directly will most certainly not work.

Q: I don’t get the NVDI driver you’ve provided working.
A: Well, first of all, make sure you have a working version of NVDI5 running. We’re not providing this.
If this that’s running fine on your machine, copy the provided files from their directory into the your existing NVDI directories with the same name.
Finally adjust your ASSIGN.SYS file accordingly, so it uses the ATW800/2 video drivers you’ve just copied. Alternatively, you can also replace your ASSIGN.SYS file with the one provided in the driver archive at your own risk. Make a backup of yours before doing so.

Q: How do I setup XVDI using the GDOS from NVDI?

  • Install NVDI with Standard Option (not Nova)
  • rename NVDIDRVx.SYS to NVDIDRVx.SYX (i.e. disable them)
  • choose option d. in XVDIMENU do set GDOS name to NVDI.PRG
  • choose option b, in XVDIMENU to choose output method xVDI with GDOS,
  • don’t forget to save

Q: That bouncing XVDI logo after booting nags me like hell. Can I remove it?
A: Sure. Inside the XVDIMENU there’s an option to set the timeout. Set it to 0 and you’re golden!

Q: Wired things happening after booting.
A: Generally, if booting is not working as it was before installing your ATW800/2 and XVDI, try to boot your system as “bare” as possible. That is:

    • Disable all accessories
    • strip the AUTO folder to XVDI or NVDI only
    • Use a pure, original version of TOS, preferably 2.06
    • No fancy UI replacements like Gemini, Jiinee etc.

Q: I have strange effects like symbols in the menubar are not displayed or at booting I got an error message saying “illegal pointer to MFREE”
A: Yes, this is a know behavior when the XCONTROL.ACC accessory is installed, and/or this is using the COLOR.CPX control panel extension. We recommend using a more recent version of XCONTROL.ACC or use an alternative like COPS or ZCONTROL.ACC.
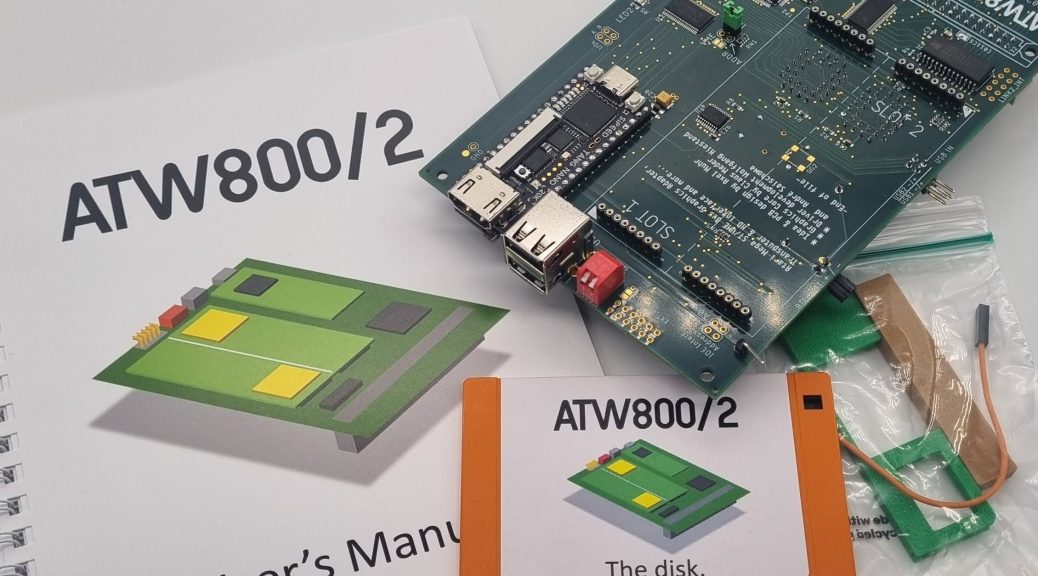
Buy an ATW800/2

(Pre-)Ordering

As explained on the main post, there are two ATW800/2 variants available: Either Mega-ST or VME-bus (Mega-STE & TT).
To make production easier I dropped the “no TRAM” option, which means from the 2nd batch on, all cards are now fitted with a Transputer Links interface so you can plug in 2 Transputer Modules (aka TRAM) and/or connect a Transputer farm externally.
This simplifies the pricelist:

Mega ST+T 200€
VME+T 190€

We still consider these prices to be very “power without the price“ish and given I’m not a business but just an Atari enthusiast, I will not make profits from this.

The 1st batch showed that even having most of the card pre-populated at the PCB shop, the ‘vintage’ and through-hole parts have to manually populated. This results in about an hour of work per card(!). Yes, that did surprise me, too.
Beyond that, every extra Euro will go into the creation of next projects 😉

Shipping 📦

It’s 2026 and shipping prices are still high. I am shipping from Germany as trackable package only.
Also I chose the box dimensions that way, that it snugly fits into DHLs shipping categories. It weights about 250 grams (that’s 0.55lbs or 8.8oz or 0.039 stone – no idea what’s that converted to Ningi 😉 )

 Shipping into the European Union is relatively affordable with  15€ (Just in case, for Germany it’ll be 7€ as “DHL Paket”)

 UK and Switzerland will be 20€ then.

Sadly the USA is currently (2026) completely unpredictable. Maybe 27€
Random tariffs and taxes changing on a weekly basis led to total shipping(-price) chaos. At the moment DHL stopped all shipping to the USA except presents below a value of $100 (85€).
Before you ask: Those presents will be subject to intense inspection by US customs to make sure no one is sneaking in commercial goods. The risk is on your side… things are just #verycomplicated.
(The 3rd batch went through without any loss. So knock on wood.)

 Canada, Australia and Japan can choose between 27€ if you’re patient(*) or a whopping 48€ which will be priority shipping – lately I made the experience that the 50€ isn’t worth it. It’s not that much faster than the cheaper one.

*) I had shipping times from 10 to a hefty 60 days. Totally random, no idea what influenced the one or the other.
Other countries, please contact me – I’ll check for the cheapest solution.

If there are import taxes applied in your country, that’s up to you to pay these. Sorry, that’s how it works – not like the some people think.

The waitlist ⏰

Aaaand the waitlist for the 5th batch is full!
Everybody registering now, will be placed onto the “subs bench”. This is not a bad thing. In the last batch, 8 people did not reply or dropped their slot, so you have a realistic chance. 

Please do not post into the comments of this page if you like to be added or want to order a card directly!
I will not add you to the list because I can’t monitor multiple channels (comments, email, forum DM, discord DM etc.)

So please use this form… also provide an email address you’re frequently monitoring . When shipping starts, I will move your slot to the next person in line if you do not answer my mail(s) within 4 days.

Name
Street name and number
optional
Preferrably use top-level-domain codes (e.g. US / UK / DE / NL / PL etc...)
When shipping starts you will be contacted on this address and asked for payment. So be sure that "geekdot.com" is not in your spam-filter!
This nickname will be used on the public pre-order list. If omitted I will use firstname and the lastname initial.
ATW800/2 model you like to reserve
Select VME bus for the Atari TT and Mega-STe. Mega-ST only fits in the Mega-ST.
Do you want the 3D printed bezel with it? (+5 EUR)
ONLY RELEVANT TO VME CARDS! If you want to print it yourself, the STL files are available in the public File Share
If needed, leave a short note here.

1️⃣ For fairness sake, accept orders for just one card per person.
I know, many of you have more than one Atari and like to enhance them all. That way as many users as possible can get their hands on a card.

When, oh, when will the 6th batch be made?” you ask: 2026 that’s for sure.
If there’s still enough interest, I will start a new batch after recovering from the solder fumes and nerve-wrecking shipping process.

You do not need to leave a down payment. As soon as  production and shipping starts, I will contact those on the list via email asking if you’re still interested – so make sure you’re providing an address which you read regularly.
Please no “Are we there yet?” mails during the wait. Thanks.
Should you have changed your mind then, I’ll ask the next one in line.

Status chain is:

  • CONTACTED ( & invoice sent and payment pending or agreed on)
  • REPLIED (Answered and indicated to pay)
  • PAID (Thank you very much!)
  • READY (to ship, need to get it to the post office)
  • SHIPPED (you will get an email with tracking URL)
  • REMINDER (sent. Sleepy heads. These are those who you you should look at, if you’re on the ‘subs bench’ 😉)

Those waiting for 5th batch… 😊

Serial Name Bus Status
201 TheFoxCZ VME
202 Warren Mega-ST
203 MichaelM Mega-ST
204 robdaemon Mega-ST
205 officer960 VME
206 Frank VME
207 jamesfmackenzie Mega-ST
208 bee VME
209 Noe R. VME
210 damanloox VME
211 Stemmi VME
212 Jack C. VME
213 John H. VME
214 part VME
215 Zirkumflex VME
216 adammm VME
217 Bastiaan VME
218 adeb Mega-ST
219 coolchilli Mega-ST
220 adeb VME
221 Bruno R. VME
222 Blackfalcon030 VME
223 Richard C. VME
224 dearhorse VME
225 Frank R. VME
226 Mark B. VME
227 Lou Mega-ST
228 bbisi Mega-ST
229 Schlom VME
230 David S VME
231 Winfyd A. VME
232 IngoP Mega-ST
233 Cyborg VME
234 fichten VME
235 HalfBit Mega-ST
236 benne VME
237 falconwings VME
238 Christian R. VME
239 Thomas H. VME
240 James G. Mega-ST
241 Christian W. VME
242 Kyle D. no model given
243 vhenares Mega-ST
244 SVE VME
245 Buggy VME
246 Anand S. Mega-ST
247 Enito VME
248 Bama VME
249 Teopnd VME
250 Oldskool Mega-ST

The subs bench 🪑

Those who still have hope… if you’re not asked to jump in for someone on the waitlist, you’ll be automatically moved to the next (i.e. 6th) batch.

251 Hannu Mega-ST
252 kupido Mega-ST
253 Michael S. Mega-ST
254 sunaiac VME
255 Janatari VME
256 Rianata VME
257 Sylvester L. Mega-ST
258 piXL VME
259 Alexander C. VME
260 iluvator Mega-ST
261 Hawk VME
262 Indus VME
263 uunek VME
264 SySTeM VME
265 VarenST VME
266 Hitchcock VME
267 Rudee VME
268 Roger C. Mega-ST
269 PhilC Mega-ST
270 PaW2000 VME
271 don_apple VME
272 Icky VME
273 supergaummxx VME
274 KLund1 Mega-ST
275 jok VME
276 casibo VME
277  

ATW800/2

Welcome to the ATW800/2 page – read that as you like:  “ATW800 two” or “ATW800 half”, depending on your expectation.😉
Whatever way, it’s the Atari Transputer card as it was meant to be.

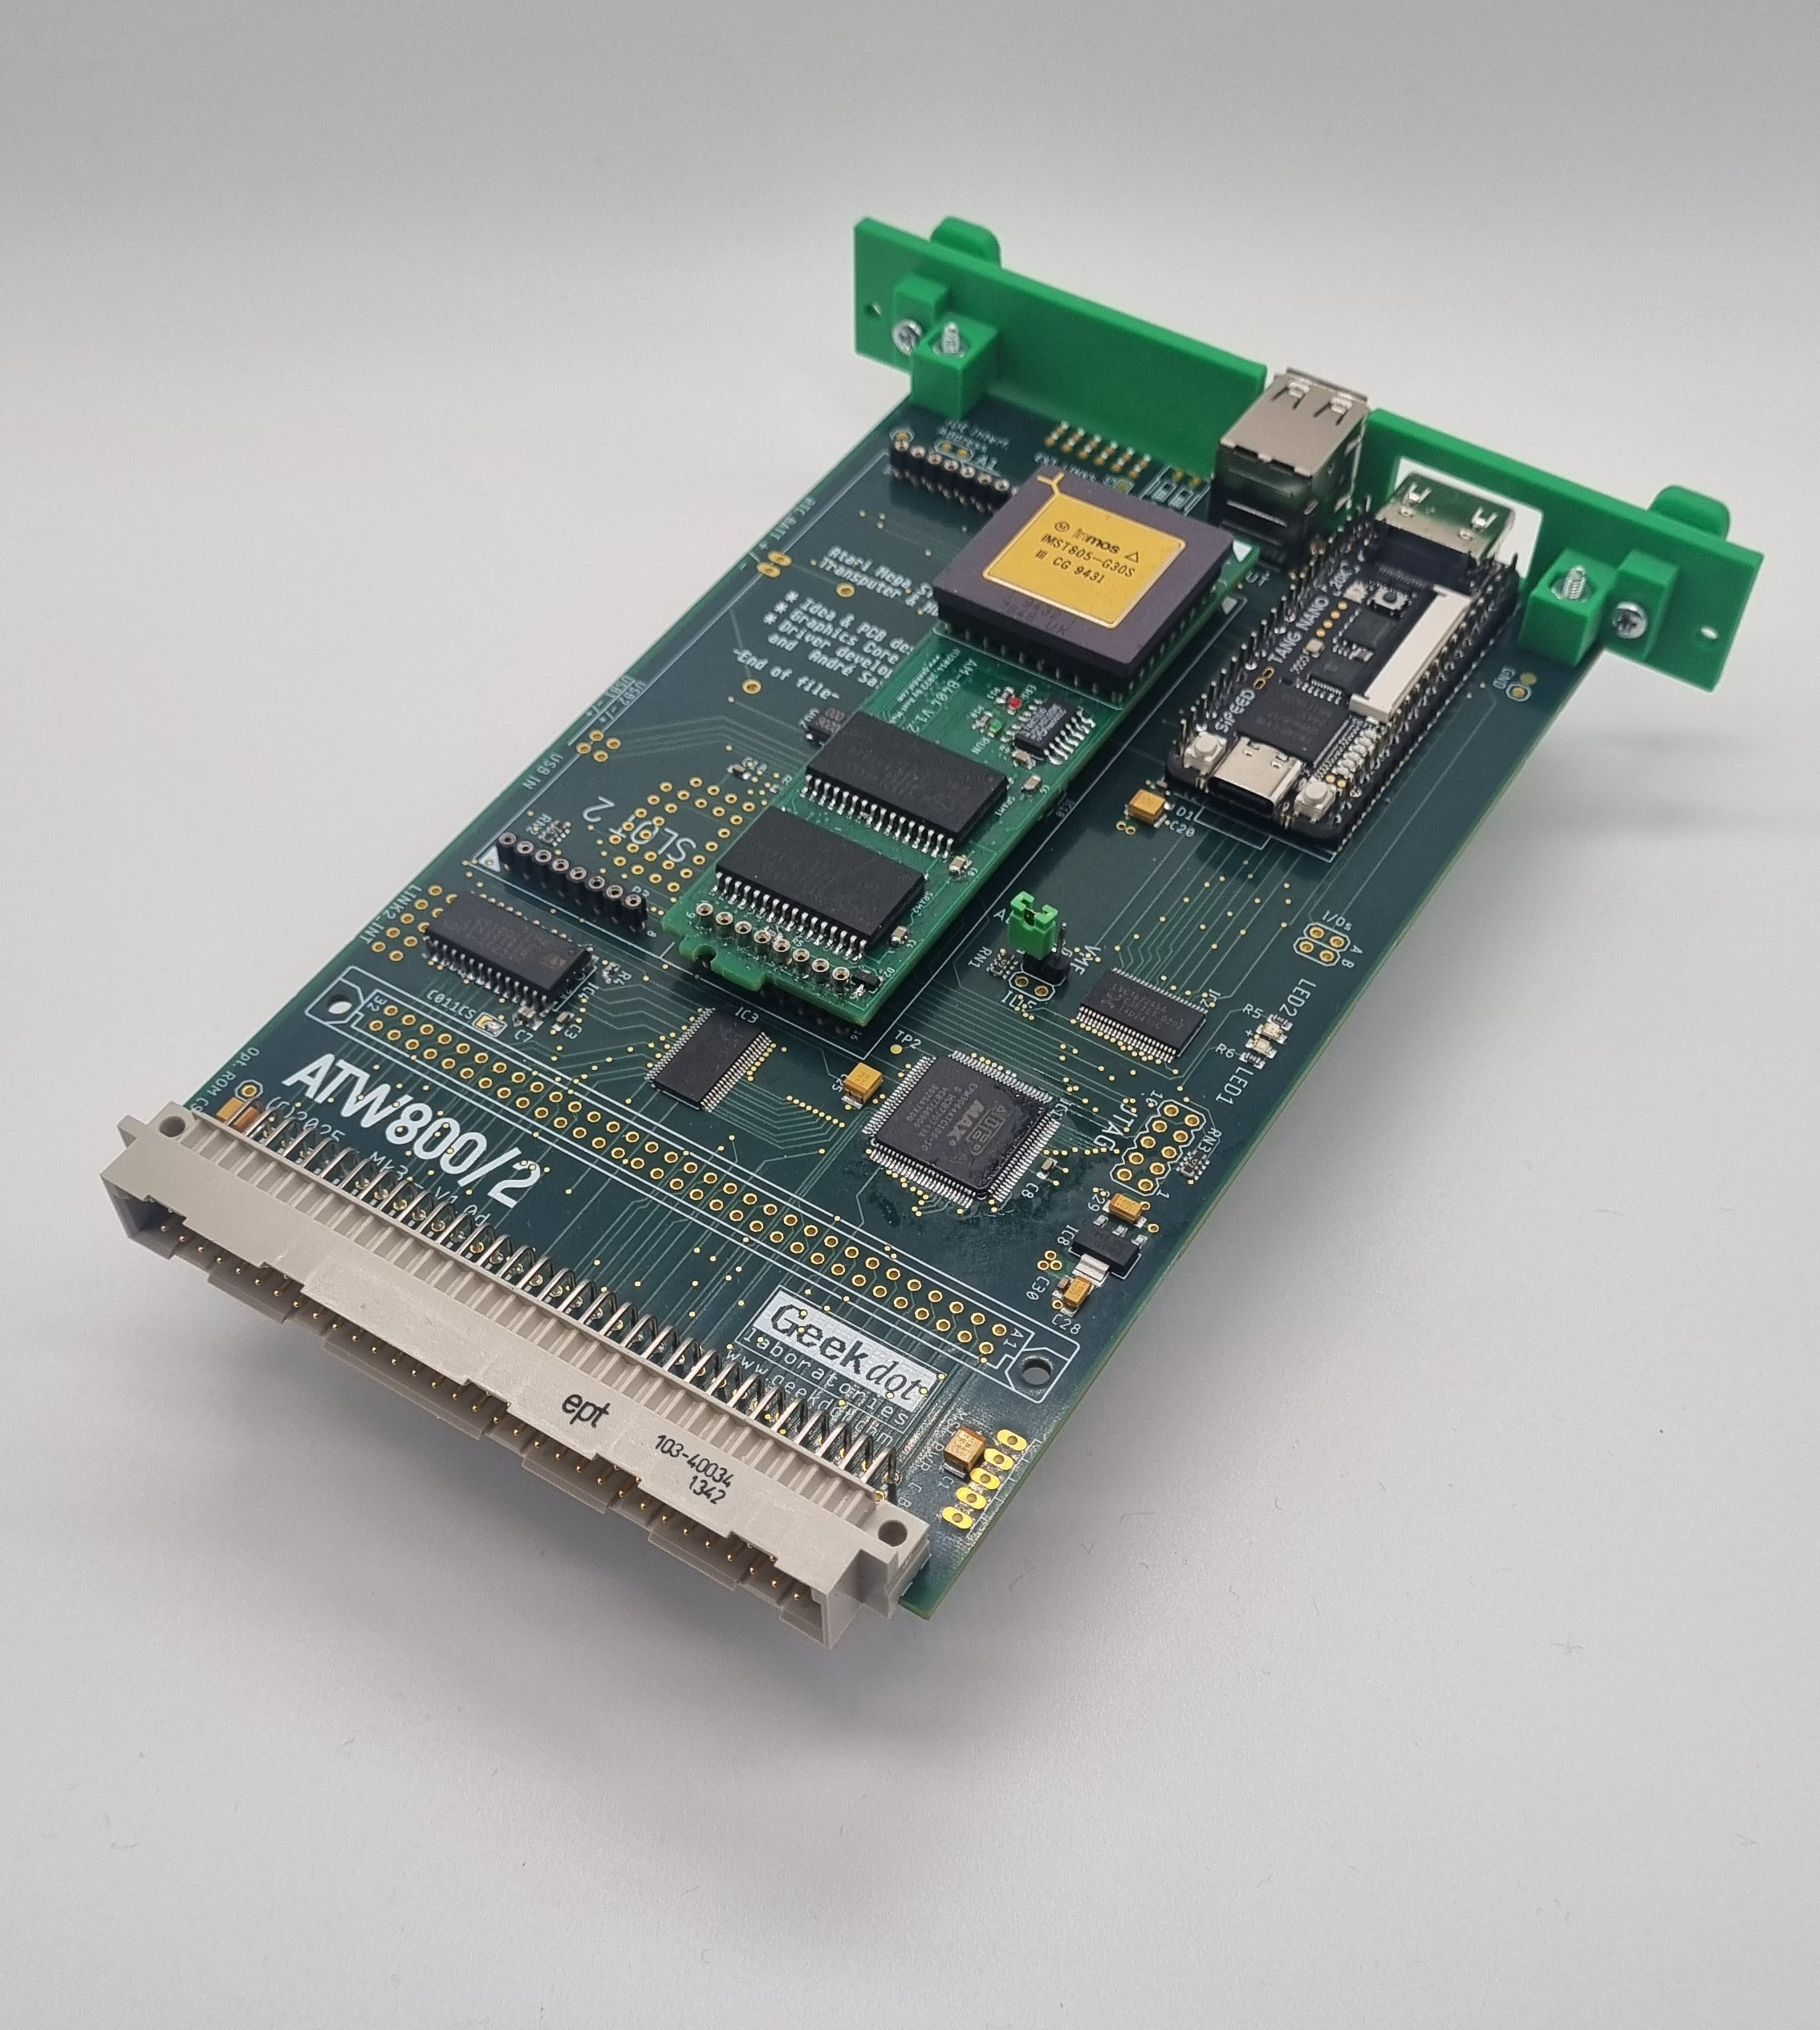
Mega-ST version of the ATW800/2

Quick navigation

If you (re)visited and looking for something specific, here’s the fast lane:

📰📢 Newsflash: The ATW800/2 made it into HACKADAY! 🥳

And  we got our first unboxing video! Thanks for that TJ!

Here’s another “happy TJ” 😉

Background

Before we go into features & technical details I’d like to talk a bit about motivation and goals of this project.

You might have read about my STG[A]TW card for the ATARI Mega-ST expansion bus. That contained an ET4000 graphics card borrowed from IBM PC ISA-land and an Inmos C011 Link-Adapter to connect to a Transputer CPU.
This showed the direction but was a bit cumbersome. Also, ET4000 cards are getting hard to find, expensive (>100€) and not all of them actually do work in your ATARI – and most important, my intention was to create something affordable – remember: Power without the price ✊

The idea is/was to provide a plug-and-play version of a expansion which brings your ATARI as close as possible to what the ATARI Transputer Workstation (ATW800) provided.
That is: Transputers of course as well as expanded graphics capabilities.

Here are my 6 goals I want(ed) to achieve:

  1. Be reasonably ‘historically correct’
  2. Create a design avoiding obsolete parts where possible
  3. Stay in a affordable price range
  4. Simple installation
  5. Integrate/play nice with other peripherals
  6. Offer flexibility

Goal #1 is a philosophical topic one can discuss for his/her whole retro-nerd life. It’s the same as with e.g. cars. Is it OK to put an US V8 into a Ferrari? Electrifying a 1970 Porsche 911? LED headlights in a vintage car? Trailer Queen or patina? The list and discussion will go to the end of humankind.
The very same goes for vintage computer systems. There’s nearly none left which hasn’t had a Raspberry Pi of some sort slapped into it. Starting with a Pi Nano as WiFi-module and ending with a full blown 1.5GHz Pi 4 in an 8bit machine… for my taste, this is not the way.
So with this project we stay with what would have been possible in the let’s say 90s. It might be reached by using more integrated parts, but no recent high-tech here. Sorry. Which brings us to the next point…

Goal #2 is more or less a financial decision. If you use parts which are long time out of production, you depend on a grey market which is limited and can quickly drain, might be full of fakes and prices explode due to greediness.
So instead of buying the last stock of e.g. ET4000W32 chips and create a redesign of an x86 ISA card kludged onto a 68k bus, it’s wiser to go for a ‘virtual design’ which won’t go EOL and can grow as we go… in this case: FPGA is the wayBut following goal #1, don’t overdo.
If there’s (currently) no other option, we obviously have to go with the old parts. The Inmos C011 link-adapter is an example here.

Goal #3 limits #2 in some aspects. It’s relatively simple to pick a recent FPGA which actually would be capable to easily simulate your whole ATARI ST (or two)… but that would be quite expensive – not just the chip but also the design, which requires external RAM, 3-4 voltages and multi-layer PCBs to cope with 200+ BGA connects.
The compromise here is an FPGA board which offers all that already mounted onto it and will be piggy-backed onto our card.
And because cheap is always a challenge, we went for the Chinese Nano FPGA family which has an unreached price/feature ratio and fits the “Power without the price” mantra.

Goal #4 is quite simple: Not everybody is a virtuoso with his/her solder iron. So I tried to avoid as much additional soldering/cabling as possible.
Basically you plug the card into the Mega-ST or VME slot and you’re good to go.
In fact, as of today, there’s just one cable to plug(!) if you want to use one optional feature of the ATW800/2 (ACSI INT). No soldering whatsoever.
Also, you should be able to plug the card in and use it without additional needs. That’s why it offers (optional) TOS ROMs.
This is the way 😉

Goal #5 reflects the awareness that there are mostly souped-up machines out there. I daresay no one who plays with uses his Atari unenhanced in one or the other way.
The ATW800/2 tries to play nice with other common expansions by precisely decoding (previously unused) addresses and even integrate their features like the looped-through USB port of the Lightning-ST.
That said, there are so many old and new peripherals that nobody can guarantee that everything works nicely together with an ATW800/2 – especially on an overloaded bus.

And because of this Goal #6 will be covered by “bespoke ordering“.
Not everybody will be interested in having 2 TRAM slots for hosting real Transputers – so you can leave them out and save some €€.
The same goes for the TOS ROMs. If you already have another ROM switcher, just leave it unpopulated.

Reality kicked in

Having all that planned out, back to the drawing board I went… just to realize that I cannot handle that all by my self.
So it became clear that I have to ask specialists if they like to join the effort.
Let me introduce you to the team aka “The league of extraordinary Transputer gentlemen“:

  • Wolfgang ‘Idek’ Hiestand of the Nova drivers fame.
    Back around the start of the 2000s, Wolfgang looked into getting his hands on the Nova source code with the intention of preserving knowledge about Nova cards. It took some time, but in the end he succeeded in recreating the original drivers. Since then, he has maintained and extended Nova drivers to support additional VGA cards and ATARI computers. For this project, Wolfgang has created a branch of the Nova drivers to support the FPGA-based card.
  • Claus Meder. God of all things FPGA and fellow Transputer maniac. So much actually that he wrote a Transputer core in VHDL.
    Claus designed and wrote the impressive graphics-core for an FPGA from hell.
  • André Saischowa. Atari and Transputer fiddler of the earliest hours. He wrote Transputer and Atari ST programs back then and just got into the matters again when we met. Perfect timing!
    André ported all INMOS tools as well as the Helios server… plus developing  driver .sys files for NVDI.
  • Honorable mention: Mike Brüstle of transputer.net. The man whose brain natively runs Transputer assembly code.
    When you have a question regarding Transputers and he doesn’t know the answer, nobody does.

All four of them have many, many more talents and without them this project would still be just another dream of mine. ❤

Features

Ah, finally… features.
I assume you’re roughly in the picture, what the ATARI Transputer Workstation was all about. Basically, it was a Transputer system running Helios  which used an Mega-ST1 as host. The powerful graphics chip (“Blossom“) was connected to the Transputer which ran X11 on it to display graphics in 1280 by 960 pixels (16 colors) or 1024 by 786 pixels in 256 colors, making the most out of its 1MB VRAM.
As said the Atari part was mainly just I/O: Harddisk, keyboard, mouse, serial and parallel interface. No access to Blossom and after booting, there was no way to run Atari software from/in Helios.

Today that’s bugging me, and like said before, I think Atari or Perihelion, the company behind Helios as well as the ATW, took the wrong approach.
The Transputer system should not sit on top of the Atari system but next to it. Both, TOS/GEM as well as the Transputer(s) should have access to all that pixel beauty.

So there you have it, the two main features and ‘raison d’Être’:

High-Res color graphics 👾

The ATW800/2 graphics controller is actually a tiny and cheap FPGA board piggybacked onto the card. While we started out with the Tang Nano9k it soon proved to be unstable as soon you stretched it to the max… as for now, we changed to the slightly more expensive Nano20k which therefore offers more room and faster/bigger RAM.
[NB: This is the prefect proof that it does make sense to keep this part “virtual” – no shortcoming or chip EOL’ing can stop the product itself. All it needs is an adaptor.]

Displays will be directly connected to its HDMI port.

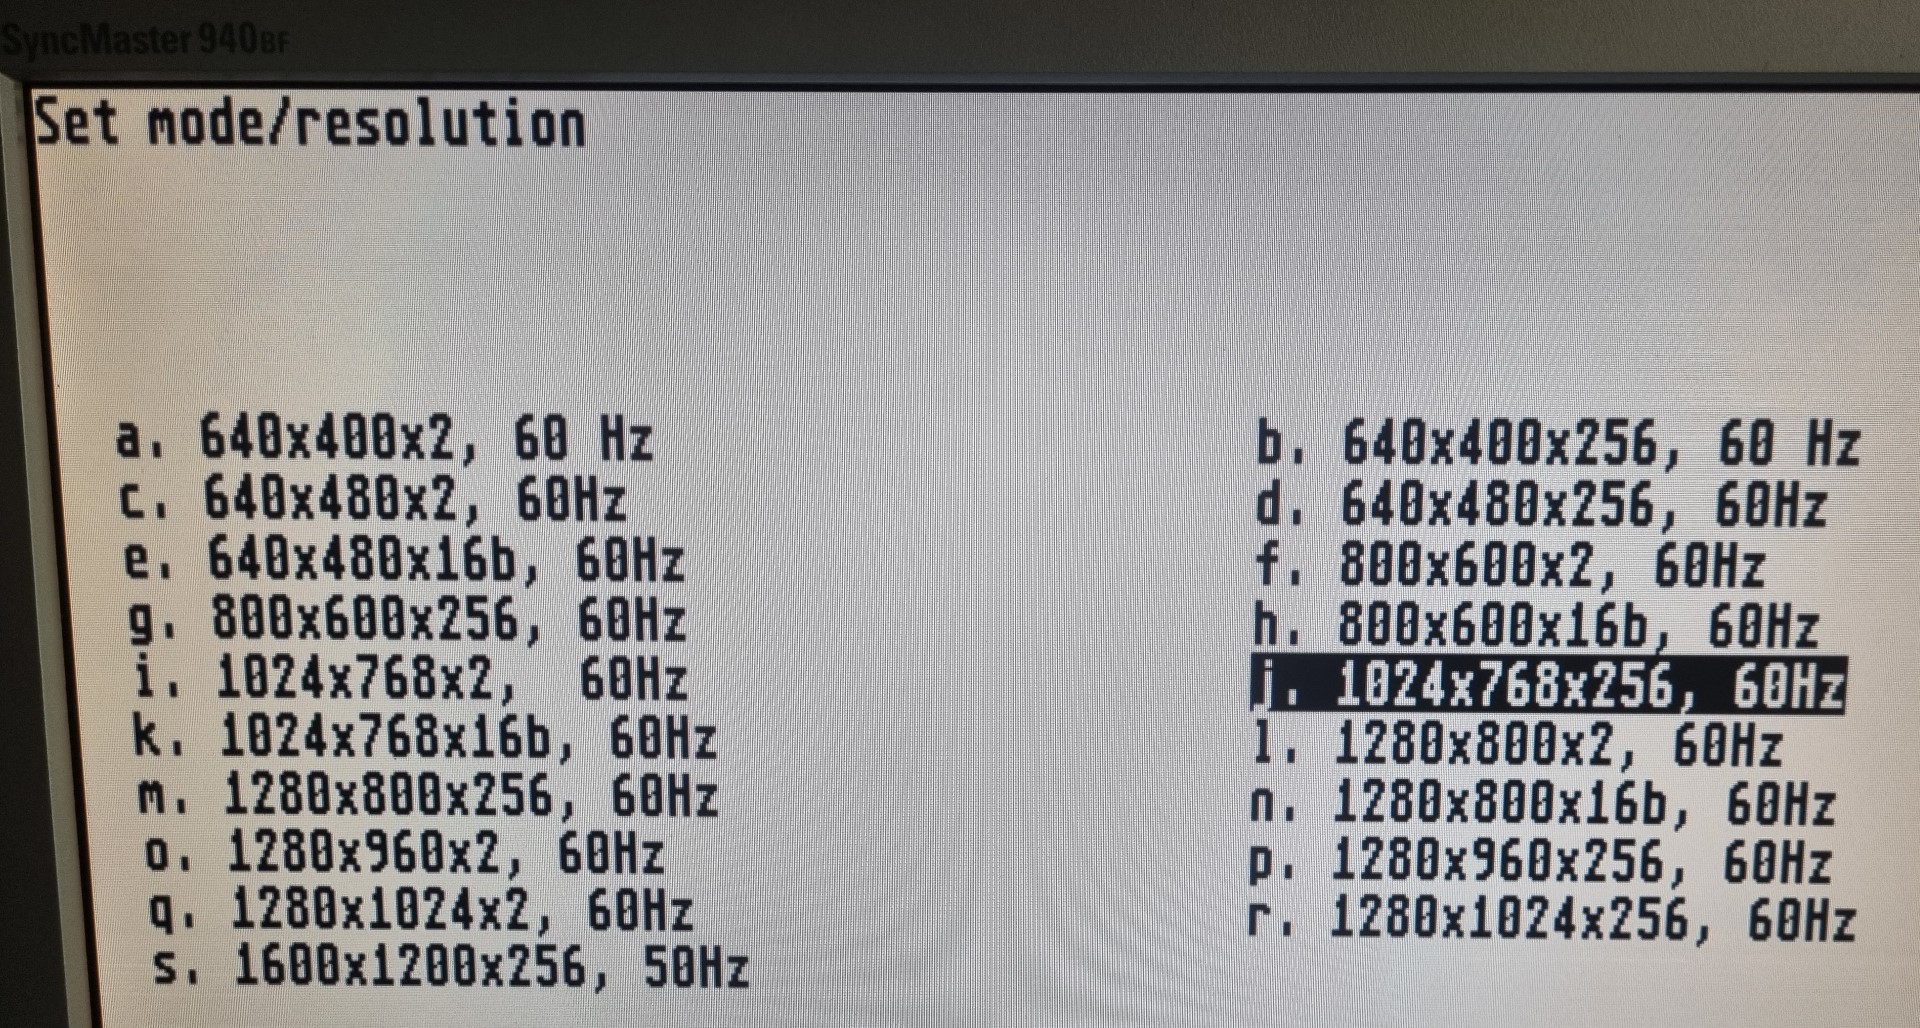
The running core, called “Seurat” (named after the inventor of Pointillism), has access to 2MB of VRAM, which is twice what Blossom had. Thus there are quite some resolutions possible (in 2,  8 and 16 bit colors):

Woo-hoo… holy Bat-Resolution! 🤯 (1600×1200@256)

To cope with such an amount of pixels Seurat features a blitter with is able to push roughly 130MB/s for fast redraws and smooth scrolling.

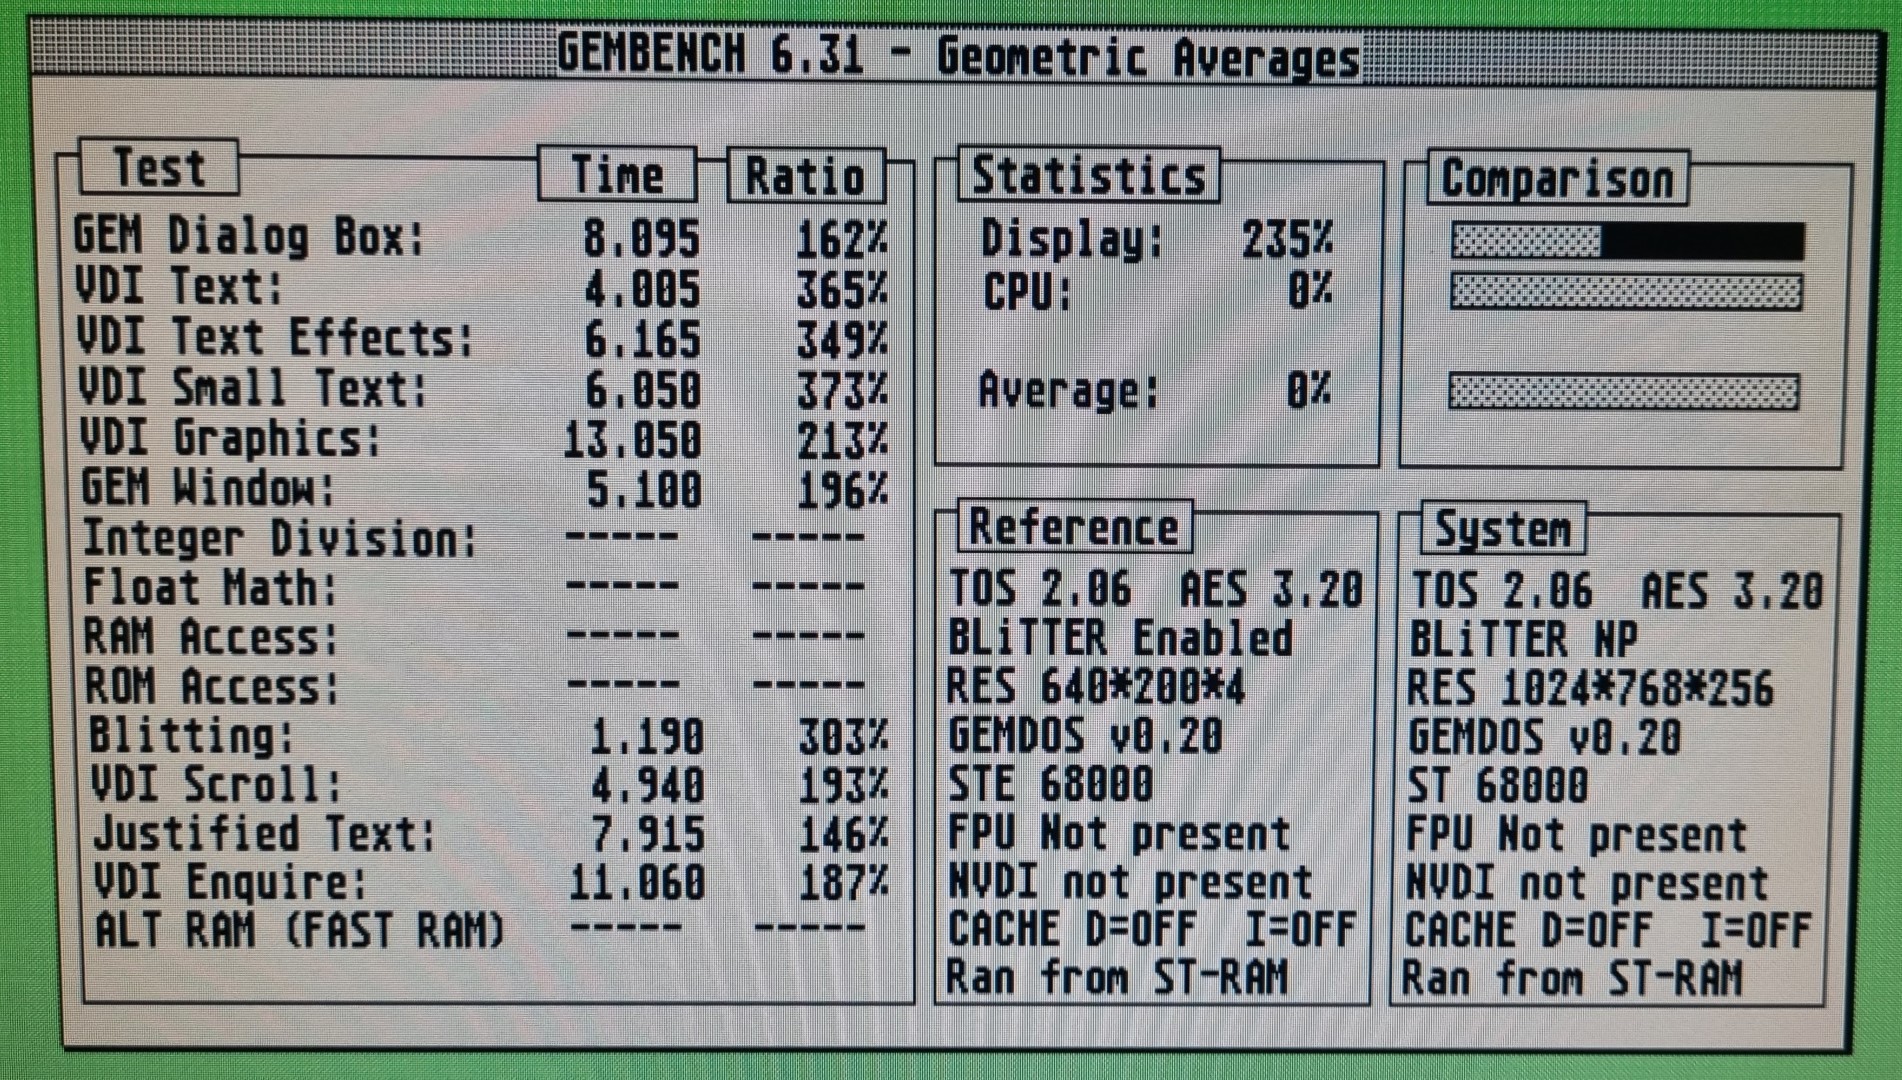
As of today (July 2024) the current Gembench 6 numbers vs. 640×200 ST-Med (no NVDI!):

Transputer(s)

Yes, they might not be of everybody’s interest, but they were the main actor in the ATW800 and are fascinating beasts when you take a closer look at them.
32bit RISC’ish CPUs, running at 20-30MHz, each having 4 links to directly connect to other Transputers. That way one can create a massive, unlimited parallel system that blew away anything you could run at home back in 1990.
This strictly follows my goal #1: Historically correct. Run things on the real stuff and feel how an ATW800 felt back then.

The ATW800/2 features 2 slots for classic size-1 TRAM modules next to the Nano20k. Here’s one size-1 TRAM installed:

TRAMs were/are available in many configurations, for those who want to know more, I made a dedicated page about TRAMs.

But that’s not all. Because Claus isn’t Claus without some sort of magic, he also added a synthetic Transputer core into Seurat.
That core is 100% T425 compatible and can not only access his own RAM (6MB, can be partitioned by the user) but also the Video-RAM… like Blossom did.
To make everything perfect, this synthetic Transputer has a link to the physical Transputers on the ATW800/2 which are also linked and themselves have a link at the edge of the card to connect to the outside world.

To round this up:
Everything is shared with the Atari host. You have access to the physical Transputer(s) and the synthetic ones over the 68k bus.
GEM has access to the VRAM as do the synthetic Transputers… and indirectly over their links, the physical Transputers, too.
Given proper programming, the possibilities are endless. Here are some ideas:

  • Accelerate Atari programs using Transputers (send data, let them do the math, collect results)
  • Run X windows on Helios (running the X client on a synthetic Transputer).
  • Use the synthetic Transputers as GPU. Let them do the VRAM manipulation. Lines, vertices, transformation… you name it.
Additional features (for the Mega-ST)

But wait, there’s more 🤓…

Like I told you in the beginning, I’d like to be this as much plug-and-play as possible. So the ATW800/2 features 1MB in-system programmable Flash ROM. That ROM can host 4 different versions of TOS selectable by two DIP-switches at the back-edge of the card.

Next to that DIP-switch you’ll find a dual USB port. That is a dumb loop-through to the front left edge of the ATW800/2. It is meant to connect an optional Lightning-ST so you have a nice & clean way to lead those connectors to the outside without cutting holes into your Mega-ST case.
Alternatively you can use these port to power external ACSI drives like the ACSI2SD or ACSI2STM etc.

Besides the 3 external Transputer-Links there’s also an internal one at the cards front. Just in case you have my relocator installed…

The ATW800/2 features a battery-holder for a coin battery. Because the original AA battery compartment of the Mega-ST can get in the way with the ATW800/2, this might have to be cut out 😥.
That holder can then replace the original one.

And finally, because the Nano20k has it already on-board, we’re to providing a harddisk interface using the Nano’s Micro-SD feature.
This feature is seen as a free add-on, not a real feature as it is a bit picky about the Micro-SD card used – thus we still consider this feature being at ALPHA stage.
We strongly recommend known brands like SANDISK. No-names will give various results from working up to desaster.

Why “Mega-ST” only?
Well the ATW800/2 is also available for the VME bus, i.e. Mega-STe and Atari TT.
Most of those optional features aren’t needed in those systems. Also VME cards require a 0.5mm unpopulated edge on both sides to slide into its cage.

  • ROMs cannot fully served through the VME bus.
  • When installed in the VME cage, there’s nearly no way to feed in the USB connector of a Lightning-TT.
  • Same goes for internal TRAMs and a battery cable.
Look Ma’! VME connector fitted!

There you have it. This is all we’re able to talk about right now. Some smaller details might change until the release – that’s called ‘agile’ 😏
Let’s sum it up again:

The ATW800/2 will be available for the Mega-ST bus as well as VME bus. This is our progress so far. It will be updated every time we think it’s worth doing so.

Mega-ST bus support
100%
VME bus support
100%
Graphics
100%
Real Transputers
100%
Synthetic Transputers
100%
4 TOS ROMs selectable and programmable
100%
Using MicroSD as harddrive
70%

Technical details

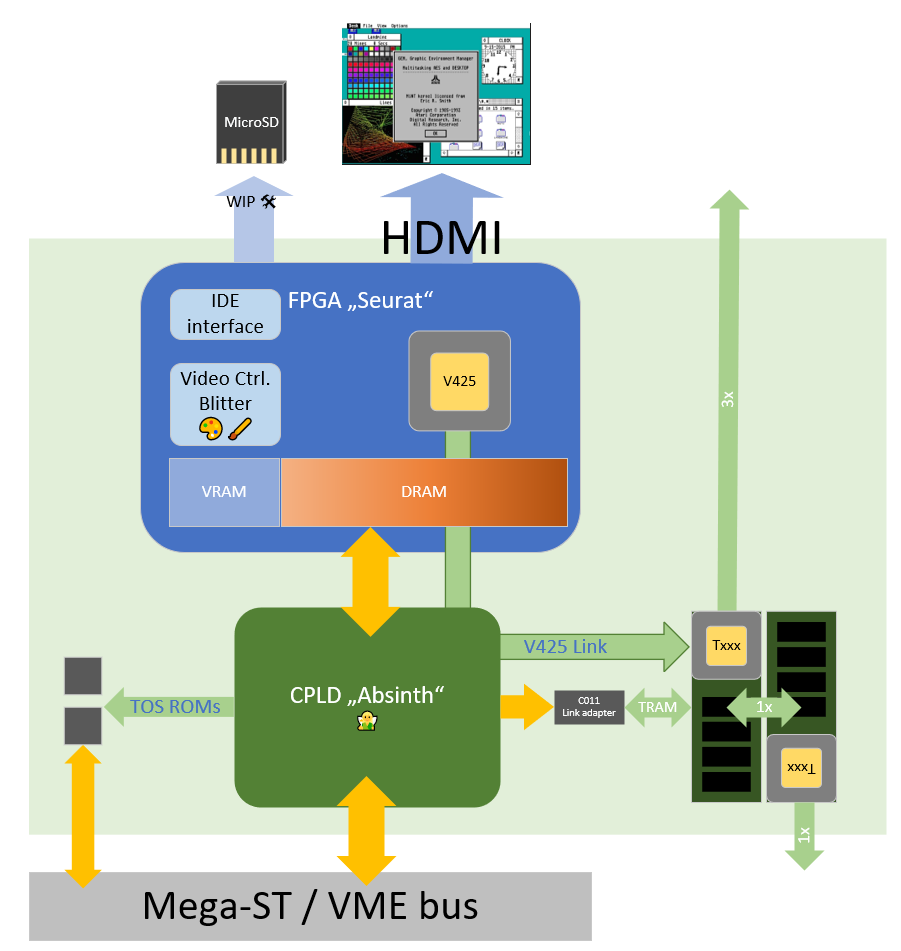
The ATW800/2 basically consists of 3 main devices:

  • The FPGA (“Seurat”)
  • The CPLD (“Absinth”)
  • The Inmos C011 link-adapter

Absinth is the glue to the system-bus. He decodes addresses, manages the different functions on the card and controls the C011. He’s also the gateway between the 5V and 3.3V worlds.

Seurat itself, the core within the FPGA, consist of the Framebuffer controller, a blitter and (currently) two one synthetic T425 Transputer cores. The 2nd core was scarified for more Transputer Memory or VRAM.

This is a schematic representation:


This was the pre-announcement in July/August 2024

And for those, who haven’t watched it… here’s the hastly made YT video 😅

…and another one showing the card running on the VME bus of an ATARI TT

Ok, ok shut up and take my money! 💸

Great, you got hooked! 😉 In this case, here’s a dedicated post on how to get one.
I’m building them in batches of 50 pieces. So it’s either an open list for an ongoing batch you can get added to or, if the list is already full, a “subs’ bench” where you can sit and wait if one of the players on the field needs to be replaced…


Tto68k

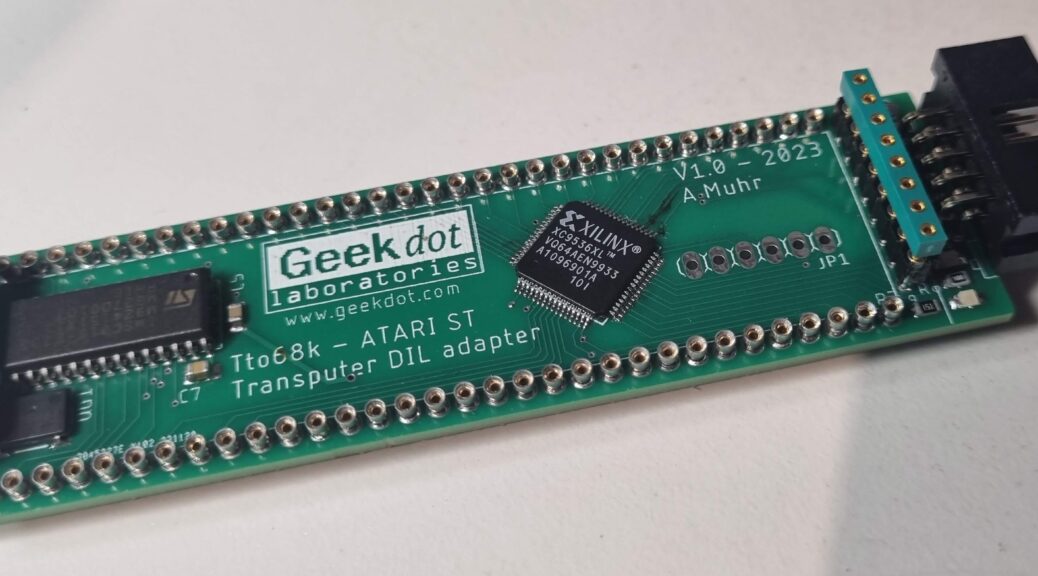
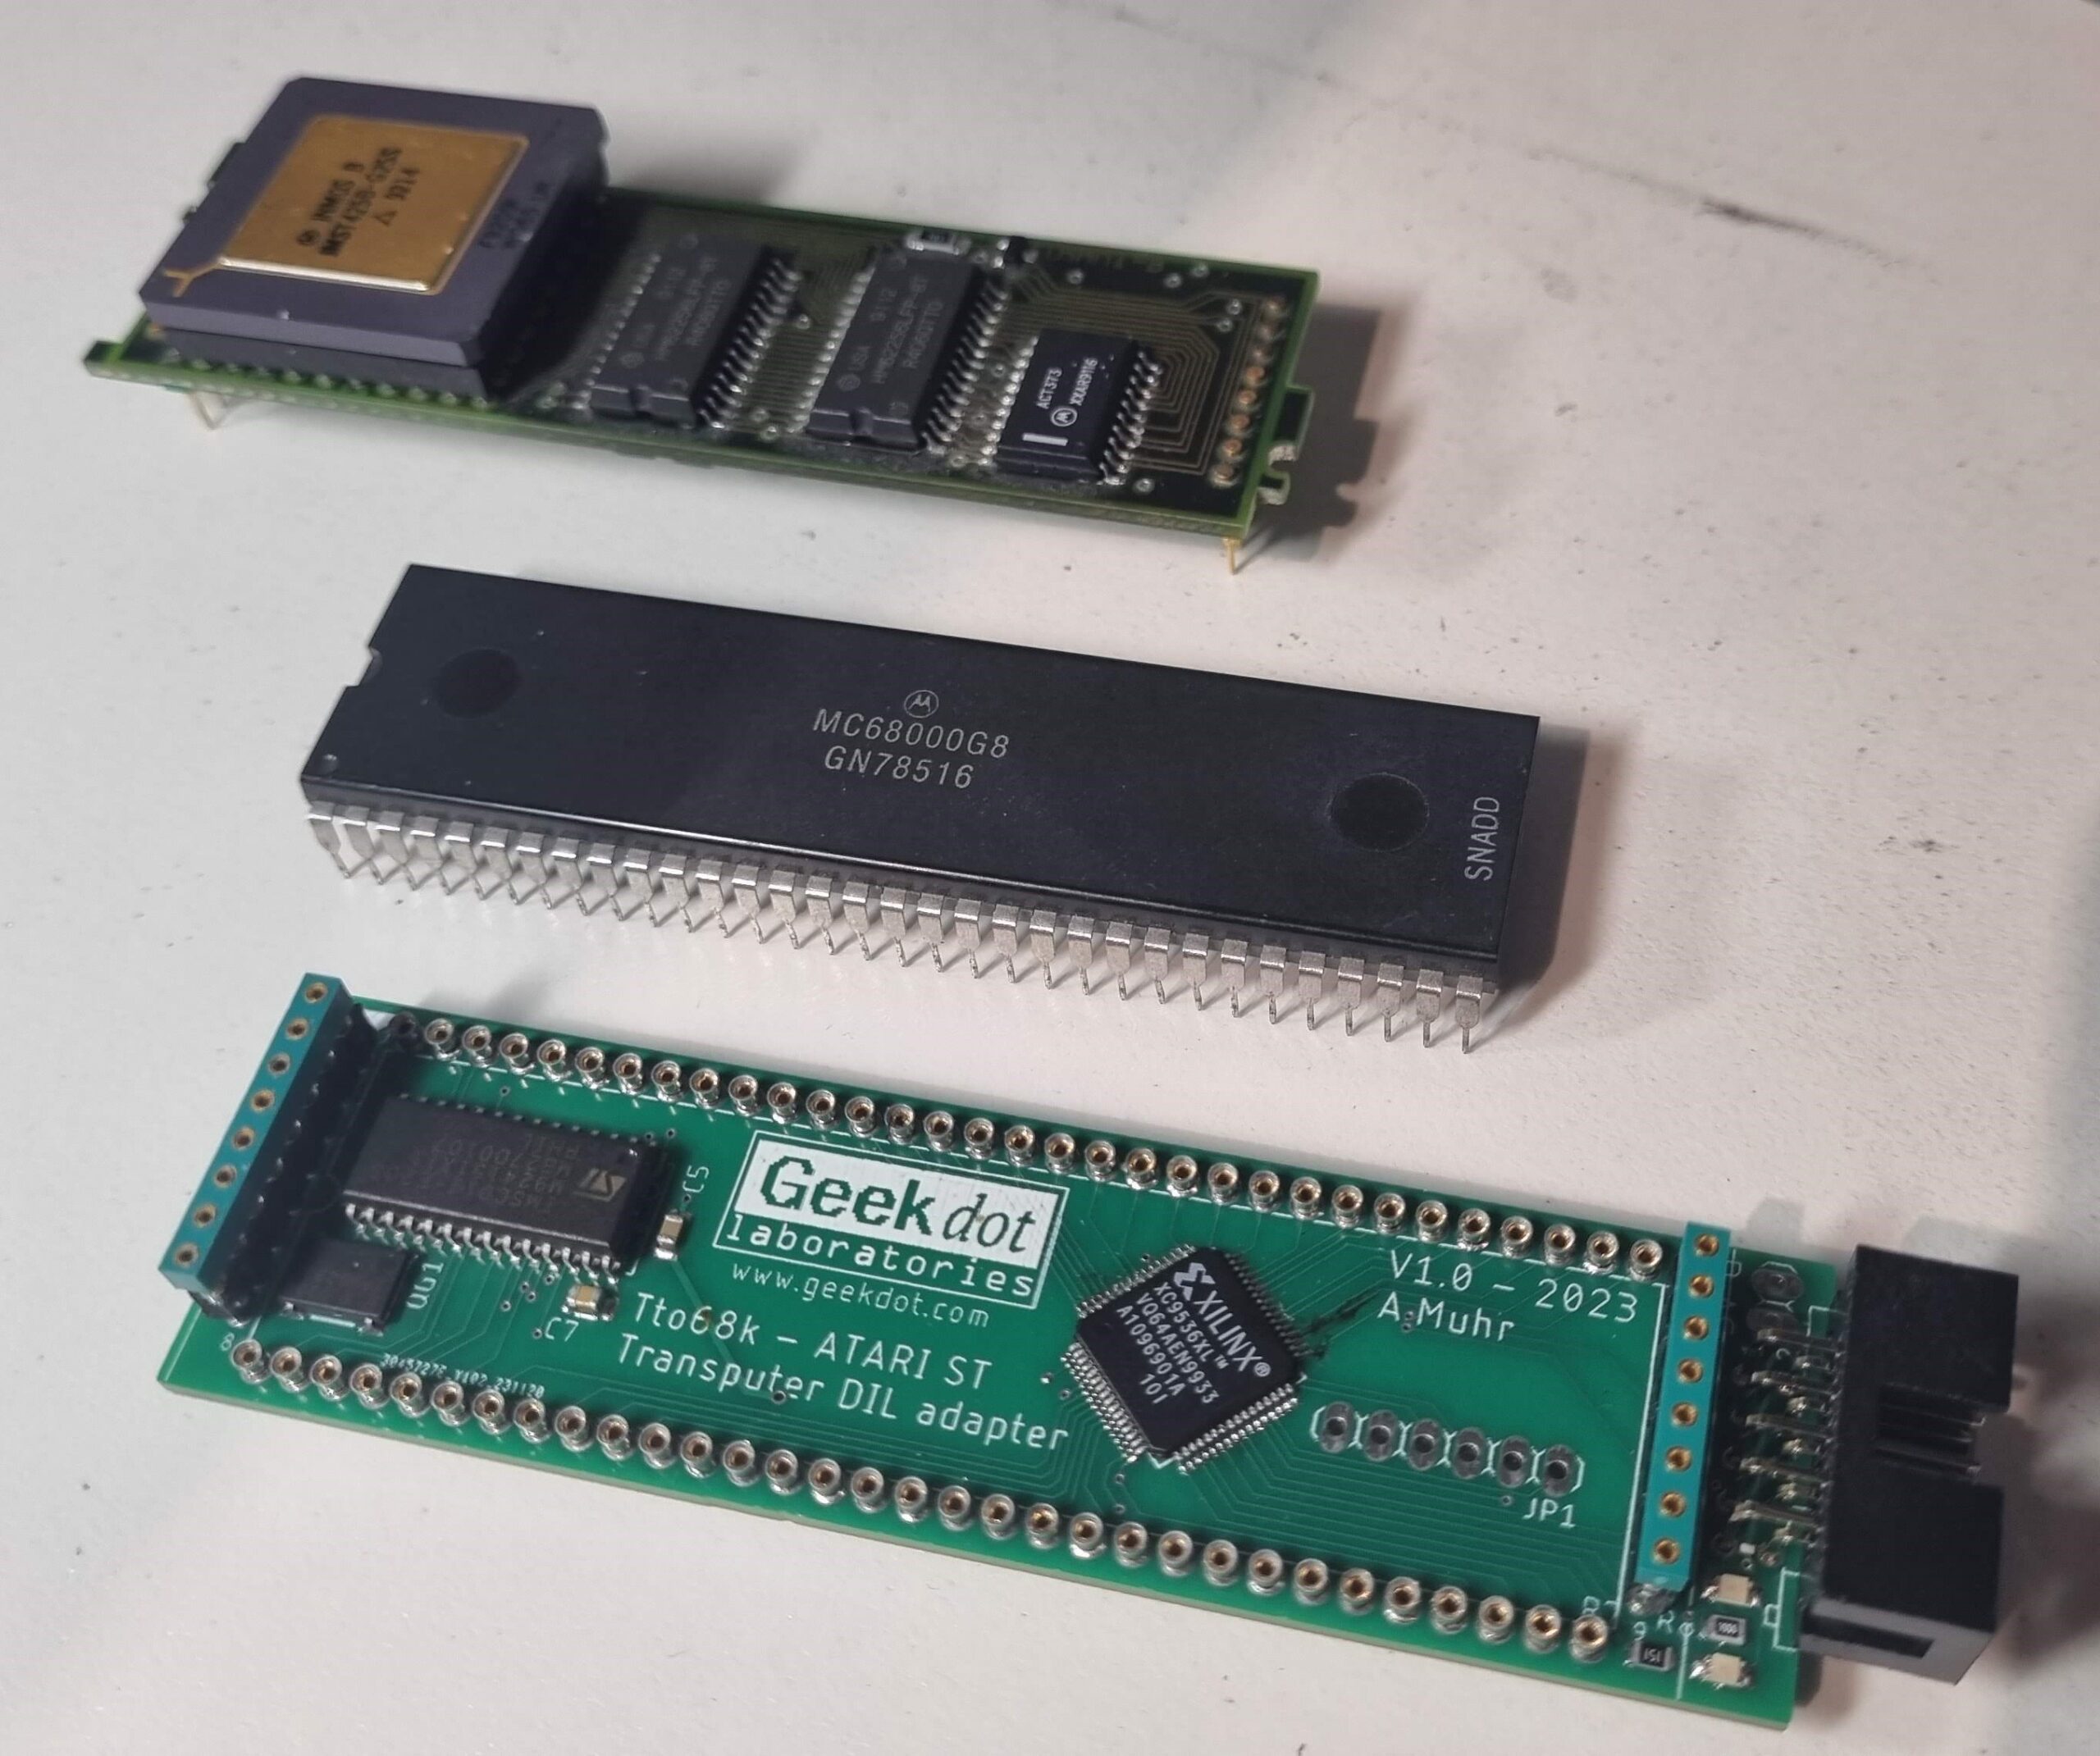
The Tto68k project started by a classic “phone call doodling” situation… but instead of drawing strange patterns I was fiddling alternately with one of Transputer TRAMs and a spare 68000 CPU I had laying on my desk.
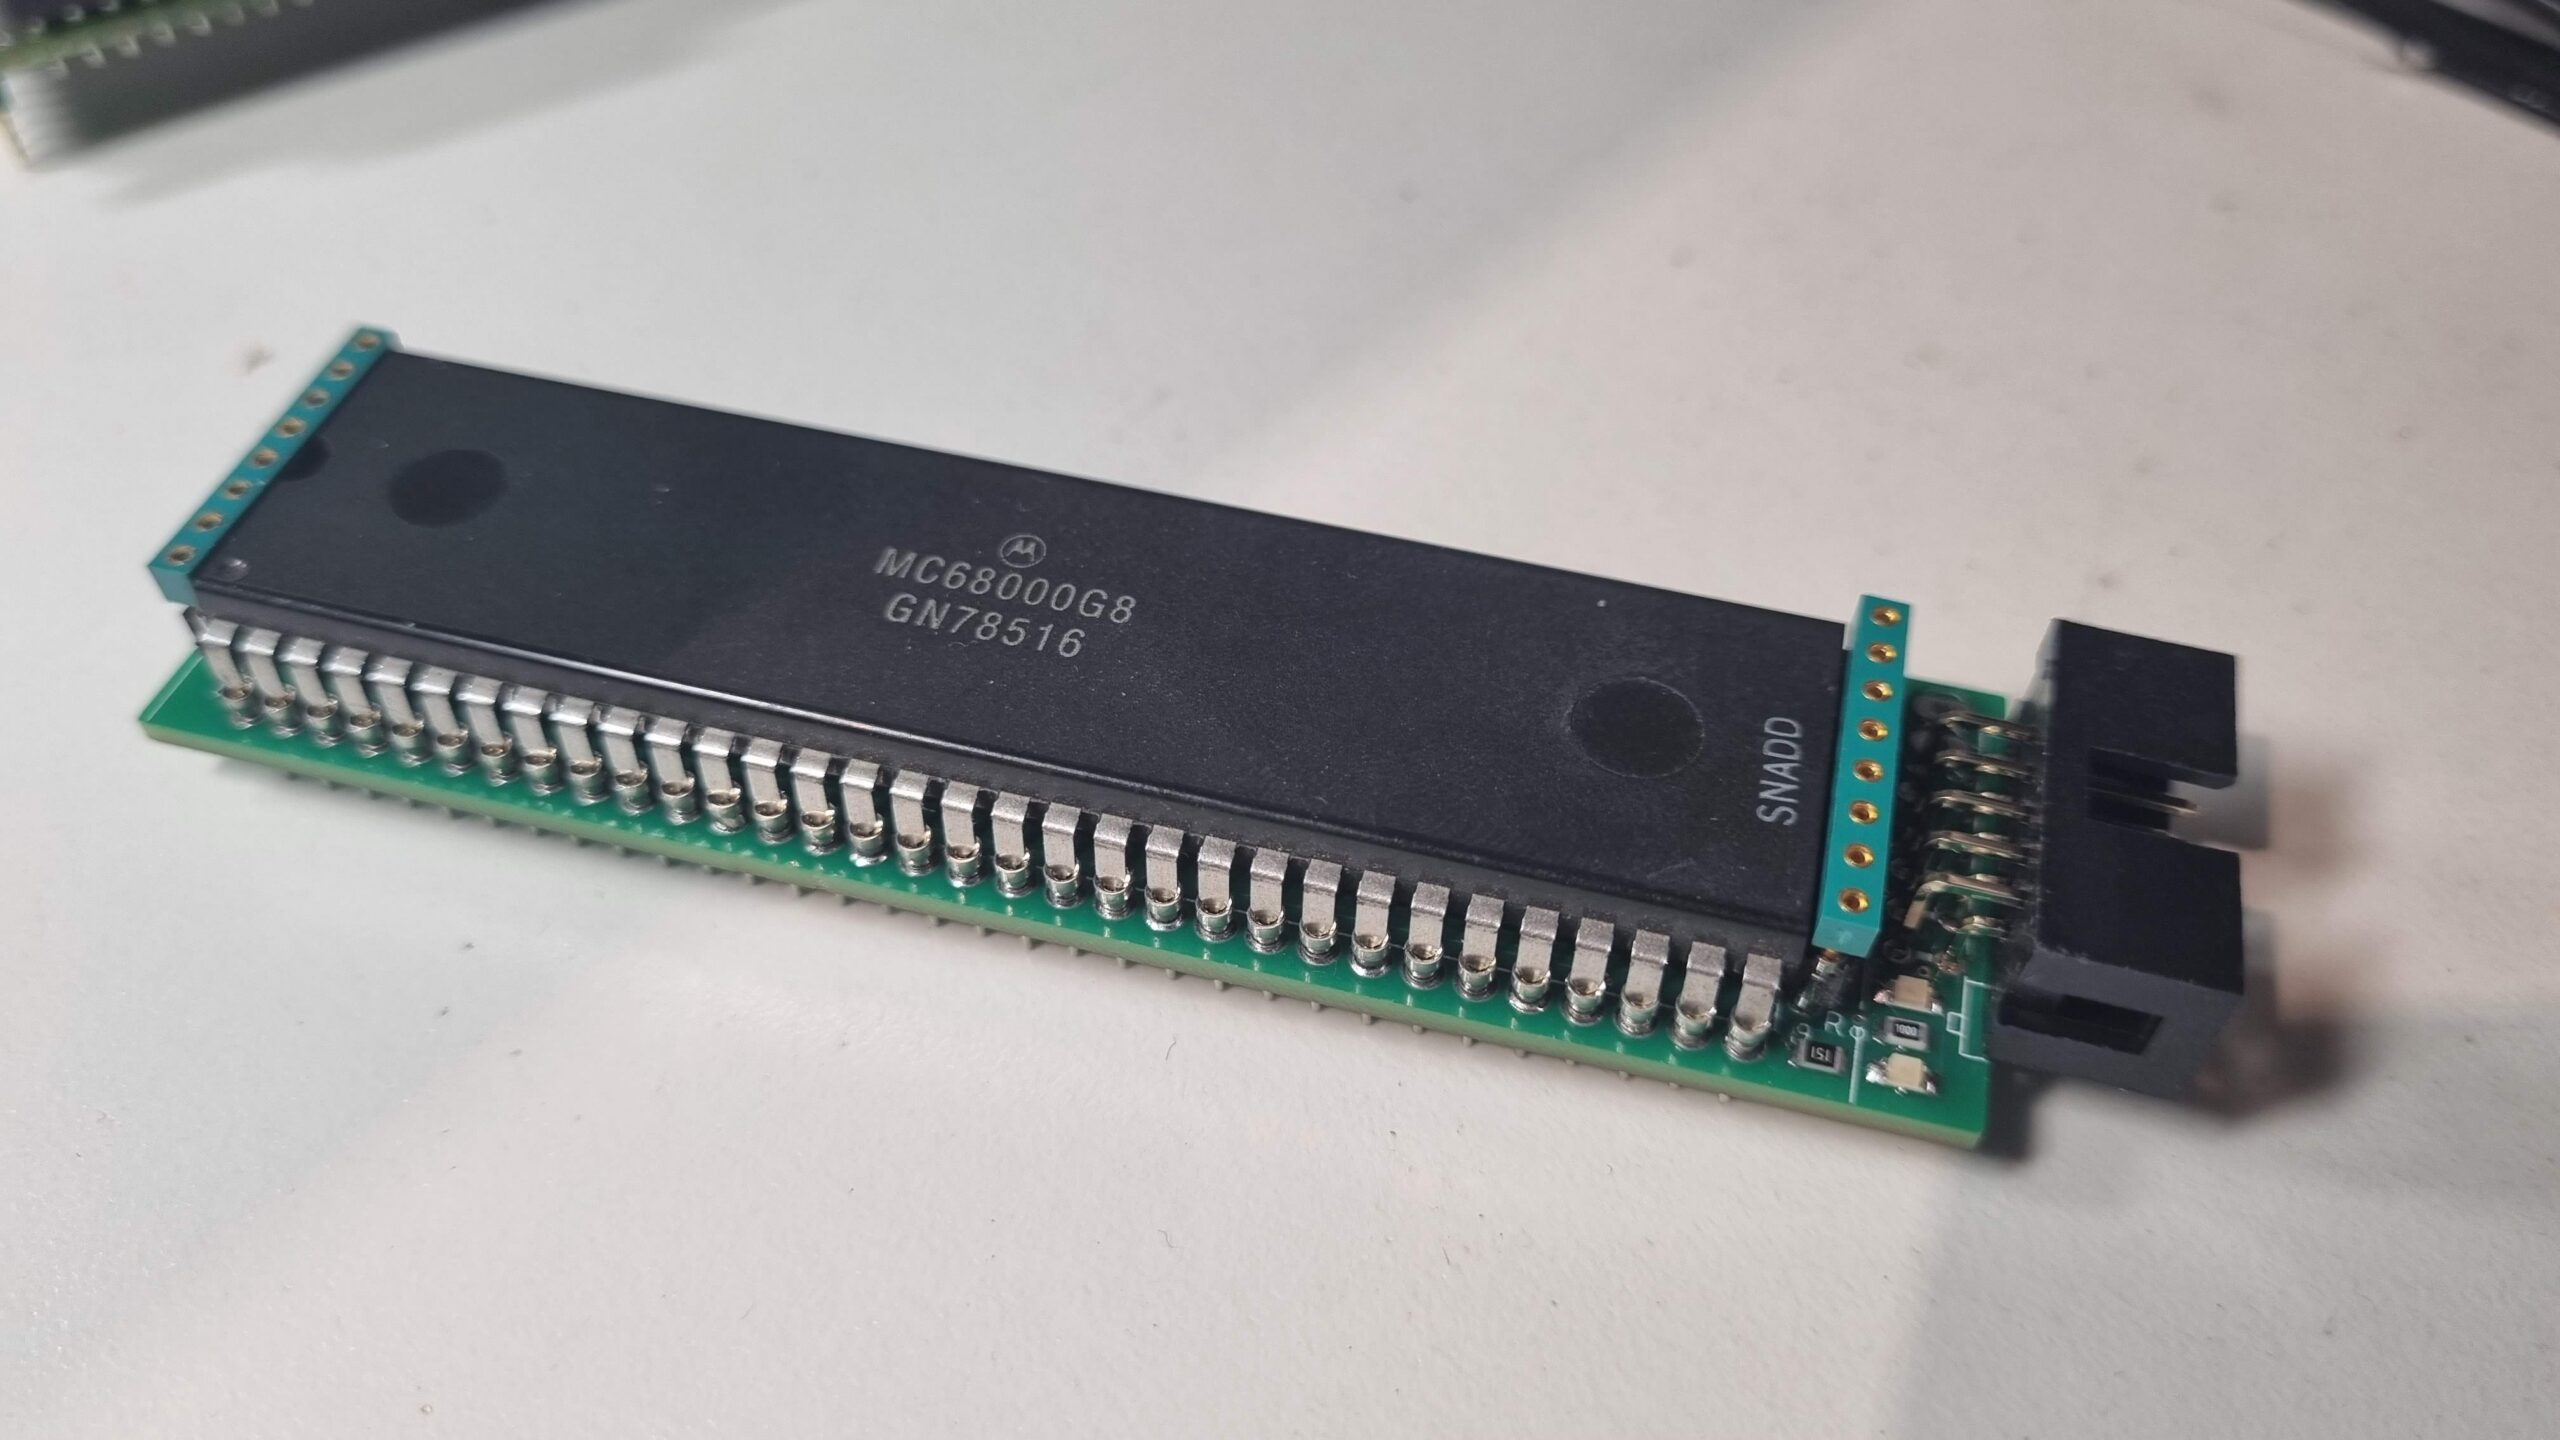
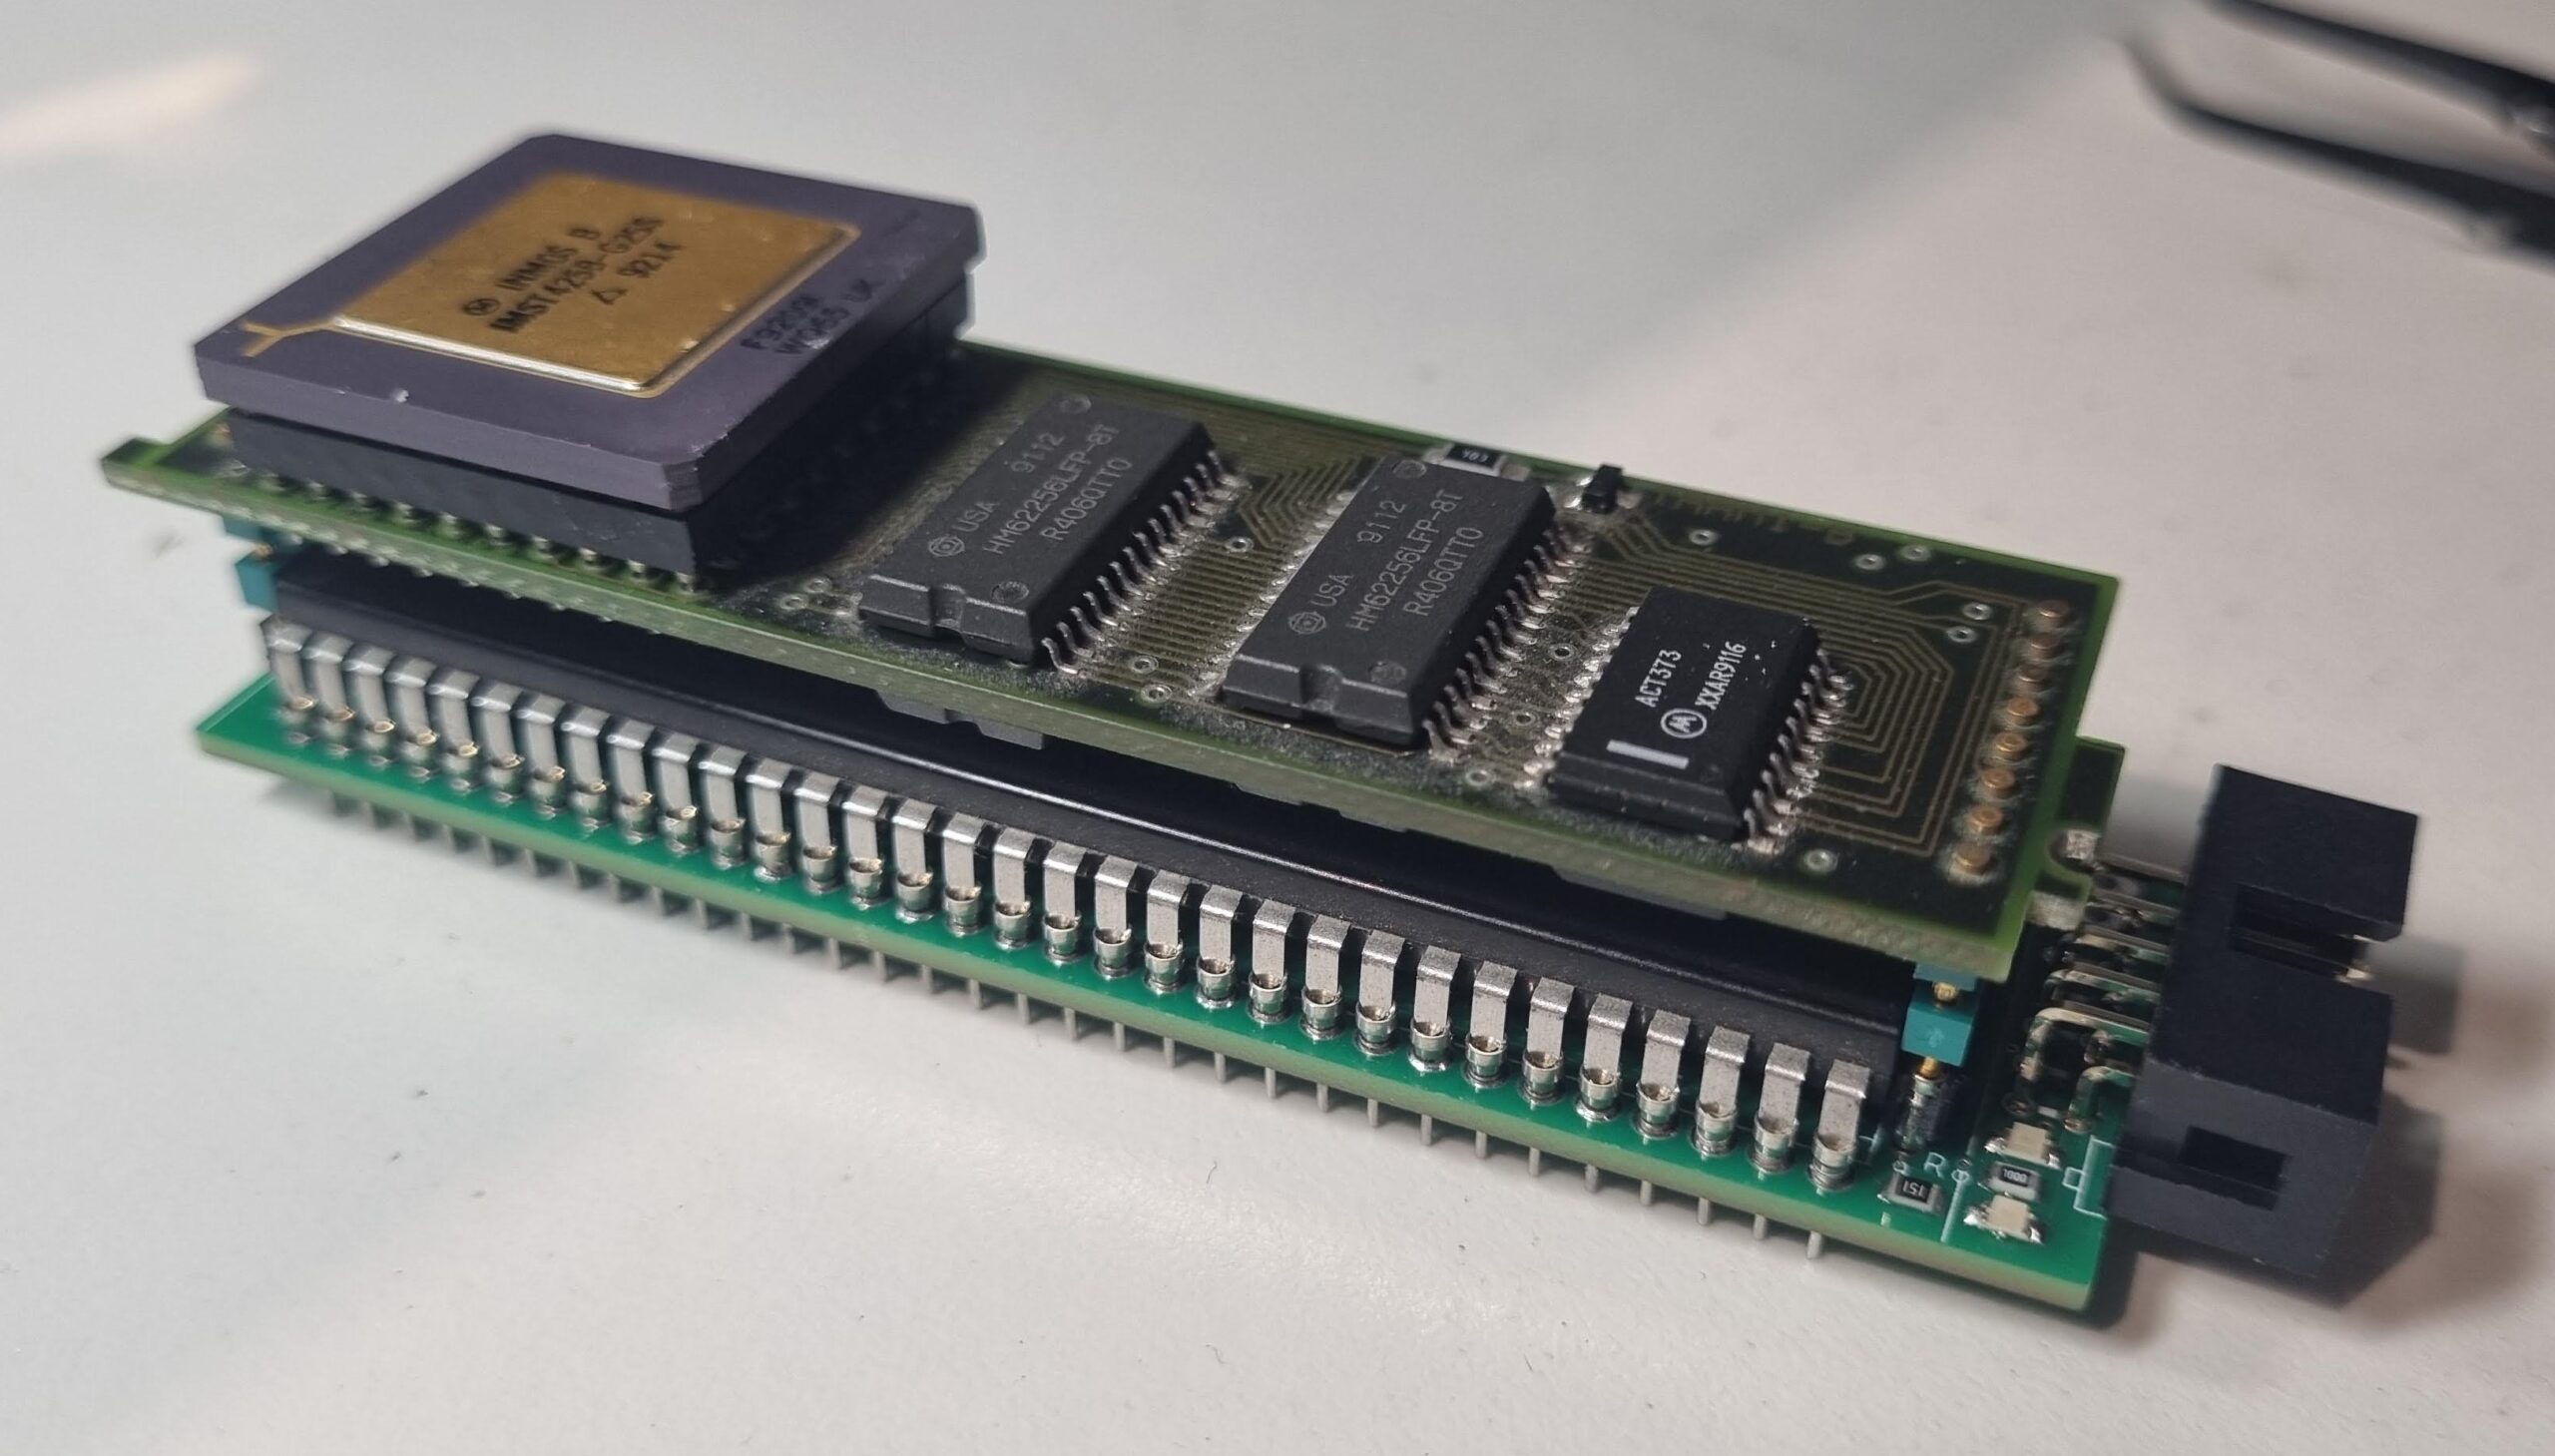
At one point it dawned to me, that the 68000 classic 64pin DIL package perfectly fits in-between a TRAMs socket-pins 😲.

Obviously this discovery immediately had to go into a project which I called Tto68kactually it is a spin-off from the STG[A]TW project which I recently did for the Atari Mega-ST.
So this is fully compatible and everything developed for that card (minus the VGA stuff, obviously).

Three in a row…
Ahhh… a perfect fit!
15 MIPS topping the 68k’s 1 MIPS 💪

Where space allows, the PCB offers certain features:

  • 2 LEDs showing the Transputer status (running/error)
  • An external Link, compatible with the STGATW and my CPU-relocator. Thus you can connect to another TRAM on that one.
  • Dedicated 5V/GND pins to feed-in external power (if needed)
  • Version 1.1 will have two “multi-purpose” pins (see below)

So while the features are pretty basic compared to the STGATW, it has one advantage: The 68000 socket is system-agnostic. And I don’t mean just the different ATARI ST models (520, 1040, Mega) but other systems, too. E.g. the AMIGA, the entry Macintosh line etc. As some of them have more advanced bus management than the ATARI, I saved two of the CPLDs pins as “multi-purpose” pins.
For example in the case of an AMIGA these could be used for the configuration chain (/CFGINn, /CFGOUTn).
While in the ATARI STs those will be used for TOS ROM decoding… or whatever comes to my/your mind.

All that said, this post is just an announcement for now.
Like mentioned, I’m working on a Version 1.1 which will be much more usable, especially for other systems than just the ATARI ST.

STG[A]TW programming and software

Ok, you read/heard about the STG[A]TW and want to know more about how to use it and -most importantly- for what it’s good for?

First and foremost, a Transputer is a computer-system of its own connected to a host. In this case an ATARI Mega ST.
But given an available host-adapter that could also be e.g. a Unix machine, a classic PC, an Apple II or even a Commodore C64, C128 or Plus/4
That host communicates with the Transputer over a link-interface using specific memory addresses or, if available, a library. That way the host can send executable binaries to the Transputer, send or receive data to/from it and control  it (boot, debug, etc.).

Because each host system is different, these addresses are different, too. But the transfer protocol and Transputer executables are always the same. So looking at this BASIC code example for the C64 gives you an idea, how it works – the steps are the same for every host-communication no matter which host-system used.

As usual, here’s a table of contents for those being in a rush..

Quick intro about standards & history

Yes, there have been very different ATARI ST and Transputer interfaces in the past. “Two and a half” systems were most prominent – let’s have a look at them before we go into details of the STG[A]TW.

The Atari Transputer Workstation aka ATW800

I think I’ve already wrote a lot about the ATW800 in several post on this page, even designed an expansion card for it – despite I don’t own an ATW myself.
To make a long story short: This is basically a design, where the ATARI Mega-ST is used as a boot device and after that just handles file- and user-I/O. The Transputer is attached to the ST via DMA and runs the Helios OS and has direct access to the graphics controller called ‘Blossom’. Totally different concept.

KUMA K-MAX

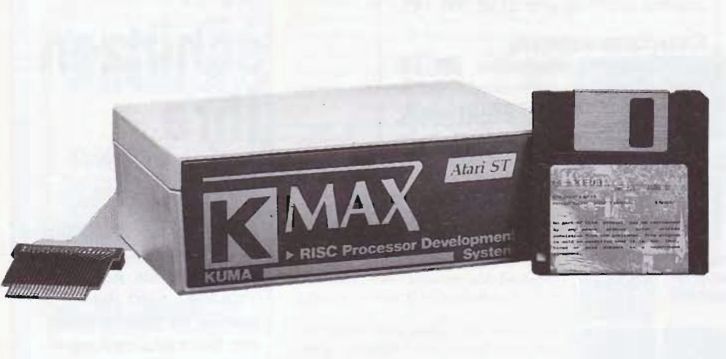
The KUMA  K-MAX was a box connected to the ATARI ROM-module port and thus acted as pure ‘number cruncher on a leash’.
There are two reviews still available: The English review of atarimagazines.com and the German ST-Computer article even showing some photographs of which I ‘borrowed’ this:

Transfertech

Outside “the scene” this is a relatively unknown German company which actually made a lot of Transputer-centric hardware.
For the ATARI series they had 3 host interfaces:

  • A ROM port interface (all ST models)
  • A Mega ST bus interface (ROM port design botched onto the bus)
  • A VME-card (Mega-STE, TT)

Like the KUMA K-MAX, this design also attached the Transputer(s) as number cruncher.
As I own all of them, I might write a dedicated post about them some day.

This is how we do it

As all of the above did their own thing, there is and was no standard for interfacing the ATARI ST series – So I defined one with the other ATARI ST Transputer enthusiast André Saischowa, who did some intense ATARI Transputing fiddling back in the days.

In case of the ATARI ST the link-interface ( e.g. STG[A]TW) ‘lives’ at the base address 0xFFFAC0 and uses 18 bytes from there up to 0xFFFAD2. So the complete adress-range looks like this (uneven, so we can address the lower byte of a 68000 word):

#define base 0xfffac0
#define inreg base+1 /* C012 */
#define outreg ((base)+3)
#define instat ((base)+5)
#define outstat ((base)+7)
#define reset ((base)+17) /* writing*/
#define analyse ((base)+19)
#define errflag reset /* reading*/

But you don’t have to bother with those as we provide two more convenient ways to talk to a Transputer.

☝ Some words of warning to the programmers:

  1. While the 68000 in your ATARI is big-endian, Transputers are little-endian. So data being send back and forth might need conversion.
  2. Floating-point variables used by the Transputer are IEEE 754-1985, thus 32 Bit (single precision) or 64 Bit (double precision).
    Some compilers like Turbo/Pure-C on the ATARI ST use 80bit doubles.
    Those need to be converted by e.g. the xdcnv call from the PCFLTLIB library.

The static way

The raw-way is using an include file called “trproc.h”.  It’s – like everything else – included in the program archive, located in the “DEVELOP” folder.

This include-file provides you these calls to receive (get) or send (put) data to/from your Transputer:

get/puttrchar(char) read/send one byte
get/puttrshort(short) read/send a short (2 bytes)
get/puttrint(int) read/send an integer (32 bytes)
get/puttrlong(long) read/send a long (32 bytes)
get/puttrfloat(float) read/send a float (32 bytes)
get/puttrdouble(double) read/send a double (64 bytes)
get/puttrraw(char *array, int length) read/send an array of length

The calls marked blue are doing the endian-conversion for you.

Additionally there’s a call to check for an available Transputer: checkTransputer(int checkType) 

If checkType is ‘0’, this function will return ‘1’ if it was able to find a Transputer or ‘0’ when not.
Setting checkType to ‘1’, the return value will give you the “family” of the found Transputer:

0 – No Transputer found
1 – Found a C004 link-switch
2 – A 16bit T2xx Transputer was found
4 – A 32bit T4xx/T8xx Transputer was found
-1 – Found something unknown

The elegant way – TBIOS

The much more elegant way is provided by André who extended the ‘ALIABIOS’ from a project published in the German computer magazine c’t back in 1989.
It’s a GEMDOS driver called “TBIOS.PRG” and can be put into your AUTO folder or called manually when needed. This driver has all the bells’n’whistles like a proper XBRA-ID etc.

DOS# call-name - result (D0=0 Ok) 

100 SetLinkAdr(Adr:W) D0 =-1 not ready 
101 ByteToLink(Value:W) D0 =-1 Timeout 
102 ByteFromLink() D0 =-1 " 
103 LongWordToLink(Value:L) D0 =-1 " 
104 LongWordFromLink((Value):L) D0 =-1 " 
105 SliceToLink((Buf):L,Len:L) D0 RealLen 
106 SliceFromLink((Buf):L,Len:L) D0 " 
111 TestError() D0 =1 Transputer Error 
112 SetReset() D0 =0 
113 SetAnalyse() D0 =0 
114 BootRoot((FileName):L) D0 <0 Error 
115 NewFunkOk() D0 ="ELK1" functions available 
116 BlockToLink((Buf):L,Len:L) D0= sent bytes
117 BlockFromLink((Buf):L,Len:L) D0= sent bytes -
118 BlockFromLink((Buf):L,XLen:L,YLen:L,Offset:L) without timeout
119 GetCommand(Buf) D0 =-1 no command found 
(as SliceFromLink but shorter timeout)

👉 Need short coding examples here

Programs and demos

As ATARI never planned something like this card, there’s no ready-to-use software… it’s up to you to create miracles 😊
But compared to my 8bit Transputer adapters, there’s quite some stuff to start with:

💾 Visit the Atari Transputer Software repo at GitHub (most recent) or get this ZIP archive containing everything discussed below.

Basic Testing

Yes, literally, we’re testing if your Transputer is working correctly using a BASIC program called T_TEST.GFA – so right, it’s GfA Basic in this case. But in essence it’s nearly the same used for my C64 or Apple II interfaces.
This little Program checks if it can find a link-interface, a Transputer and if so, which kind (16 or 32 bit). If that went OK, it does a little coms-speed test by reading 4KB from the Transputer and times that.

Mandelbrot fractal

You knew that this has to be the first thing to be written 😜
There are two Transputer binaries…

TMANDEL.PRG – the evil, dirty, down-to-the-metal, direct-to-screen-writing version.
This is good for getting an idea of how fast data is being pushed to the Atari ST without much handling overhead.
As this writes to the Screen directly, it only runs in “ST-High” resolution (i.e. 640x400x1).

GEMMAN.PRG – The well behaving GEM version.
It opens a window max’ed to the current resolution and starts plotting the fractal in 16 colors. This takes longer than TMANDEL, as it does quite a bit of GEM juggling before plotting a pixel…

Getting serious

So, this is the part for doing serious things with your Transputer(s) and specifically André Saischowas domain.
He did not only port all needed INMOS tools like iserver to run all the available development tools from back in the days (OCCAM, C, etc) but also ported the Helios server, i.e. the software which runs on the host (i.e. your ATARI) and communicates with the Helios Kernel(s) running on your insane Transputer Farm!
This is a good 75% of what the ATW800 offered – the missing 25% are the graphics which ran on the Blossom chip and was only accessible by the Transputer.

That said you’ll currently find 2 folders in the archive:

  • C-Code – contains the Mandelbrot demos
  • Andres – the serious stuff containing
    • AUTO – the TBIOS driver and stuff needed during ATARI bootup
    • BIN – the INMOS tools like iserver as well as the always-needed ispy utility
    • D72UNI – contains the transputer hosted compiler environment based on d7205a (OCCAM) and d7214c (C-Compiler). Visit transputer.net for plenty of documentation on those. See the README in that folder.
    • HELIOS11 – well, that’s the Helios v1.1 distribution. It’s way smaller than the v1.3 and good for an initial try. You can later switch to v1.3.1 following these steps.

There you have it (for now) – the ATARI ST is therefore the currently third best supported host platform after the PC running DOS or Windoze NT(!) or SPARCStations running Solaris 2.

The STG[A]TW

This is my first ever project I did for one of my favorite computers, the ATARI Mega-ST. Like told in one of my blog posts, the ATARI ST was my 2nd greatest love ❤ (after the C64) and being part of a very  cool company back in the days I only have fond and happy memories of it.

After all the years of fiddling with nearly every machine on the market, it’s like coming home by just looking at its system font or hearing it’s specific bell-sound (even the ever-annoying key-click sound it makes by default).
And now it’s time to do something cool with it… adding, what I’ve missed back then: Color and -of course- Transputers 😉

TLDR;

Ok, so you’re in a hurry or suffer from severe ADHD?

This is a graphics card for the ATARI Mega ST internal bus including a Transputer interface.

Got it. More details please…
What about software? (links to a different post)
Why, for god’s sake!?
There’s a relocator, too?
Ok, how much?

NB: This card is now superseded by the ATW800/2

Say hello to the STG[A]TW!

What’s that about the strange naming?! Well, this card is a hybrid of a classic STGA ISA graphics-card adapter and a Transputer interface for the Mega-ST bus.
Mega-ST, high-res graphics and Transputers? Mhh, does this ring a bell? Yes, component-wise this is exactly the configuration of an ATARI ATW800, the famous and rare ATARI Transputer Workstation (for which I designed a Farmcard, just in case you own an ATW).
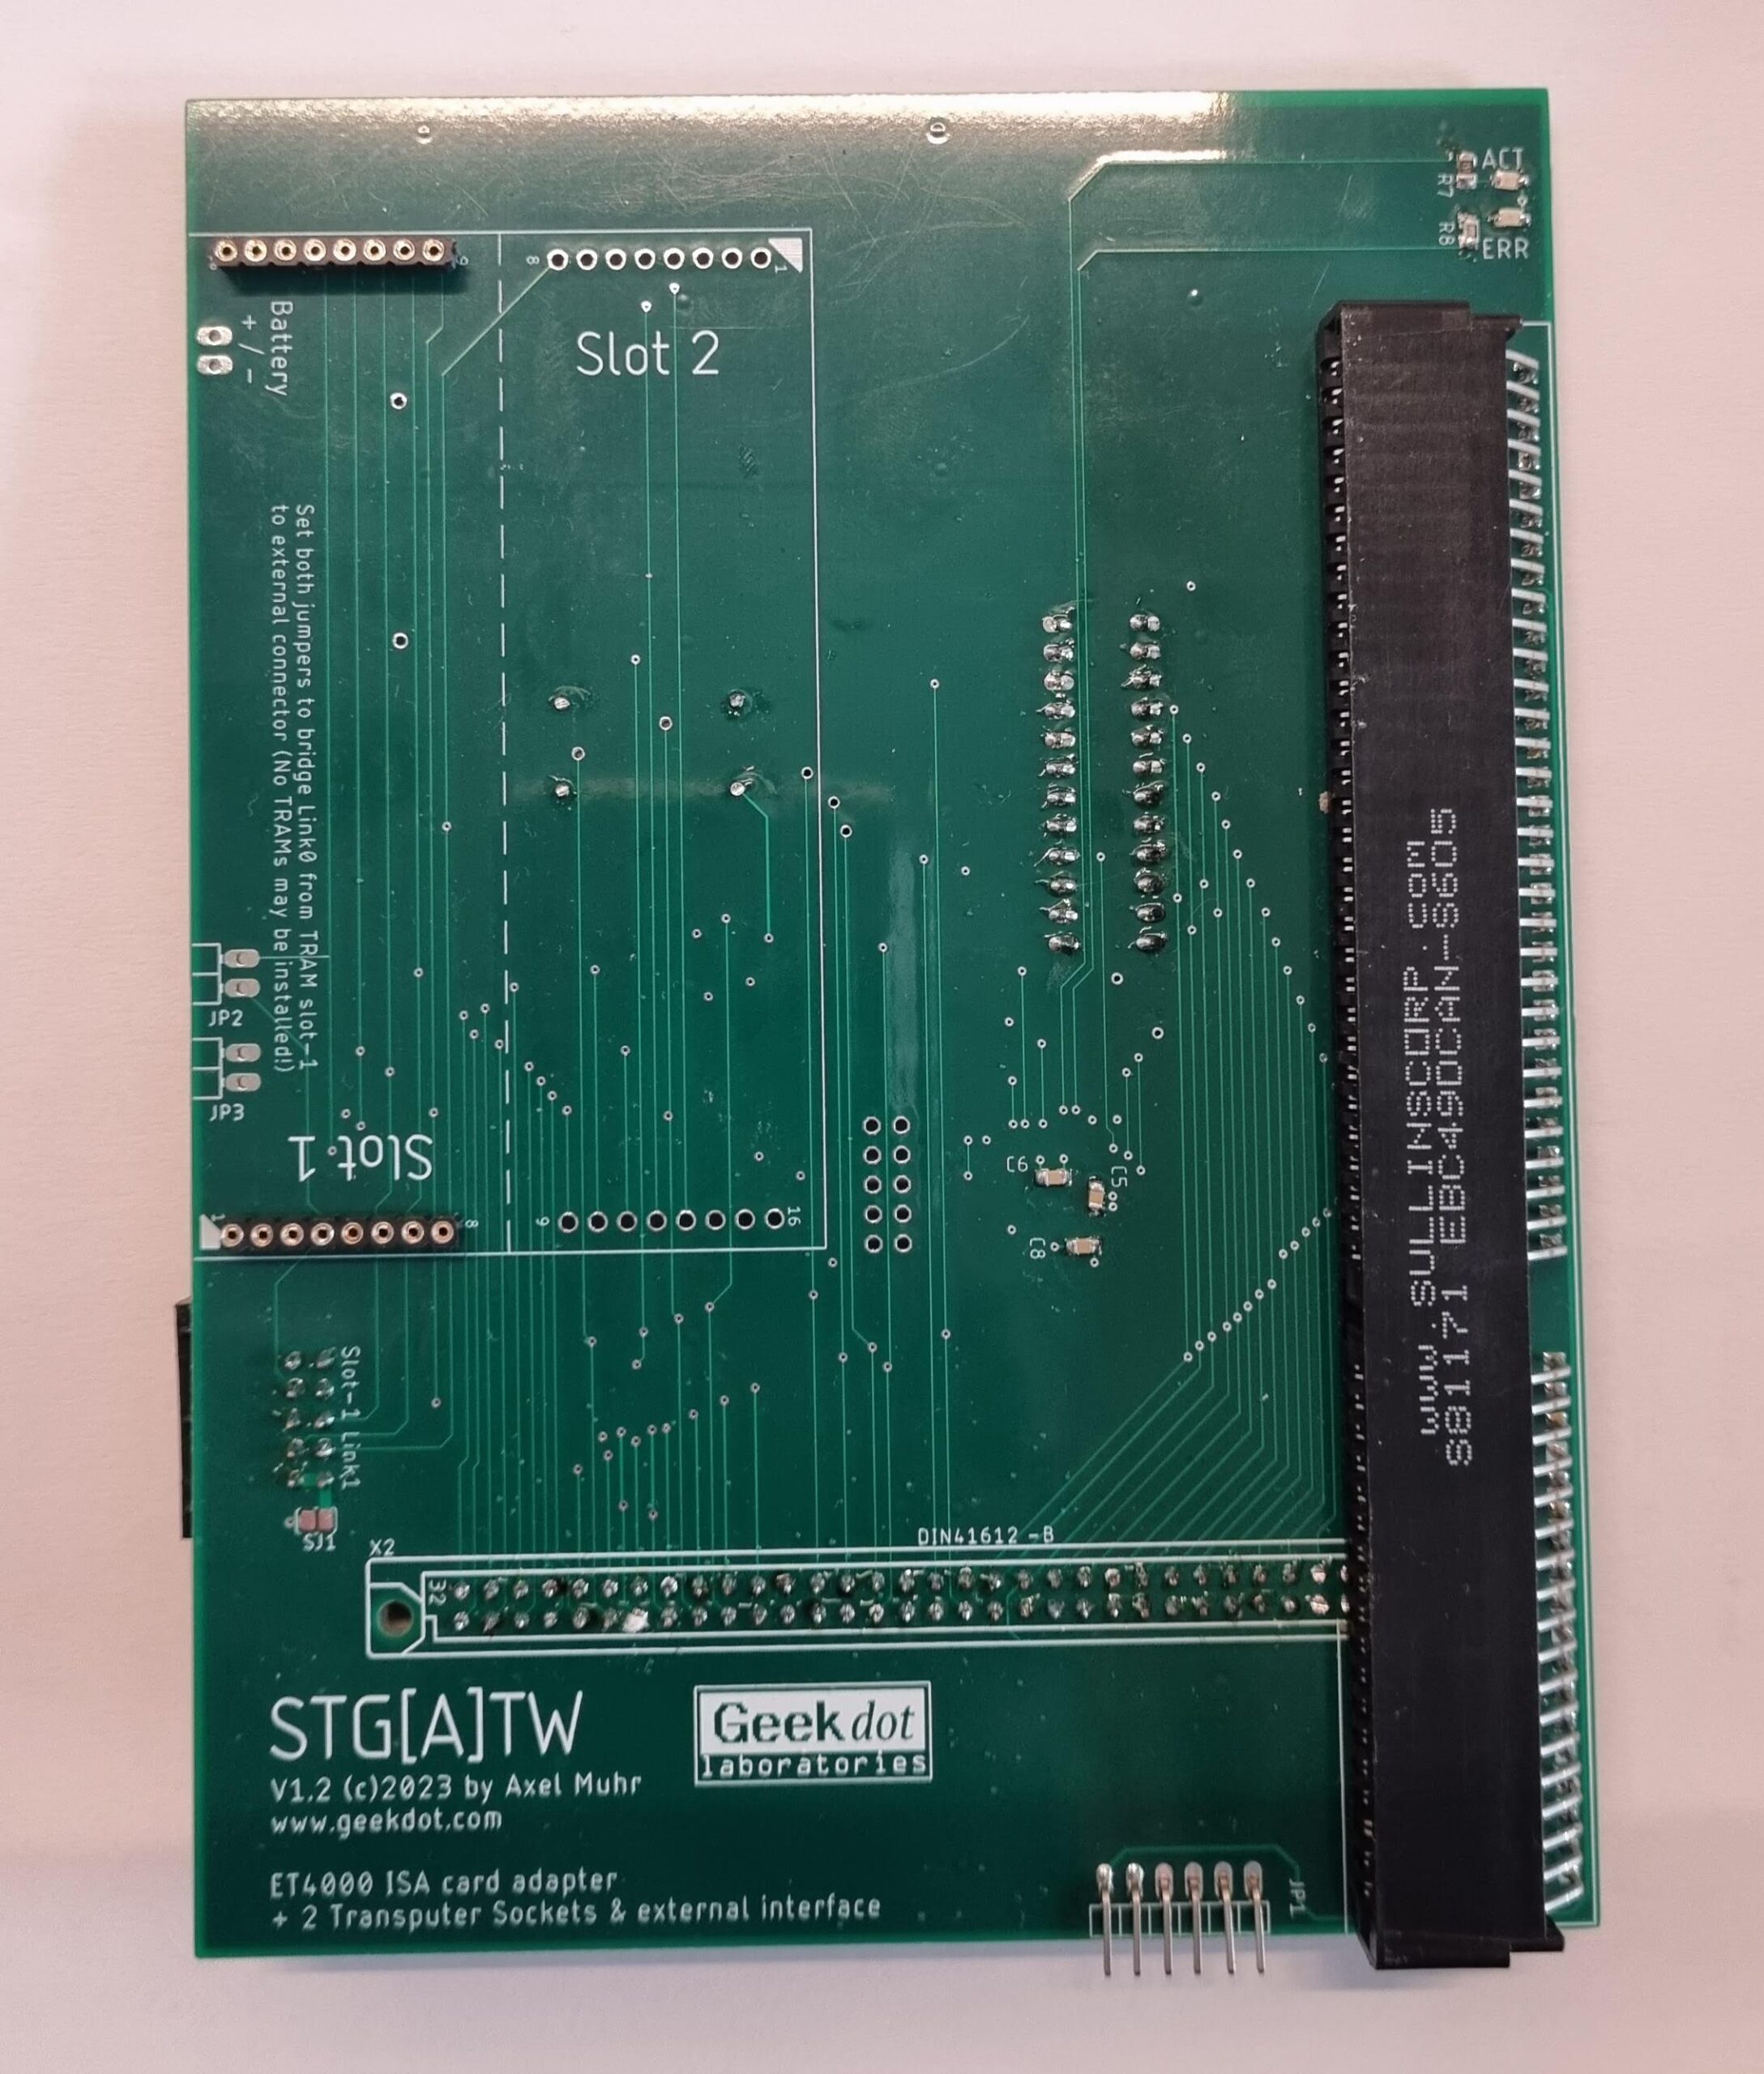
So adding the two, it’s an STGA-ATW or STG[A]TW for short… and it looks like this:

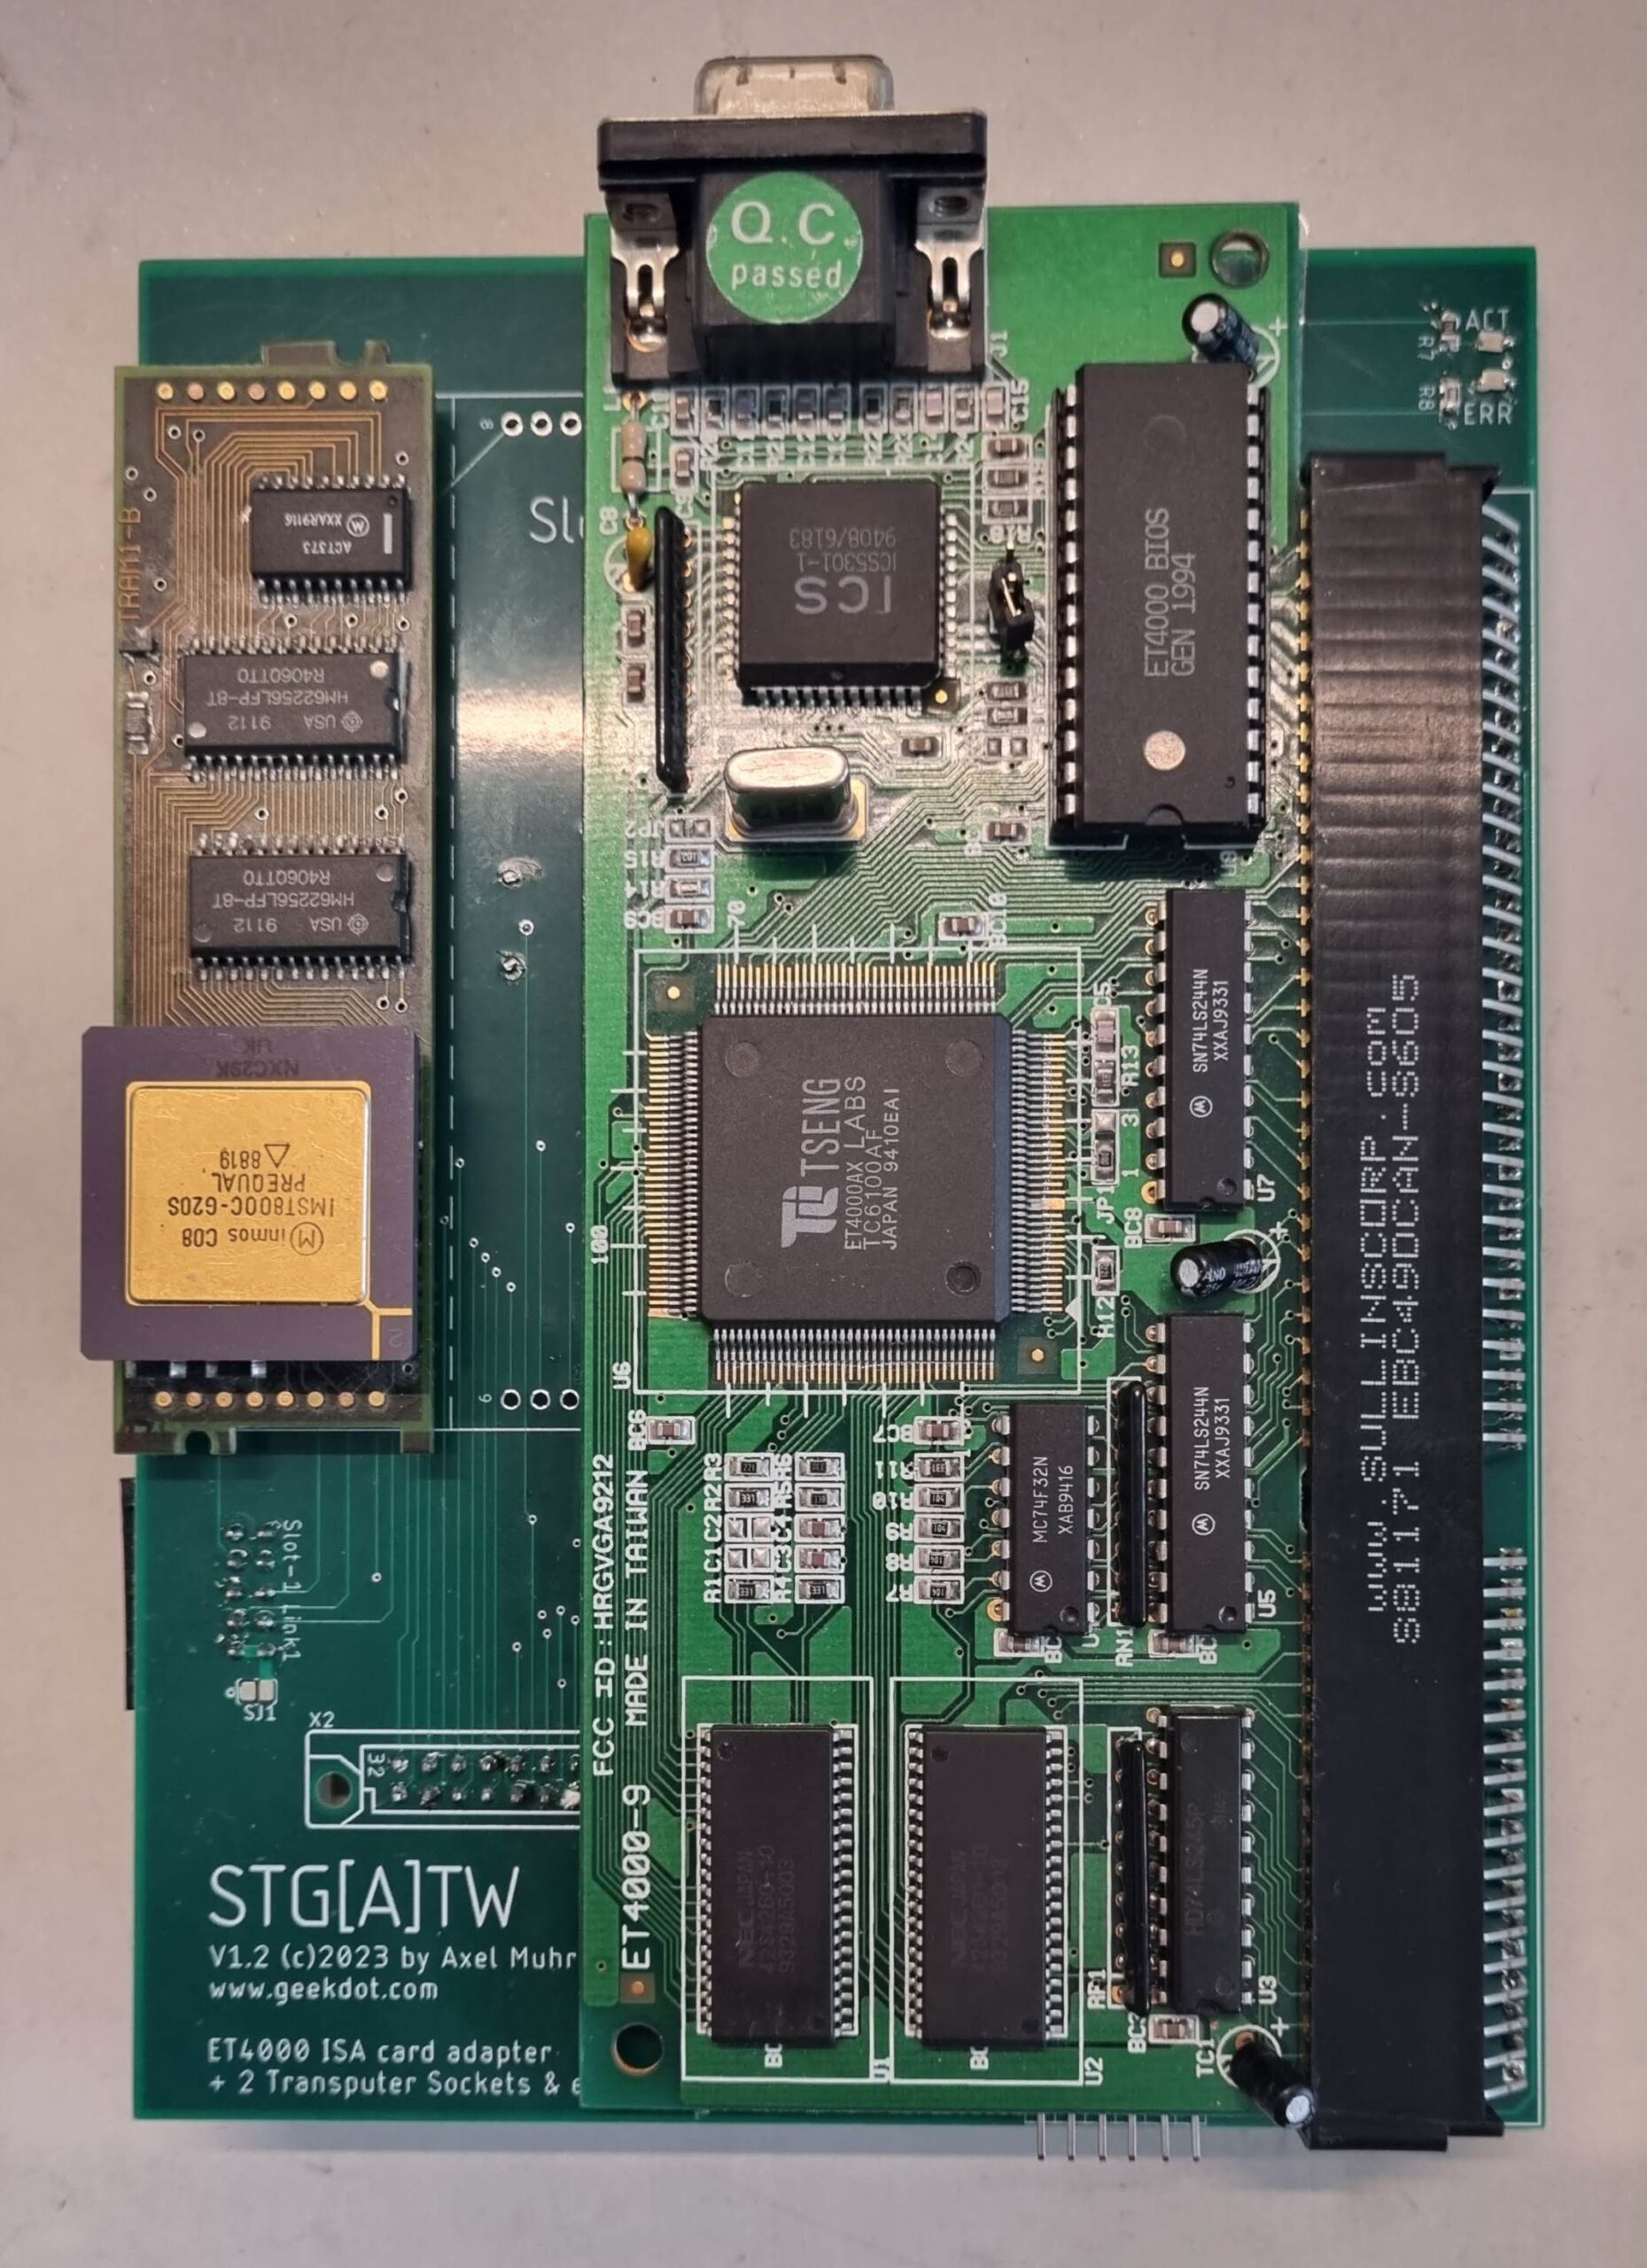
Looking at the top you’ll spot the 90° angled ISA Slot at the right edge, giving (selected) ET4000 graphic cards a home.
To the left there are two Transputer TRAM slots making it possible to use two size-1 or a single size-2 TRAM.
Obviously, an ISA card and the TRAMs would collide, so you have to choose… or you’re a lucky owner of a low-profile ET4000. Then you could use your VGA card plus one TRAM like this:

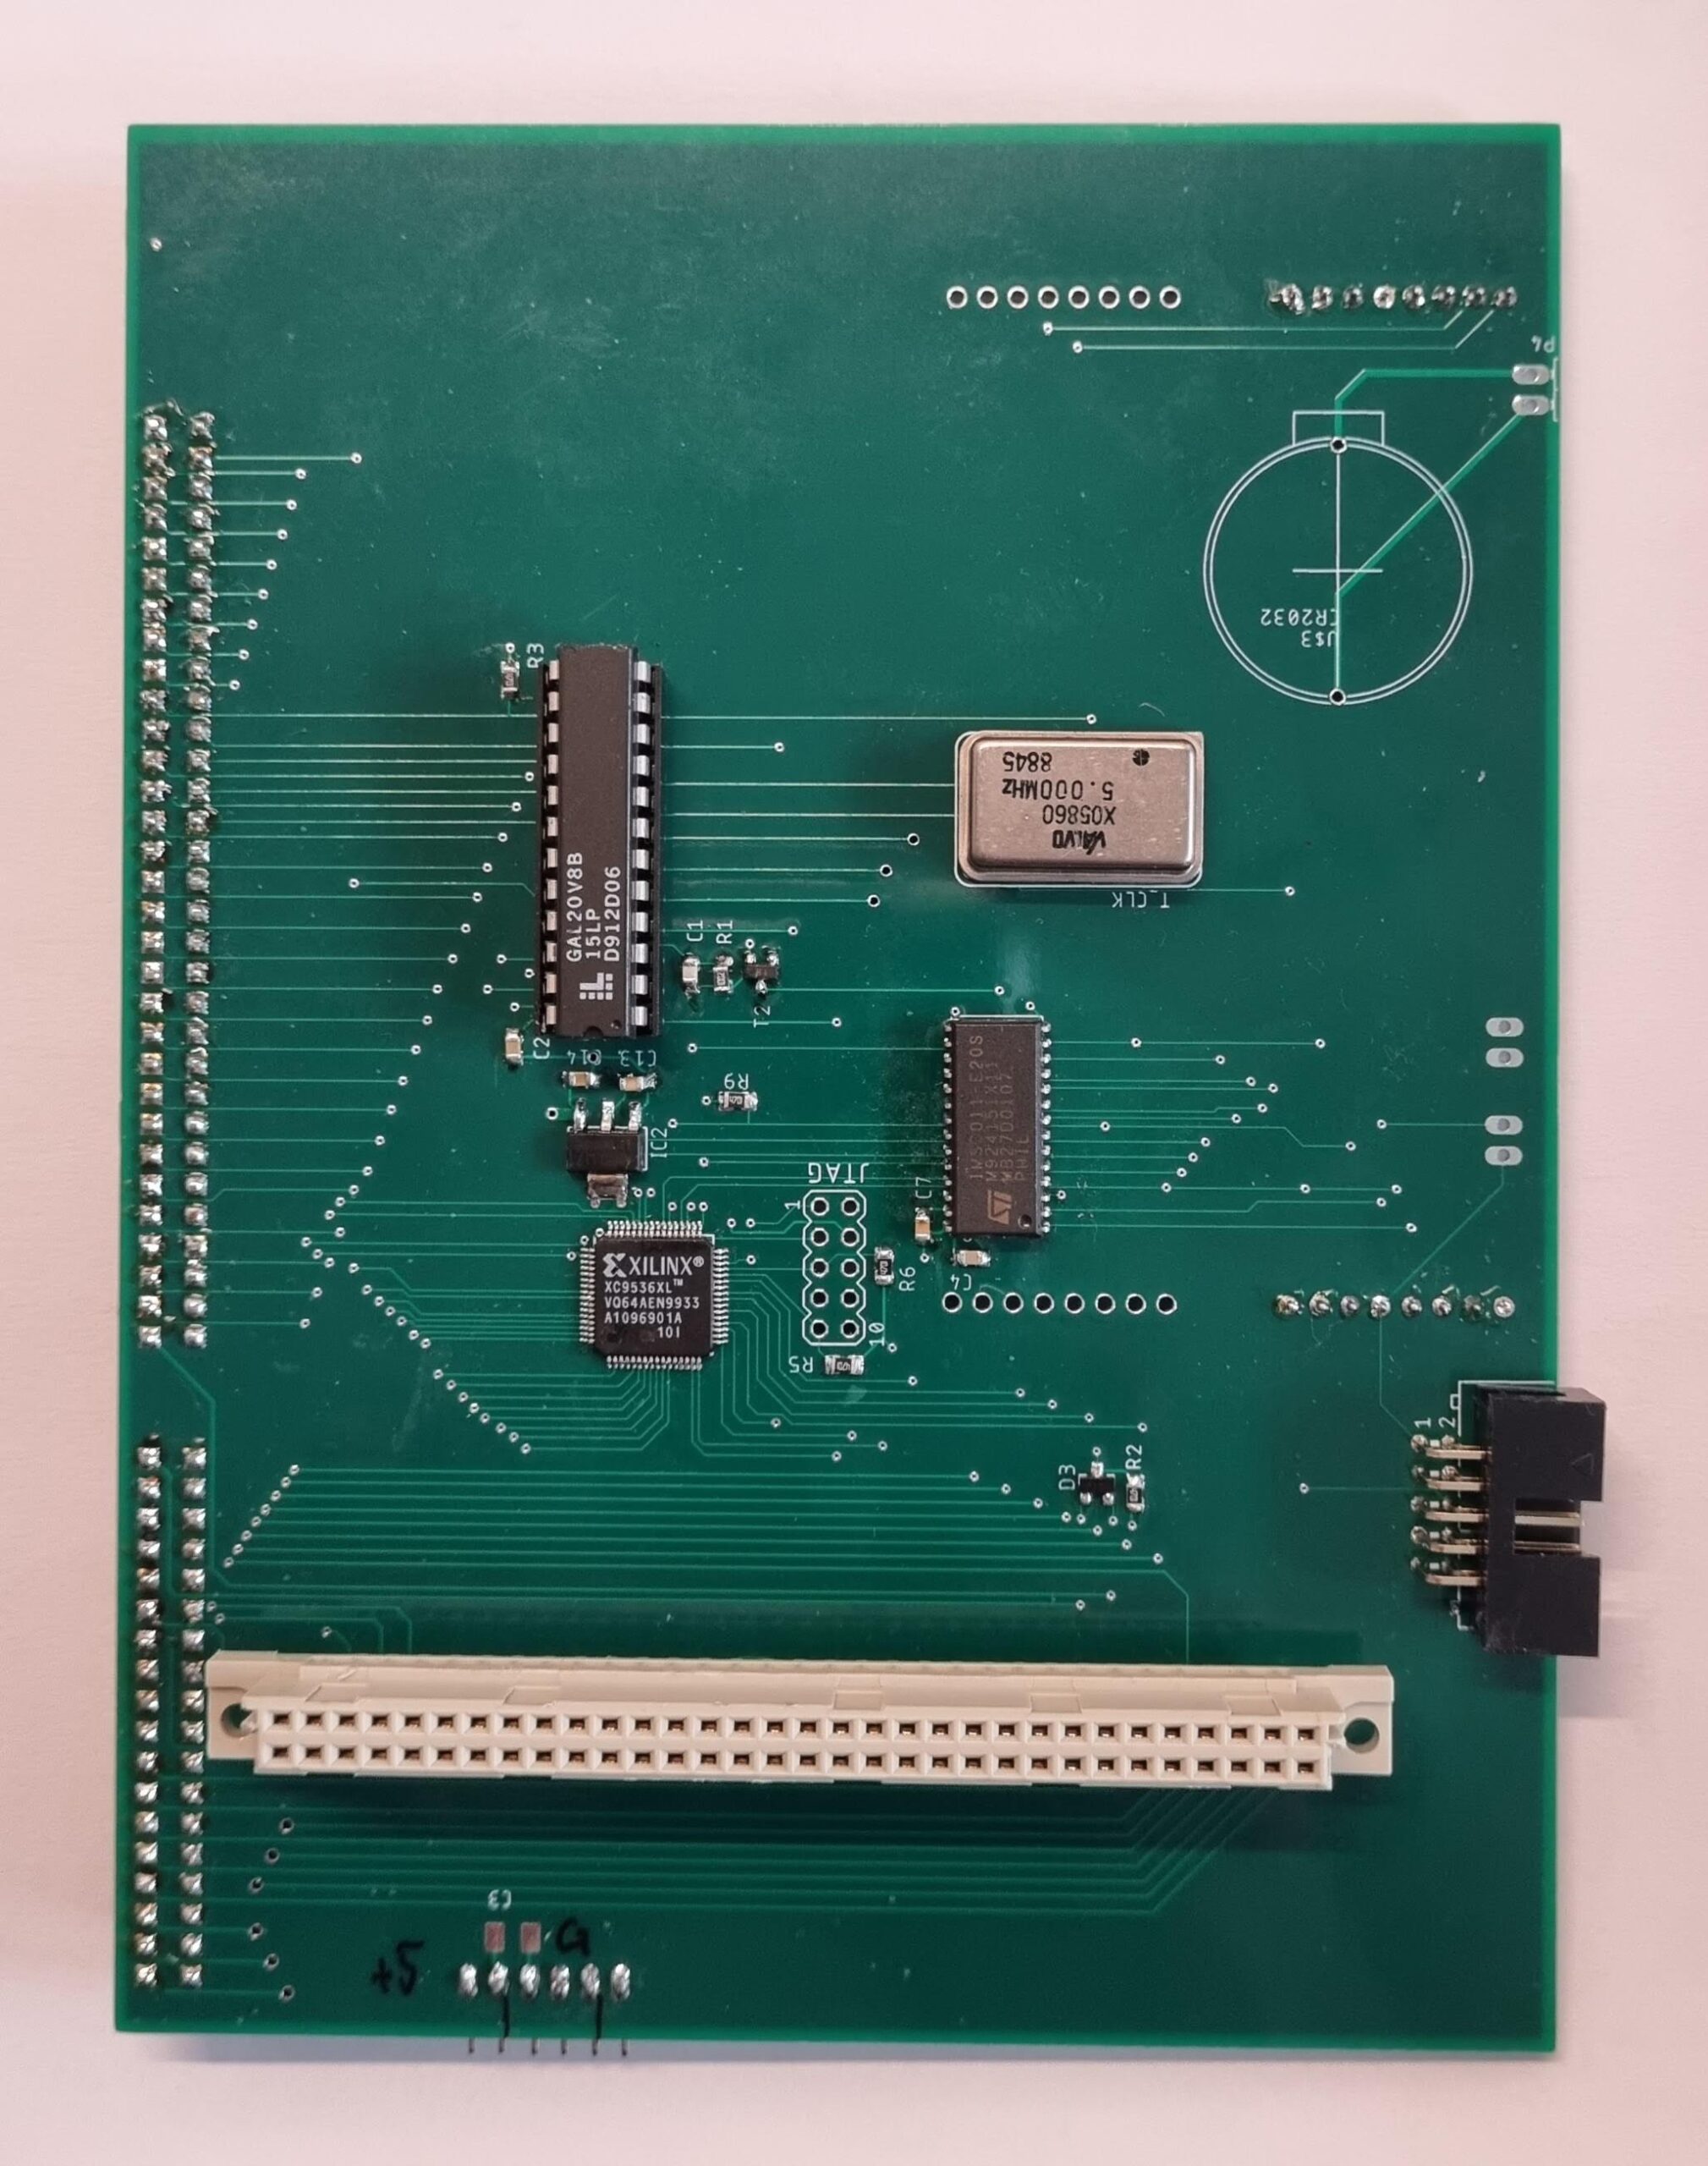
But even if your ET4000 card is covering the whole STG[A]TW don’t despair! Looking at the backside you can spot the external Transputer link connector (on the right edge):

Using this you can connect to e.g. an external Transputer(-farm) of any size… for example something like my 64 CPU Final Cube 🔥

Looking further around the backside you can spot a preparation for a CR2032 coin-shape battery holder. That is meant to replace the two AA batteries used in the original case-lid because depending on the TRAMs used, it might be necessary to remove the battery compartment (yes, you’d need to cut it out 😰) .

Talking about power… at the bottom you can see the external power connector which supply is mandatory – you need to connect at least 5V and ground, optionally 12V if your ET4000 needs that.
That said, I highly recommend to make sure your Mega ST’s PSU is powerful enough – best would be to replace it by e.g. a Maxwell RD-50A.

Why?!

I knew you’d ask. Well in case you haven’t noticed yet, I’m a total Transputer nut. It’s a fabulous, genius CPU and design. The more you dig into it, the more you’ll love it.

Back then I adored the ATW800 and always wanted to own one. But it was insanely expensive and -to be honest – wasn’t a real member auf the ST/TT-family anyhow.
This is because the Mega-ST1 inside the ATW was mainly used as a bootup machine for the Transputer and after that was up and running, everything the ST did was file- and user-I/O (Mouse, Keyboard, RS232).

In my humble opinion, the STG[A]TW is (somewhat) the way how ATARI should have done it back then. Instead of creating an ‘island solution’ they should have used the existing install-base and offer an expansion to it. Plug in the missing parts (graphics & Transputer) and keep the TOS/GEM eco-system in charge.
Users could keep running their applications and use the extra ‘ooomph’ to speed them up. Think of all the accelerators Apple Macintosh users had available to speed up PhotoShop filters or have it do the heavy number crunching of science applications etc.
Even all data has to travel over the bus to the Transputer and back, this is still faster than the 8MHz 68000.

Given that in 1990 about 350 ATW800 were produced and sold at 5000-7000 GBP which equaled to about 13700 DM or 8000$ (that’s about 11400 GBP, 13700 EUR or the same in US$ today),
I bet the number of a “ATW for the poor” would have been much higher.

So, again, why? Well to have Mandelbrot fractals calculated fast and  in colo(u)r, of course!
Fast means ~60sec, even using slow GEM routines. Using the same algorithm and iteration depth, the ST’s 8MHz 68000 took nearly 3 hours to calculate the same fractal.

Here’s a quick peek how ‘fast’ looks like:

Evolution – a quick excursion

If you’re into hardware development you might wonder why there’s a very vintage GAL and a semi-vintage CPLD used in this design.
Here’s my explanation and shameful justification 😉

From the very simple and basic design of the STGA I took the usual nerdy feature-creep road to hell 🙄
My initial design naturally included the GALs logic into one big CPLD. And having all address-lines available on this, that design also included (on top of the ISA and Transputer interface) a 68882 FPU, an IDE interface and a ROM decoder… everything worked fine BUT all ‘modern’ ET4000 cards didn’t.
I stared at logic-analyzer traces for weeks and weeks and compared them to the original STGA they were absolutely identical. But whatever I did, I wasn’t able to get ET4k cards with a Rev. TC6100AF chip working.
In the end I decided to keep the STGA part as-is, including the external AND-ing of /LDS & /UDS and inverting of /DTACK and put the Transputer handing into a smaller (and cheaper) CPLD.
Thus the FPU, IDE and ROM decoding was off the table and to be honest, there are other solutions which do that job better anyhow.

From left to right: STGA, the Über-STGA and the final STG[A]TW
So there you have it: Colorful high-res GEM combined with the mighty Transputer power… but I understand, that those low-profile ET4k cards are getting rarer and rarer and not everybody has an external Transputer farm to connect to.
So I made another card or better a so-called CPU relocator…

The TRAM-Relocator

Most (Mega) ST users out there already have one or more expansions to their system, mostly plugging into or onto the CPU creating a ‘stack’ of PCBs.
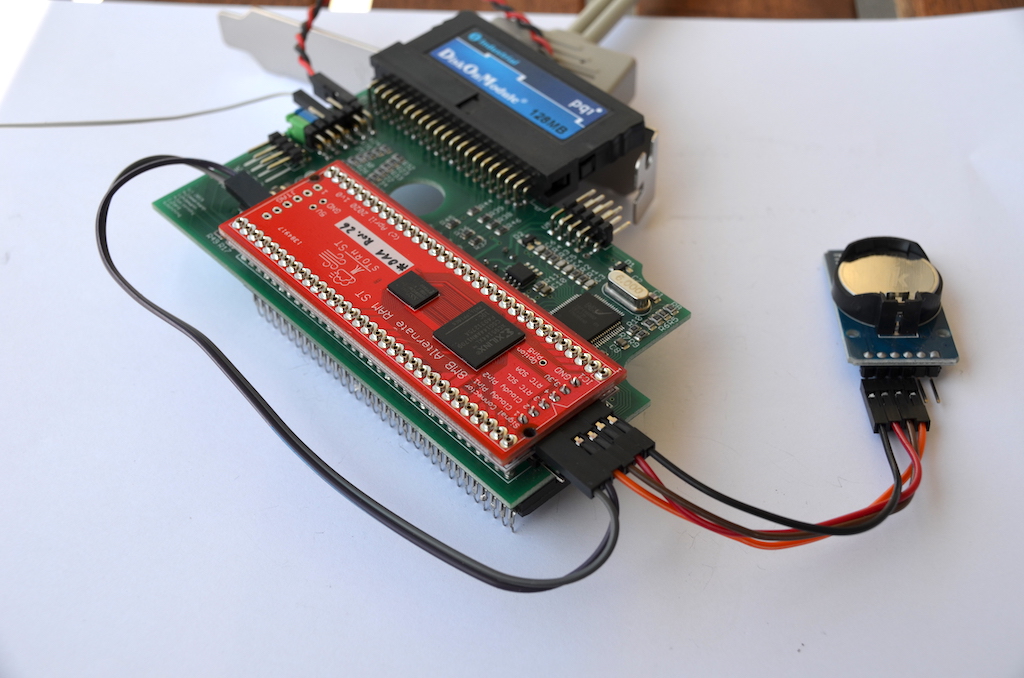
Because the STGA (as well as the STG[A]TW) overlaps over the Mega STs CPU socket you might want relocate the CPU a bit away from the Mega-Bus socket. Simple relocators simply move it a bit towards the front of the case. But that still results in having a stack of multiple extensions. For example here’s a Storm ST (Alt-RAM) on top of a Cloudy (4x ROM) plugged into a Lightning ST (IDE & USB):

This can get tricky in some crowded Mega ST cases…
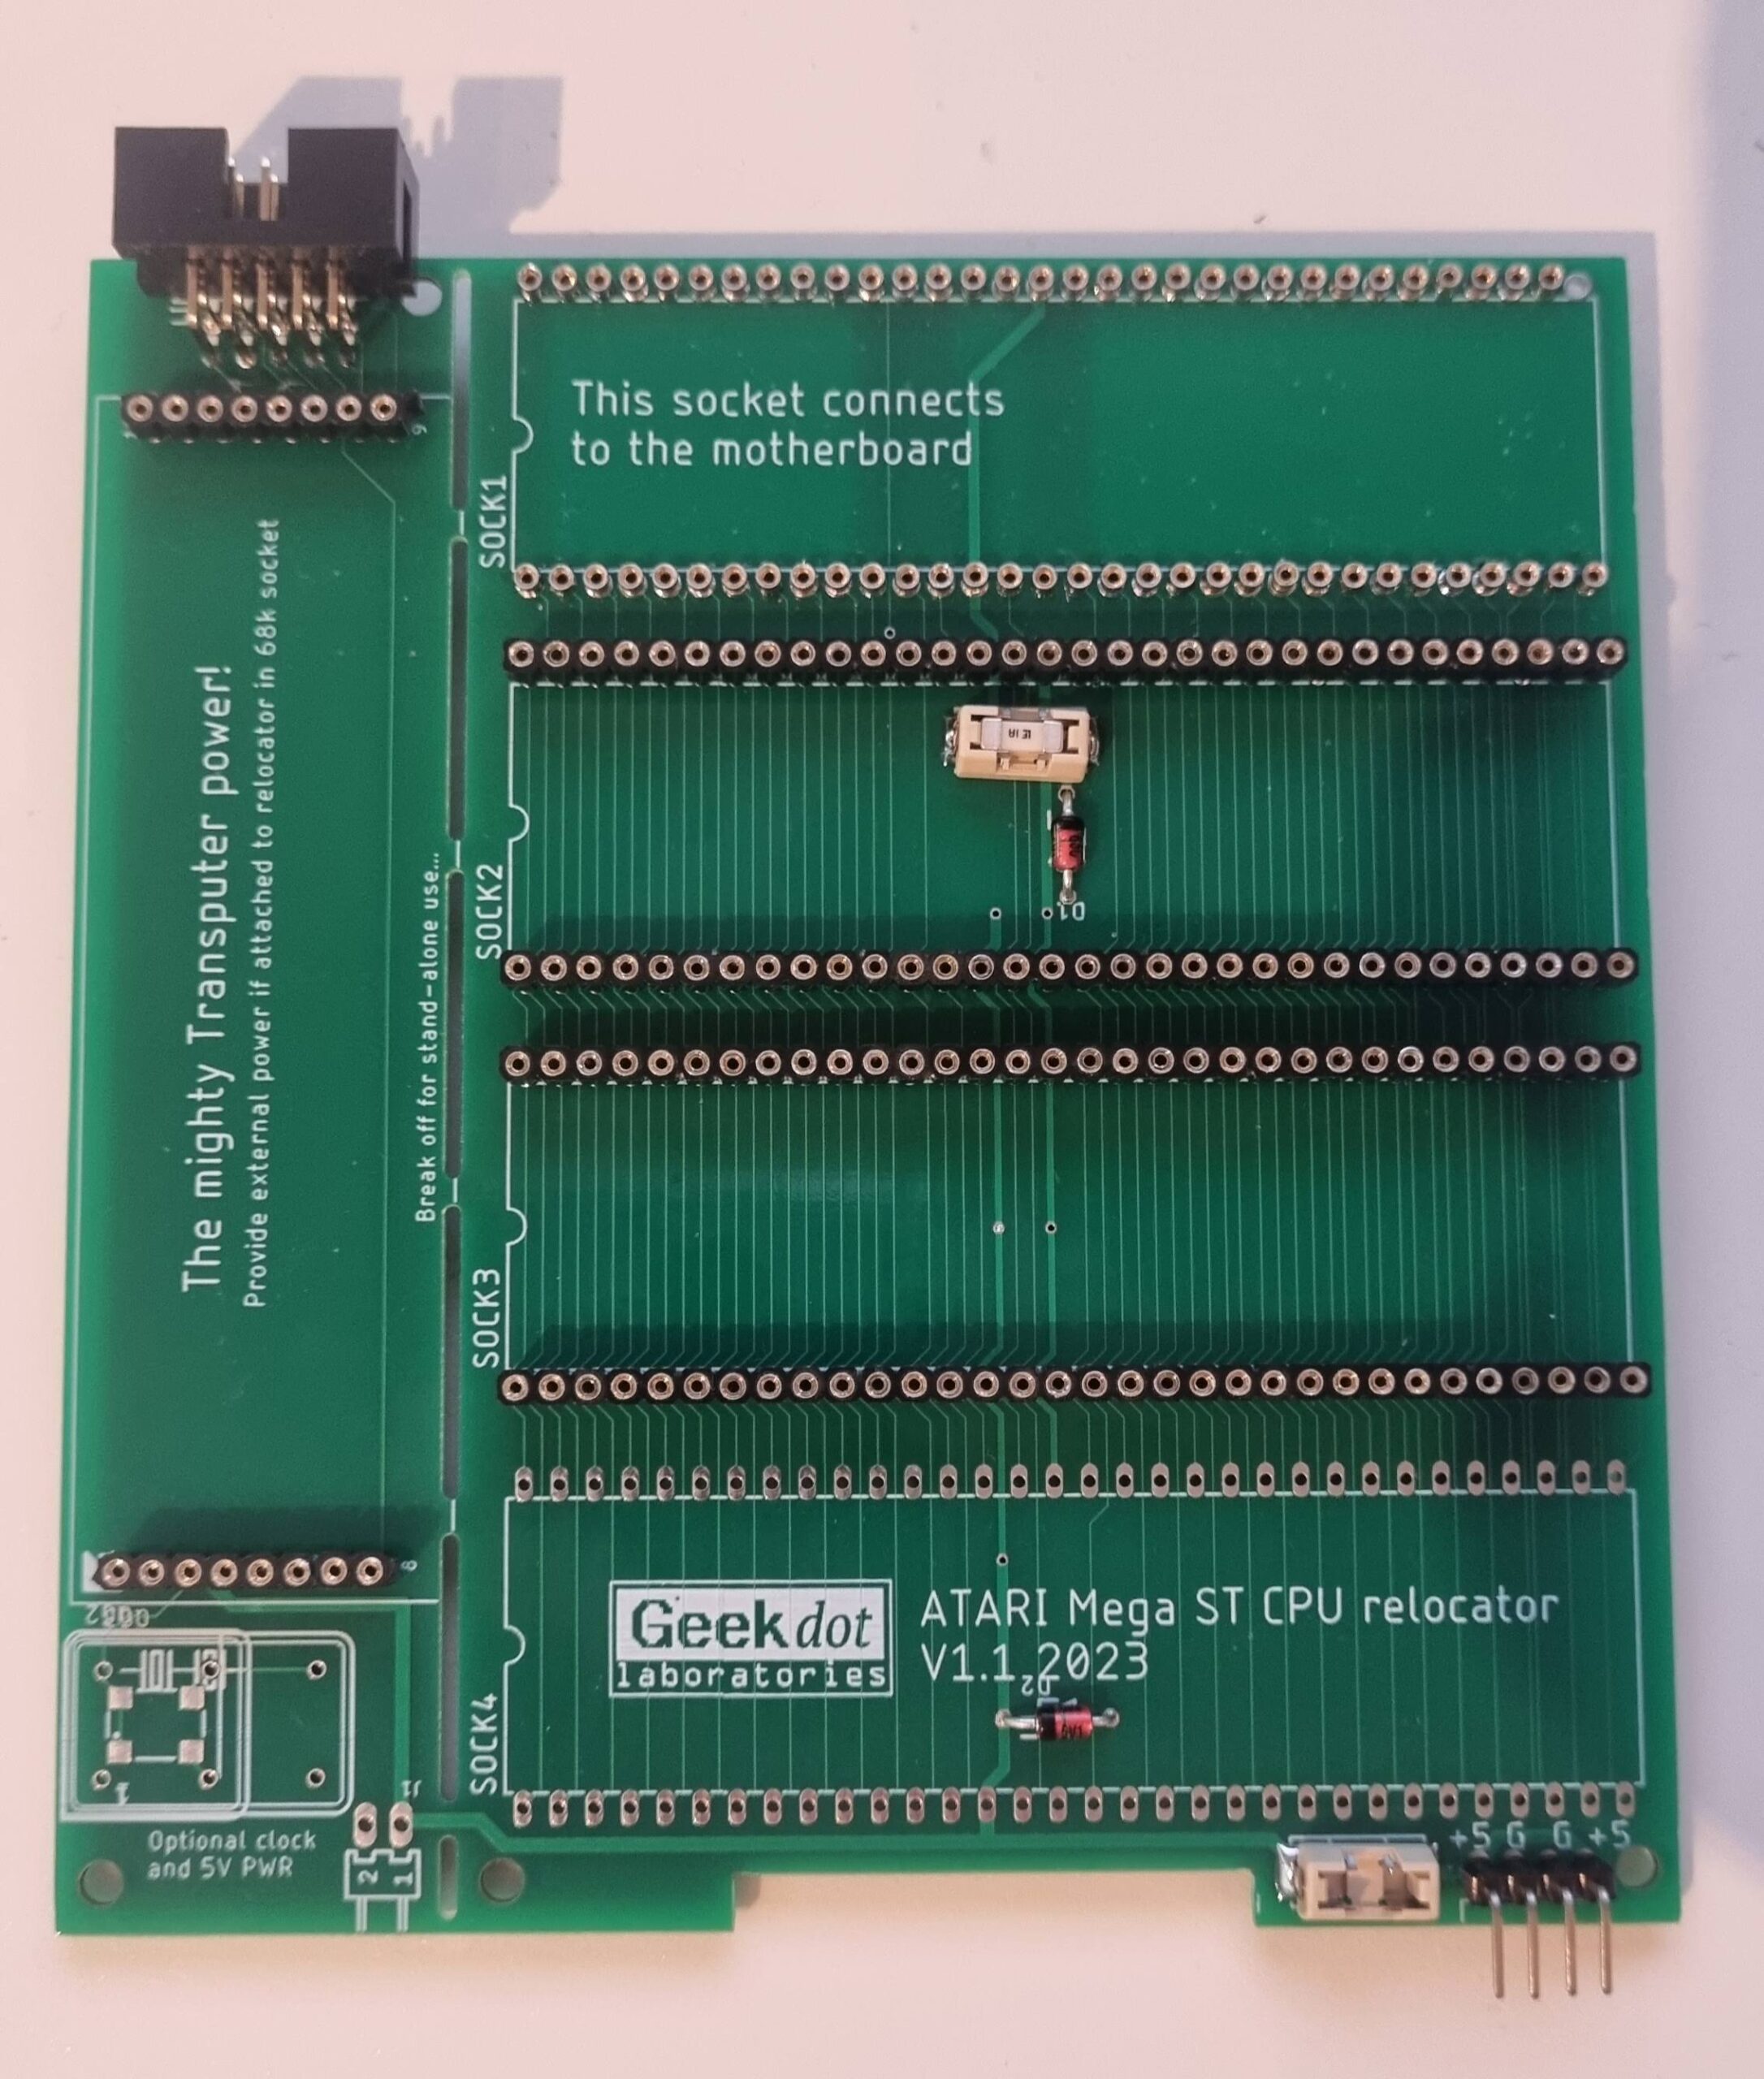
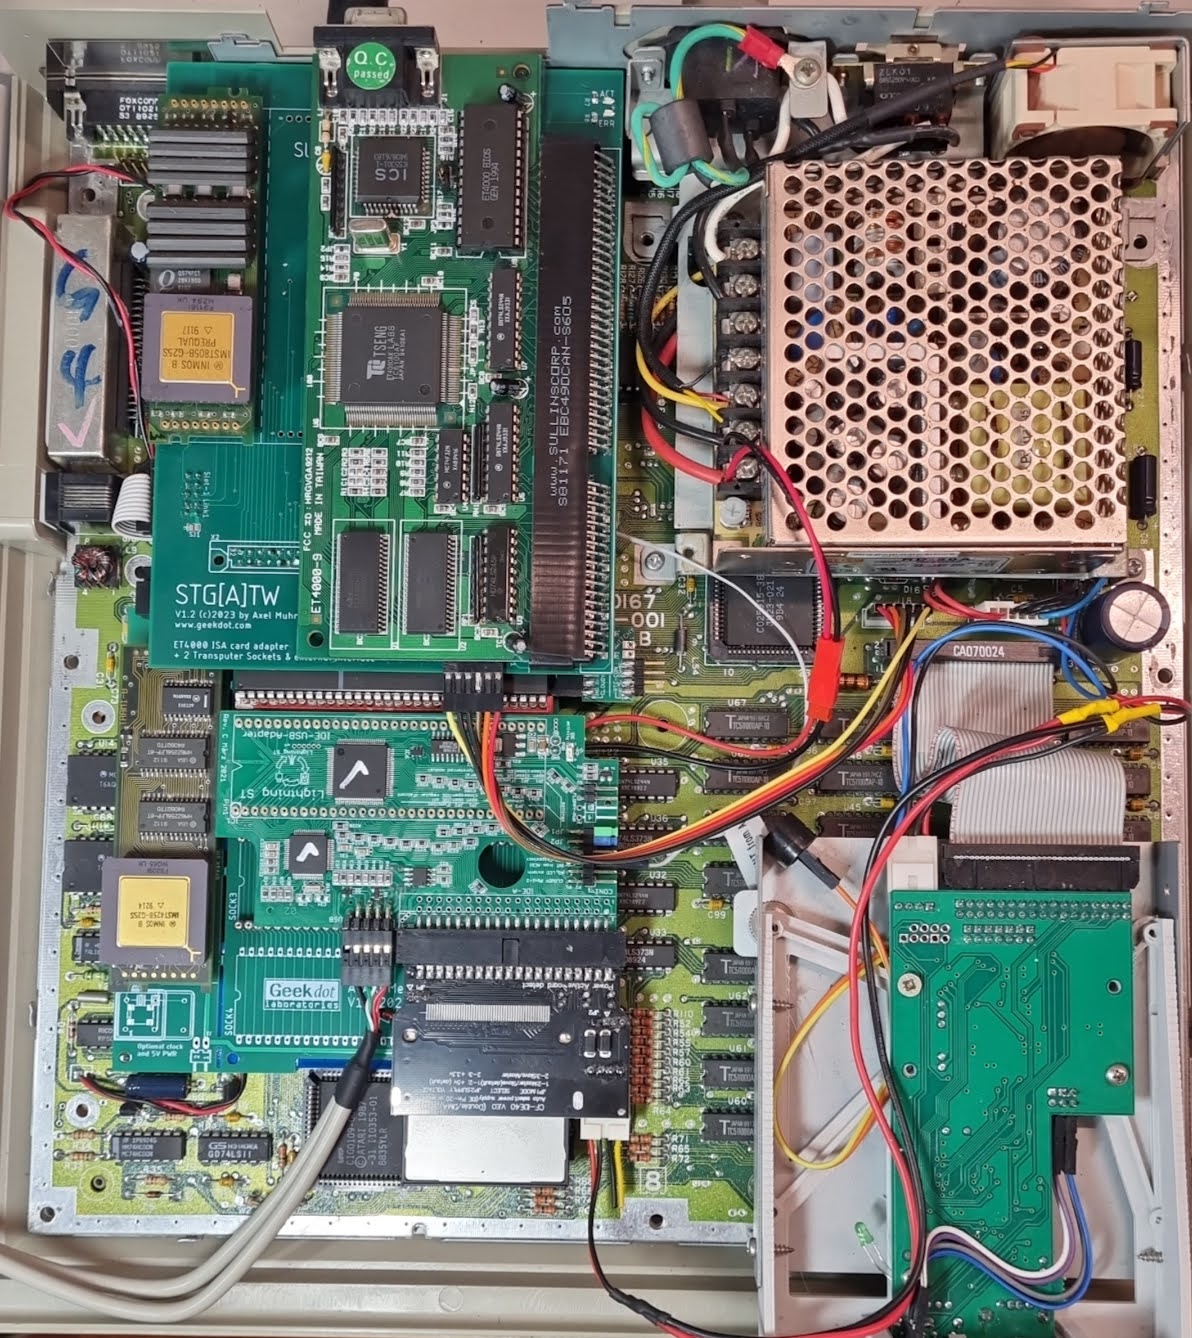
I really liked the ‘Bus I/O port design’ of the Exxos’ STF Remake Project having multiple sockets next to each other.
And if you have your original TOS ROMs removed (and replaced by e.g. a Cloudy) there’s actually some space to roll out 4 of them having the Relocator sitting flush on the Mega-ST mainboard (make sure the backside of the Relocator is completely isolated!):

4 Sockets and a cool TRAM socket 😁

Like clearly written on the PCB, SOCK1 goes into the (to-be-retrofitted) CPU Socket and using ‘hollow pins’, it can take a CPU itself.

SOCK2-4 are available to extensions of your choice – all 3 of them are protected against power-surges by a fuse and a diode.
This design decision has been made due to my own painful experience loosing everything which had been plugged into the CPU socket… and the Blitter 😥

In the lower right corner are pins for an additional external power connector, also protected. That might be necessary depending what you’re plugging into those sockets.

Finally, the left edge is a Transputer TRAM socket which can be connected to the STG[A]TW by a 10pin flat-cable providing link signals and a 5MHz clock signal.
That way, you can use the STG[A]TW with an internal Transputer even your ET4000 card is big as a baking-tray.
It is highly recommended to use external power when doing so. The poor 68000 power-pins won’t be enough for it.

If needed, the whole TRAM part can be snapped-off from the Relocator to, uhm, relocate the TRAM elsewhere in- or outside the case or use it stand-alone. For that matter itself features an optional connector for power as well as a place to solder a required 5MHz oscillator and 2 mounting holes.

With everything in place, your “ATW800 for the poor” could look like this:

What you see here is the STG[A]TW plugged in, giving home to a low-profile ET4000 and a Size-1 TRAM.
The Relocator was plugged into the CPU socket and in its 1st slot the  Cloudy-Storm  and the 68000 sitting on top of it, took seat.
Slot 2 of the Relocator is taken by a Lightning-ST… and last but not least, a second TRAM was put onto the Relocator (you can spot the grey flat-cable connecting it to the STG[A]TW.

Want one?

All this sounds so cool that you want to own a STG[A]TW?
Well, first check out this list:

  • There’s next to no GEM user software for it yet
    👉 but we’re working on it and there’s a pretty good system support in place already – and Helios is running already! 🥳
    An extra post on that is currently in the works available here.
  • Do you have an ET4000 card of which you know it’s working with the NOVA drivers?
    👉 I am not able to support you in getting your specific card working – there are just too many models and permutations of possible TOS/GEM/Driver installations. See this atari-forum.com thread to get an idea…
  • Do you own a TRAM?
    👉 I might provide you with one at extra cost, mail me.
  • Do you have time to wait?
    I’m manually building these boards and it’s a lot of work (0.5pich SMD, lots of trough-hole pins to cut and file down etc.)

If that’s 4  times “Yes” I can build & sell you one of the 6 which I have left for 100€ (plus shipping)… yes, that’s hefty but the quite large PCB is 4 layers (for stable power-distribution), just the ISA slot connector is 10€ already, Mega Bus 5€, GAL, CPLD etc.etc…. plus, as said,  it takes quite some time to build & test them.
Drop me a mail on the bottom of that page if interested…

SOLD OUT… sorry 😥

As for the CPU-relocator, I’m selling un-populated PCBs for 8€ (Or get the gerbers here and have yours made at your favorite PCB manufacturer).
I’m not building them because the CPU ‘socket’ (SOCK1) is made of 64 single pins which you have to pry/get out of precision pin-headers.


That’s a tedious work you most likely want to do once… but not many times.

All that said – If you weren’t able to get a STG[A]TW, don’t despair.
I consider this as my stepping stone and learning platform for something cooler to come 😎.
Because I don’t like vapor-ware and hot-air-talking, I’ll tell you more when it’s a) done and b) working.

The T2C=

It had to be done… and now, 12 years later 😱, it is done:
Finally the T2C64 was poured into a proper PCB and some bells’n’whistles had been added – so it’s now on par with the T2A2 for the Apple II series. Say hello to the T2C=!

TLDR;

Here’s a quick intro for those being to lazy to follow the link to the T2C64.

This card enables your Commodore 8-bit computer to communicate with a Transputer Module piggybacked onto the card.
A Transputer is a 32bit RISC(ish) CPU from the 80’s that has the unique ability to connect to other Transputers by a very simple 2-wire protocol making it possible to create large, powerful computing networks – at least by 1980+ measures 😉

What can I do with it?
How to talk to the Transputer?
Can I do something useful with that?
How fast can I move data back and forth?
Ok, how much?

After many years the Commodore 8-bit bug had bitten me again and it was due time to put some love into my C64 Transputer interface.
But while at it, I thought it would be handy to use this card not just with my C64 but also on all other Commodore machines featuring an expansion port.

This led to the (to my knowledge) first 8-bit Commodore ‘flipper card’, i.e. it has a port connector on each end. One for the C64 & C128 and one for the C264 family, namely the C16, C116 and Plus/4. Yes, it works with all of them. Pull it from your C64, flip it 180° and plug it into e.g. your Plus/4. Cool, huh?
So here’s a quick feature list:

  • Edge connectors to connect to the Commodore
    • C64
    • C128
    • C16/C116
    • Plus/4
  • Each edge connector offers 2 I/O address ranges to be set by a jumper (0xDE00/0xDF00 and 0xFD90/0xFDF0)
  • Offers two TRAM (TRAnsputer Module) slots to connect either 2 Size-1 or one Size-2 TRAM
  • External Transputer-Link connector to connect the T2C= to larger external Transputer networks (pinout is the same as on the T2A2) – not populated on the pictures here.
  • The data-bus is fully buffered to prevent interference with other cards when used in e.g. an expander
  • 3.3V CPLD used to reduce power-consumption as much as possible.

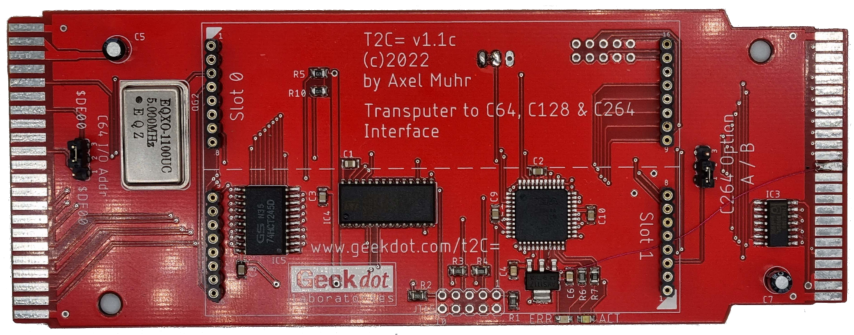
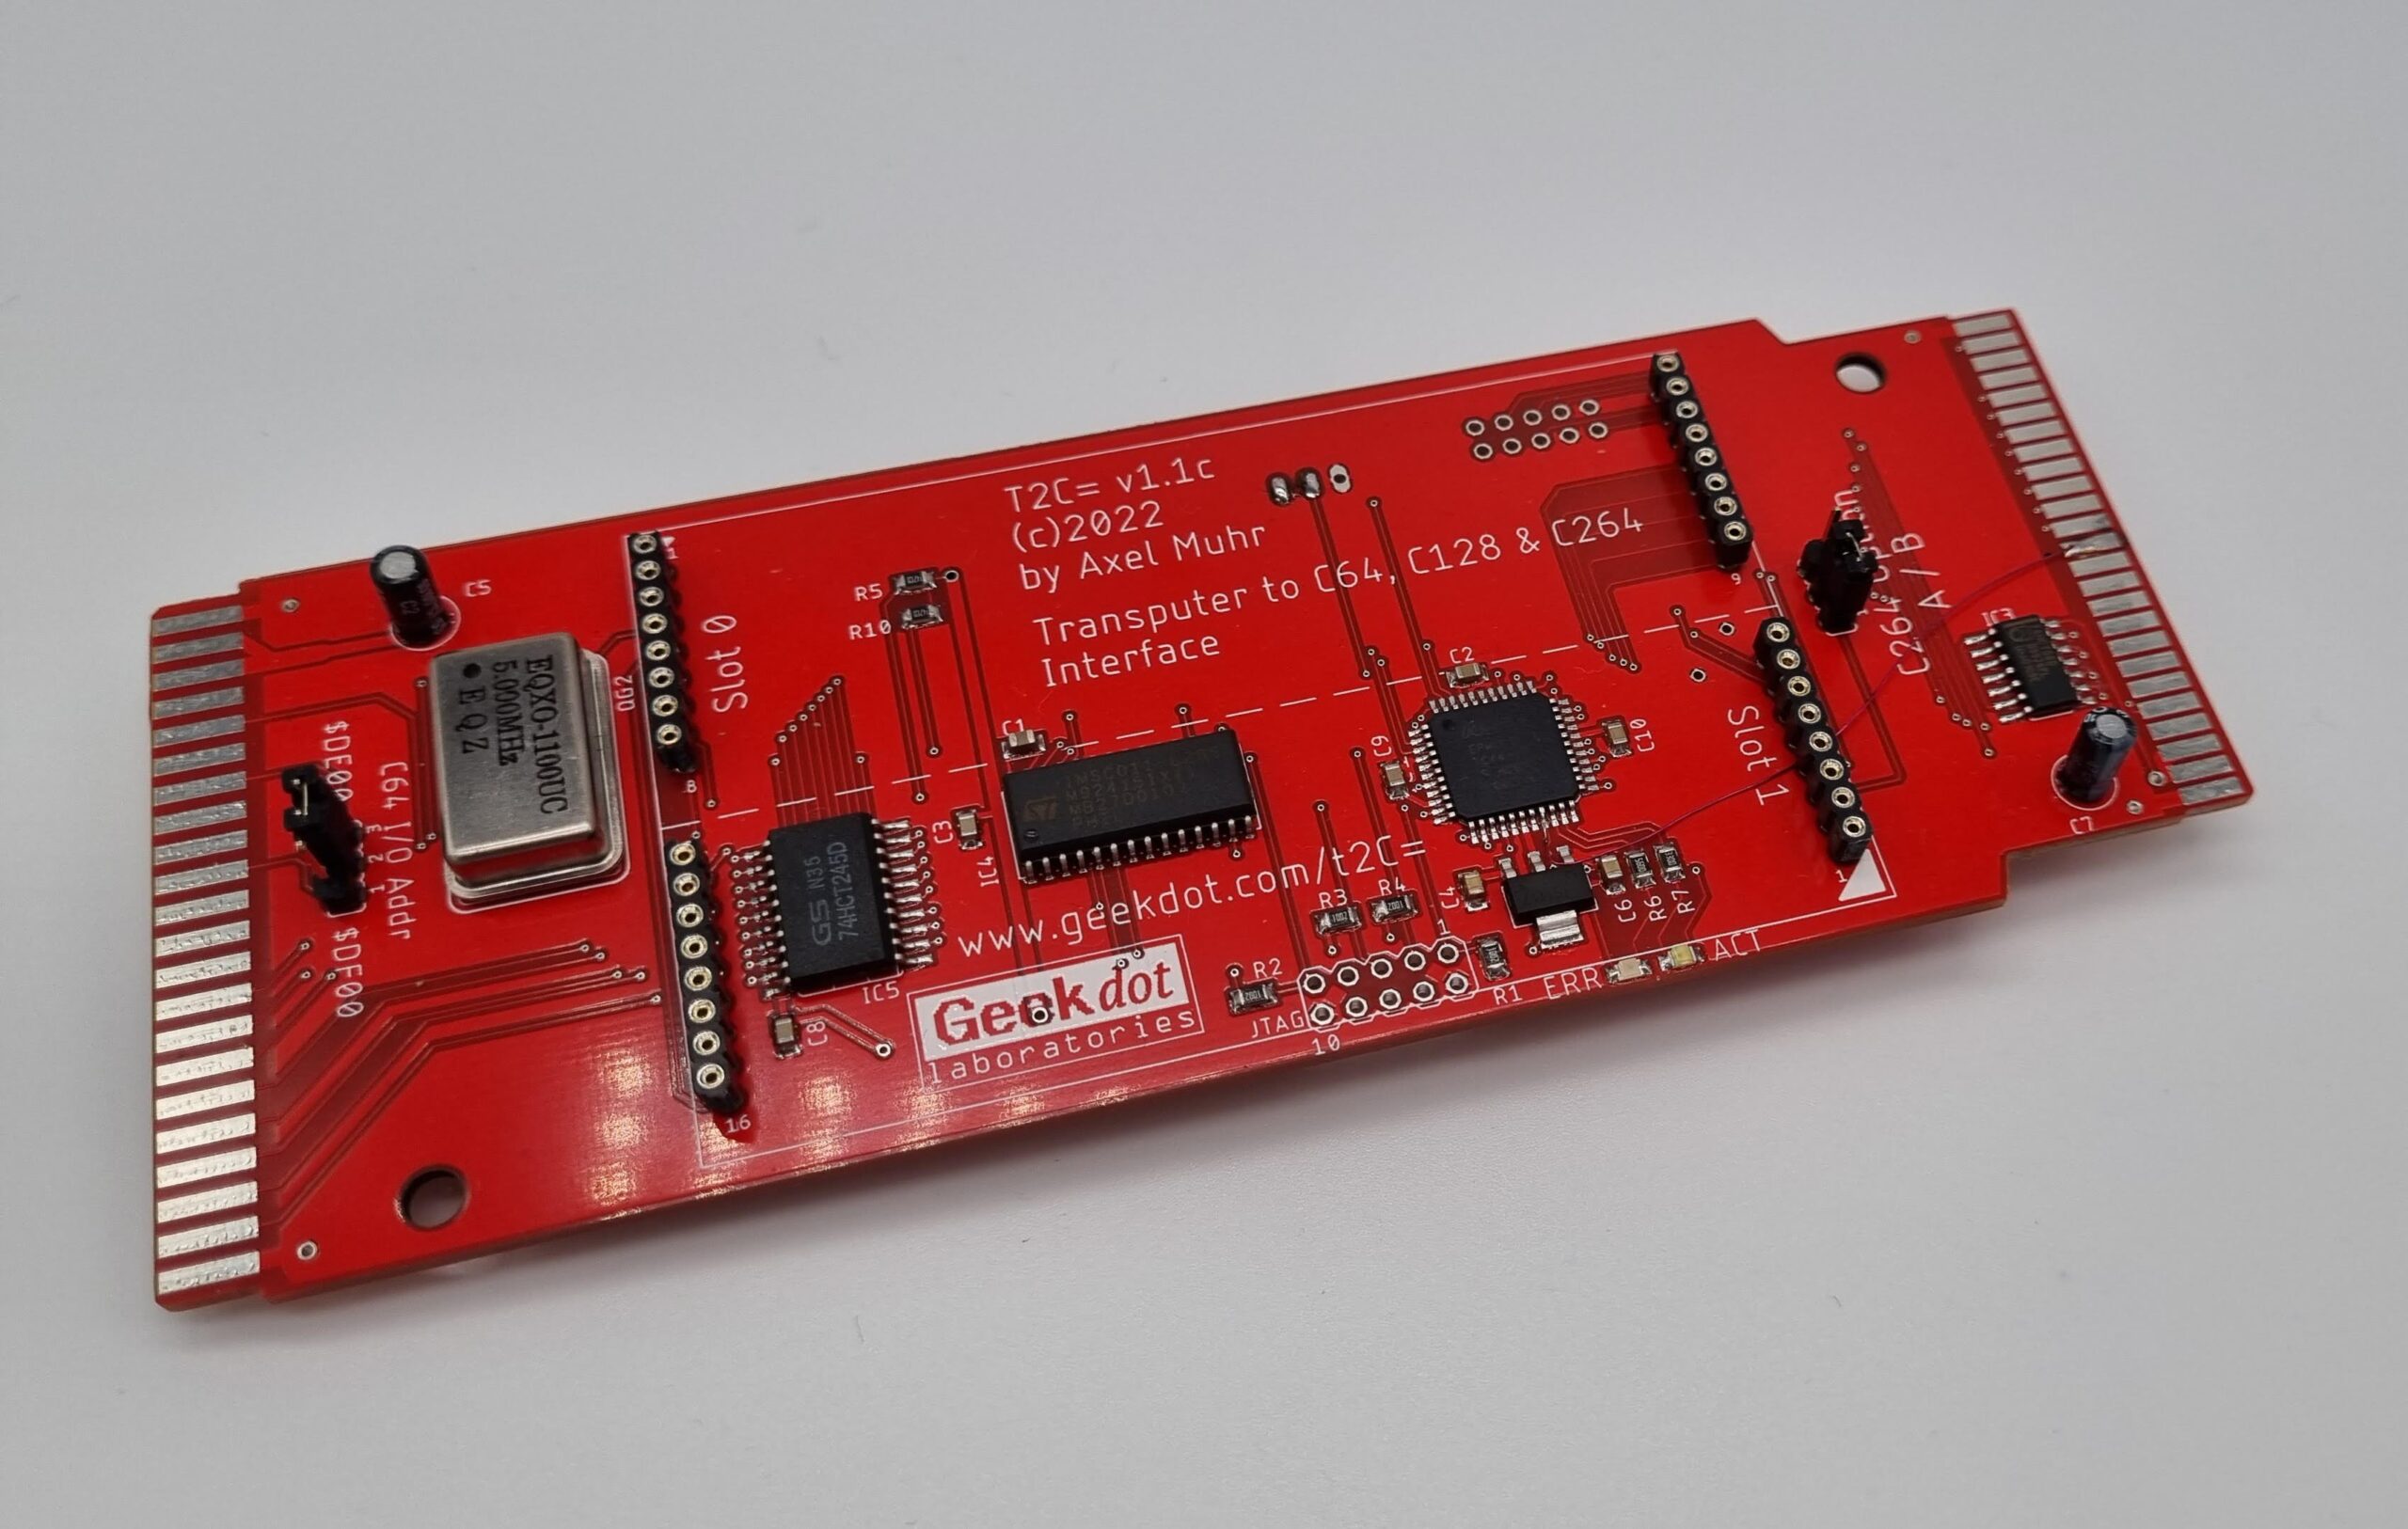
Here’s the card in full glory… without a TRAM plugged in:

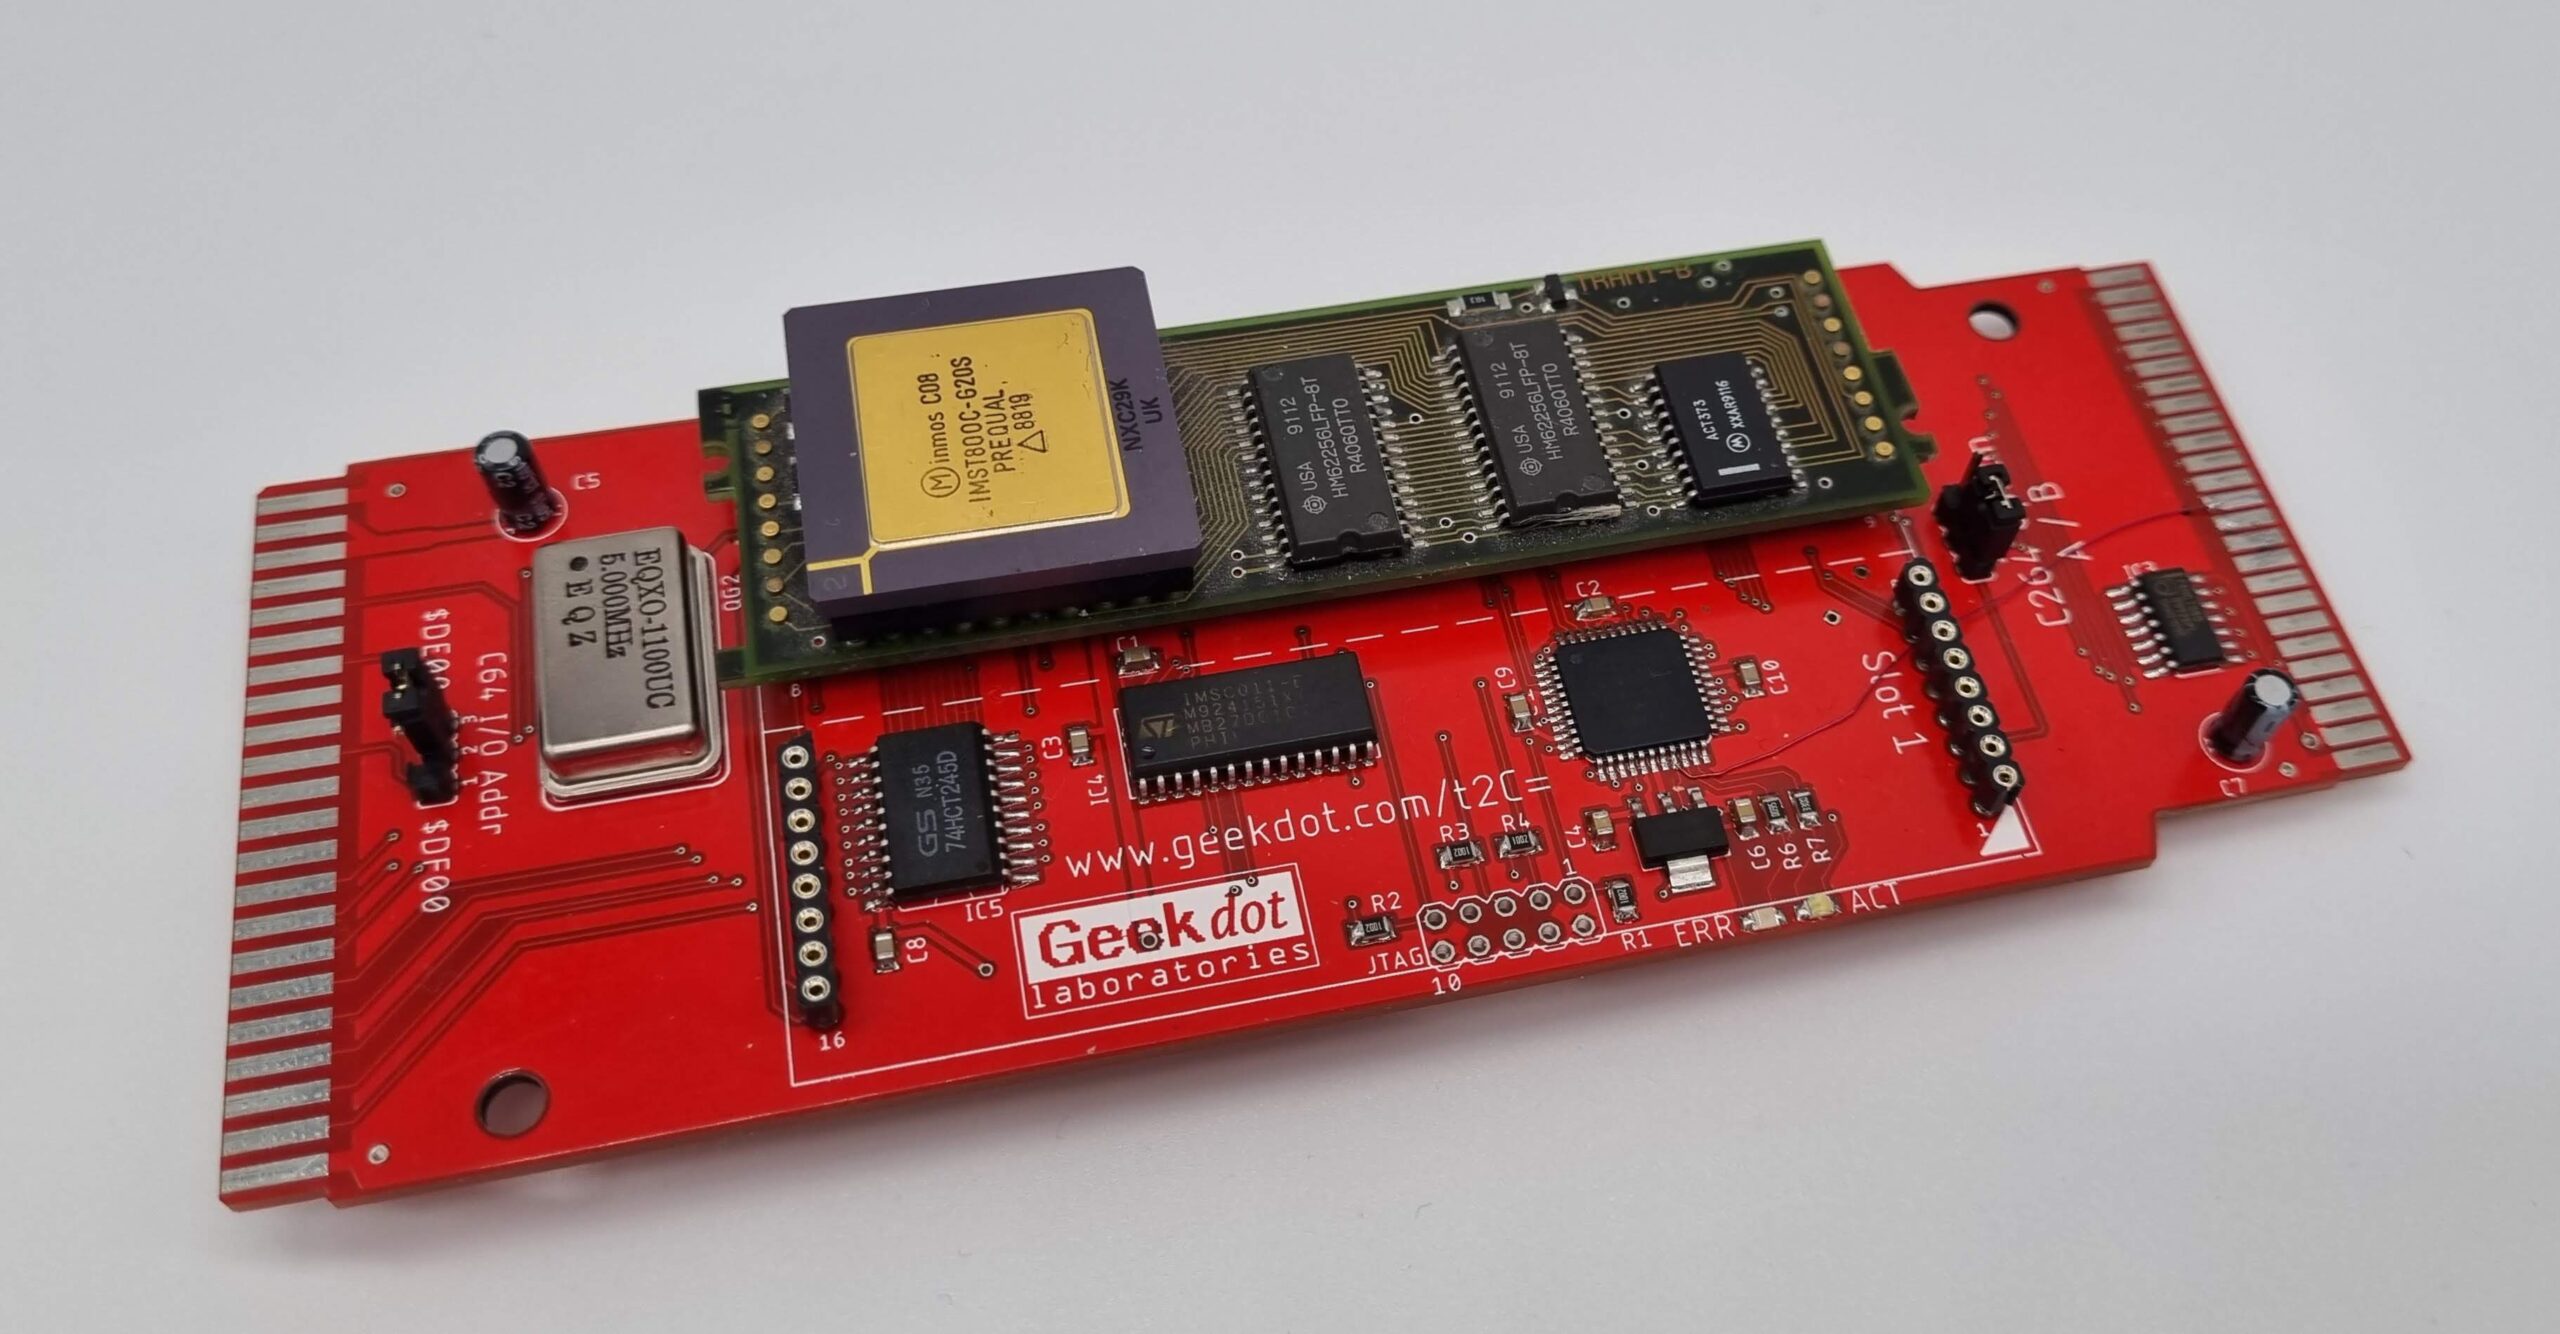
….and with one size-1 TRAM which itself provides a 32bit T800 Transputer and 128K RAM. The 2nd slot is still free.

TRAMs came in a wild range of variations. Be it CPUs used on them and/or the amount of RAM. But there also been peripherals like SCSI controllers or graphic cards – check my little TRAM page if you like to get an idea.
Yes, TRAMs are quite vintage and thus hard (or expensive) to get… but don’t despair… I’ve designed my own and also have some old ones in stock – probably enough to serve the hand-full of interested nerds 😉

What can I do with these?

I knew that was coming 😜
Well it mostly depends on you. The T2C= is an accelerator running its own code in its own RAM and can exchange data with your Commodore 8-bit machine – everything is possible.

All code examples and sources are available in this archive.
Commodore files are in a .D64 disk image.

Personally I always have the initial reflex to run a Mandelbrot fractal on everything’s slightly capable to do so. Most of the time, that’s where my euphoria ends and my project-ADHD kicks in… but that doesn’t stop you from having cool ideas.

Technically this setup isn’t much different from slapping a Raspberry Pi to your Commie and let that do stuff… but there’s something I’d like to call the “5 connoisseurs C’s” which might not be everyone’s cup of tee but very tempting to others:

  • Contemporary: Transputers are from the same era like your Commodore machine while being much more powerful – we’re talking about ~15MIPS here.
  • Completely different: Transputers are natively programmed in OCCAM, a very interesting, different language than the one you might be used to.
    That said, no worries, there are C, Pascal and Fortran compilers, too. Here’s a page offering a little “SDK” I created – it’s a VirtualBox image coming with everything you need to start coding.
  • Connected: Transputers are made to be networked into a parallel network… making your well programmed application running even faster as benchmarks show.
  • Challenging: “Well programmed” means wrapping your genius brain around multi-threaded, parallel paradigms or use the fast 2 or 4K on-chip RAM the most clever way.
  • Communicate: And finally, find a clever way to communicate with the host (i.e. your Commodore) and vice versa.

Ideas for using it could be raytracing, do complex calculations, heavily compress/manipulate data, use it as a simple storage (“Stupid-REU”) or write a Helios server for it and use your C= as a terminal [Helios is a UNIXish OS running on 1 to infinitive Transputers]

A final word of warning: While the T2C= uses very little power, a Transputer (and the RAM on a TRAM) does use quite some juice.
Depending on the TRAM this can be as little as 500mA up to 1A – which means your power-supply should be a stronger one.

Communication

Let’s start with the most simple and actually useful code:
Detect a connected T2C=/Transputer and check if it’s working correctly. This code was already shown on my T2C64 posts but now it’s enhanced for newly added machines and runs in BASIC V2 as well as V3.5 or V7.

After telling the base-address it does the following:

  • Init/Reset the Transputer to a sane state
  • Read & display the statuses of the Link interface
  • Write some data into the Transputers RAM and read it back
  • Finally, send a small program to the Transputer which makes it possible to find out its model (16bit T2xx, 32bit T4xx/T8xx or just a C004 programmable link switch)

So here’s the new TDETECT code:

100 SY=peek(65534):print chr$(147);"This seems to be a";
110 if peek(1177)=63 then poke1177,62:sy=peek(65534):poke1177,63
120 if sy=72 then print " c64": goto 160
130 if sy=23 then print " c128": goto 160
140 if sy=179 then print " plus 4 or c16":goto 160
150 print"n unknown model";print
160 print "select T2C= base address"
170 print "1: c64/c128 $de00 (56832, default)"
180 print "2: c64/c128 $df00 (57088)"
190 print "3: c264 $fd90 (64912, default)"
200 print "4: c264 $fdf0 (65008)"
210 print "5: enter your own"
220 input m
230 if m=1 then ba=56832: goto 290
240 if m=2 then ba=57088: goto 290
250 if m=3 then ba=64912: goto 290
260 if m=4 then ba=65008: goto 290
270 if m>5 goto 160
280 input "base address:";ba
290 print"initializing transputer"
300 do=ba+1:rem data out
310 is=ba+2:rem in status
320 os=ba+3:rem out status
330 re=ba+8:rem reset/error
340 an=ba+12:rem analyze
350 rem ------------------
360 poke re,1
370 poke an,0
380 poke re,0
390 rem clear i/o enable
400 poke is,0
410 poke os,0
420 print"reading statuses"
430 print"i status: ";(peek(is)and1)
440 print"o status: ";(peek(os)and1)
450 print"error: ";(peek(re)and1)
460 print"sending poke command"
470 pokedo,0
480 print"o status: ";(peek(os)and1)
490 :
500 print"sending test-data to t. (12345678)"
510 poke do,0:poke do,0:poke do,0:poke do,128
520 poke do,12:poke do,34:poke do,56:poke do,78
530 print"i status: ";(peek(is)and1)
540 :
550 print"reading back from t."
560 poke do,1:rem peeking
570 poke do,0:poke do,0:poke do,0:poke do,128
580 print peek(ba);peek(ba);peek(ba);peek(ba)
590 :
600 dimr(4)
610 print"sending program to transputer..."
620 forx=1to24
630 readt:poke do,t
640 wait os,1
650 nextx
660 print:print"reading result:"
670 c=0
680 n=ti+50
690 ifc=10 goto 760
700 if ti>n then ee=ee+1:if ee=10 goto 760
710 if(peek(is)and1)=0 goto 700
720 r(c)=peek(ba)
730 c=c+1
740 goto 680
750 rem ------------------------
760 if c=1 then print"c004 found"
770 if c=2 then print"16 bit transputer found"
780 if c=4 then print"32 bit transputer found"
790 data 23,177,209,36,242,33,252,36,242,33,248
800 data 240,96,92,42,42,42,74,255,33,47,255,2,0

Do something useful?

So now that we have detected a connected Transputer on our Commodore, it should do something useful like… adding numbers.
While this is way beneath his dignity, it’s a good example of uploading code to the Transputer and how to send and read data.

For this, I’d like to redirect you to the 2nd code example I’ve posted for the T2C64…

And finally in this former post I coded a Mandelbrot fractal (Video inside! 😉) for the C64 using cc65 and the TGI graphics library which calculates and displays the initial fractal within a minute or so.

Now having the whole family of C264 machines added, I thought it would be nice to have a demo for them, too.
So, just because it can do graphics out of the box,  I wrote the Mandelbrot “frontend” in BASIC 3.5. It worked but it was brutally slow…it takes like 10 minutes or so to get this screen 🐌

That is – of course – because BASIC is darn slow in doing the IO and plotting. Looking at one of the above examples, reading a byte from the Transputer means read a byte, set “pen” to the next coordinate, decide if to plot or not, repeat – in code (provided in the D64 disk image) this looks like that:

390 for y=0 to 199
400 :for x=0 to 319
420 ::px=peek(ba)
430 ::if px=32 then draw 0,x,y:else draw 1,x,y
440 :next x
450 next y

Because it’s so slow, I even didn’t need to check the input-status of the link-interface as the Transputer delivers the data much quicker than BASIC can say “next”…

This of course will be the ultimate show-stopper. What’s the sense of such a fast number cruncher, if you can’t get the data out of it fast enough?

Speed?

Mhh, so how long does it take to (just) read data from the T2C=?
Let’s start with BASIC to have milestone. This is “BAS-SPEEDTEST”, a very simple benchmark.
It loads a tiny Program into the Transputer which makes him spitting out an endless loop of counting from 1 to 10. Then we read the amount of 4KB and stop the time on that.

NB: As seen on the examples above, there’s an automatic handshaking in the way that the C012 link-interface chip on the T2C= sets a flag (Out-Status) each time there’s a byte ready to be fetched. But BASIC is so slow, that there’s always new data available the next round reading.

100 ba=56832:rem Adjust your base accordingly
110 dd=ba+1:rem data out
120 is=ba+2:rem in status
130 os=ba+3:rem out status
140 re=ba+8:rem reset/error
150 an=ba+12:rem analyze
160 rem ------------------
170 poke an,0
180 poke re,0
190 poke re,1
200 for d=1 to 500:next d
210 poke re,0
220 print"sending program to transputer..."
230 forx=1to33
240 readt:pokedd,t
250 waitos,1
260 nextx
270 print"reading incoming data..."
280 zeit=ti
290 for l=1 to 4096
300 in=peek(ba)
310 next
320 print"time for 4k:";(ti-zeit)/60
370 rem --- for the transputer
380 data 32,181,36,242,33,248,36,242,33,252,37,247
390 data 34,249,70,33,251,36,242,74,251,96,7,1,2,3
400 data 4,5,6,7,8,9,10

That showed it clearly… Basic is an IO-sloth.
Even without waiting for the Input-State ready it took the C64 16.5 seconds to read 4KB – nearly twice as long if we check for the input-status.

Machine without WAIT IS with WAIT IS
C64 16.5 29.4
C128 24.28* 40.5
Plus/4 19.8 33

*) It’s strange, that Basic V7 is even slower – investigation is ongoing
Talking to “the 128 Master” (Johan Grip) the mystery was solved.
Basic 7 also does a “long” fetch through extra vectors and code in ram. That does add quite a bit of overhead.
You could say that BASIC 7 has a “bad peek performance” 🙂

More speed, please!

Ok, let’s use something more mature… like the cc65 creating nice code for all our beloved Commodore machines.

#pragma static-locals(1);
 
#include <stdlib.h>
#include <time.h>
#include <conio.h>
#include <peekpoke.h>
#include "trproc.h" // that's in the provided archive
 
#define TOBEREAD 4096 // how many bytes should be read
 
static char tcode[33] = {
0x20, 0xB5, 0x24, 0xF2, 0x21, 0xF8, 0x24, 0xF2, 0x21, 0xFC, 0x25, 0xF7,
0x22, 0xF9, 0x46, 0x21, 0xFB, 0x24, 0xF2, 0x4A, 0xFB, 0x60, 0x07, 0x01,
0x02, 0x03, 0x04, 0x05, 0x06, 0x07, 0x08, 0x09, 0x0A
};
 
int main (void)
{
clock_t t;
unsigned long sec, kbps;
unsigned sec10;
 
int i;
char onechar;
 
clrscr ();
 
#if defined(__C64__) || defined(__C128__)
cprintf ("Expecting T2C= at 0xde00\r\n"); 
#elif defined(__PLUS4__) || defined(__C16__)
cprintf ("Expecting T2C= at 0xfd90\r\n"); 
#endif
 
/* Init Transputer - fixed to plus/4 dfeault for now */ 
init_t(); 
 
/* upload Transputer code */
cprintf ("Sending code to Transputer\r\n");
puttr(tcode, (sizeof(tcode)));
cprintf ("start reading %d bytes...", TOBEREAD);
t = clock ();
 
/* reading X KB byte by byte*/
for(i=0; i < TOBEREAD; i++) {
gettrchar(onechar);
}
cprintf ("done\r\n");
t = clock () - t;
 
/* Calculate stats */
sec = (t * 10) / 50;
sec10 = sec % 10;
sec /= 10;
kbps = TOBEREAD / sec;
 
/* Output stats */
cprintf ("\r\nDuration: %lu.%us (%lu byte/s)\n\r", sec, sec10, kbps);
 
/* Done */
return EXIT_SUCCESS;
}

But this time it just took 4.4/4.6/3.6 seconds on a 64/128/+4! 🏍💨 Four times faster than BASIC.

Are we there yet?

That looks promising and there’s still a C-compiler which we can optimize… read: replacing it with assembly code super-power.

For that I wrote a little macro-library for KickAssembler. Any other assembler will do, too, of course.
Besides the Transputer initialization and detection stuff there are macros for reading and writing a single byte, up to a “page” (256bytes) and the full 64K using two zero-page adresses… this is how we read the 4KB in the benchmark:

.label base = $de00 // define according to setting
.label inreg = base
.label outreg = inreg + 1
.label instat = inreg + 2
.label outstat = inreg + 3
.label reset = inreg + 8
.label analyse = inreg + $c
.label errflag = reset
 
		* = $C000 // or wherever you like
start:		
		inittr()  // macro init_transputer
 
		lda #$2E  // print a "." at 1/1 for debugging ;)
		sta $0400
 
		puttr_1page(bench, 34)  // upload the benchmark code
 
		lda #$00  // Set destination pointer to base ($8100)
		sta $FB   // in zero page
		lda #$81
		sta $FC
 
		gettr_big($FB, $1000) // get 4KB data and write it to $8100
 
		rts
 
		// code for benchmarking & testing (33 bytes)
		// The first byte is always 'sizeof(code)'
  bench:	.byte $21, $20, $B5, $24, $F2, $21, $F8, $24, $F2, $21, $FC, $25, $F7
		.byte $22, $F9, $46, $21, $FB, $24, $F2, $4A, $FB, $60, $07, $01
		.byte $02, $03, $04, $05, $06, $07, $08, $09, $0A

“Wrapped” as a SYS call into a BASIC program to stop the time – including the Transputer code upload and checking the input-status – this code takes 0.5 seconds to read 4KB and even with writing the read data to a defined memory area! 🚀
That’s 33 times faster than BASIC and still 8 times faster than cc65.

Getting one?

Still with me and you’re really interested in getting one of these?
Please go through this checklist first:

  • You’re aware that there’s no software for it yet
  • You’re aware that you have to code for the Transputer and are up to learning new things
  • You also need to write code on the Commodore side – assembly needed for maximum speed
  • Besides the T2C= you will need a TRAM. So you need to own/purchase one, too.

If you can answer all of them with “Yes”, “fine with me” and/or “sure!” I can provide you with a T2C= for €40 plus shipping.

I also have TRAMs available in different configurations:

  • My own design, the AM-B404  (size-1, 2MB SRAM): 50
  • Various manufacturers: size-1, 1MB DRAM: Ask me.
  • “bargain offer”: original INMOS IMS-B404 (size-2, 2MB): 30€
    (given their size, they will clog your T2C= completely)

available CPUs are:

  • T425-20: 25
  • T800-20: 35€

Shipping with tracking is
European Union 15€  (Just in case, for Germany it’ll be 7€ as “Paket”)
UK/Switzerland 20€
USA 27€

⇒ drop me a mail tonobody likes SPAM
(Sorry, you have to type that into your mail-client – nobody likes SPAM, so do I)

UMAX tuning

[UPDATE 2025 – got a CacheDoubler! 😍 See further down for added details]

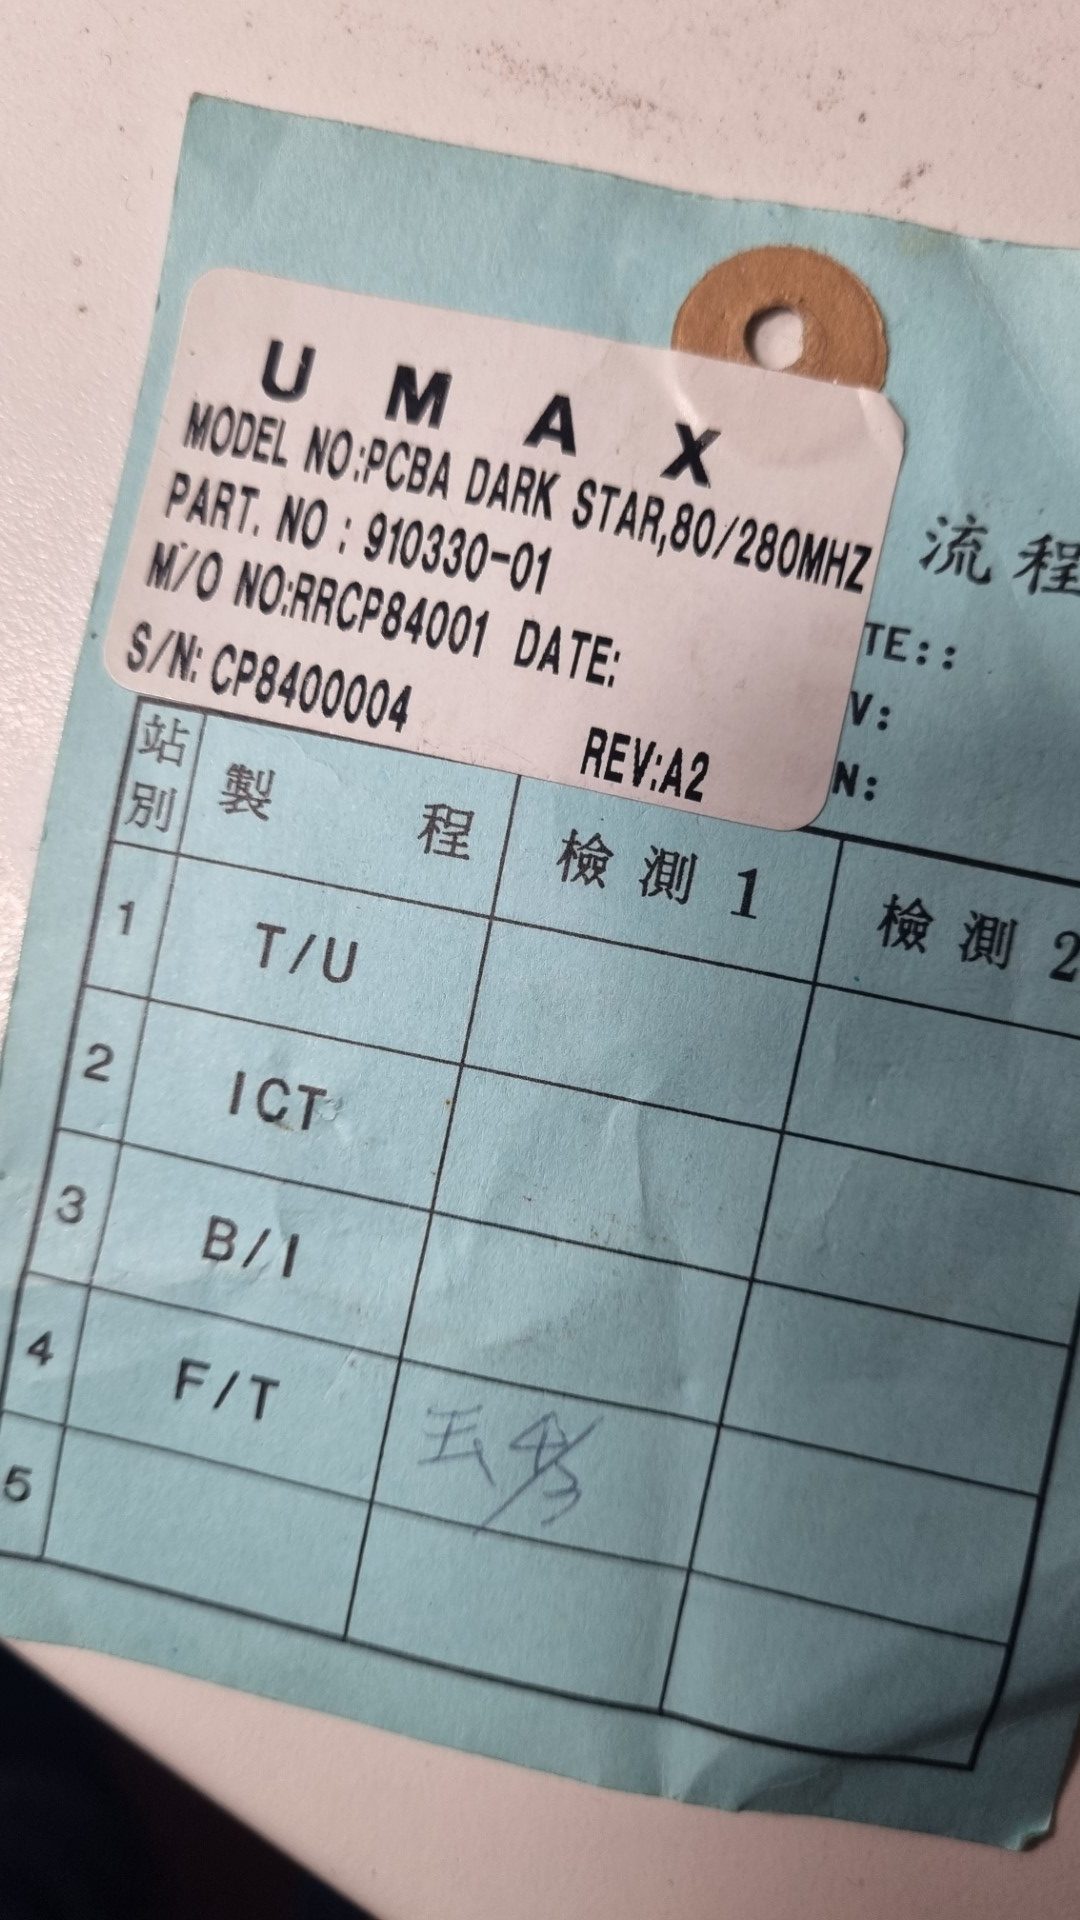
Apple Performa and PowerMac models 5400/6400 used a mainboard code-named “Alchemy“. The same board, sometimes with some changes, was used in different Mac clones like the UMAX Apus 2000 & 3000 series (SuperMac C500 & C600 in the US) and PowerComputing PowerBase.

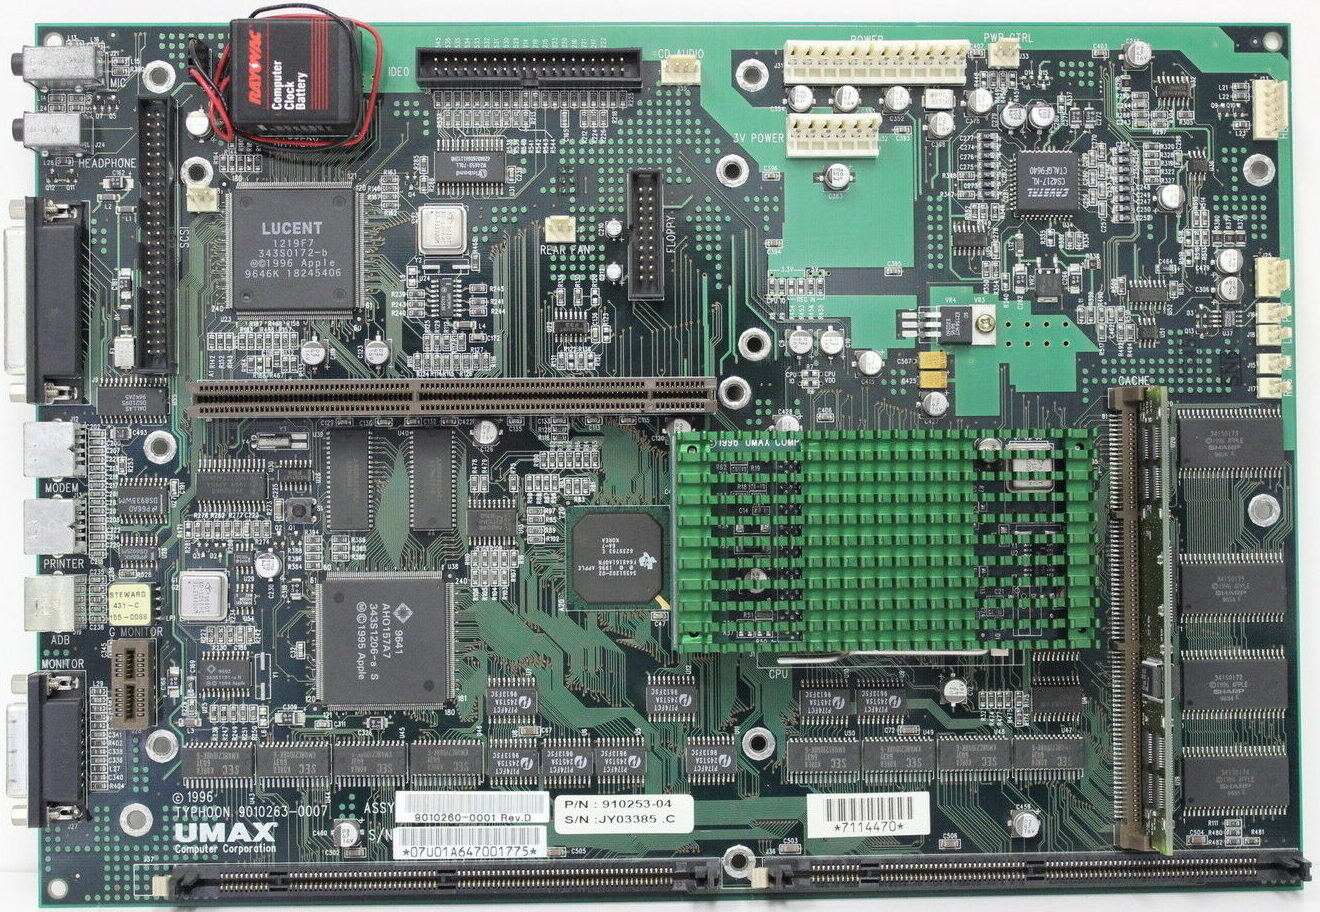
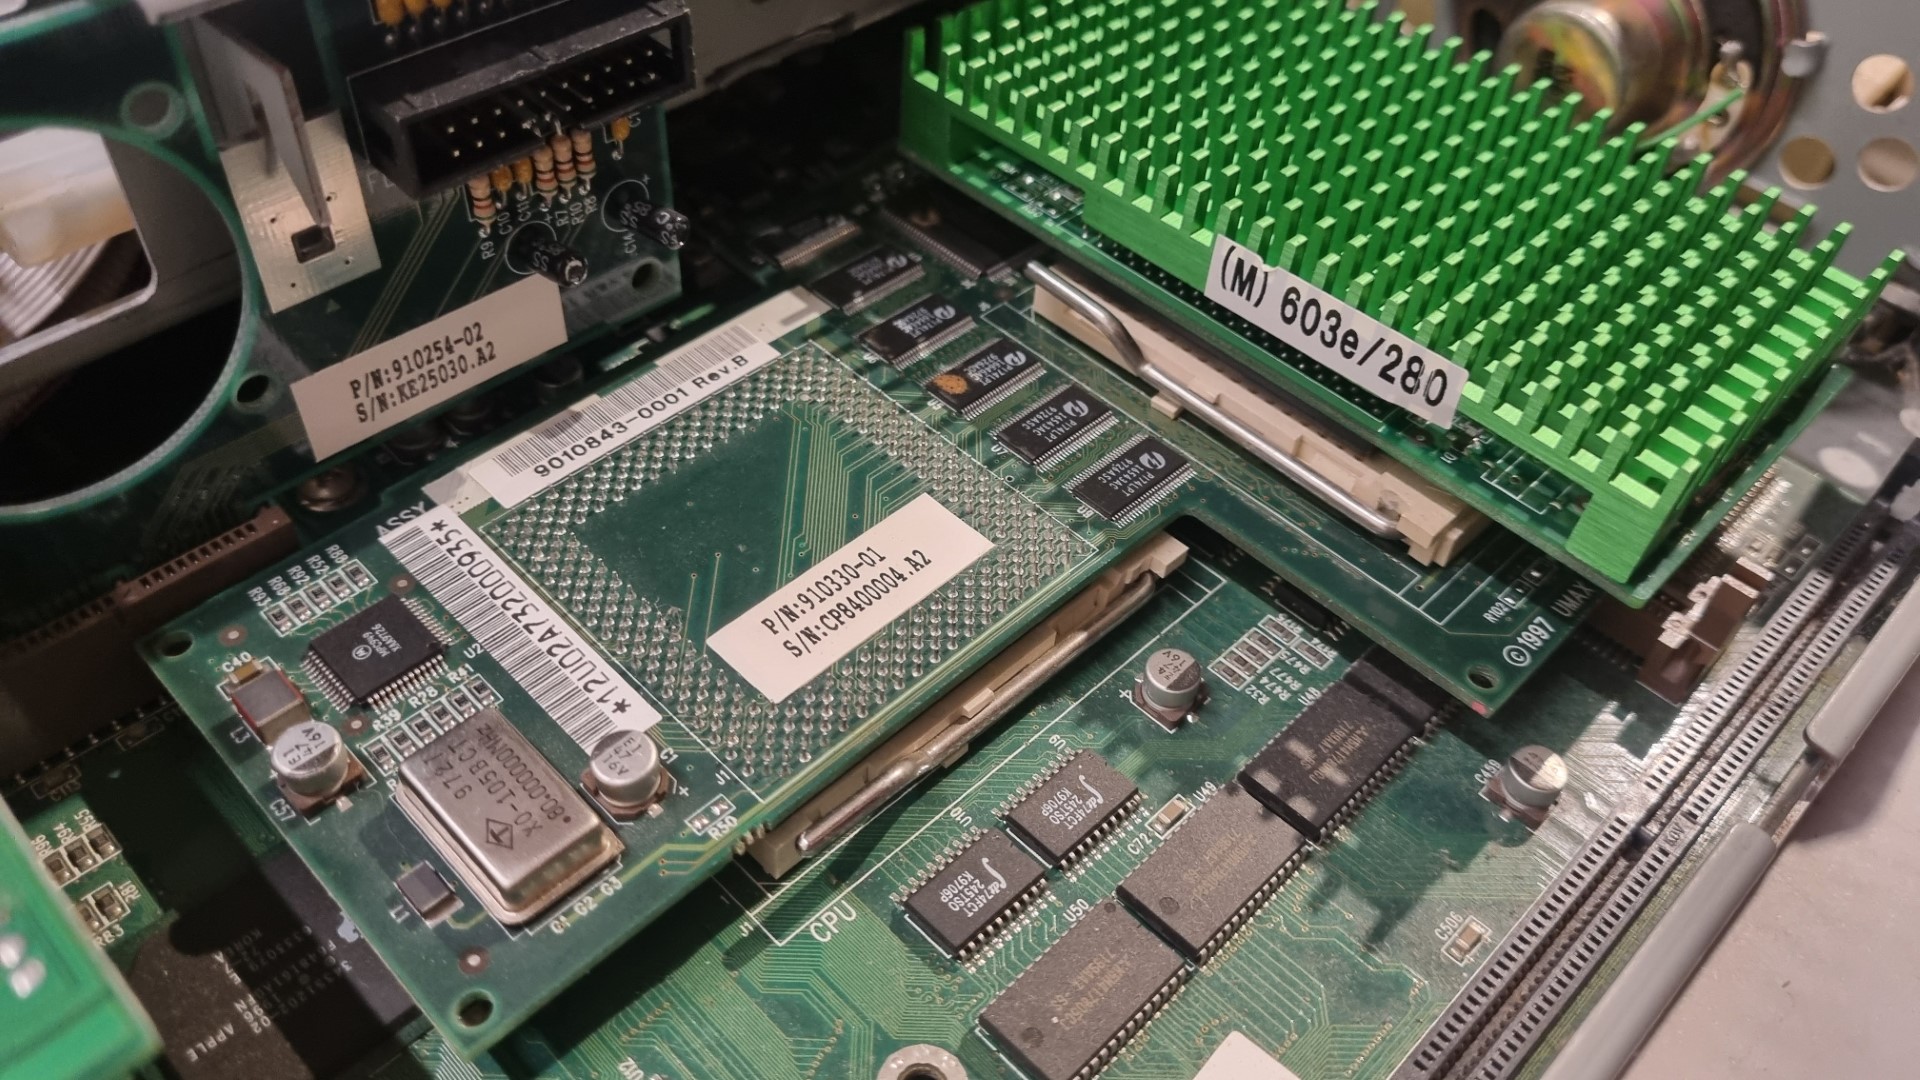
One fine day I got an UMAX Apus 2k, which uses a derivate of this board, re-cristened to “Typhoon” which you can see here in it’s full beauty:

Processor
  • Apple: PowerPC 603e
  • Power Computing: PowerPC 603e, 750
  • Umax: PowerPC 603e, 750
Only Power Computing and Umax can be upgraded
Systembus 40 MHz fixed
L2-Cache Slot for 256k or 512k L2-Cache
RAM 5V DIMM 168 Pin 60 ns (EDO)

  • Apple: 2 DIMM-Slots, 8MB on-board (136MB max.)
  • Power Computing: 3 DIMM-Slots (160MB max, Bank 1 only 32MB, Bank 2&3  64MB)
  • Umax: 2 DIMM-Slots, 16MB on-board (144MB max.)

To the limit!

So being the way I am… I had to optimize it. Jus can’t help it 😉
Here are the steps I’ve taken – in the order of making sense the most and being less difficult:

RAM

Simple rule: The more, the better.
This will get you the maximum performance – not in speed, but you can run memory-hungry applications without swapping (virtual memory) which is a major PITA and drags down everything.
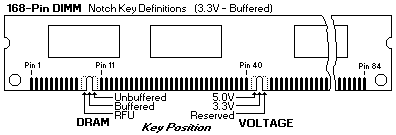
That said, finding the correct RAM is also a pain because this board uses now very obsolete 5V buffered 168-pin DIMMs. 5 Volt is already hard to find – but the buffered version is even worse.
You can check that by looking at the coding keys (“groves”) at the DIMMs bottom:

The UMAX/SuperMac board can handle two 64MB DIMMs… if you can find & afford them.

L2 Cache

A “Level 2” cache is a must-have on all PPC machines. AFAIK UMAX/SuperMac did not sell their clones without one – Apple certainly did.
If your machine doesn’t have one, get one ASAP!
If you can get a bigger one than the one you have, do so!

  • None to 256K – increases CPU performance about 30 %
    The overall responsiveness is dramatically increased
  • 256K to 512K – adds about 20% performance.
  • 512K to 1MB – need this SIMM! Mail me 😉

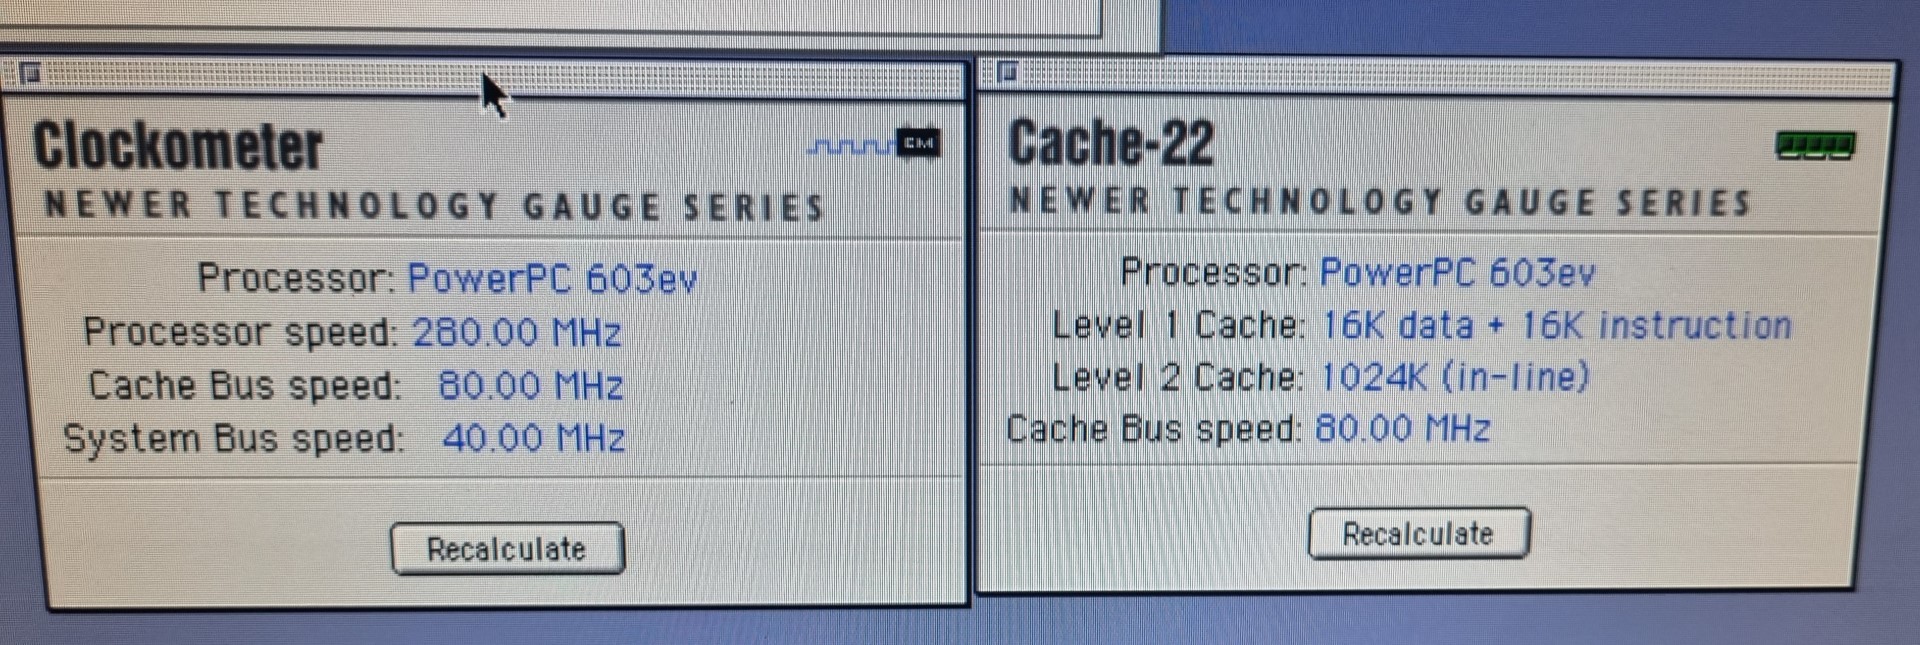
Umax offered an optional CacheDoubler PCB plugging between the  socket and the CPU. It features an 1MB L2-Cache and upped the bus-clock to 80 MHz. AFAIK it came as standard in the UMAX C500x/C600x models.
Of course these are unicorns now and rare as chicken teeth.

NB: There are some caveats about the L2 cache discussed further down…

Faster CPU

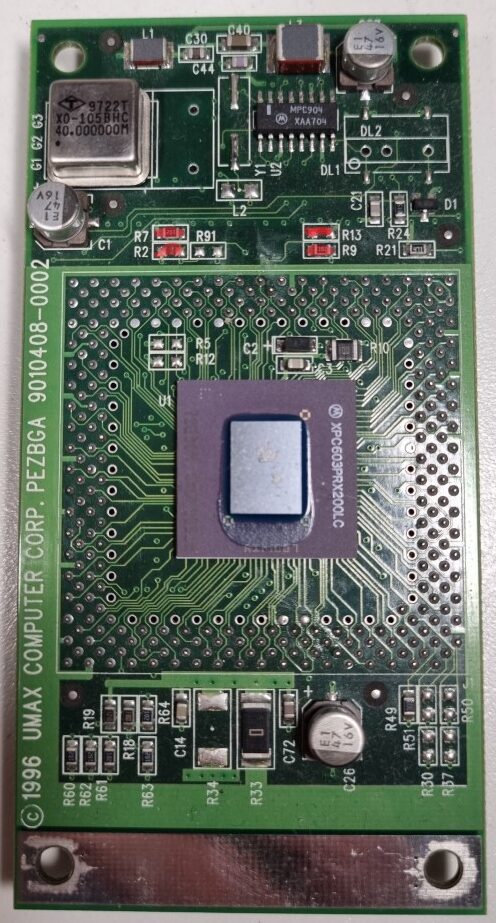
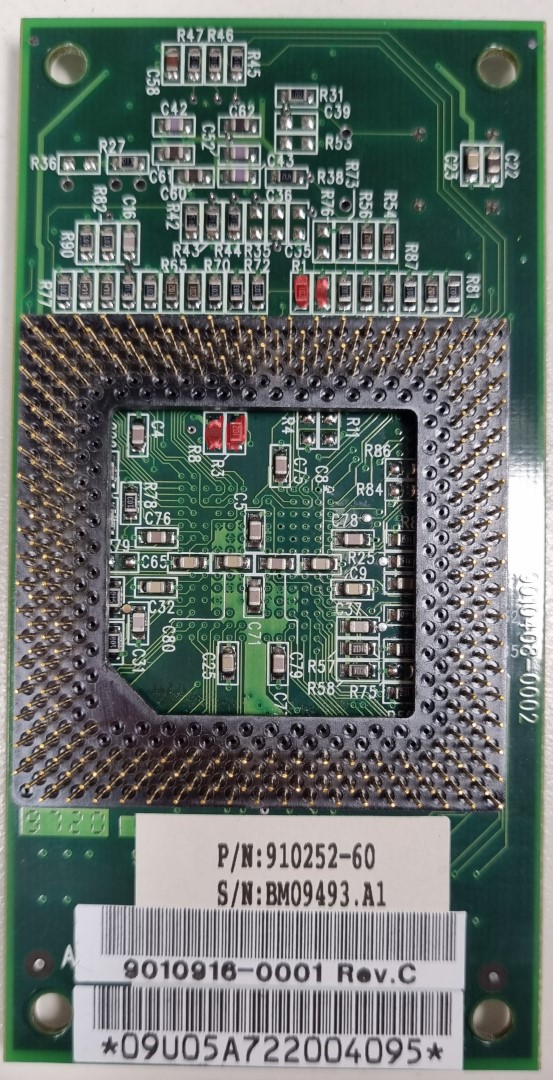
Yes, this board has a ZIF socket like the Pentiums did back then. And as such, you might be able to find a faster one. But unlike the Intel CPUs, these come on a small board covered by a big, green heat-sink.
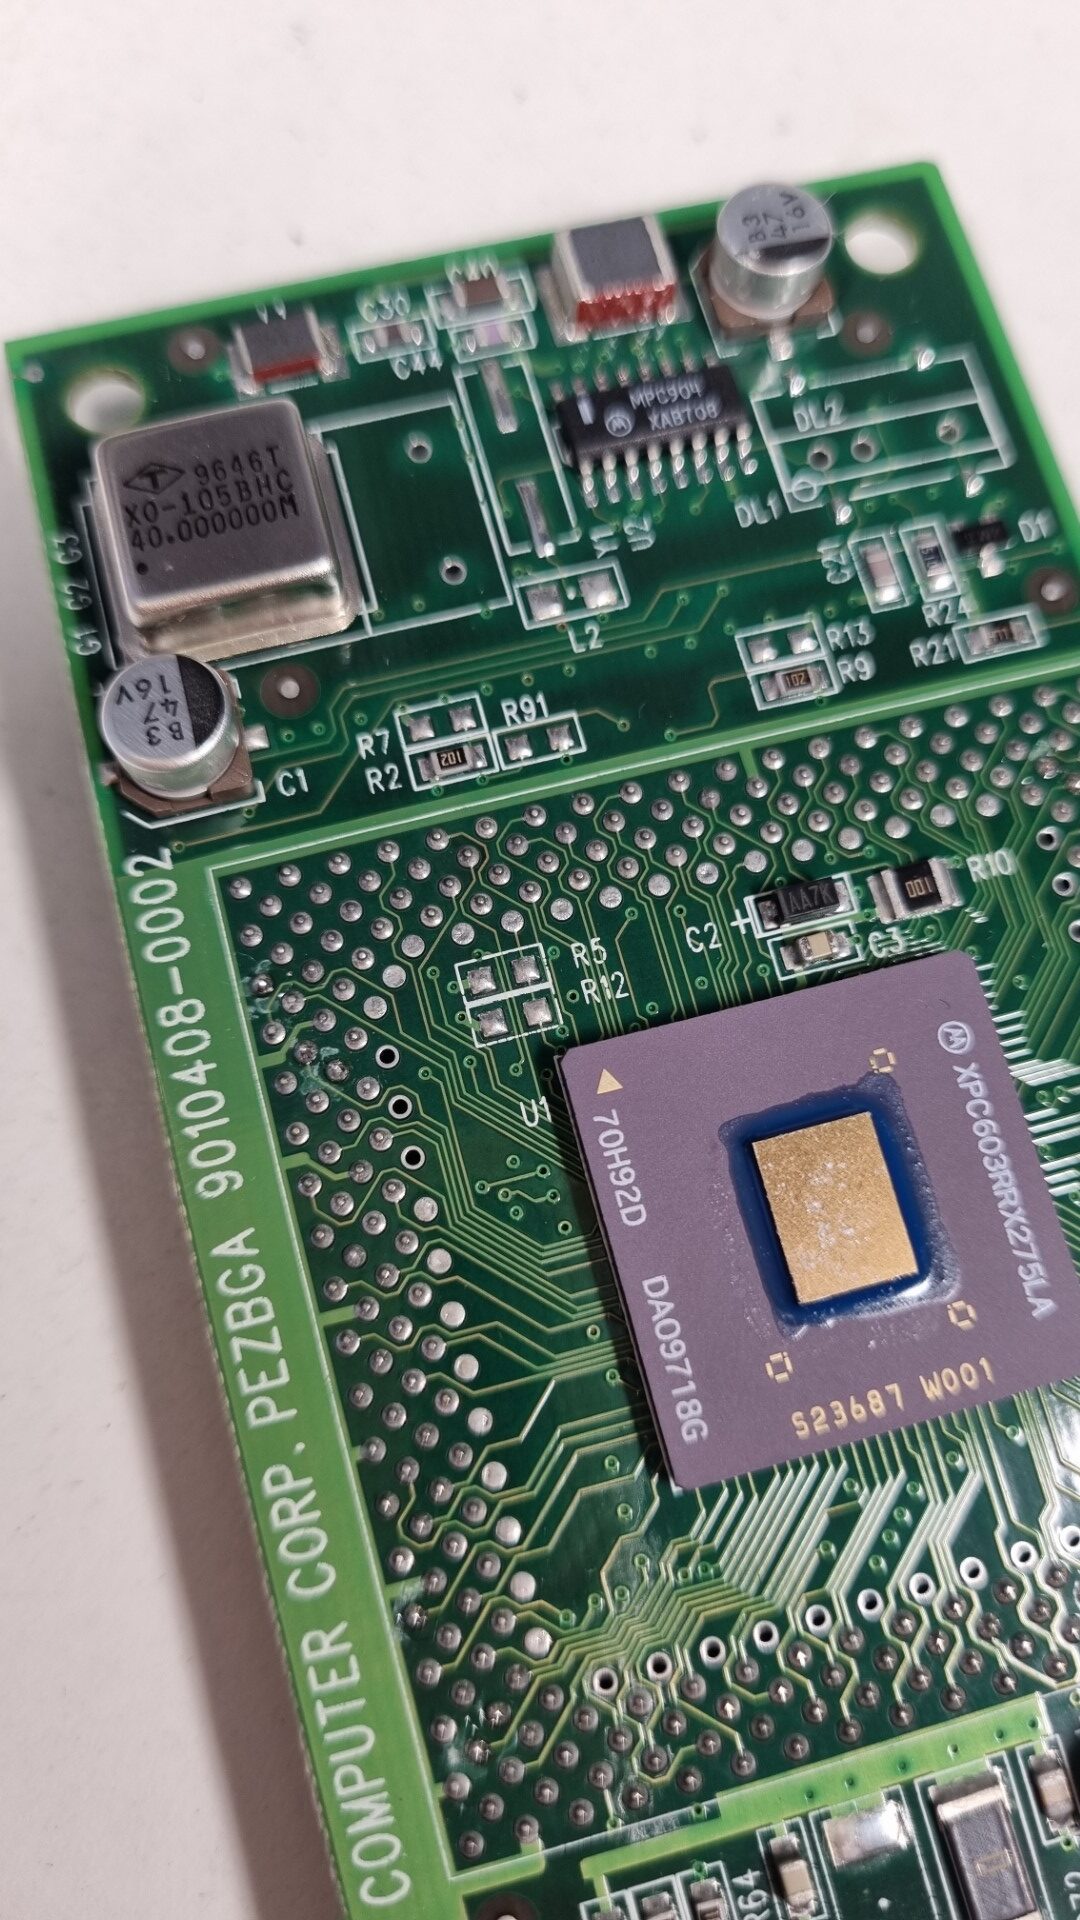
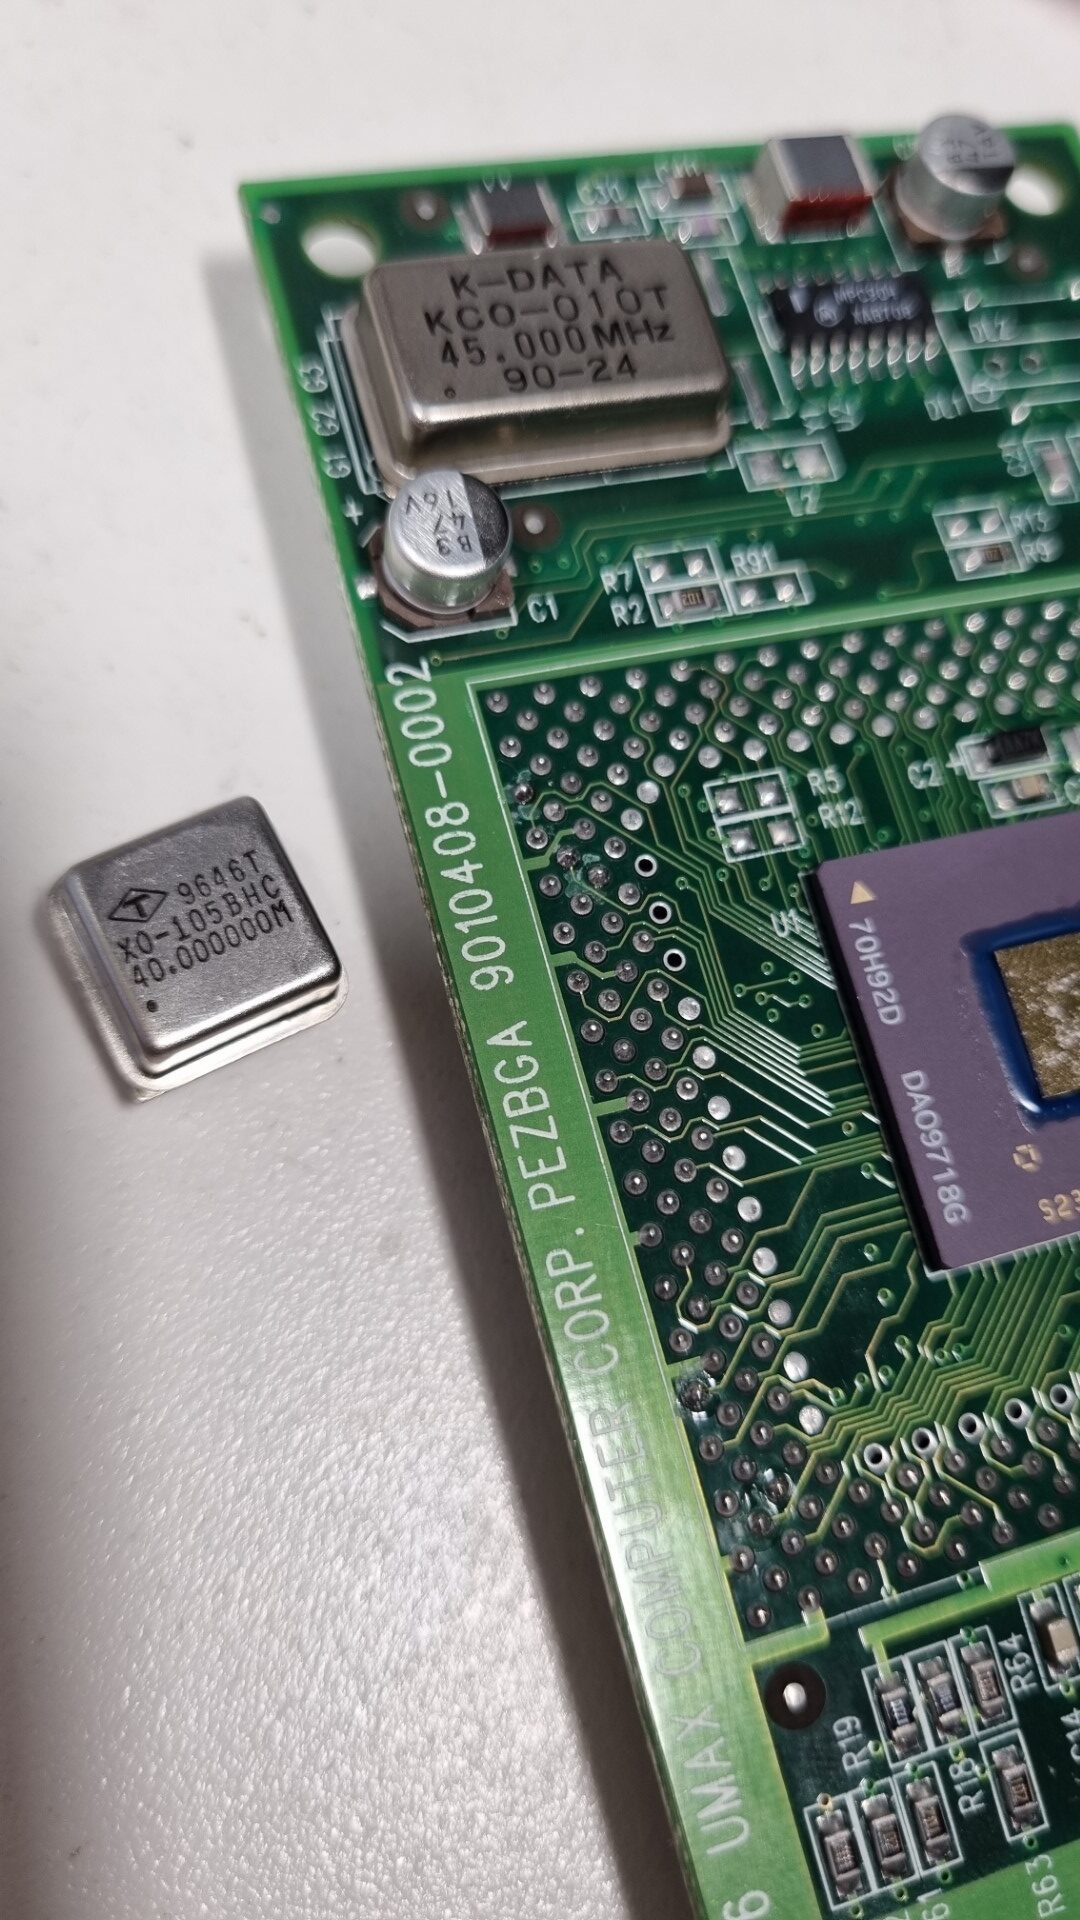
Underneath is the CPU (in BGA package) a bit of logic, caps, lots of resistors and an oscillator.

So even if you were unable to find a faster CPU you can still ‘motivate’ yours – read: Overclocking!

As usual with overclocking, every CPU has its limits. The experiences with the 603e(v) used by UMAX are:

  • 160Mhz to max. 225
  • 200Mhz to max. 240
  • 240Mhz to max. 270

How’s that done? Quite simple (if you’re ok with soldering 0603 SMD parts) by relocating some of 8 resistors which are on the top and bottom of the CPU card… marked red on the pictures below:

Use this table to change the CPU multiplier relative to the standard 40MHz bus-clock. There are also settings for 80-140MHz, but this is about overclocking so these make no sense whatsoever, right?

CPU Speed
160MHz
180MHz
200MHz
220MHz
240MHz
Busclock x
Multiplier
40 x 4
40 x 4.5
40 x 5
40 x 5.5
40 x 6
R1 [1.0k]
R2 [1.0k]
R3 [1.0k]
R9 [1.0k]
R6 [1.0k]
R7 [1.0k]
R8 [1.0k]
R13[1.0k]

Resistor color: Green = Bottom, Red = TOP
✔ = set, ❌ = not set

If the multiplier is not enough, you can also increase the bus-clock, too.
That way you can go up to a theoretical maximum of 300MHz 🔥

Oszillator 40.0MHz 45.0MHz 48.0MHz 50.0MHz
x4.0 160MHz 180MHz 192MHz 200MHz
x4.5 180MHz 202.5MHz 216MHz 225MHz
x5.0 200MHz 225MHz 240MHz 250MHz
x5.5 220MHz 247.5MHz 264MHz 275MHz
x6.0 240MHz 270MHz 288MHz 300MHz
As with the resistors, you’ll need some (de)soldering skills… but it’s a simple procedure: Old oscillator out, new one in. They were even kind enough to plan for a bigger oscillator case.

Before…

…and after.

For maximum bus-performance don’t use odd divisors like “x4.5”

☝ If you plan to overclock your bus to 50MHz or more you have to get a faster L2 cache…

Most 256K cache SIMMs seem to have an IDT7MP6071 controller using an IDT71216 TAG-RRAM which has a match-time of 12 ns (You can derive that from the marking “S12PF”” on the chip). That`s far too slow for 50MHz bus-clock. If you would be able to change the TAG-RAM to a 8 ns Part, it would probably work.
Bigger cache SIMMs seem to feature faster TAG RAMs. Here’s a nice thread on 68kmla.org on those SIMMs.

Finally, here’s a comment from an Motorola engineer referring to the Tanzania board (but same issue) I found in a corner of the web:
One final problem is the main memory (DRAM) timing. If the firmware still thinks the bus clock is 40 MHz (25 ns), it won’t program enough access time (measured in clocks) at 50 MHz (20 ns). There are resistors to tell the firmware what the bus speed is, so that it can program the correct number of clocks into the PSX/PSX+ to get the required 60 ns access time. For the StarMax, this means removing R29 and installing it in the R28 location for 50 MHz operation.”

I have no clue (yet) if and where those resistors are on a Typhoon board.

Update 2025

While I was asleep, my brother in arms Bolle wasn’t, so he saved the CacheDoubler which was on eBay for me! 😍
So after some days, look what the cat brought in:

a “Dark Star” Rev A2, aka the super-rare CacheDoubler… and in it went. Ahh, what a nice view!

Crossing fingers, power on, aaaaand:

Woo-Hoo! Full steam ahead ahead🚀!
Now the CPU is clocked at 280MHz as it was meant to be… interesting enough, my bus overclocking on the CPU module is completely ignored. So it seems that the 80MHz crystal on the CacheDoubler is overruling it – multiplying it by 3.5 to get to the 280MHz CPU clock.
There would be room for experiments e.g. setting the multiplier to 4 or up the bus to 85MHz, but a can hold myself back, given the rarity of this board 😎.

And if this would be enough of luck, I found a pair of 64MB 5 Volt EDO DIMMs nearly the same day Bolles package arrived.
So this little UMAX x500 / APUS 2000 is now filled up to the brim.

Conclusion

So, what have I done in total?

I added as much RAM I was able to find (16MB on-board, one 16MB and one 32MB DIMM two 64MB DIMMs) to get a total of 64MB 144MB which is just OKish frickin’ awesome for a 603 PPC Mac

I wasn’t able to (yet) find any bigger or faster L2 cache than the 256KB I already had installed. So that one stayed as-is.

One megabyte of 80MHz inline L2 cache, baby! All my sub-G4 PowerMacs hate this litte UMAX for that 😉

I replaced my stock 200MHz 603e CPU with a module containing a 275MHz 603ev (Even the label says 280). It has its multiplier set to 6 already… so running on a 40MHz bus is runs at just 240MHz.
My wild guess is that it was meant for the CacheDoubler mentioned above and switched to a multiplier of 3.5… [you guessed right, Axel]
So I upped the bus-clock oscillator to 45MHz resulting in a 270MHz clock – 5Mhz below the CPUs spec but the bus is not stressed too much… the system runs stable and I measured a comfortable 45°C/113°F on the heat-sink.
This mod will be ignored by the CacheDoubler. So even the modded CPU module now runs at 280MHz.

Here’s a Speedometer 4.02 comparison of before and after:

This shows that every CPU benchmark ran more or less those 35% faster, which are the difference of 200 vs 270MHz – even the Disk and Grafics performance increased between 7% and 10% which is also due to the increased bus-speed.

How does that fit into a greater perspective? Let’s compare to the Macbench numbers provided by user Fizzbinn in the 68kmla forum:

My system sorts itself 29% above the 240MHz machine concerning CPU performance… but FPU is less?!? No idea why that is.
Disk is probably a faster model than mine (WD Caviar 21600).

with CacheDoubler these numbers went up even more:

506 CPU (+37%)
474 FPU (+11%)
331 Disk (+12%)

Pretty nice for an 603e, huh? Yeah, that’s still way behind the crescendo G3/400  L2 accelerator… but therefore it’s all Supermac original 😉

What else

Well, 2 PCI slots… one for a standard 100Mbps NIC and the other one got a VillageTronic Picasso 520 which fits nicely in a System 8.5 Mac.
I tried a PCI USB card… that lead to constant boot-crashes. I should have google’d that first, else I would have known that “Although CacheDoubler does great things for performance, field reports indicate you cannot use a USB PCI card with CacheDoubler installed.” 🙄

All my benchmarks were made with the original 1.6GB Western Digital IDE harddrive… which started to knock after a lot of read/write and installation experiments. So I tried other solutions:

  • BlueSCSI – works fine but is quite slow (124% in MacBench 4.0)
  • IBM DDRS 34560 – 4GB SCSI harddrive, pretty noisy but at least 279%… still slower than the IDE
  • Found a super silent 40GB IDE drive (Maxtor “DiamondMax Plus 8”) in my “Garbage Pile” (aka basement) which was detected by Mac OS immediately. And it delivered a whopping 508% speedup against the PMac 6100 base.

So this Maxtor hard drive will be the system drive. HFS+ 40 Gig should be enough for experimenting.


NumberCruncher Reloaded Software

“Real” applications for your NumberCruncher Reloaded

I prepared an archive, containing all applications (I was able to find) supporting an Apple II FPU accelerator card in some manner, i.e. natively or via SANE.
These were commercial programs back in the days and were not provided with the card itself – to learn more about the basic tools which came with the card, visit the NumberCruncher Reloaded main post.

You can Download all presented applications as ShrinkIt archive or ZIP file

Obviously, they’re mainly math packages… and sad but true, as for now they’re all Apple IIgs programs:

GSnumerics (by Spring Branch Software)

GSnumerics

Symbolix (by Henrik Gudat of Bright Software)

Screen Shot

jazGraph (by Jason Perez)

MathGraphics (by Dirk Fröhling)

saneglue (by Söhnke Behrens)

From the README: “lsaneglue is a library that contains code to let you call SANE funtions directly from ORCA/C”.
This lib provides convenient functions like findfpcp() and most calls to floating-point operations.

I hope that due to the availability of the NumberCruncher Reloaded this software collection will get some new addition by enthusiasts of the vivid Apple II retro scene.

NumberCruncher Reloaded Details

Because the main page of the NumberCruncher Reloaded grew bigger and bigger, I’ve split the FAQ and programming stuff in this separate post.

FAQ

Q: Which Apple computers are compatible with the NC-R?
A:
I’ve tested the NC-R in my IIgs and IIe. Those work for sure.
The original FPE was communicated as being compatible with the II and II+, too. I don’t have those machines and while the compatibility is highly possible, it has yet to be proven.

Q: I’m experiencing crashes and instant lock-ups starting programs which are supposed to use the NC-R
A: Most likely your software is expecting the FPE/NC-R in another slot.
For speed sake, most current programs naively supporting an FPU card, expect the card in a certain slot. Especially the SANE INIT.
So please check if your NC-R is installed in the correct slot and try other programs if they are crashing, too.
I recommend the Mandelbrot program provided on the NC-R Tools disk. This program scans all slots for a FPE/NC-R by itself.

Q: What are these LEDs for?

  • The green BUSY LED blinks at every access to the FPU.
  • The yellow INFO LED doesn’t have a proper job yet. Currently it’s connected to DEVSEL, so you can see it blink very briefly, when your Apple II scans its bus.
  • The red ERROR LED will be lit when the FPU encounters a so-called ‘protocol violation’, i.e. there’s some problem in the communication between the Apple and the 68881/2.
    See page 30 in the manual for more details.

Q: And for what use is that 5×2 pin-row at the cards back-edge?
A: That’s the connector to update the firmware if that should ever be nesseccary. For now there’s just the one version which is installed.

Q: Can I make the NC-R go faster? What about overclocking?
A: Not really. See the ‘Benchmark‘ section further down.

Q: On the pictures of the NC-R I can identify a 40MHz Motorola 68882. Do all NC-R have such fast FPU?
A: No. I use whatever 68882 is available on the market. Strangely enough, sometimes a 40MHz version is cheaper than say a 16MHz.
So whichever version is installed in your NC-R, it’ll be fast enough and always clocked at 16MHz anyhow.

Q: How can I write programs using the NC-R?
A: This is an extensive question which can’t be answered satisfyingly in an FAQ. Refer to chapter 3 of the manual to learn how the NC-R works internally and how to program it in assembler, C or even Basic.
But I’m also thinking about a dedicated post about just that matter.

Q: I wrote a small program to test the NC-R and it’s not really faster than using SANE on my IIgs
A: There’s a certain amount of calculations need to be done until the NC-R shows its performance. A single addition probably takes longer than it would need on e.g. a stock Transwarp GS because all the communication overhead.
This dramatically changes if you have lots of floating-point calculations in one stream, optimally using the 68881/2 internal registers.

Q: Are you writing software for the NC-R
A: Well, maybe in the future but currently I’m busy with other projects.
But so much can be revealed: Brutal Deluxe has its NC-R already 😲

Q: How can I ask you a question / get help / praise / complain / rant about the NC-R?
A: I reactivated my little Forum on this page. Therefore it got its own Apple II board.
This way everybody can participate in your question or complaint… speaking of complains: Do not complain that you have to register and that it took so long for the approval! This is a one-man show, there are time-zones and despite other rumors, I do have a job 😀

Q: Why did you chose green for the PCBs colo(u)r?
A: It’s a remake. So  it should at least somewhat resemble the original look. Also given there are translucent lid/case options available today I personally don’t like the idea of a motley bunch of green/blue/red/white cards standing out of my Apple II… yeah, I’m old-school 👨‍🦳