Tag Archives: Helios

ARM eval boards and Helios

     “Every end implies a beginning.”

This post started out as a special Helios article, but given the rarity and historical importance of the used hardware, it’s now somewhere between the worlds of OS and Hardware – and the combination marks the end of an operating system and the launch of an incredibly successful processor family.

Helios is most likely already one of the loneliest OSes on the planet… I estimate about 10-20 active Helios installations of the Transputer version currently running. But the Helios ARM version supposed to run on my VLSI ARM eval boards is probably the only one on planet Earth.

Quick history digression

Talking about lonely… The  eval boards we’re discussing here, the VY86PID family, was what you could buy from VLSI. VLSI  founded  ARM Ltd. together with Acorn and Apple.
So you’re actually looking at the birthplace of your mobile phones processor right now. This is, where it all started!

When you’ve planned to build a computer based on VLSIs range of ARM CPUs back in the days – most notable the ARM6xx, 7xx and ARM7500 series – you got a VY86PID board . And because not many did – mind the Acorn RiscPC and Apple Newton – those boards are rare as hens teeth today. Googling for it will most likely bring you back here 😉
There’s just one good, original source of information left: The page of Art Sobel himself, Hardware Applications Manager for Embedded products at VLSI Technology, father of the boards discussed here.

Last question: “Why VY86PID? That sounds Intel’ish, like the x86 family.”
Well, VLSIs official name for their ARM IC range always started with VL or VY86… so  for example the fist mass-produced CPU, the ARM2, was officially called VL86C010. It’s memory controller was VL86C110 and they used  VY86C610 for the ARM610.  Only with the introduction of their last ARM CPU, they changed it and called the ARM7500 VY27073B

Hardware

But now, let’s have a look at the eval boards first…
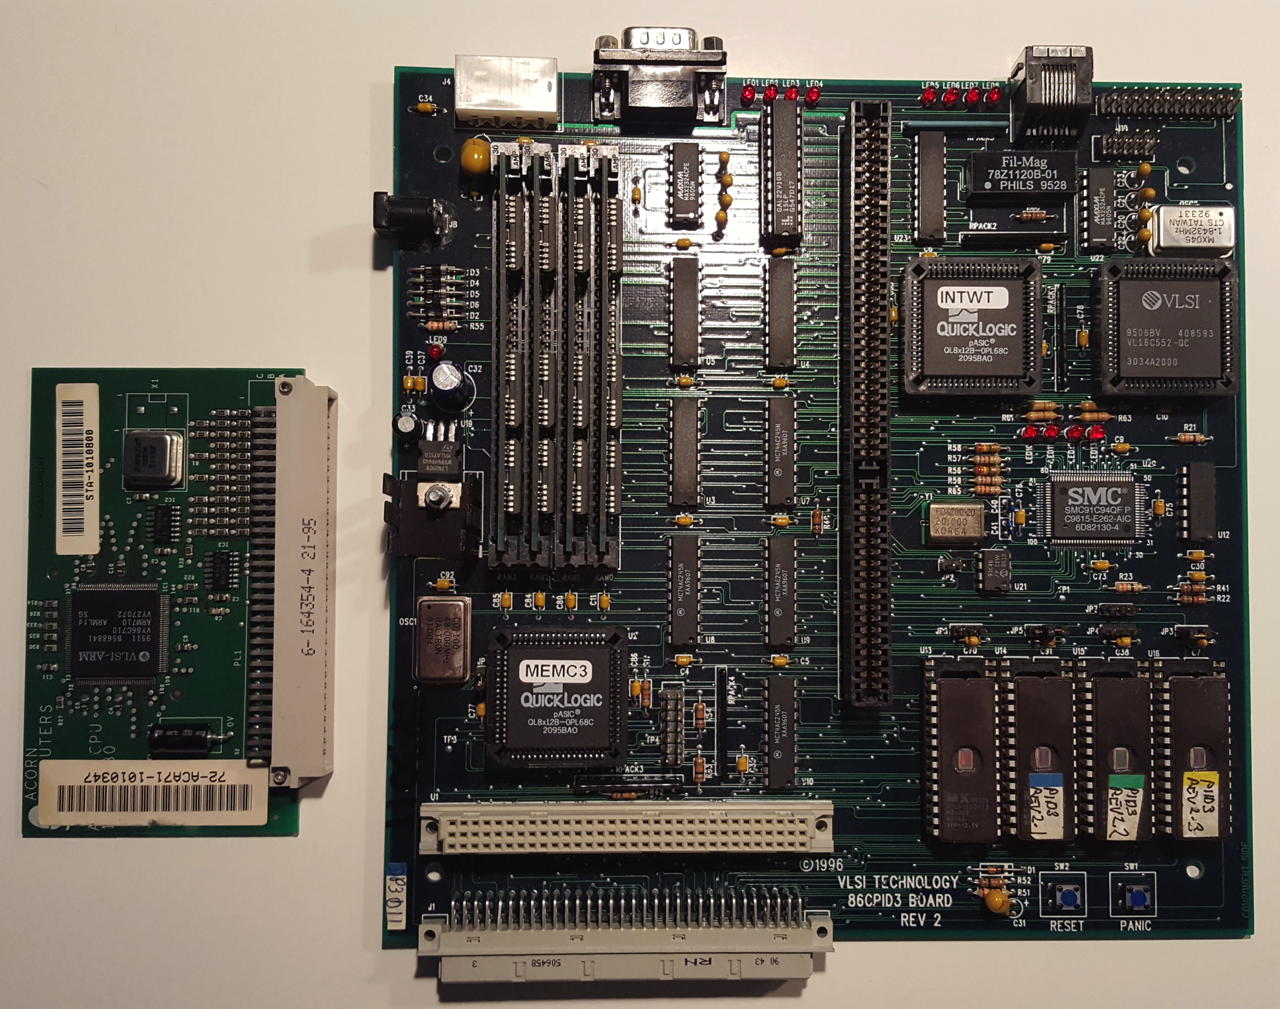
VY86PID 2

This is the earliest implementation of a PID I ever saw and own. Its components are:

  • ARM600 CPU at 30MHz – soldered onto the board
  • 4 SIMM slots for 1-16MB RAM
  • MEMC3 memory controller on a 12MHz bus
  • ‘INTWT’ INTerrupt (With Timer) controller (Maybe a VL86C410 derivative)
  • VL16C552 Serial/Parallel controller serving an on-board connector each
  • 128KB-1MB ROM (jumpers used for setting the size)
  • one ISA compatible expansion slot
  • 4 status LEDs, Reset- and Panic-buttons
  • an empty PLCC68 socket for the FPA10 FPU from GECPlessey
  • edge-connector to connect a ‘logic analyzer probe board’

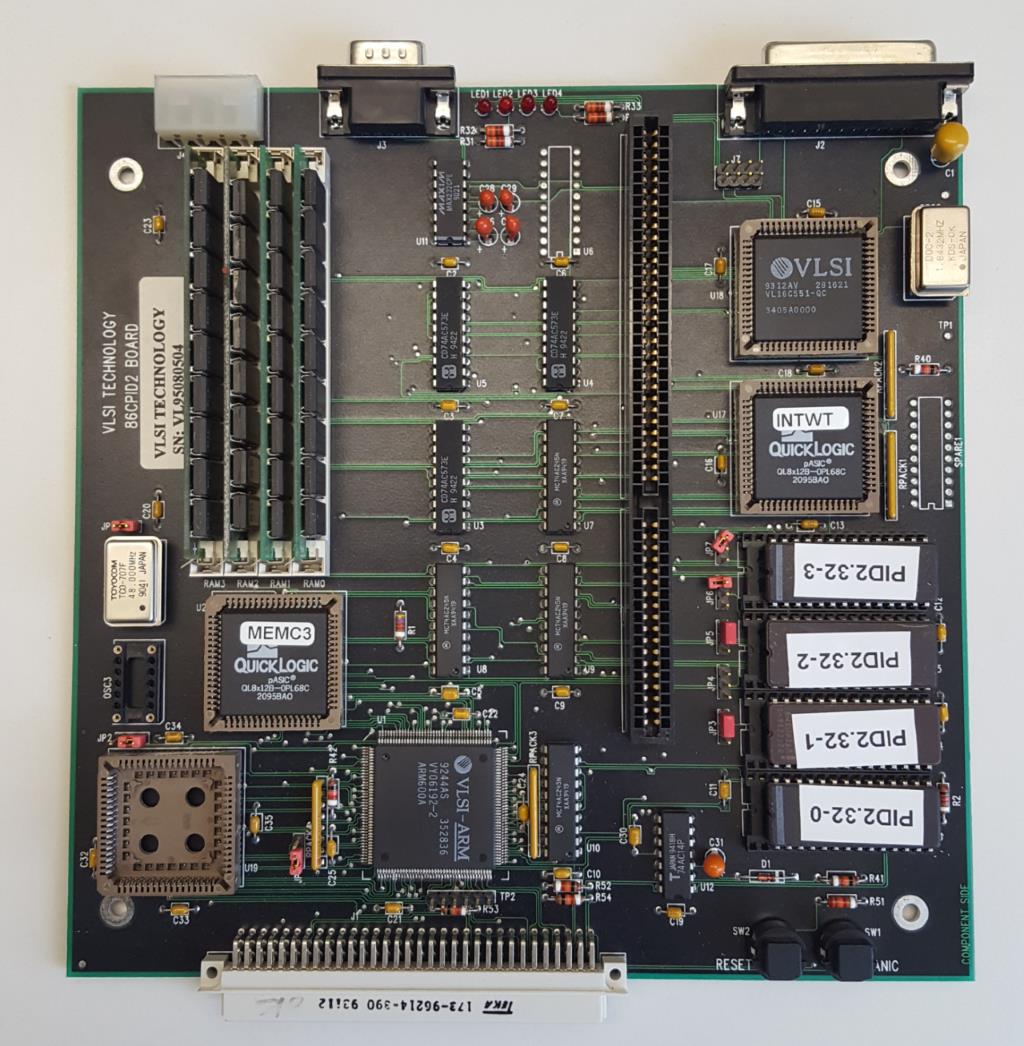
It’s worth mentioning that both controllers, the MEMC as well as the INTWT were implemented in QuickLogic ‘pASIC’ QL8X12B 1st generation FPGA. That’s about 1000 gate arrays – tiny in today’s measures. That’s interesting as the MEMC was available as commercial ASIC already – but it that could only support 4MB explaining the appended version number “3”.
Also, take note that the PID2 uses an ARM600, not the later widely used 610 (RiscPC, Newton 1xx series). The 600 features support for a floating point co-processor, ARM Ltd. usually used the term floating point accelerator – this was only supported with the ARM600 & 700 and later integrated in the ARM7500FE.

VY86PID3

This is the PID3, sometimes also written PID III – this time it’s processor-independent for ARM610, 710, and 810 CPUs, featuring a connector for a CPU module which is 100% compatible to the ones used in the Acorn RiscPC.
Most parts are similar to the previous PID – even the FPGAs – so these are the notable differences:

  • No CPU on-board – instead it offers a slot
  • 10BaseT Ethernet port (SMC 91C94) with 4 status LEDs
  • the empty PLCC socket was removed

Luckily I got an extensive manual with it, even containing all the schematics. Boy, those were the days, when manuals were real manuals!

vy86pid3b

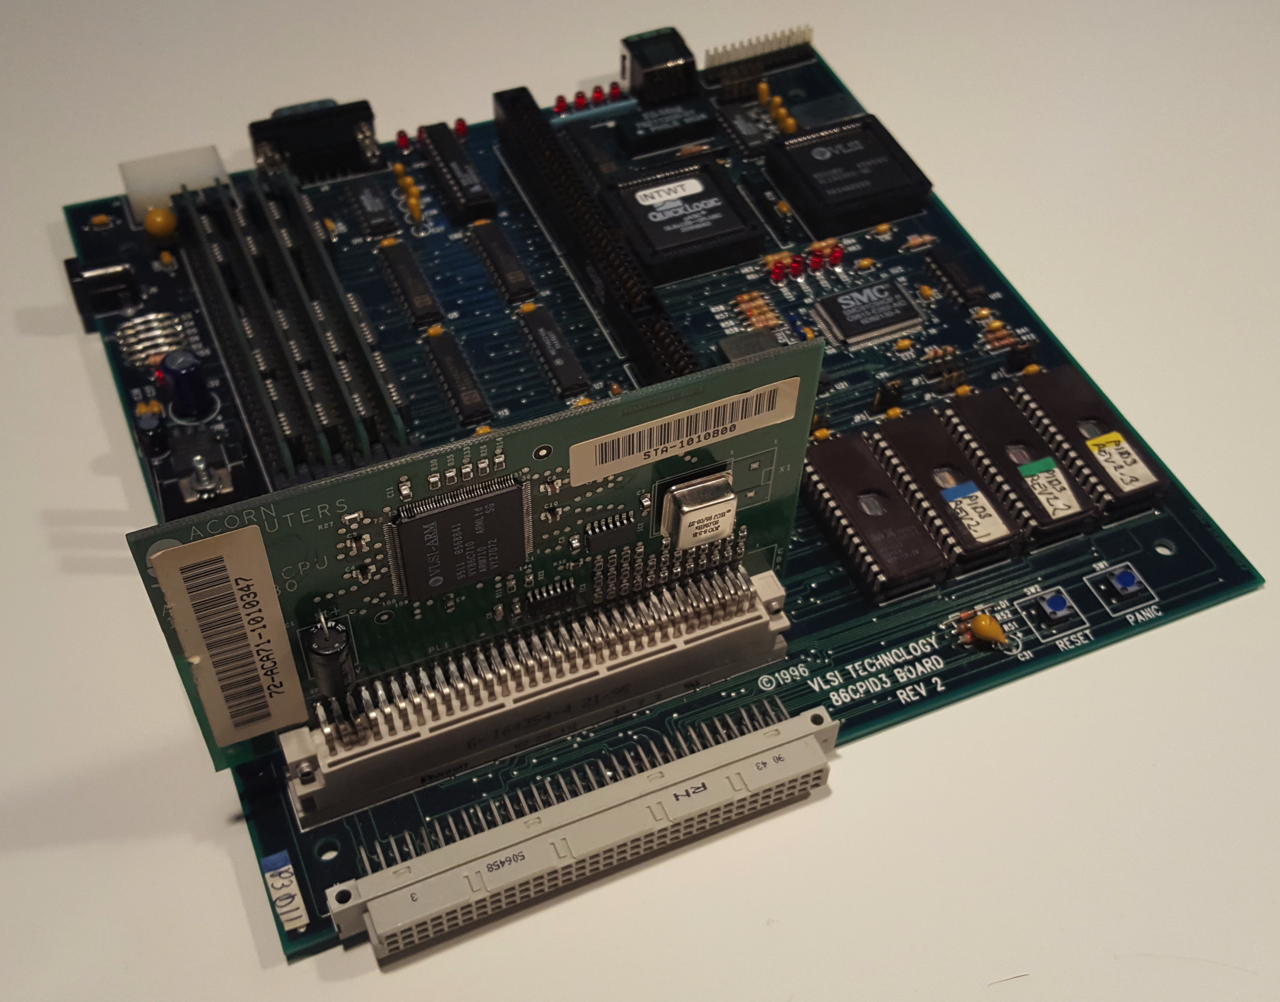
The PID3 with (dis)connected CPU board (it’s an ARM710 card from Acorn RiscPC)

vy86pid3a

So far for the hardware. Both run a rudimentary monitor program from ROM – so let’s have a look into that…

Software

Out of the box the PIDs run a monitor program called “DEMON”, short for DEbug MONitor.
As with most single board computers (eg. Motorola VME boards) those monitors are more or less command-line BIOSes with some debugging features (read/write memory & registers) and are mainly used to load binaries and start them.


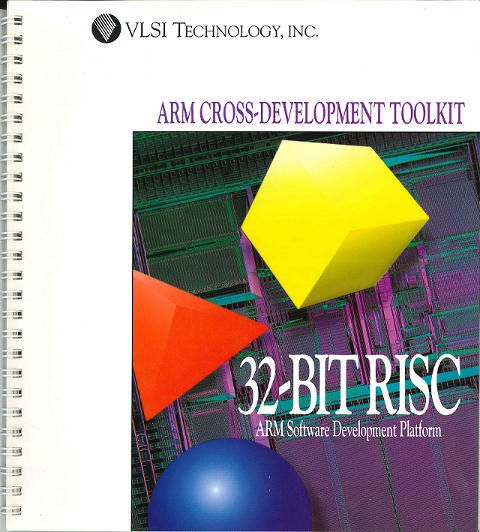
The toolchain which came with the eval boards is available here. It even includes a (cross)C-compiler and libs in source!

Helios (so far…)

This was the reason why I bought the boards – getting Helios run on ARM. The original Helios sources which I’m hosting on github also came with a kernel for ARM, specifically the Acorn Archimedes and, well, the PID2…

Historical side note: Why Helios on ARM?

Well,  at the time this port was done it became obvious that the INMOS Transputer wasn’t developing as fast as other CPU families did and so Perihelion, like other INMOS customers,  turned towards alternative architectures.
Also they looked for more profitable market: “The emphasis by this time was to make an embedded real-time system rather than an interactive Unix clone” [Nick Garnett, designer of Helios] Set-top boxes come to my mind… and later SGS-Thomson was quite successful in that area with their Transputer based ST20 family.

There are 2 supposed ways on getting Helios onto a PID – both using an RS232 connection:

  1. load the kernel through the Helios server (that’s the DOS/Unix terminal tool) which then talks to the DEMON or
  2. Have Helios burned into EPROMs instead of DEMON.

I wasn’t able to get the EPROMs work (binary image here) – or more precisely, connect to the system. It didn’t accept connections from the server, even the readme says so. The LEDs a showing a heartbeat pattern, so I assume the kernel is running – but without a shell connection I can’t tell more.

The alternative way by uploading through the server looked more promising… I got it stable at 38400 baud and using the debug flag (ctrl-shift-c) I could see the bytes flying upwards…

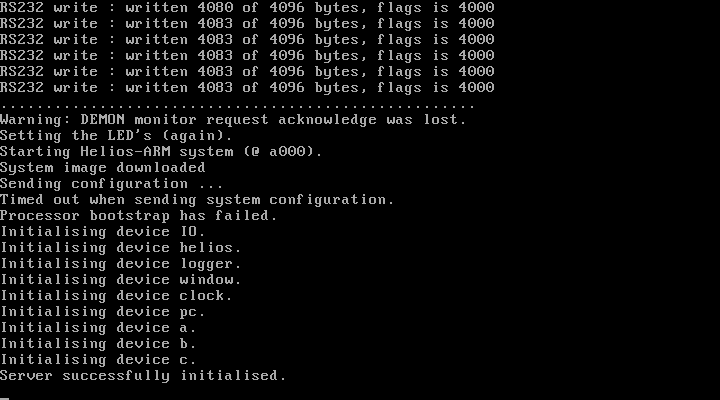
…but then it looses the connection, misses an ACK and then  fails to send the system config.  The server – while successfully initialized – then sits and waits forever  😥

To be continued…

Sparky 2

Meet Sparky 2, my main Solaris box. Yeah, Sparky2 isn’t exactly a roman or greek mythical figure, even the ‘sun theme’ would give you hundreds of possible god, godess and daemon names but there’s a reason.
Sparky2s main reason d’etre is Helios core development. As far as my research in the sources went, Perihelions main dev-box was called Sparky – so to honor their work I continued to use this name.

Hardware

Sparky2 is actually the 2nd incarnation of my Solaris dev-box. “Sparky-1.5” was/is a lovely SparcStation 20, dual SuperSparc-60 CPU, 384MB RAM and even a on-board CG14-Framebuffer.
But that beast is just loud. Loud fans and a loud SCA-SCSI drive. As with most of my vintage computers, I was thinking and planning to replace everything to make it nearly noiseless but while the power-supply fan was doable, the hard-drive replacement would result in unjustifiable costs… and still it wouldn’t been any faster then.

So here it is, the ultimate “Solaris-Box-which-can-run-even-in-your-bedroom™”: A Blade 150.

case

Yes, you’re right, pretty recent stuff (2000-2006) for Axels ususal crap equipment, and in a Sun hardware evangelists view, it’s not even worth being called “a SUN”, but I needed it to run silent, and because the Blade 100/150 series is mainly build from standard PC parts, it’s perfect for noisless tuning.
It comes in a small ATX-desktop case, uses IDE drives, a standard ATX power-supply, standard PC133 ECC DIMMs (cheap these days!) and the 650MHz UltraSparc IIi CPU is fast enough to compile any vintage project in matters of minutes and not hours.

internals

So out went the power-supply fan as well as the case-fan in the front and both were replaced by my noise-killer-of-choice: BeQuiet! fans.
The supplied Seagate IDE drive is already very silent, so I didn’t replaced that by some IDEtoSDCARD adapter or even a SSD (no, it wouldn’t be faster, the interface is ATA66).
As for the CPU-fan I was told that some (more silent) NVIDIA fans perfectly fit – need to try that later found a better solution, see post below.

Software

Depending what you’re planning to do with it, a blade supports IIRC Solaris from version 7 up to 10. In my humble opinion Solaris 8 is the best OS to fiddle around with vintage sources: “Modern” enough and still featuring SunOS 4.1.x compatibility through the ‘SunOS Binary Compatibility Package” (called SUNWbcp).

While not necessarily needed for vintage coding, I still think it’s a must-have: pkgutil from the OpenCSW project – especially since Sunfreeware is unixpackages.com now, which isn’t free anymore.
Contrary to this, pkgutil is the ultimate & free package-manager and just works as you might got used on other platforms (yum, ipkg and such). It’s much of a relief when you finally got basics like bash, less and another-editor-than-vi etc. Here’s how to get started.

Most important of all, you’ll obviously will need gcc. I had good results with GCC 2.95 which is not available on OpenCSW, but if you know how to Google, you’ll find it for sure 😉

Troubleshooting

This post is constantly growing, it’s mainly for me remembering not making some fu**ups again… but it might be useful for you, too 😉

Debugging the server

Booting Helios with server.exe you can provide a couple of debugging switches to see what’s going on:

  • A – All. Either enable all debugging, or disable any debugging which is currently active.
  • B – Boot. Give a progress report while the root processor is being booted.
  • C – Communications. Monitor transmissions to and from serial lines and similar devices.
  • D – Delete. List all files and directories being deleted.
  • E – Errors. Report any error messages generated by the I/O server.
  • F – File I/O. Give details of miscellaneous file I/O activities such as renaming files.
  • G – Graphics. Report any graphics transactions.
  • H – Raw disc. List sector reads and writes on a raw disc device.
  • I – Initialisation. Give a progress report as the I/O server initialises its various component servers.
  • J – Directory. Show details of any directory accesses.
  • K – Keyboard. Report any key presses.
  • L – Logger. Cycle the error logging destination between screen-only, file-only, and both screen and file.
  • M – Message. Report all messages sent to and from the I/O server.
  • N – Names. Show the names of objects Helios is trying to access.
  • O – Open. List all files that Helios is trying to open.
  • P – Close. Report any file close requests sent by Helios.
  • Q – Quit. Give a progress report when the I/O server tries to exit.
  • R – Read. Monitor any file reads.
  • S – Search. Report all distributed searches arriving at the I/O server.
  • T – Timeouts. Report any stream timeouts that may occur.
  • U – Nopop. In the Server windows system, toggle between pop and nopop mode.
  • V – OpenReply. Give details of replies to Open, Create, and Locate requests.
  • W – Write. Monitor any file writes.
  • X – Resources. Produce a snap shot of what the I/O server is currently doing.
  • Y – List. Give details of all debugging options.
  • Z – Reconfigure. Re-read the configuration file host.con

Those switches can be combined, e.g. server -rw

Cool: If the debug-output becomes too much to read (i.e. on screen) you can toggle the setting by pressing ctrl-shift plus the corresponding character. E.g. “c” to mute all the traffic on the serial line.

Logging

Now that we get some info about what’s going on internally, it might be a bit too much to follow on the screen (and you can’t redirect the output with “server > output.txt”). But don’t despair, there’s a way to define a logfile in HOST.CON:

logging_destination = [screen | file | both]
logfile = logbook

So simply define where you want the logging to go (screen or file or both) and define a logfile name. In this case it will be written inlogbook in the Helios root directory.
Please mind that the logfile will be overwritten (not appended) each time you reboot!

Config-Files

I cannot repeat it often enough: ALL config files (but HOST.CON) are Unix-Formatted, ie. LF instead of LF+CR. So each time something is behaving strange, check your config files for proper formatting!
I’ve spent hours of debugging just to find out I had (again) “tainted” a config file by quickly having a look with edit.exe :-/

Running X Window

This is probably the pinacle of what you can do with Helios… literally, as there are probably just a handfull of people left having the needed hardware.

HELIOSX

This is because the Helios X Window System only features drivers for two “graphic cards”: The INMOS IMSB020 ISA card or the IMSB419 (or similiar) TRAM. Both sporting the INMOS G3xx framebuffer chip.

Low-level stuff

The G3xx controls the displaying device in a very low-level manner – back in those days these devices were classic cathode ray monitors and high refresh intervals guaranteed a stable, non-flickering picture (>70Hz up to 100Hz an more). Today a TFT/LCD display is the common display and those are quite picky about the refresh interval being fed into them (60-70Hz).

It might be difficult to find a TFT display which is able to “catch” the G3xx signal. But thanks (again) to Michael Brüstle, there’s a super-great tool to calculate the correct values needed to configure the G3xx to match your display… or get close to it.
You’ll need certain values for your display later in this chapter, here’s a list of them – actually that’s my setting:

screen_width = 1024
screen_height = 768
video_clock = 65 #MHz
line_time = 336
half_sync = 17
back_porch = 40
v_sync = 12
v_blank = 52
v_pre_equalise = 6
v_post_equalise = 6
transfer_delay = 21

Also, a mouse is very much needed to use X Window (surprise!). So make sure your host OS (e.g. DOS) is actually running a driver for that – I recomment CuteMouse, very small, very complete.

Because it is essential that the X server runs on the same TRAM the framebuffer/graphic controller is located. This has some influence on how to configure the system.

Using an IMSB020 aka “BOZO”

Without any TRAM installed on your BOZO, make sure to run single_user! (check /etc/nsrc)

If you’re planning to run in multiuser mode the onboard CPU must not be the root processor!
So change the links using the on-board “Linkswitch” like this:

c:\>debug.exe
o 16C 3 (i.e. set bit 0 and 1 on port 0x16C)
q

This makes the TRAM in slot 0 root processor running the network server (/00) and the onboard T805 becomes /01

Files to edit

Edit “startx” in the Helios root directory. In line 22 it reads:

  remote -d 00 run xhelios

change this to

  run -d xhelios

Now read on at “General Setup”

Using a “remote” display TRAM (like IMSB419/437/438)

Like the comment in the startx file says “If you have a multi-transputer network you must make sure that the X server is started on the processor that has the grahpics hardware.”

Files to edit

Edit “startx” in the Helios root directory. In line 22 it reads:

  remote -d 00 run xhelios

modify this to match your TRAM setup, eg. if your IMSB419 is connected to link 3 of your current (working) Transputer, it should read

  remote -d 03 run xhelios

General Setup

Check your host.con file. Around line 41 you’ll find this section:

Xsupport
mouse_resolution = 2
mouse_divisor = 2

Make sure Xsupport is uncommented. The mouse settings seemed to be fine with all my tests – you milage may vary, so play around if needed.

Copy the file
newxrc from /local/xsrc/devices to /etc
and
twmrc and/or “mwmrc” from the root folder to your home (/users/root)

Now edit newxrc to match your display values as described in the beginning of this chapter. Also check the display hardware entry in line 293 (newg332.d).
If you’re using a IMSB020, you can enable native keyboard support in line 301.
Below that are keyboard layouts (US/GB/D) and number of mouse buttons. I’m not really sure if the “processor” and “progname” values are really used – I think they’re ignored.

Feel free to edit twmrc if you like more applications to start automatically etc.

Finally, if you are running a TCP/IP network stack (i.e. tcpip and inetd are sucessfully running) you don’t have to do anything further.
If you don’t run TCP/IP you have to append “notcp” in your startx line 22, eg:

run -d xhelios notcp

You’re Done. Now start X11 calling startx from the root directory.

Going Multiuser

Yup, Helios is a Multitasking-Multiuser OS… but not quite as you might got used to it using UNIX(ish) OSes in recent times. There are some caveats:

Theory

As Helios is running on Transputers (mostly) and Transputers do not feature an MMU, there’s no ‘protected’ multitasking, i.e. a badly written application can kill (at least) the Transputer it is running on, if not the whole network. This might bring back memories of Apples System 7.x “Multi Finder” or Windoze 95 and other cooperative multitaskting solutions.
The only half-way robust way to really protect Helios processes is to ‘lock them away’ into a dedicated Transputer.

Running Multiuser (ie. providing remote login etc.) means you need at least 2 Transputers. To protect certain essential services like ‘netserver’ and ‘sessionmanager’ those have to run on the “root Transputer” (/00) which is not accessible to any user – including root. Logging in from the console on your PC will automatically put you onto the next Transputer in-line, eg. /01.
In consequence, if you like to have another user logging in over ‘telnet’ or serial console you’ll need another Transputer for that user (making it 3 in total).

Practice

So what do we need to configure to go Multiuser? First you should have your Transputer network configured and running as described 2 posts before this.
Then we check the nsrc file found in Helios’ /etc folder. Because I couldn’t say it better, I’ll copy from the Manual:
The nsrc file contains a list of options for the networking software, like the host.con
file which has a list of options for the I/O server. The nsrc file is read by the startns
program when networking software is started up, and passed in the environment to
the network server and/or Session Manager.”
(Just a refresher: network, networking and server means Transputer networks, no TCP/IP stuff and such.)

It should look somehow like this:

# root_processor = /Bozo/01
# single_user
# password_checking
# processor_protection
# no_taskforce_manager
share_root_processor
preload_netagent
waitfor_network
# 30 seconds is the default interval, -1 disables network monitoring
#monitor_interval = 10

I won’t go into every detail of each setting – there’s a Manual for that (p.58). Just make sure that ‘single_user’ is commented. For the curious amongst you: share_root_processor means the taskforce-manager, network-server and session-manager may run on the same CPU. If Helios runs in Multiuser mode like we are going to do, this is ignored anyway.

That’s it. If everything worked as described, Helios will boot all processors (but showing only /01 and /02) and logging in locally on your host machine will put you on Transputer /01. Users logging in via telnet will automatically put onto Transputer /02. This is a ps output entered in a telnet session:

% ps /00 /01 /02
Processor 00
ProcMan.0           Loader.1            netserv.4
Pipe.5              session.7           login.9
Processor 01
ProcMan.0           Loader.1            tcpip.3
inetd.4             Pipe.6              tfm.27
shell.28            telnetd.31          ttyserv.32
login.33
Processor 02
ProcMan.0           Loader.1            tfm.3
Pipe.4              shell.5             ps.7

The (inaccessible) Root-Transputer /00 is running the netserver and session-manager.
Processor /01 does the TCP/IP, inetd and telnetd handling, runs a shell (local login), cares for tty and runs a taskforce-manager (needed for parallel programs).
Finally processor /02 is the one the telnet-user actually lives and triggered the ps command from its shell.

So after all this configuring we have multiple Transputers running, TCP/IP is there and we can host multiple users (given we have enough Transputers to host them)… next and final step: X-Window!

Networking

Alright, so we have a UNIX’ish OS running on our Transputer(s). After a while staring at the ‘network show’ command, hysterically giggling about soooo much computing power, you might think: Hey, what about real networking?

Yeah, you’re right, being a real man you should be able to telnet into your “Helios box”. And compared to other vintage OSes, it’s pretty easy.
The Helios installation you’re using is already set up for it. The documentation calls it the “Ethernet I” and “Ethernet II” package.

Obviously you’ll need a network interface card (NIC) plugged into your host machine. That NIC shouldn’t bee too recent, because you’ll need a ‘packet driver‘ for it. The packet driver standard was quite common in the DOS hey-days and crynwr.com still offers everything you need: Drivers, programmer reference (if you need ’em) etc..

We seem to be pretty lucky to have a Helios Version 1.31 because if I got the “Ethernet-I” documentation right, earlier versions were supporting just 2 NICs by defining ethertype WD8003 or DLINK in the host.con file. Bummer. But with a packet driver you can even use your high-end Intel 100mpbs PCI NIC.

So get the driver for your card and install it on your host. In my case it’s a 3COM 509 (aka Etherlink III), the best you can get for the ISA slot 😉 Installing the driver in DOS requires you to know some bits about your NIC: The used interrupt and the IO port. So my NIC uses IRQ10 and its port is at 0x300. To install the packet driver call it like this:

C:\> 3c5x9pd.com 0x60 10 0x300

That means: Use interupt vector 0x60 (that’s where applications hook into), IRQ 10 and Port 0x300, please. You’re done on the DOS side of things.

Initially, you need to tell Helios how to use the pc-ether driver. This step needs to be done only one time by booting into Helios entering

% gdi /helios/etc/devinfo.net /helios/etc/devinfo

and quit Helios again (by entering stopio or pressing Ctrl-shift-F9).
Before booting Helios again, make sure “ethernet” is uncommented in your host.con file. If you’re unsure what that is, go back to the second post of this how-to.

If that’s checked & done, go ahead an boot Helios entering “server“.
On the HeliosServer-display (Helios calls it “a window”) you should see a quick “/ether: Ethernet address xx:xx:xx:xx:xx” which is the MAC address of your NIC, before you’ll get to the login screen. So login and enter this command:

% /helios/lib/tcpip myHostname 192.168.1.42 -e pc-ether &

This loads the tcp/ip daemon with its parameters which are:

  • Your hostname – can be anything, be creative
  • Your IP – you should know an unused one (sorry, no DHCP)
  • The driver to be used – in this case the driver provided by the host PC

Don’t forget it to start it into the background (&) as this is a daemon running all the time.
Finally, now that we have the socket running, we need the internet protocol daemon to run. That’s very simple, just call

% /helios/lib/inetd &

and you’re done! So quick, let’s see if everything works! Use you old friend ping:

% ping 192.168.1.1
64 bytes from 192.168.1.1: icmp_seq=1 time=46. ms
64 bytes from 192.168.1.1: icmp_seq=2 time=8. ms
64 bytes from 192.168.1.1: icmp_seq=3 time=8. ms
^C

Hooray! We’re talking to the world! Well, locally at least. Everything else is just like any other UNIX’is OS, so check /etc/hosts and the usual suspects. As you might have guessed already, there’s no way to enter a nameserver as there’s no named… it’s all IPs only.
Ah, and before I forget telnetd is in /helios/lib 😉

Final words of warning: Those two daemons need memory… quite a bit. 380KB to be exact. So it might get a bit tight in your 2MB system. If you have more than one Transputer in your system, you might think about running those on a different one. As mentioned in the previous chapter, you can add them directly in your processor map like this:

processor 3 { ~02, , , ;
run -e /helios/lib/tcpip tcpip myHostname 192.168.50.42 -e pc-ether;
run -e /helios/lib/inetd inetd
}

Also, as far as I’ve tested it, the IP stack isn’t the most robust in the world. I had some crashes here and there. Still investigating whose fault it might be.

Adding more Transputers

Perfect, we have a running Helios system now. But with just one CPU it’s not that exciting as it should be. With just one MB there’s not much you can do with the system, 2MB allows to run some programs and 4MB is what you need for e.g. running the C-Compiler.

So: “More power, Igor!

Some more background

Helios has no idea about how many Transputers are available. That’s not a shortcoming but a feature as you may not want to use all Transputers or you might like to dedicate certain tasks to a specific Transputer or you have a mixed system made of Inmos, Parsytec and Meiko parts which all behave a bit different.

This is why Helios needs a ressource map, which is a text file describing your Transputer network. As a first step, you should use ispy(a network worm tool) to identify the available CPUs in your system. Calling it together with mtest give you a list like this:

c:\> ispy | mtest  [return] Using 150 ispy 3.23 | mtest 3.22
# Part rate Link# [  Link0  Link1  Link2  Link3 ] RAM,cycle
0 T800d-25 280k 0 [   HOST    …    …    1:0 ] 4K,1 1024K,3;
1 T805b-24 1.6M 0 [    0:3    2:0    3:0    4:0 ] 4K,1 4096K,3;
2 T800d-20 1.8M 0 [    1:1    5:0    6:0    … ] 4K,1 1024K,3;
3 T800d-20 1.8M 0 [    1:2    7:0    …    … ] 4K,1 1024K,3;
4 T800d-20 1.8M 0 [    1:3    8:0    …    … ] 4K,1 1024K,3;
5 T800d-20 1.6M 0 [    2:1    9:0   10:0   11:0 ] 4K,1 1024K,3;
6 T800d-20 1.6M 0 [    2:2   12:0   13:0   14:0 ] 4K,1 1024K,3;
7 T800d-20 1.8M 0 [    3:1   15:0   16:0   17:0 ] 4K,1 1024K,3;
8 T800d-20 1.6M 0 [    4:1   18:0   19:0   20:0 ] 4K,1 1024K,3;
9 T805d-20 1.7M 0 [    5:1    …    …    … ] 4K,1 1024K,3;
10 T800c-17 1.7M 0 [    5:2    …    …    … ] 4K,1 28K,3 2016K,4 4K,3;
11 T800c-20 1.7M 0 [    5:3    …    …    … ] 4K,1 1024K,3;
12 T800d-20 1.7M 0 [    6:1    …    …    … ] 4K,1 1024K,3;
13 T800d-20 1.7M 0 [    6:2    …    …    … ] 4K,1 128K,4;
14 T800d-20 1.7M 0 [    6:3    …    …    … ] 4K,1 128K,4;
15 T800d-20 1.8M 0 [    7:1    …    …    … ] 4K,1 1024K,3;
16 T800c-17 1.8M 0 [    7:2    …    …    … ] 4K,1 28K,3 2016K,4 4K,3;
17 T800c-20 1.8M 0 [    7:3    …    …    … ] 4K,1 1024K,3;
18 T805d-20 1.8M 0 [    8:1    …    …    … ] 4K,1 1024K,3;
19 T800d-25 1.8M 0 [    8:2    …    …    … ] 4K,1 28K,3 2016K,5 4K,3;
20 T800d-20 1.8M 0 [    8:3    …    …    … ] 4K,1 1024K,3;

Wow, 21 Transputers, looks my Tower of Power 😉 Ok, so you see how the CPUs are connected to eachother and how much RAM they have, for example this line

1 T805b-24 1.6M 0 [    0:3    2:0    3:0    4:0 ] 4K,1 4096K,3;

says: Transputer 1 is a T805/25MHz has 4K internal and 4MB external RAM. It is connected with Link-0 to Transputer 0 on its Link-3 and with Link-1, 2 and 3 to Transputers 2, 3 and 4 on their Link-0. Phew, lots of colors, but it should help you reading this much easier.
Sadly, Helios cannot read this format… it uses a different one which goes like this:

network /FullTower {
Reset { driver; ~00; tram_ra.d}
processor 00 { ~IO, , , ~01; System; }
processor 01 { ~00, ~02, ~03, ~04; }
processor 02 { ~01, ~05, ~06, ;  }
processor 03 { ~01, ~07, , ; }
processor 04 { ~01, ~08, , ; }
processor 05 { ~02, ~09, ~10, ~11; }
processor 06 { ~02, ~12, , ; }
#~13, ~14; # these only have 128kb – too small for Helios!
processor 07 { ~03, ~15, ~16, ~17; }
processor 08 { ~04, ~18, ~19, ~20;
# ~21;
}
processor 09 { ~05, , , ;
# ~22, ~23, ~24;
}
processor 10 { ~05, , , ; }
processor 11 { ~05, , , ; }
processor 12 { ~06, , , ; }
#    processor 13 { ~06, , , ; }
#    processor 14 { ~06, , , ; }

processor 15 { ~07, , , ; }
processor 16 { ~07, , , ; }
processor 17 { ~07, , , ; }
processor 18 { ~08, , , ; }
processor 19 { ~08, , , ;
run -e /helios/lib/tcpip tcpip henkelmann 192.168.50.33 -e pc-ether;
run -e /helios/lib/inetd inetd
}
processor 20 { ~08, , , ; }
#    processor 21 { ~08, , , ; }
#    processor 22 { ~09, , , ; }
#    processor 23 { ~09, , , ; }
#    processor 24 { ~09, , , ; }

processor IO { ~00; IO }
}

At the first sight this looks a bit complicated, but it’s actually much easier to read than ispy’s output. If we take the last example again (without mtests addition)

1 T805b-24 1.6M 0 [    0:3    2:0    3:0    4:0 ]

the Helios version looks pretty simple:

 processor 01 { ~00, ~02, ~03, ~04; }

As you can see in my above ressource map example, there’s a bit more to it. For all details refer to chapter 2.6.5 of the Helios Manual I’ve mentioned earlier in this article.
In this case, I’ve commented out all Transputers with less than 1MB RAM because the 128K of some of them aren’t enough to even load the Helios mini-kernel (“nucleus”).
Also, you can see one of Helios’ cool features: You can bind a service/program to a Transputer at boot-time. Here are some example:

processor 00 { ~IO, , , ~01; System; }

This is my Gelach-card… with just 1MB it’s just enough for a decent basic system. The processor is reserved for use by the system. It cannot be allocated to users, and hence it is usually impossible to run applications here.

 processor 19 { ~08, , , ;
run -e /helios/lib/tcpip tcpip henkelmann 192.168.50.33 -e pc-ether;
run -e /helios/lib/inetd inetd
}

This is a 2MB T800. It is dedicated to do the TCP/IP stuff (more on IP networking later) as this requires quite an amount of RAM and CPU cycles… nicely offloaded to this Transputer.

Tool Time!

If your transputer network changes as often as mine does, it might become a drag to constantly rewrite your resource map file. This is why I wrote this little parser script in perl. It takes an “ispy | mtest” output and converts it into a Helios resource map (*.rm) file.
Yes I know, perl is not optimal in a DOS environment but I was in a hurry… maybe I’ll rewrite it in C-for-DOS one fine day.

Two more steps…

Now that you edited your resource map (e.g. network.rm) to your needs, you need to generate a binary version of it. This needs to be done running Helios. So make sure the .rm file is inside the /etc folder (below helios root) and boot your single-CPU Helios and create a map file like this:

# cd etc
# rmgen network.rm

This will create a network.map in /etc for you. Now shutdown Helios again.

Now you need to tell Helios to actually use that map file. This can be done inside your initrc file which you edit like this:

# Helios System Configuration File
# This file is interpreted by init to configure the system
# it is NOT a shell script.

# Start up the X server if required
ifabsent /window     run -e /helios/lib/window window

# Option 1
# Run the network software if necessary, and wait for the Session Manager
# to start up. Then create a console window and register it with the
# Session Manager, which will run login automatically
run -e /helios/bin/startns startns -r /helios/etc/network.map
waitfor /sm
console /window console
run -e /helios/bin/newuser newuser

# Option 2
# Run login by itself without any of the networking software. This gives
# a single-processor single-user system
#console /window console
#run -e /helios/bin/login login

This way you can now change between a single- and multi-processor system by (un)commenting either the Option 1 or Option 2block.
Now boot Helios again and you should see its initializing each Transputer while booting. When you (hopefully) get to the shell enter ‘network monitor‘ – that’s like ‘top‘ on UNIX – to indulge yourself by watching your Transputers doing… nothing/something.

Caveat: If you have more than 20 Transputers in your system (lucky you!), you might need another version of startns (copied into /helios/bin) which allows an unlimited number of Transputers to be used.

Booting Helios

Now that we have all config files adjusted to our needs, we should try to boot it.

Normally a simple call to SERVER.EXE should do it, so try now:

C:\TRANS\HELIOS13> server [RETURN]

This should show you the booting process info and results in a bash-like shell. Hooray! You’re running a real OS on your Transputer, congratulations!

You might have stumbled over the many ‘shoulds’… well, there’s a known problem with the server. It uses very simple calibration- and delay-loops (for/next) to determine speeds and setting pauses between each command sent to the Transputer. If you computer is too fast (i.e. built after 1990) those pauses might by too short and server.exe can’t initialize the Transputer correctly resulting in boot errors 🙁

But don’t despair! Michael Brüstle, aka “Mr. T”, came to the rescue and wrote a little ‘helios loader’ which uses more precise timers but is a bit basic – in other words you have to know what you’re doing… which makes this loader a piece of “real men software” 😉
What it does is: Resetting the Transputer, putting the Helios bootstrap-image and nucleus into the Transputers RAM and then quits. So it’s not booting Helios… that’s still left to the server program. To use this tool 3 steps are to be taken:

1) Download HBOOT.EXE from here and put it into your Helios root directory
2) Change your host.con file to prevent SERVER.EXE to overwrite the already loaded bootstrap-image and nucleus. So add/uncomment these lines in your host.con:

no_reset_target  # do not reset the Transputers
no_bootstrap     # don't load nboot.i
no_image         # don't load nucleus
no_check_processor # don't check CPUs as this would need a reset, too

3) [optional] Create a batch file (e.g. START.BAT) in your Helios root folder containing these two lines:

hboot lib\nboot.i lib\nucleus
server

That’s pretty self-explaining, I guess. So enter START and Helios should successfully boot now.

Next up, using more than one Transputer with Helios…

Configuration

Very well, while the filenames are streamlined now, we need to prepare Helios’ configuration files before we get things going.

Host configuration

There’s a central config file for your host, that’s your PC or more generally, the machine connected to the Transputer(s). This file is called host.con and tells the boot-programm everything it should know about your setup.
There is a host.con in your install already, but that most likely won’t fit your setup, so open it in a texteditor and adust it accordingly.
Here’s my setup which should be fine on most PCs using a Inmos B004 compatible host-interface (like the AVM B1 or most ISA-cards). I just quote the settings which might need to be changed to keep this short. The file has some documentation in-line, so read it. My comments are green:

BOGOMIPS=9999999 # This should tell the server that my PC's very fast
host          = AT 
# vs. PC, again a speed info
box           = b004 #
Important! Info about your interface card

helios_directory    = C:\trans\helios13 # adjust to your path if changed!

link_base = 0x150 # Important! Info about your interface card

processor_memory = 0x100000 # Define this if your card is a bit flaky, like the Gerlach :-/
ethernet
# enable this if you plan to use ethernet networking.

Transputer configuration

Ok, we configured the PC-side (host) now for the Transputer side of things. For a simple start we will use just one Transputer, most likely living on your interface card.

BIG caveat: Never forget that Helios is handling text-files the UNIX way, ie. Linefeed is LF, not CR+LF like in DOS! So editinginitrc or any other config-file (besides HOST.CON) needs to be in UNIX format. Don’t use DOS edit.exe! This will change linefeeds even if you use it just for viewing file, ie. not saving them.

The config file for this is ~/etc/initrc. The one that came with the installation archive is way over the top, so you have to edit it… here’s the basic version:

# Helios System Configuration File
# This file is interpreted by init to configure the system
# it is NOT a shell script.

# Start up the X server if required
ifabsent /window     run -e /helios/lib/window window

# Run login by itself without any of the networking software. This gives
# a single-processor single-user system
console /window console
run -e /helios/bin/login login

That should be it. Next step: Let’s boot the system!

Installation

Ok, you really want to get a serious Helios buff. Good!

First, download the Helios archive. I strongly recommend to go for the most recent version, which is 1.3.1. The Archive is a huge 12MB (erm, in 1990-terms) but that’s mainly because it also includes an X11 server. Don’t get too exited about X11 though. It will only work if you have a Transputer driven graphics card!
So, download this archive, save it into a path you can easily access within DOS -8 char limit!- and un-tar/zip it there. I’d suggest something like c:\trans\helios13 (=Helios root).

I assume you’re installing all this on your DOS/Windoze box.
DOS! This is vintage stuff – from days when a i486 was insanely fast and expensive.
Do not expect that any of the programs described here are running on your 64bit, 4GHz, 16GB, Windows 10 box… you will need [MS|PC|Open|Free]DOS, running on a PC preferably clocked below 200MHz. An ISA bus is mandatory for having a Transputer interface card installed (well, there were some MCA/PCI cards).If you’re a happy owner of a Sun SPARCStation or similar UNIX box, you might be able to skip this chapter.

Because this archive was created from a running install on a SunOS machine (I think), you will end up with some file names crippled to the DOS 8.3 file-naming scheme. So we have to do some renaming work in /ETC (c:\trans\helios13\etc in DOS terms) now:

host.equiv -> HOST.EQU
inetd.conf -> INETD.CON
protocols -> PROTOCOL
socket.conf -> SOCKET.CON

Next, change into /users (c:\trans\helios13\users) and remove the dots from the filenames in each folder (root/guest/shutdown) in there:

.cshrc -> CSHRC
.login -> LOGIN

Finally, we need to replace the SunOS binary, which is used to boot Helios, called ‘server’. You will find the MSDOS equivalent (SERVER.EXE) here. Put it into your Helios root folder.

Next up, configuration…