Tag Archives: CPLD

T2A2 for everyone

While the guys over at OpenApple were speculating in their latest podcast what a Transputer actually is… well, there are about a 100 links and ways on this page to find out – but hey… just click here – and of course that box saying search would do great wonders, too.

But seriously, my bad: I should have mentioned that this page your looking at is really just one post of many… so make sure you start at a Chapter (Menu. At the Top. ↑…yes up there) and read them in the order you’d read a book 😉

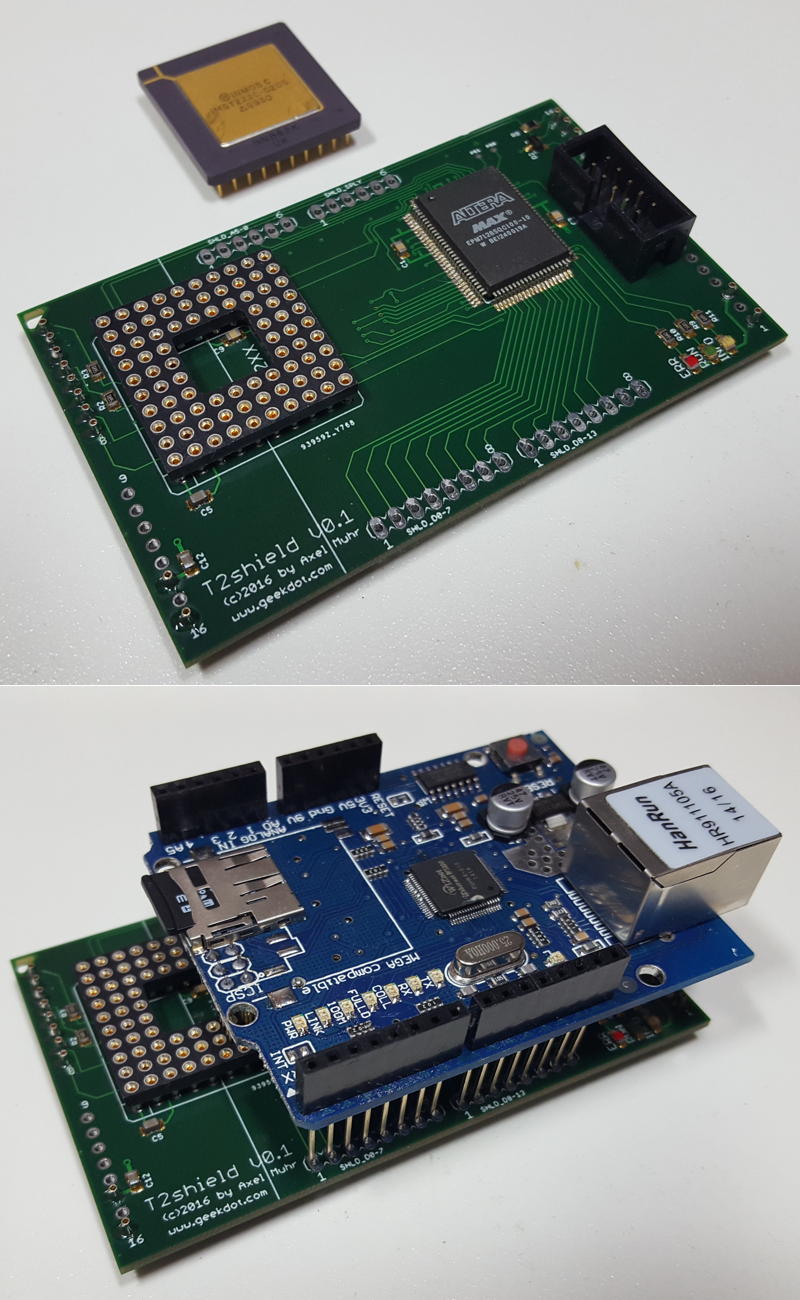
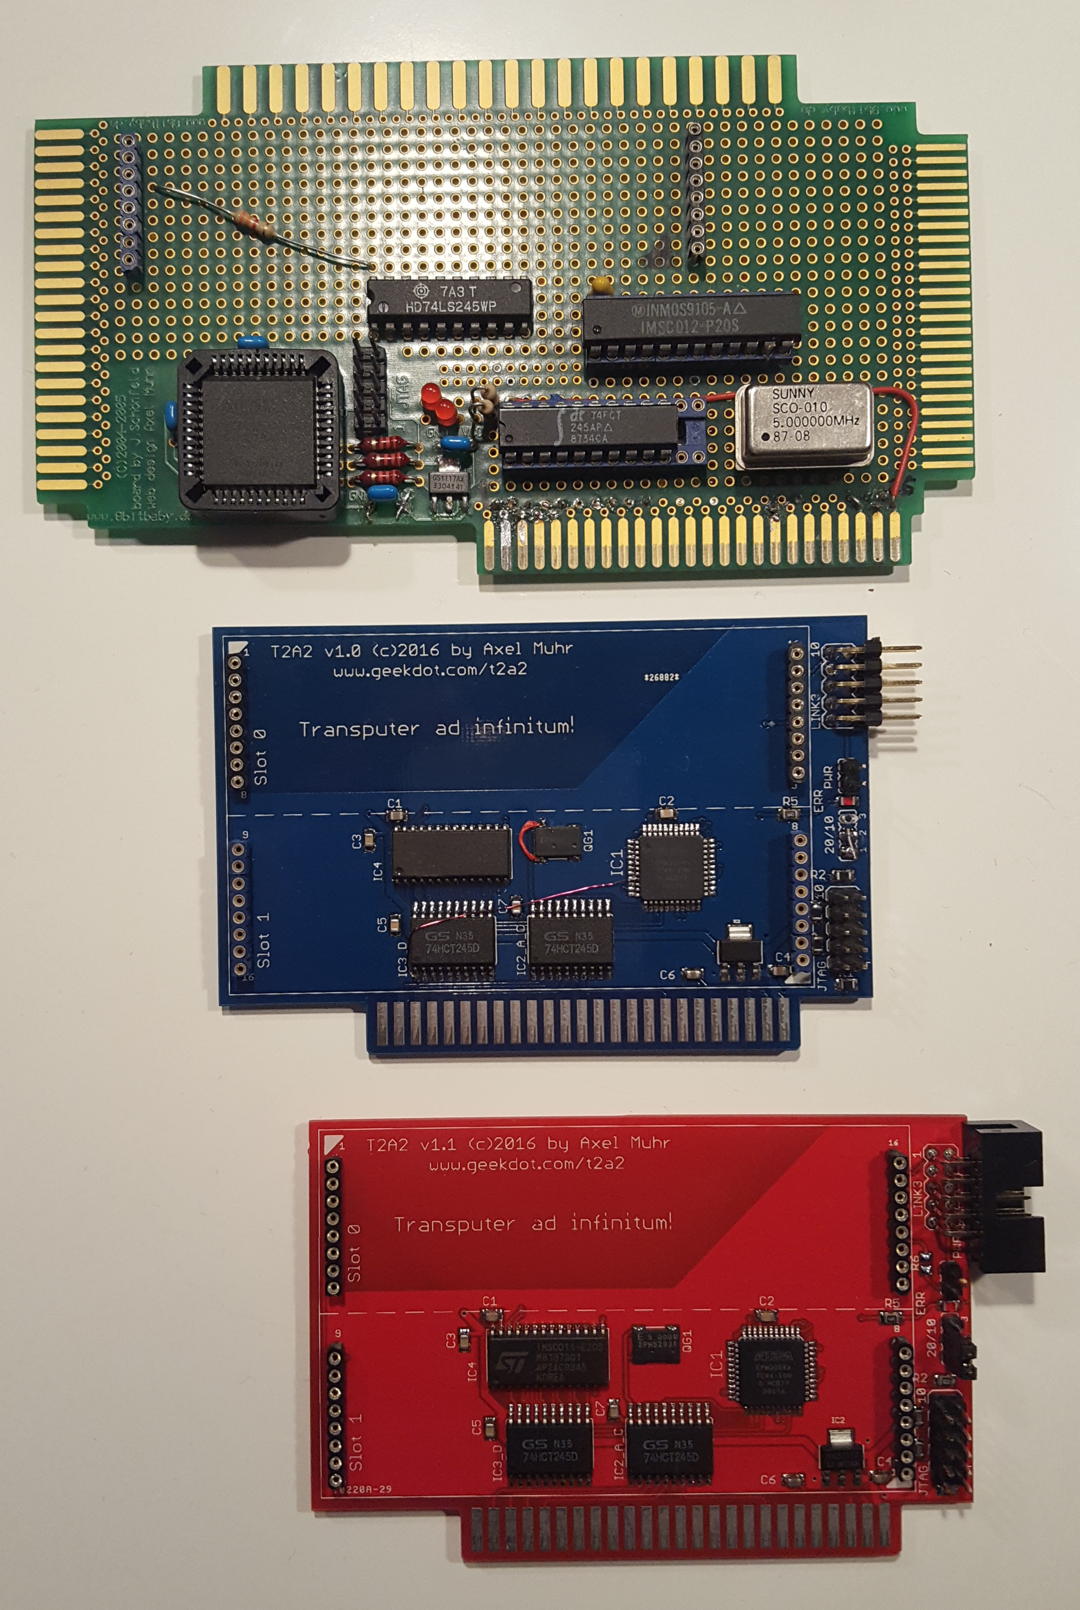
After quite some years (and a handful Apple II users requests) I felt the urge to finally put the T2A2 prototype (read that post to get a more general understanding) into a real expansion card… and here it is: Say “Hello!” to the T2A2 version 1.1!

It came a long way…

t2a2_evolution

…in more detail:

t2a2_front

As you can see, the final T2A2 is much smaller than the prototype (which used an 8bit Baby one-for-all PCB) and offers many additional features

  • 2 size-1 TRAM slots (or one size-2) – double the processing power!
  • Low-power, low-profile parts used where possible (3.3V CPLD, HCT logic)
  • External Transputer-link available as edge connector – extend your network to “near infinitum
  • Jumpers for LinkSpeed and optional power to the Transputer-link connector
  • Fully buffered to be a good Apple II bus citizen
  • Works in any slot set to “your card”

Beyond this, everything said about the prototype is still true.

Most important:

a) It’s not tested in the ][ or ][+. I simply don’t own one of those.
Update: One owner reported it’s perfectly working in his IIe!
b) The T2A2 won’t instantly speed up any of your Apple II[e/gs] applications.

It’s more like a co-processor attached to it. And even then, you’ll need something really calculation-intensive to justify the time you’ll loose due to communication between the Apple and the Transputer. A single square-root for example wouldn’t make much sense – but having a complex algorithm (like the Mandelbrot fractal in my demo)  does absolutely make sense, as you just pass the parameters to the Transputer and let him do the sweating.

But on the other hand, FPU cards like the Innovative Systems FPE (using an M68881) or my even faster clone “NumberCruncher Reloaded” did just send instruction by instruction. So I somehow fancy the idea writing a SANE driver for GS/OS to integrate the T2A2 more transparently.

Want your own T2A2?

So now you’re keen to get one yourself? Please check this list first:

  • Do you have a TRAM already? (*)
  • You are aware that there’s no real software (yet) besides my little Mandelbrot demo?
  • You are keen to program something yourself – or are fine to wait until somebody else did?

While the Apple II side of coding is pretty easy, you have to get a grip about the Transputer development, too. That includes a DOS/Windows (<=XP) setup and some knowledge of C and/or OCCAM. I’ve created a little Transputer “SDK”, namely a VirtualBox image running DOS.

Plenty of Dev-Docs are available here.  
I suggest using the INMOS cross-compilers for C or OCCAM. An alternative C compiler came from LSC, which might suit you more if you don’t like the INMOS stuff.

Ok, so you’re still with me… so I have the first batch of 20 T2A2 PCBs ready which I will populate on-demand, and for 40€ (plus shipping) one of them can be yours.
(*) I might be able to offer you a TRAM, too. The price depends on available model, RAM size and CPU used.

⇒ drop me a mail tonobody likes SPAM
(Sorry, you have to type that into your mail-client – nobody likes SPAM, so do I)

Also check the T2A2 forum for current availability, shipping procedure and built status.

Some more technical details

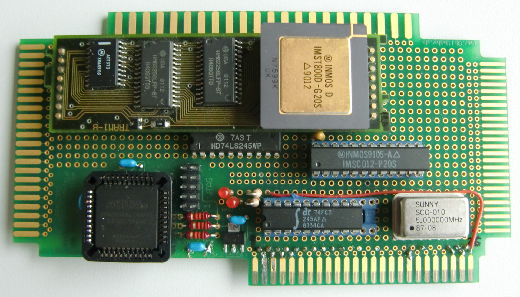
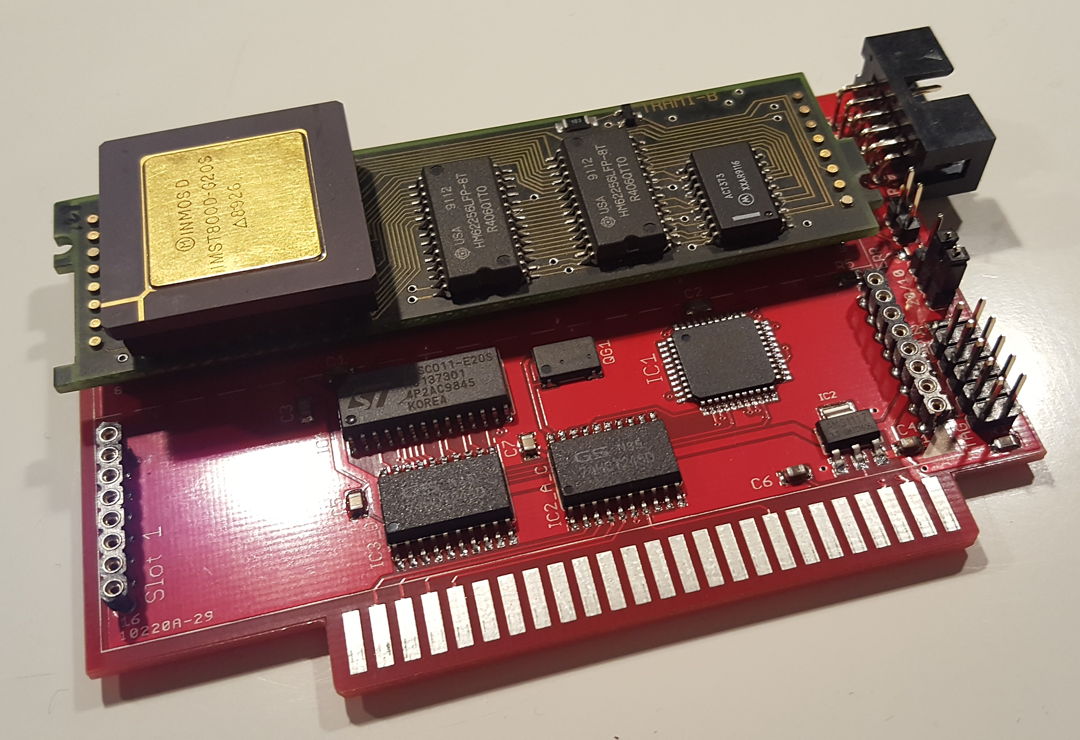
Here’s a T2A2 with a size-1 TRAM installed in Slot-0:

t2a2_with_tram

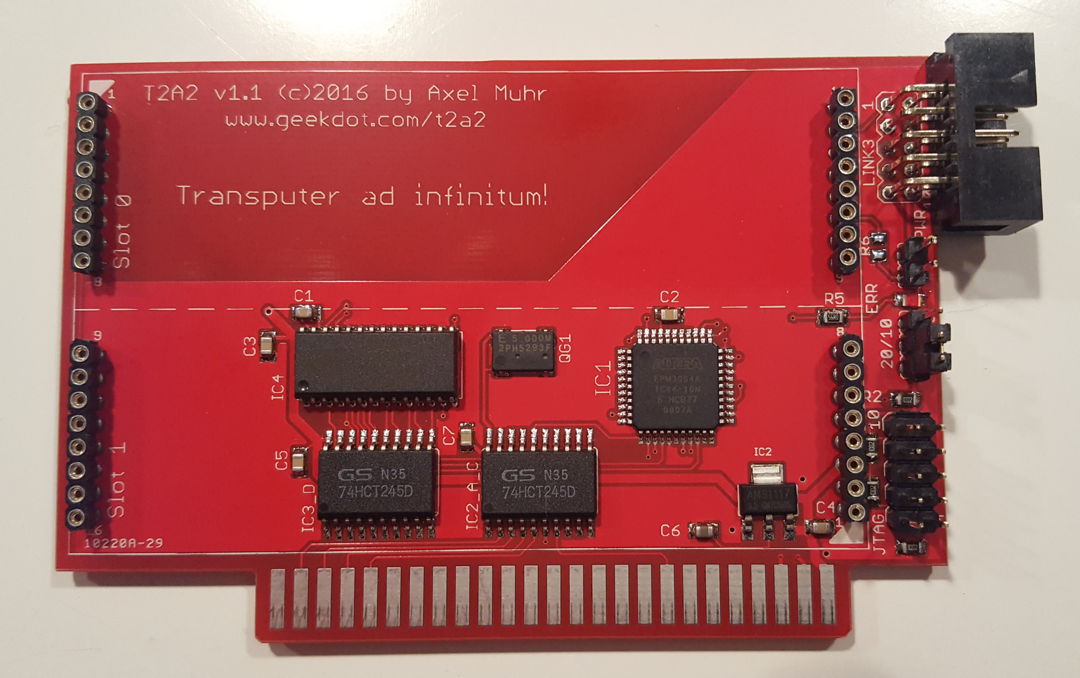
The T2A2’s CPLD programming can be updated any time through a JTAG port (the lower 2×5 pin-row at the edge).
The jumper above it can be used to set the linkspeed for the TRAMs (10 or 20mbps). If you look very close, there’s a tiny LED next to that jumper. It’s the error LED controlled by the CPLD.
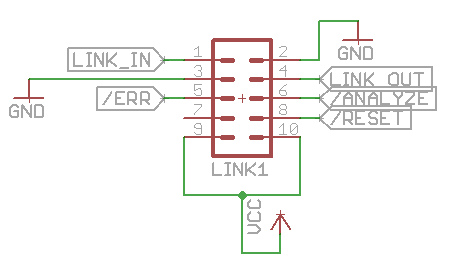
The next single jumper enables the VCC pins on the external Link connector, meant for (small!) external extensions. This connector is the same used on the Gerlach card and is very convenient because of its ubiquitous standard 2×5 shrouded pcb header connector. Here’s the pinout:

As said, the V1.1 T2A2 offers two size-1 TRAM slots. Before plugging in 40MIPS of raw processing power consider the amount of juice being pulled there. Depending on the amount of RAM and load a single TRAM can use up to 800mA of power!  😯
Given the max. of 4A on a standard IIgs power-supply, two TRAMs could bring your souped-up GS into trouble… it’s better to use the external connector with just one smaller TRAM or even simply bridge the Link0In/Out pins with Link3In/Out so that the T2A2 works as a TRAM-less adapter.
That said, there are size-2 TRAMs in existence which will snugly fit  and won’t hurt that much.

T2shield – Arduino to Transputers

[The T2shield is currently a work-in-progress project – the first alpha hardware is operating but lots of coding lies ahead!!]

The idea for the T2shield was born when I thought about getting recent peripherals like SD-cards, Ethernet, displays etc. into a Transputer network.
Sure, there are the old, original TRAMs like the STM228 SCSI controller, the B431 Ethernet TRAM or quite some choice of graphics controllers. But they’re all rare like chicken teeth these days which means unaffordable when they rarely pop up on ePay.
Rebuilding them is also a no-no given the obsolete parts they’ve used… and to be honest: A noisy, vintage SCSI-1 drive isn’t what I thought of.
So after some time I came to the conclusion it will be the easiest and cheapest way to re-use what you can buy for a few bucks from China these days: Arduino shields.
As a lucky incident such a shield perfectly fits onto a size-2 TRAM – Yay!

Without much further ado, here is the T2shield (v0.1) with a shield loosely put on top to get an idea…

t2shield

Arduino shields mainly use the SPI bus for data transfer. With its 10+Mbps SPI is much faster than e.g. I²C (which I used for my T2I2C TRAM) and can cope with fast(er) peripherals.
But this also ruled out a slow IMSC011/12 link-adapter design like the one used on the T2I2C. Also there’s no of-the-shelve SPI master controller to simply glue a bus to it.
So the design turned out much more advanced this time:

  • A 16bit Transputer (with 64KB SRAM) handles the high OS-link speeds as well as the ‘glue’ like File/Ethernet handling.
  • A comparably big CPLD (100pins, 128 marcocells) implements the SPI master controller as well as handles the T2xx memory- and interrupt-handling.
  • All Arduino digital-pins and nearly all analog-pins are connected to the CPLD to adjust to any available shield.

Also this new TRAM design is a “first” for me in many aspects:

  • 1st usage of a 16-bit T2xx Transputer (vs. 32bit)
  • 1st serious utilization of a CPLD (besides the baby-steps taken with the T2A2)
  • 1st Size-2 TRAM

Initial status

Transputer

[wppb progress =100 option=green] 100% done

A T222 Transputer is -after fixing some stupid errors- happily running and has control over his external RAM.
Here’s the first sign of life by RSPY (a brilliant ispy‘ish tool of Michael I really need to write a post about soon):

# Part rt Link0 Link1 Link2 Link3 RAM@cycle
0 T2   20 HOST  ...   ...   ...   4K@1,56K@2|

That means: A T2xx @ 20mbps linkspeed is connected to the host (PC) and has 4K internal and 56K external RAM… wait a second! just 56K? Yes, that’s because the internal 4K overlaps and RSPY leaves the up-most 4K untouched as most peripherals are mapped there and poking there could create unwanted effects…

CPLD

[wppb progress =10 option=yellow] 10% done

All basic Transputer controls are in place, LEDs are controlled by the CPLD

TODO: Implement the SPI master in VHDL. That’s THE biggest challenge for me being a total VHDL noob. Again, I wouldn’t got this far already without the tremendous help from Michael Brüstle, my VHDL Jedi-Master.

Drivers

[wppb progress =100 option=red] 0% done

Write the (Helios) driver to handle file and/or network access. This should be (optimistically) be compatible to existing file- or Ethernet ‘servers’. This will probably be the most time consuming task.

Progress?

This is (also) the first time I’m posting about a project which is not finished. So I will keep you posted about the progress with new posts in this “T2shield” chapter of this wonderful little page.
If you do own

  • a Transputer network
  • a free size-2 TRAM slot
  • a T2xx Transputer
  • some VHDL/Occam/Helios driver skills & knowledge

shoot me a mail and I might provide you a T2shield to join the development.

That said, here’s a first little sign of life:
The Transputer writes numbers to a mem-mapped address (0xFC00) while the CPLD reads the lowest 2 bits and displays them by 2 of the 3 LEDs on the T2shield

T2A2

Ok, here it is. The T2A2. What sounds like a robot from StarWars is actually a Transputer to Apple II interface. Its design is pretty much the same than its cousin, the T2C64, with the addition of some buffers to behave like a good citizen of the Apple-II bus. So this is how the little beast looks as of now (v0.5):

T2A_front

To use the Apple-II bus-connector of the 8Bit-Baby (another brainchild of mine), I had to shuffle the parts around a bit. On top you’ll see the same TRAM used on the T2C64… 20MHz T800 Transputer, 128KB SRAM. Right below it is an LS245 octal bus-transciever to handle signals like DevSel, R/W and A0-3. To its right its the IMS012 Linkadapter converting 8bit parallel bus into INMOS’ serial link-protocol. Below that, there’s the silver 5MHz oscillator to clock the IMS012 as well as the Transputer and another 245 to buffer the data-lines (D0-7). Finally on the left bottom there’s the CPLD which handles the Analyze, Reset and Error lines of the Tranputer as well as chipselect and such (Thanks to Mike for helping out on VHDL here!).

The picture above is the first Prototype and it’s finally working… even it’s a nightmare to look at its back side 😀

T2A_back

But because I’m a Commodore guy who wasn’t able to afford an Apple II in its hey-days I had to start from scratch and learn a lot…
That said, when I finally could afford an Apple II system, I went straight for the IIgs. I think IIgs is the perfect platform for an 8-bit Transputer interface given the amount of available/adressable RAM, native access to harddisks and a decent screen resolution.

Because of its simple design, the T2A2 should also work in any Apple-IIe etc. There’s no ‘firmware’, no EPROM. Just plain simple reading and writing to some (slot)specific addresses.
Due to its close relationship to the T2C64, programming is quite similiar. As a matter of fact I just slightly changed the examples I’ve used on the C64… which is the beauty of the idea.

So jump to the next post to see the first little test proggie in AppleSoft BASIC…

T2C64

So here we go, C64 first. Some moons ago I was at least midwife if not the mother of the 8BitBaby manufactured by the fairies and elves over at individual computers.

This little card features 4 slot-connectors to the most used home-computer systems as well as a CPLD… and makes a perfect basis for my first C64 “cartridge” ever 😉

The schematic was taken from “Das Transputerbuch” by U. Gerlach and being put into the CPLD saving lots of TTL chips. Actually all you need then is an Inmos C012 or C011 link-interface chip, a 5MHz oscillator and some resistors and caps.
I refrained from designing a complete Transputer system but went the easy route by interfacing to a TRAM. A TRAM is a complete “Transputer system on-a-stick”, like those used in my Tower of Power. All you need for a TRAM is an interface to your system. For the C64 you would need the thing I’ve called T2C64 (aka “Transputer to C64”)

The T2C64 prototype in its full glory:

T2c64

A short overview what’s on the card:

  • The left edge is the connector to the C64s expansion slot (ignore the other edges).
  • The square black chip is the Altera CPLD mainly containing the bus-interface and the Transputer Analyze/Reset/Error signal handling. Ah, and it controls the 2 LEDs.
  • The long black chip above the CPLD is an Inmos C012. This guy interfaces an 8bit parallel bus to the serial Inmos link ‘bus’.
  • The silver thing is a 5MHz oscillator to clock the C012.
  • And finally the longish module at the top edge is a TRAM with 128KB RAM and a mucho-macho T800 Transputer.

The CPLD maps the C012 register into the memory area of 0xde00, using just 6 addresses:

  • Data in       0xde00 (56832)
  • Data out     0xde01 (56833)
  • in-status     0xde02 (56834)
  • out-status   0xde03 (56835)
  • reset/error  0xde08  (56840)
  • analyse      0xde0c  (56844)

So programming it pretty easy, still, you have to read some Inmos manuals about the protocol etc… that said the next chapters will show you some code examples I’ve slapped together just to test the hardware. All sources and binaries (.D64 image) are available in a zip file over here, obviously most of that does not make sense without having a T2C64…

Read on in the next posts for demo-code and even a video. “uuh, videos!”