Tag Archives: benchmark

UMAX tuning

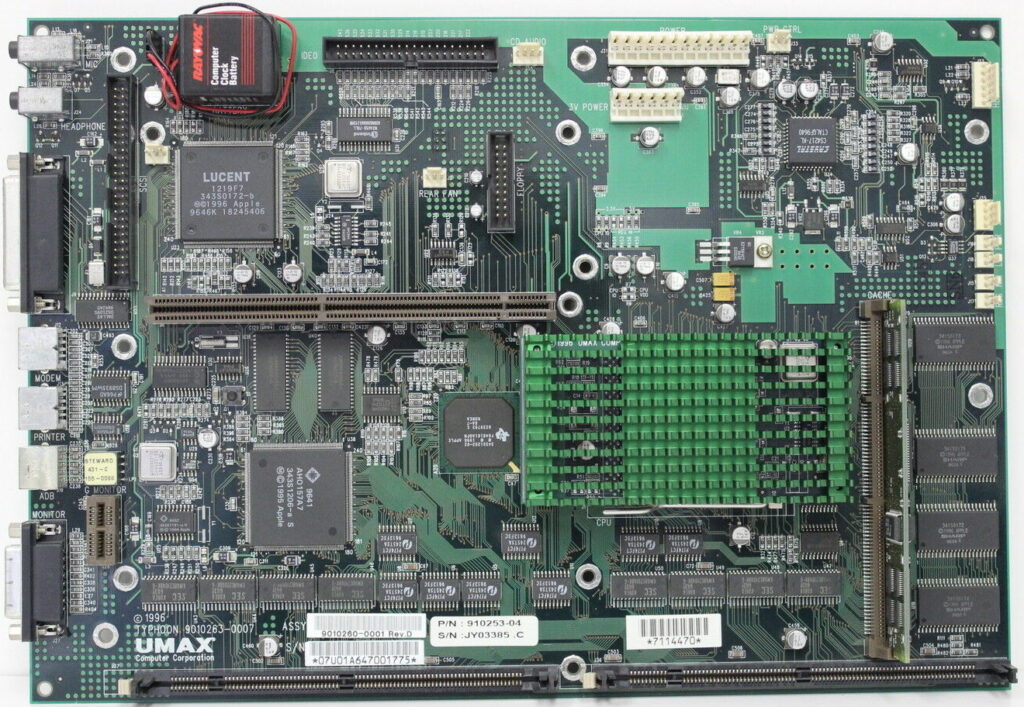
Apple Performa and PowerMac models 5400/6400 used a mainboard code-named “Alchemy“. The same board, sometimes with some changes, was used in different Mac clones like the UMAX Apus 2000 & 3000 series (SuperMac C500 & C600 in the US) and PowerComputing PowerBase.

One fine day I got an UMAX Apus 2k, which uses a derivate of this board, re-cristened to “Typhoon” which you can see here in it’s full beauty:

Processor
  • Apple: PowerPC 603e
  • Power Computing: PowerPC 603e, 750
  • Umax: PowerPC 603e, 750
Only Power Computing and Umax can be upgraded
Systembus 40 MHz fixed
L2-Cache Slot for 256k or 512k L2-Cache
RAM 5V DIMM 168 Pin 60 ns (EDO)

  • Apple: 2 DIMM-Slots, 8MB on-board (136MB max.)
  • Power Computing: 3 DIMM-Slots (160MB max, Bank 1 only 32MB, Bank 2&3  64MB)
  • Umax: 2 DIMM-Slots, 16MB on-board (144MB max.)

To the limit!

So being the way I am… I had to optimize it. Jus can’t help it 😉
Here are the steps I’ve taken – in the order of making sense the most and being less difficult:

RAM

Simple rule: The more, the better.
This will get you the maximum performance – not in speed, but you can run memory-hungry applications without swapping (virtual memory) which is a major PITA and drags down everything.
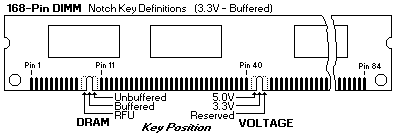
That said, finding the correct RAM is also a pain because this board uses now very obsolete 5V buffered 168-pin DIMMs. 5 Volt is already hard to find – but the buffered version is even worse.
You can check that by looking at the coding keys (“groves”) at the DIMMs bottom:

The UMAX/SuperMac board can handle two 64MB DIMMs… if you can find & afford them.

L2 Cache

A “Level 2” cache is a must-have on all PPC machines. AFAIK UMAX/SuperMac did not sell their clones without one – Apple certainly did.
If your machine doesn’t have one, get one ASAP!
If you can get a bigger one than the one you have, do so!

  • None to 256K – increases CPU performance about 30 %
    The overall responsiveness is dramatically increased
  • 256K to 512K – adds about 20% performance.
  • 512K to 1MB – need this SIMM! Mail me 😉

Umax offered an optional CacheDoubler PCB plugging between the  socket and the CPU. It features an 1MB L2-Cache and upped the bus-clock to 80 MHz. AFAIK it came as standard in the UMAX C500x/C600x models.
Of course these are unicorns now and rare as chicken teeth.

NB: There are some caveats about the L2 cache discussed further down…

Faster CPU

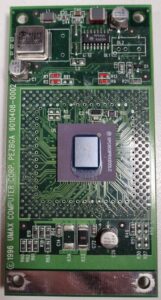
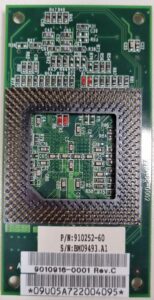
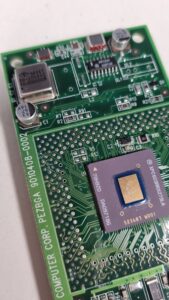
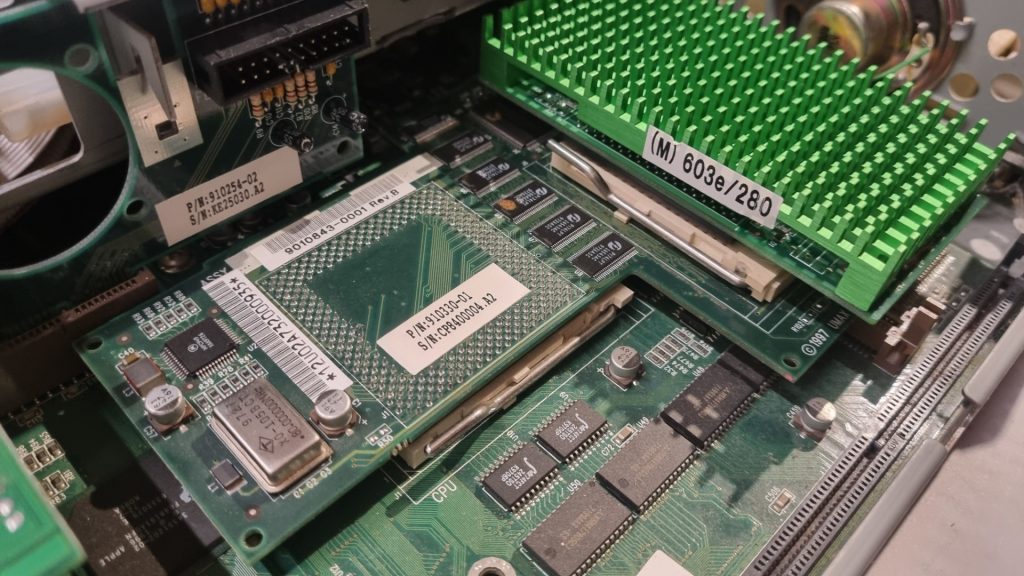
Yes, this board has a ZIF socket like the Pentiums did back then. And as such, you might be able to find a faster one. But unlike the Intel CPUs, these come on a small board covered by a big, green heat-sink.
Underneath is the CPU (in BGA package) a bit of logic, caps, lots of resistors and an oscillator.

So even if you were unable to find a faster CPU you can still ‘motivate’ yours – read: Overclocking!

As usual with overclocking, every CPU has its limits. The experiences with the 603e(v) used by UMAX are:

  • 160Mhz to max. 225
  • 200Mhz to max. 240
  • 240Mhz to max. 270

How’s that done? Quite simple (if you’re ok with soldering 0603 SMD parts) by relocating some of 8 resistors which are on the top and bottom of the CPU card… marked red on the pictures below:

Use this table to change the CPU multiplier relative to the standard 40MHz bus-clock. There are also settings for 80-140MHz, but this is about overclocking so these make no sense whatsoever, right?

CPU Speed
160MHz
180MHz
200MHz
220MHz
240MHz
Busclock x
Multiplier
40 x 4
40 x 4.5
40 x 5
40 x 5.5
40 x 6
R1 [1.0k]
R2 [1.0k]
R3 [1.0k]
R9 [1.0k]
R6 [1.0k]
R7 [1.0k]
R8 [1.0k]
R13[1.0k]

Resistor color: Green = Bottom, Red = TOP
✔ = set, ❌ = not set

If the multiplier is not enough, you can also increase the bus-clock, too.
That way you can go up to a theoretical maximum of 300MHz 🔥

Oszillator 40.0MHz 45.0MHz 48.0MHz 50.0MHz
x4.0 160MHz 180MHz 192MHz 200MHz
x4.5 180MHz 202.5MHz 216MHz 225MHz
x5.0 200MHz 225MHz 240MHz 250MHz
x5.5 220MHz 247.5MHz 264MHz 275MHz
x6.0 240MHz 270MHz 288MHz 300MHz
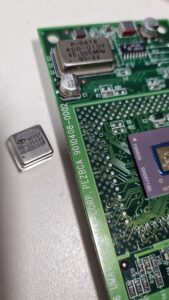
As with the resistors, you’ll need some (de)soldering skills… but it’s a simple procedure: Old oscillator out, new one in. They were even kind enough to plan for a bigger oscillator case.
Before…
…and after.

For maximum bus-performance don’t use odd divisors like “x4.5”

☝ If you plan to overclock your bus to 50MHz or more you have to get a faster L2 cache…

Most 256K cache SIMMs seem to have an IDT7MP6071 controller using an IDT71216 TAG-RRAM which has a match-time of 12 ns (You can derive that from the marking “S12PF”” on the chip). That`s far too slow for 50MHz bus-clock. If you would be able to change the TAG-RAM to a 8 ns Part, it would probably work.
Bigger cache SIMMs seem to feature faster TAG RAMs. Here’s a nice thread on 68kmla.org on those SIMMs.

Finally, here’s a comment from an Motorola engineer referring to the Tanzania board (but same issue) I found in a corner of the web:
One final problem is the main memory (DRAM) timing. If the firmware still thinks the bus clock is 40 MHz (25 ns), it won’t program enough access time (measured in clocks) at 50 MHz (20 ns). There are resistors to tell the firmware what the bus speed is, so that it can program the correct number of clocks into the PSX/PSX+ to get the required 60 ns access time. For the StarMax, this means removing R29 and installing it in the R28 location for 50 MHz operation.”

I have no clue (yet) if and where those resistors are on a Typhoon board.

Conclusion

So, what have I done in total?

I added as much RAM I was able to find (16MB on-board, one 16MB and one 32MB DIMM) to get a total of 64MB which is just OKish for a PPC Mac

I wasn’t able to (yet) find any bigger or faster L2 cache than the 256KB I already had installed. So that one stayed as-is.

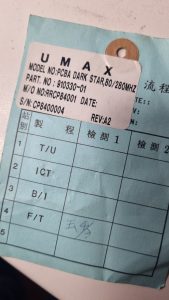
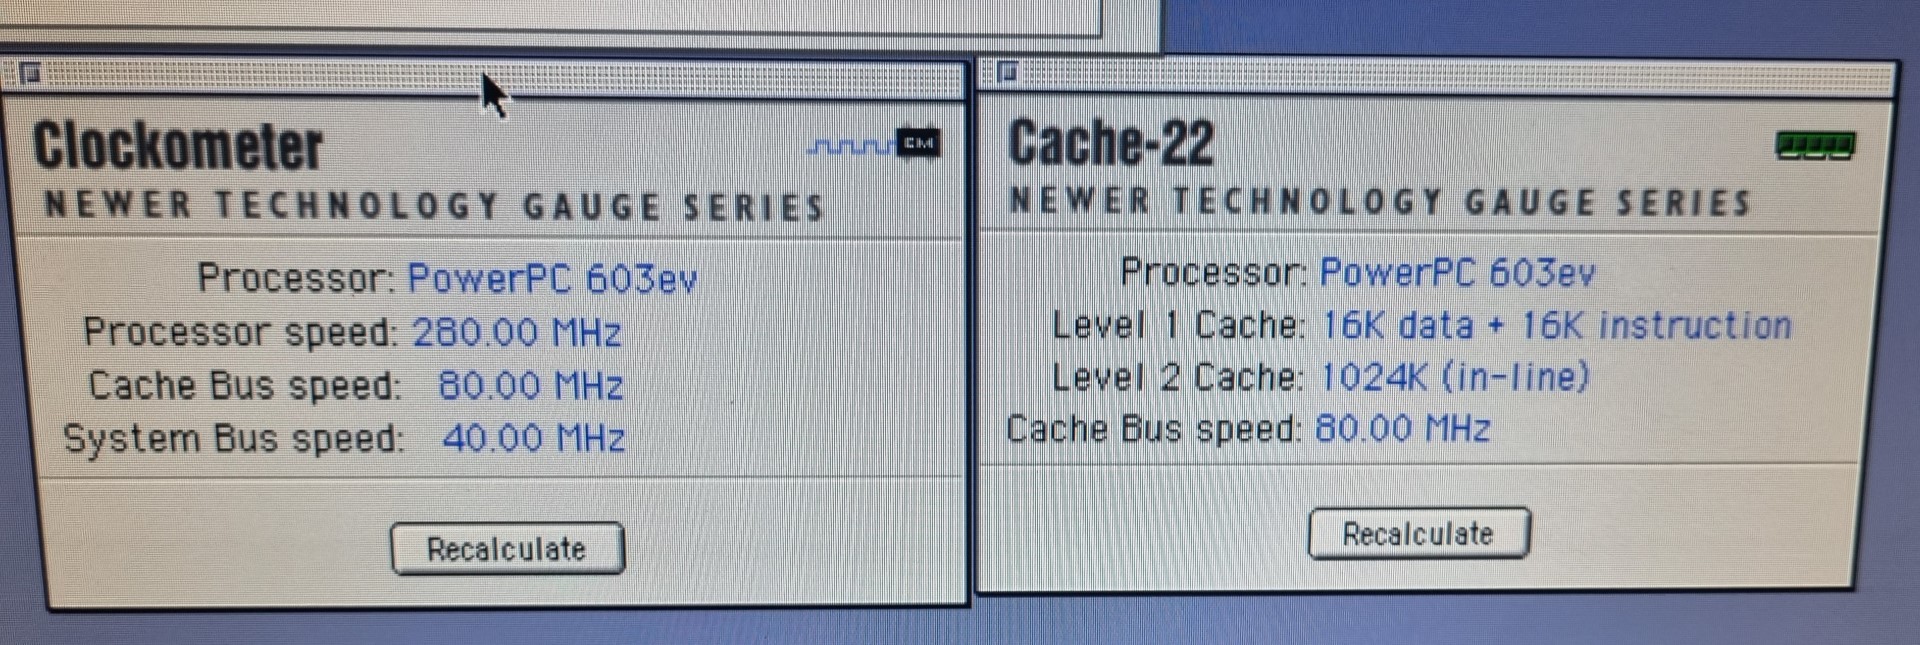
I replaced my stock 200MHz 603e CPU with a module containing a 275MHz 603ev (Even the label says 280). It has its multiplier set to 6 already… so running on a 40MHz bus is runs at just 240MHz.
My wild guess is that it was meant for the CacheDoubler mentioned above and switched to a multiplier of 3.5…
So I upped the bus-clock oscillator to 45MHz resulting in a 270MHz clock – 5Mhz below the CPUs spec but the bus is not stressed too much… the system runs stable and I measured a comfortable 45°C/113°F on the heat-sink.

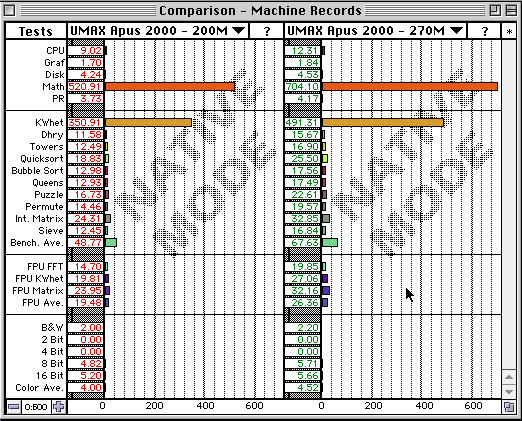
Here’s a Speedometer 4.02 comparison of before and after:

This shows that every CPU benchmark ran more or less those 35% faster, which are the difference of 200 vs 270MHz – even the Disk and Grafics performance increased between 7% and 10% which is also due to the increased bus-speed.

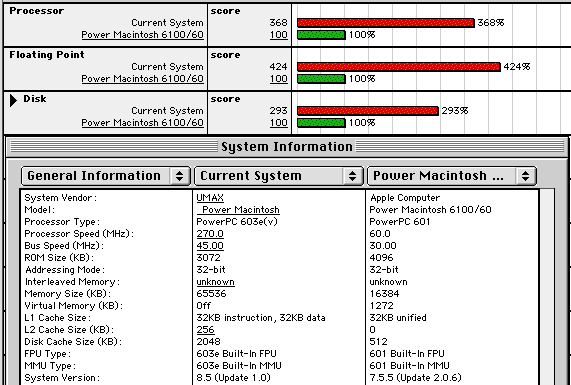
How does that fit into a greater perspective? Let’s compare to the Macbench numbers provided by user Fizzbinn in the 68kmla forum:

My system sorts itself 29% above the 240MHz machine concerning CPU performance… but FPU is less?!? No idea why that is.
Disk is probably a faster model than mine (WD Caviar 21600).

Tuning the Mandelbrot benchmark

It’s an open secret that the CSA mandelbrot benchmark tool (available in my ‘basic Transputer tools‘ package) is one of my favorite benchmark and test-tool when playing around with my various Transputer toys.
One fine day I thought VGA with more than 16 colo(u)rs  would be nice… and the coding began. First step: Put the original source (well, already enhanced by a timer and some debugging) on github.

The original CSA Mandel program uses the official 640×480 16 color VGA mode (aka 0x12) and uses its own calls for that, i.e. no external 3rd party libs. Very manly 😉 but not very colorful…

Mandel_16

So I created the first branch (aka Mandel_3) added a more “modern” command-line options handling and dived into hand-coding VBE (VESA BIOS Extensions) matters. That was very instructive and fun… and the first results showed that I didn’t just got 256 colors now but draw speed was increased, too  😯

Look Mom! More colors:

Mandel_256

Running in host-mode (/t) on my P200MMX the initial screen took 6.6s vs 7.1s for 16-colors – so a difference of 0.5s or 7% should be much higher on Transputers, so I thought. And should this mean that bigger Transputer farms had been bottleneck’ed by the actual plotting of pixels?

Because 256 colors and higher resolutions (up to 1280×1024 depending on your VGA cards VESA BIOS) are fine, but even more colors are better, I branched the code a 2nd time (MANDEL_BGI) and replaced the VBE code by a BGI SVGA interface.
While originally Borland only supports VGA, there are 2 BGI drivers written by 3rd party developers which do support SVGA and up to 24-bit colors.
It’s commonly known that BGI is not the fastest graphics interface on planet earth… and the benchmark proved this:

P200MMX Orig VESA SVGA SVGA256
1 7.123 6.623 8.911 6.915
2 38.258 36.635 39.717 37.725

I was hoping the change would have more impact when running the same on my Cube system… well it didn’t:

65x T800 (integer) Orig VESA SVGA SVGA256
1 2.323 2.288 3.940 2.383
2 8.163 8.173 8.181 8.164

So as final conclusion, I will stay with the VBE SVGA drivers included in the V3.x code – it’s a good compromise between overall code/distribution size, comfort and speed.
The original VGA mode (0x12) will stay in the code forever to get comparable benchmark measurements – if you really need CGA/EGA/Hercules, you can always use the 2.x version.

The Cube

Meet The Cube – this is the Transputer Power-House successor to the Tower of Power, which was a bit of a hacked frame-case and based on somewhat non-standard TRAM carriers with a max. capacity of just 24 size-1 TRAMs…

The Cube hardware

This time I went for something slightly bigger  😎 …A clear bow towards the Parsytec GigaCube within a GigaCluster.
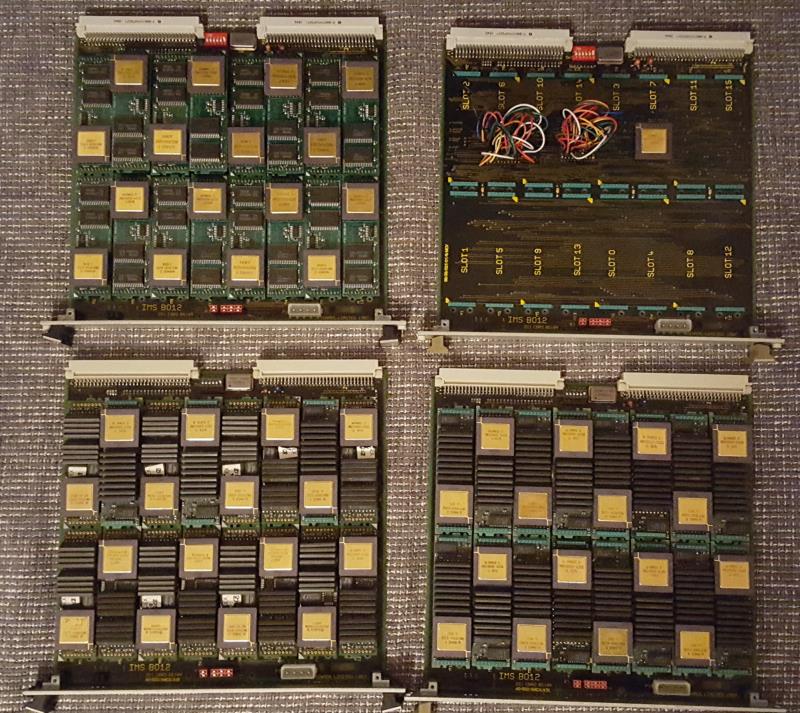
The Cube uses genuine INMOS B012 double-hight Euro-card carriers, giving home to 16 size-1 TRAMs – Parsytec would call this a cluster and so will I.
Currently The Cube uses 4 clusters, making a perfect cube of 4x4x4 Transputers… 64 in total. Wooo-hooo, this seems to be the biggest Transputer network running on this planet (to my knowledge)
If not, there still room left for more  😯

Just to give you a quick preview, this is what ispy responds when ran against the Cube:

Using 150 ispy 3.23 | mtest 3.22  # Part rate Link# [ Link0 Link1 Link2 Link3 ] RAM,cycle  0 T800d-24 276k 0 [ HOST ... ... 1:1 ] 4K,1 1024K,3; Display all 64 lines
1 T800d-25 1.7M 1 [ ... 0:3 2:1 3:0 ] 4K,1 2048K,3; 2 T800d-24 1.8M 1 [ ... 1:2 4:1 5:0 ] 4K,1 2048K,3; 3 T800d-25 1.8M 0 [ 1:3 6:2 5:1 7:0 ] 4K,1 2048K,3; 4 T800d-24 1.8M 1 [ ... 2:2 6:1 8:0 ] 4K,1 2048K,3; 5 T800d-25 1.8M 0 [ 2:3 3:2 8:1 9:0 ] 4K,1 2048K,3; 6 T800d-24 1.8M 2 [ ... 4:2 3:1 10:0 ] 4K,1 2048K,3; 7 T800d-24 1.8M 0 [ 3:3 10:2 9:1 11:0 ] 4K,1 2048K,3; 8 T800d-25 1.8M 0 [ 4:3 5:2 10:1 12:0 ] 4K,1 2048K,3; 9 T800d-25 1.8M 0 [ 5:3 7:2 12:1 13:0 ] 4K,1 2048K,3; 10 T800d-24 1.8M 0 [ 6:3 8:2 7:1 14:0 ] 4K,1 2048K,3; 11 T800d-24 1.8M 0 [ 7:3 14:2 13:1 15:0 ] 4K,1 2048K,3; 12 T800d-25 1.8M 0 [ 8:3 9:2 14:1 16:0 ] 4K,1 2048K,3; 13 T800d-25 1.8M 0 [ 9:3 11:2 16:1 17:0 ] 4K,1 2048K,3; 14 T800d-24 1.8M 0 [ 10:3 12:2 11:1 18:0 ] 4K,1 2048K,3; 15 T800d-25 1.8M 0 [ 11:3 ... 17:1 19:0 ] 4K,1 2048K,3; 16 T800d-24 1.8M 0 [ 12:3 13:2 18:1 20:0 ] 4K,1 2048K,3; 17 T800d-25 1.8M 0 [ 13:3 15:2 20:1 21:0 ] 4K,1 2048K,3; 18 T800d-25 1.8M 0 [ 14:3 16:2 ... 22:0 ] 4K,1 2048K,3; 19 T800d-25 1.8M 0 [ 15:3 22:2 21:1 23:0 ] 4K,1 2048K,3; 20 T800d-25 1.8M 0 [ 16:3 17:2 22:1 24:0 ] 4K,1 2048K,3; 21 T800d-25 1.8M 0 [ 17:3 19:2 24:1 25:0 ] 4K,1 2048K,3; 22 T800d-25 1.8M 0 [ 18:3 20:2 19:1 26:0 ] 4K,1 2048K,3; 23 T800d-25 1.8M 0 [ 19:3 26:2 25:1 27:0 ] 4K,1 2048K,3; 24 T800d-24 1.8M 0 [ 20:3 21:2 26:1 28:0 ] 4K,1 2048K,3; 25 T800d-25 1.8M 0 [ 21:3 23:2 28:1 29:0 ] 4K,1 2048K,3; 26 T800d-25 1.7M 0 [ 22:3 24:2 23:1 30:0 ] 4K,1 2048K,3; 27 T800d-24 1.8M 0 [ 23:3 30:2 29:1 31:0 ] 4K,1 2048K,3; 28 T800d-25 1.8M 0 [ 24:3 25:2 30:1 32:0 ] 4K,1 2048K,3; 29 T800d-25 1.8M 0 [ 25:3 27:2 32:1 33:0 ] 4K,1 2048K,3; 30 T800d-25 1.8M 0 [ 26:3 28:2 27:1 34:0 ] 4K,1 2048K,3; 31 T805d-20 1.7M 0 [ 27:3 ... 33:1 35:0 ] 4K,1 1024K,3; 32 T800d-24 1.8M 0 [ 28:3 29:2 34:1 36:0 ] 4K,1 2048K,3; 33 T800d-20 1.8M 0 [ 29:3 31:2 36:1 37:0 ] 4K,1 1024K,3; 34 T800d-24 1.8M 0 [ 30:3 32:2 ... 38:0 ] 4K,1 2048K,3; 35 T800c-20 1.8M 0 [ 31:3 38:2 37:1 39:0 ] 4K,1 1024K,3; 36 T805d-20 1.7M 0 [ 32:3 33:2 38:1 40:0 ] 4K,1 1024K,3; 37 T800c-20 1.6M 0 [ 33:3 35:2 40:1 41:0 ] 4K,1 1024K,3; 38 T800d-20 1.6M 0 [ 34:3 36:2 35:1 42:0 ] 4K,1 1024K,3; 39 T800d-20 1.7M 0 [ 35:3 42:2 41:1 43:0 ] 4K,1 1024K,3; 40 T800d-20 1.8M 0 [ 36:3 37:2 42:1 44:0 ] 4K,1 1024K,3; 41 T800d-20 1.7M 0 [ 37:3 39:2 44:1 45:0 ] 4K,1 1024K,3; 42 T800d-20 1.8M 0 [ 38:3 40:2 39:1 46:0 ] 4K,1 1024K,3; 43 T800d-20 1.8M 0 [ 39:3 46:2 45:1 47:0 ] 4K,1 1024K,3; 44 T800d-20 1.8M 0 [ 40:3 41:2 46:1 48:0 ] 4K,1 1024K,3; 45 T800d-20 1.8M 0 [ 41:3 43:2 48:1 49:0 ] 4K,1 1024K,3; 46 T800d-20 1.7M 0 [ 42:3 44:2 43:1 50:0 ] 4K,1 1024K,3; 47 T800d-20 1.8M 0 [ 43:3 ... 49:1 51:0 ] 4K,1 1024K,3; 48 T800d-20 1.8M 0 [ 44:3 45:2 50:1 52:0 ] 4K,1 1024K,3; 49 T800d-20 1.6M 0 [ 45:3 47:2 52:1 53:0 ] 4K,1 1024K,3; 50 T800d-20 1.8M 0 [ 46:3 48:2 ... 54:0 ] 4K,1 1024K,3; 51 T800d-20 1.8M 0 [ 47:3 54:2 53:1 55:0 ] 4K,1 1024K,3; 52 T800d-20 1.8M 0 [ 48:3 49:2 54:1 56:0 ] 4K,1 1024K,3; 53 T800d-20 1.8M 0 [ 49:3 51:2 56:1 57:0 ] 4K,1 1024K,3; 54 T800d-20 1.6M 0 [ 50:3 52:2 51:1 58:0 ] 4K,1 1024K,3; 55 T800d-20 1.8M 0 [ 51:3 58:2 57:1 59:0 ] 4K,1 1024K,3; 56 T800d-20 1.7M 0 [ 52:3 53:2 58:1 60:0 ] 4K,1 1024K,3; 57 T800d-20 1.8M 0 [ 53:3 55:2 60:1 61:0 ] 4K,1 1024K,3; 58 T800d-20 1.8M 0 [ 54:3 56:2 55:1 62:0 ] 4K,1 1024K,3; 59 T800d-20 1.8M 0 [ 55:3 ... 61:1 ... ] 4K,1 1024K,3; 60 T800d-20 1.7M 0 [ 56:3 57:2 62:1 63:0 ] 4K,1 1024K,3; 61 T800d-20 1.6M 0 [ 57:3 59:2 63:1 ... ] 4K,1 1024K,3; 62 T800d-20 1.8M 0 [ 58:3 60:2 ... 64:0 ] 4K,1 1024K,3; 63 T800d-20 1.8M 0 [ 60:3 61:2 64:1 ... ] 4K,1 1024K,3; 64 T800d-20 1.7M 0 [ 62:3 63:2 ... ... ] 4K,1 1024K,3;

Here are some more figures:

  • 32 x T800@25Mhz/2MB  (my very own AM-B404 TRAMs)
  • 32 x T800@20MHz/1MB  (mainly TRAMs from MSC and ARADEX)
  • -> 96MB of total RAM
  • -> 70-130 MFLOPS (single precision)
  • ~800MIPS combined integer power
  • ~60Amps @5V needed (That’s 300W  😯 )

So we’re talking about 70-130 MFLOPS here – depending which documentation you trust and what language (OCCAM vs. Fortran) and/or OS you’re using. That was quite a powerhouse back in 1990 (Cray XM-P class!)… and dwarfed by a simple Pentium III some years later 😉
Just for to give you an comparison with recent hardware (Linpack MFlops):

Raspberry Pi Model B+ (700 MHz) ~40 DP Mflops
Raspberry Pi 2 Model B (1000 MHz – one core) ~134 DP Mflops
Raspberry Pi 3 Model B (1200 MHz – one core) ~176 DP Mflops

Short break for contemplation about getting old…

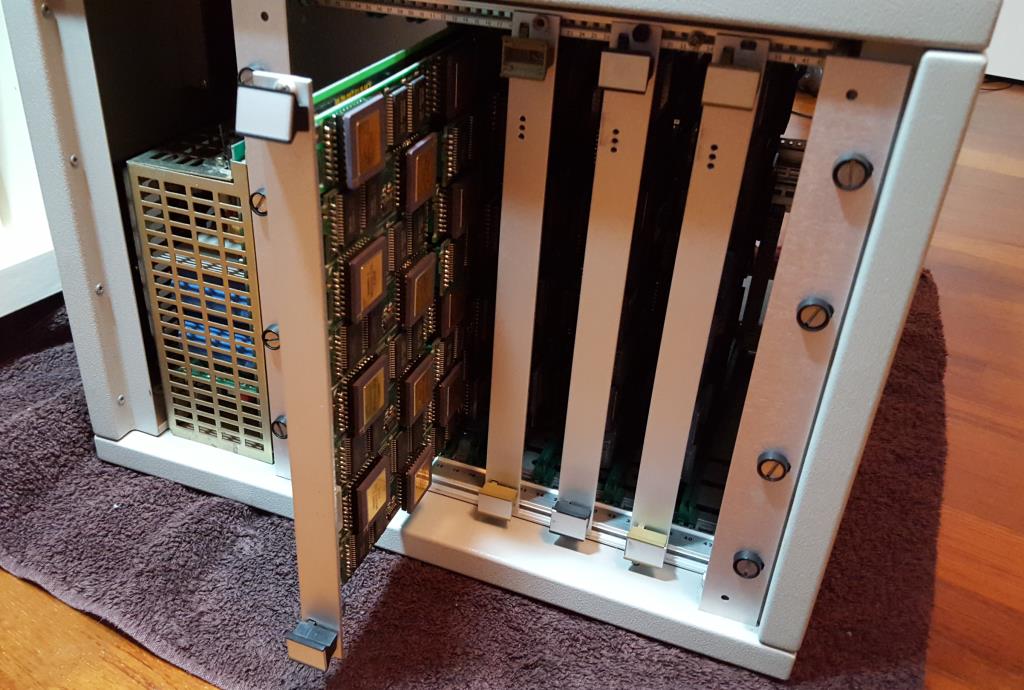
Ok, let’s go on… you want to see it. Here it is – the front, one card/cluster pulled, 3 still in. On the left the mighty ol’ 60A power supply:

Cube_Front_4x

Well, this is the evaluation version in a standard case, i.e. this is meant for testing and improving. I’m planning for a somehow cooler and more stylish case for the final version (read: Blinkenlights etc.).

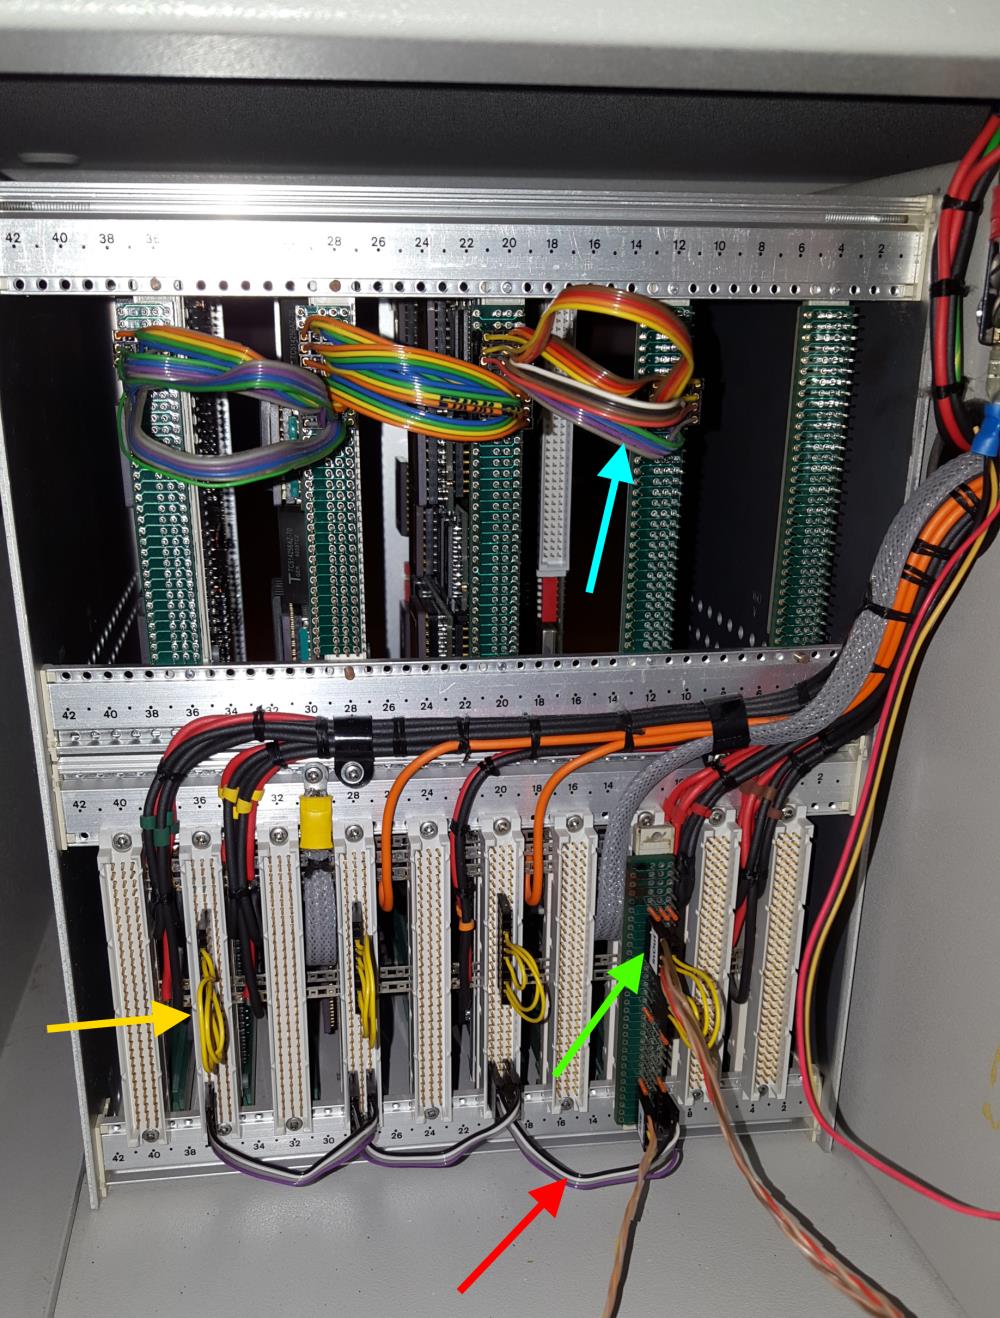
And here’s the IMHO more interesting view… the backside. It shows the typical INMOS cabling.

CubeBack

As usual, I color coded some of the cables.
The green arrow points to the uplink to the host system to which The Cube is connected to. Red are the daisy-chained Analyse/Reset/Error (ARE) signals. The yellow so-called jumper-cables connect some of the IMSB004 links back into the boards network. And in the upper row (blue) four ‘edge-links’ of each board are connected to its neighbor.

This setup connects four 4×4 matrices (using my C004 dummies as discussed here)  into a big 4×16 matrix. Finally I will ‘wrap’ that matrix into a torus. Yeah, there might be more clever topologies, but for now I’m fine with this.

Building up power

For completeness, here’s a quick look at how things came together.

The 4 carriers/clusters with lots of size-1 TRAMs… upper right one is the C004-dummy test board (now also fully populated). Upper left is pure AM-B404 love <3

ITEM_futter

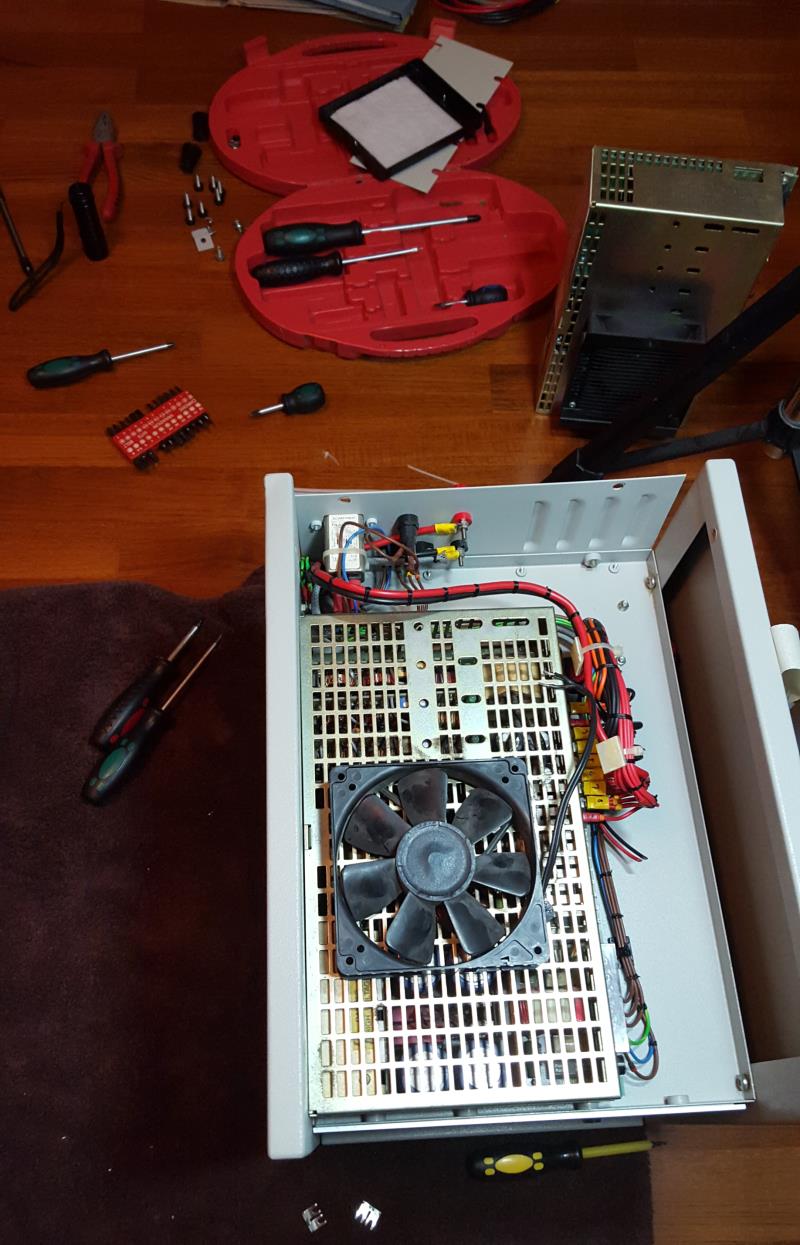
Fixing/replacing the broken power-supply (in the back), including the somewhat difficult search for a working cooling solution:

ITEM_repairing

The Cube software

Well there isn’t any specific software needed to run The Cube, but it definitely cries out loud for some heavily multi-threaded stuff.

So the first thing has definitely to be a Mandelbrot zoom. As usual, I used my very own version with a high-precision timer, available in my Transputer Toolkit.

Here’s the quick run in real-time – you can still figure out visually each Transputer delivering its result:

Other Transputer and x86 results of this benchmark can be seen in this post over here.

We need (even) more power, Igor!

So this is running fine – using internal RAM only. On the other hand, it seems that the current power supply has some issues with, well, the electric current.
When booting Helios onto all 64/65 Transputers which uses all of the external RAM, very soon some of them do crash or go into a constant reboot-loop.
By just reducing the network definition (i.e. not pulling any Transputers) to 48, Helios boots and runs rock-solid.
Because measuring the voltage during a 64-T boot shows a solid 5.08V on all TRAM-slots it most likely means the power supply either can’t deliver the needed amount of Amps (~60) or produces noise etc.  😥
So this is the next construction site I have to tackle.

To be continued…

Lies, damn lies and benchmarks

As soon you’re talking about Transputers with people which weren’t there back in 1985 you’ll be asked this very soon: “How fast are these Transputer thingies”? Then there’s a stakkato of “MIPS? Whetstones? Dhrystones?” etc…

As always with benchmarks, the only valid answer is “it depends”. Concerning Transputers that’s even more true.
First, I suggest you read this Lies, Damn lies and benchmarks document from INMOS itself. It pretty much describes the dilemma and all the smoke and mirrors around that matter.

Benchmarks? It depends.

So you’ve read the above INMOS document? As you might saw, it’s full of OCCAM code. That’s the #1 prerequisite to get fast, competitive code (as long you’re not into Transputer assembler). From there it gets worse if you use a C compiler or even FORTRAN…

My little benchmark

Because it scales so well, works with integer as well as floating point CPUs and also runs on the x86 host while using at least the same graphic output routines, my personal benchmark is CSAs Mandelbrot tool (DOS only).
My slightly modified version is part of my Transputer Toolkit, which is downloadable here. You will need that version because I extended the code of this Mandelzoom with a high precision timer (TCHRT, shareware, can’t remove the splashscreen, sorry) when run with the “-a” parameter. You’ll need my provided default “MAN.DAT” file, which contains 2 coordinates to calculate (1st & 2nd run) to get comparable numbers.

So to bench your Transputer system start it with:

 man -v -a

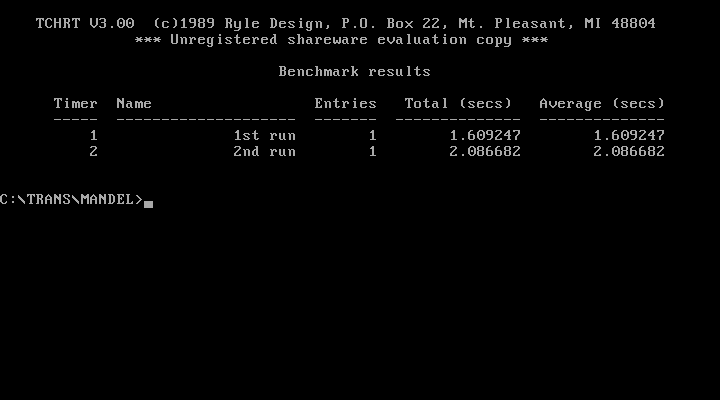
which runs it in VGA mode (640x480x16c), loads the coordinates from “MAN.DAT” and when done presents you with a summary screen like this:

csa_mandel_timer

To run it on your hosts x86 CPU, call it with “man -t -v -a”

The Results

Here are my results of the different Mandelzoon runs I made in the past. The blue background marks the host machine results, yellow are the integer timings and green is where the mucho macho things are happening.. well, sort of 😉
There are two columns for the results, the HD timer and the hand-timed runtimes. This is because these are from days before I enhanced the Mandelzoom.
This table will continously updated of course. e.g. the last row is pretty new – what might that system be?  😯

The sources are available in my github repository – so we can collaborate on enhancing and optimizing it.

HD in-programm Timer (s) Hand-Timed
System 1st 2nd 1st run 2nd run Comment
i386DX/33 (0kb L2) 1800 0 1:30:00
(canceled)
0 Canceled 1st run after a quarter of Mandelbrot was done…
i386DX/33 (0kb L2) + 387 588 3316 0:09:48 0:55:16
Am386/40 (0kb L2) + 387 490 2980 0:08:10 0:49:40  21% faster clock but only 10.5% better result
i386DX/33 (128k L2) + 387 274 1547 0:04:34 0:25:47
Am386DX/40 (128k L2) + 387 228 1292 0:03:48 0:21:32
i486DX/33 (8k L1, 0k L2) 01:06.24 368.56 Pretty close to a single T800-20
i486DX2/66 (8k L1, 128k L2) 00:33.72 185.51 Very close to 2x T800-20
Pentium 133 (256kb L2) 00:09.09 00:55.01 About 8x T800-20
Pentium 200 MMX 00:07.13 00:38.06 About 9x T800-20
AMD K6-3+/266 00:06.00 00:32.00 Downclocked, 64k L1, 256kb L2, 1M L3
Core i3-2120 3.3GHz 00:01.66 00:02.13 VirtualBox,1 CPU
1x T425-20 0:00:25 0:02:28   There’s something wrong here – needs re-run
2x T425-20 00:51.55 04:56.60
3x T425-20 00:34.42 03:17.81
4x T425-20 00:25.86 02:28.56
5x T425-20 00:20.74 01:58.96
6x T425-20 00:17.37 01:39.19
9x T425-20 11 62 0:00:11 0:01:02
13x T425-20 8 42 0:00:08 0:00:42
21x T425-20 5 27 0:00:05 0:00:27
25x T425-20 4 23 0:00:04 0:00:23
65xT425 (48x25Mhz, 16x20MHz) 00:02.323 00:08.163 Actually it was 64xT800 and one T425 forcing the calculation to integer
1x T800-20 01:09.13 06:27.18
1x T800-25  0:00:55 0:05:09 25% higher clockrate should result in 17.5% speedup. Incl comm-overhead that pretty much fits
1x T800-30 00:00.46 00:04.30
2x T800-20 00:35.65 03:13.79
3x T800-20 00:23.16 02:09.32
4x T800-20 00:17.43 01:37.04
5x T800-20 00:14.04 01:17.74
6x T800-20 00:11.82 01:04.83
5x T800-25 11 62 0:00:11 0:01:02
9x T800-20 8 40 0:00:08 0:00:40
13x T800-20 5 30 0:00:05 0:00:30
17x T800-25 00:03.8 00:18.59  “1st run” shows that the slow ISA interface is really  getting a bottleneck
21x T800-20 4 18 0:00:04 0:00:18
33x T800-20 00:02.88 00:11.97
65x T800 (32×25, 33x20Mhz) 00:02.21 00:05.74