All posts by Axel

http://www.geekdot.com/about-me/

Atari 2080STF – a prototype?

I bought this Atari 2080STF in 2003 and stored it as-is in my collection. The ST being my first 16bit machine I thought it could be a good point in time to un-dust and resurrect it 16 years later.

Atari 2080STF2080??  Yes, that’s true. There are different stories out there about their prototype/fake status.
As far as I see, there are two 2080STF versions out there:

  • The “Yugoslavian Version”
  • My Prototype

The Yugoslavian 2080STF is a pretty simple re-batching of a 1040ST which was upped to 2MB RAM and sold by a company called Mladinska Knjiga.

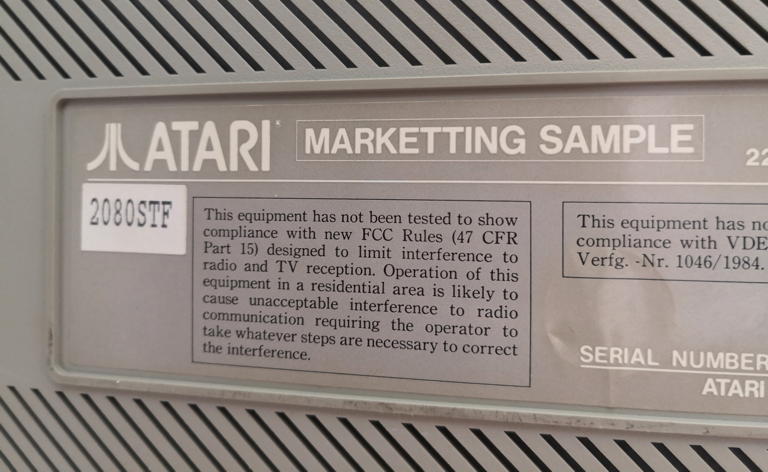
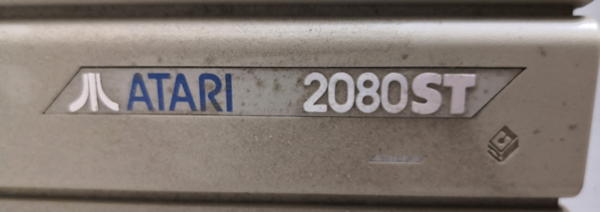
My 2080STF is different. In contrast to the Yugoslavian it features a proper, 3d embossed label, not some flat DIY thing.
Instead of some serial# printing looking like made with a children-stamping kit it says this:

MarkeTTing Sample… should it have been an omen?

Marketting? Well… somebody’s been in a hurry or not native to English. Anyhow, the label shows the same quality as those used with Ataris produced in greater numbers. That said, there’s no serial number and the model ist just a paper-sticker.

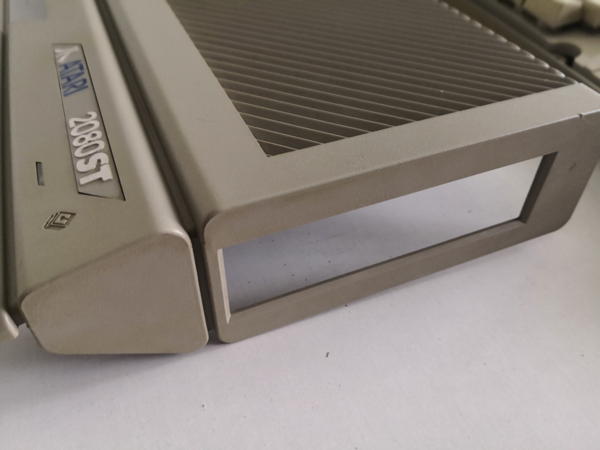
Next unique thing is the floppy cut-out on the right side. It’s the same square one like on a Falcon, but the plastics are in the proper ST grey. Mhhhh….

Looks Falcon’ish, but it isn’t…

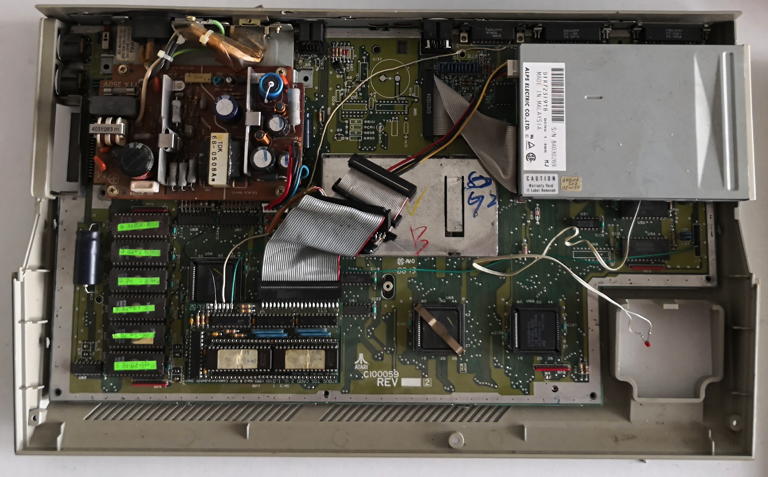
Finally the mainboard: Yes, it’s very 1040STFM without the M(odulator) part. But then it features a yet undocumented issue number of C100059, production week 8813. And mind the installed Blitter at the lower right.

Lots of ugly mods to be removed ASAP! But I’ll keep that IDE controller sitting on top of the 68k.

So what do we got here? Not having any matching-numbers system like in the vintage car world, we can only guess…
It might be a real “Marketing Sample” made for a planned pimp-up of the 1040 family. On the other hand it also can be a nicely composed Frankenstein system made of parts e.g. being sold at Ataris sell-out in 1995.
Given the sum of the unique parts being used, I opt for the “real marketing sample”, probably being put together using available parts and meant for checking out, if there’s a demand/market for such model(s)… and history taught us that there wasn’t.

Anyhow, I pulled out the crap which had been “installed” over the previous years…

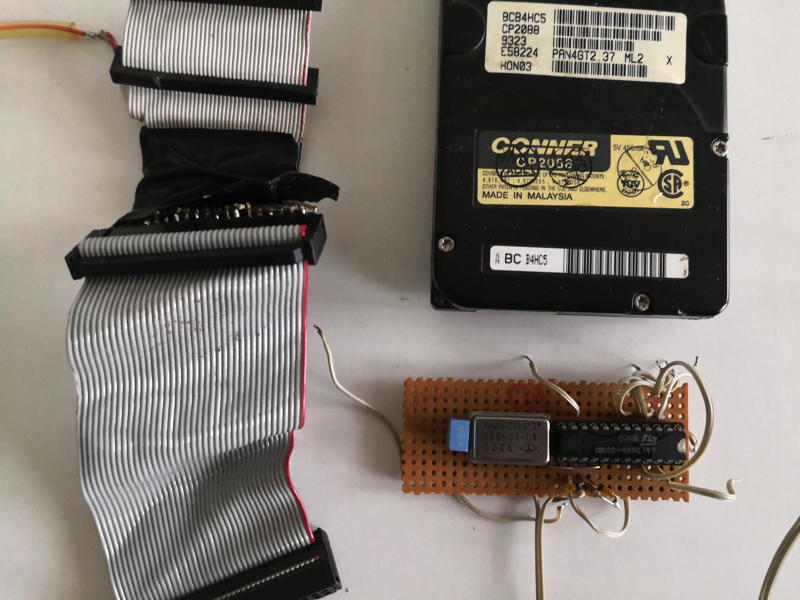
Boy, look at that IDE “cable adaptor”… a soldering nightmare. And who needs more than 19200 baud anyhow?

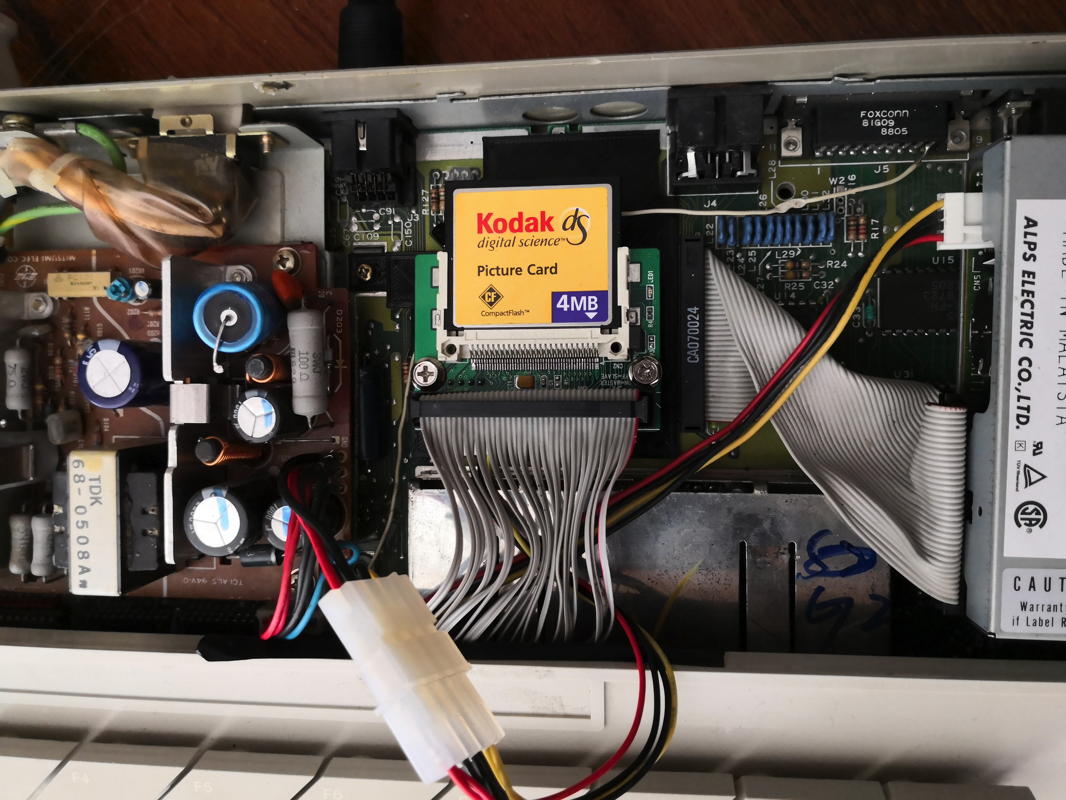
So the noisy 2.5″ 80MB harddrive got replaced by a CF-Card which nicely fits where the modulator would be, if this would be a STFM.
Additionally I 3D-printed a mounting thing for it which you can download here.
Finally, the build-in Hard & Software TOS-Card II 2.06 (that’s a long product name!) got fixed so it actually can switch between the on-board TOS and the 2.06 sitting on the card.

When everything’s done, it looks nice and tidy down there:

Yeah, that’s a 4MB card… just for testing. I took a “spliced” IDE cable I made ages ago – does a good job to squeeze underneath the keyboard.

So I think I’m all set for some pure 8MHz 68000 fun… oh boy, did I love those days.

Restauration

In 2026 (23 years after getting it!) I decided to give this rare ATARI more love… which it really deserves – shame on me!
So I stripped it to clean things and (again) freed it from all unnecessary things.

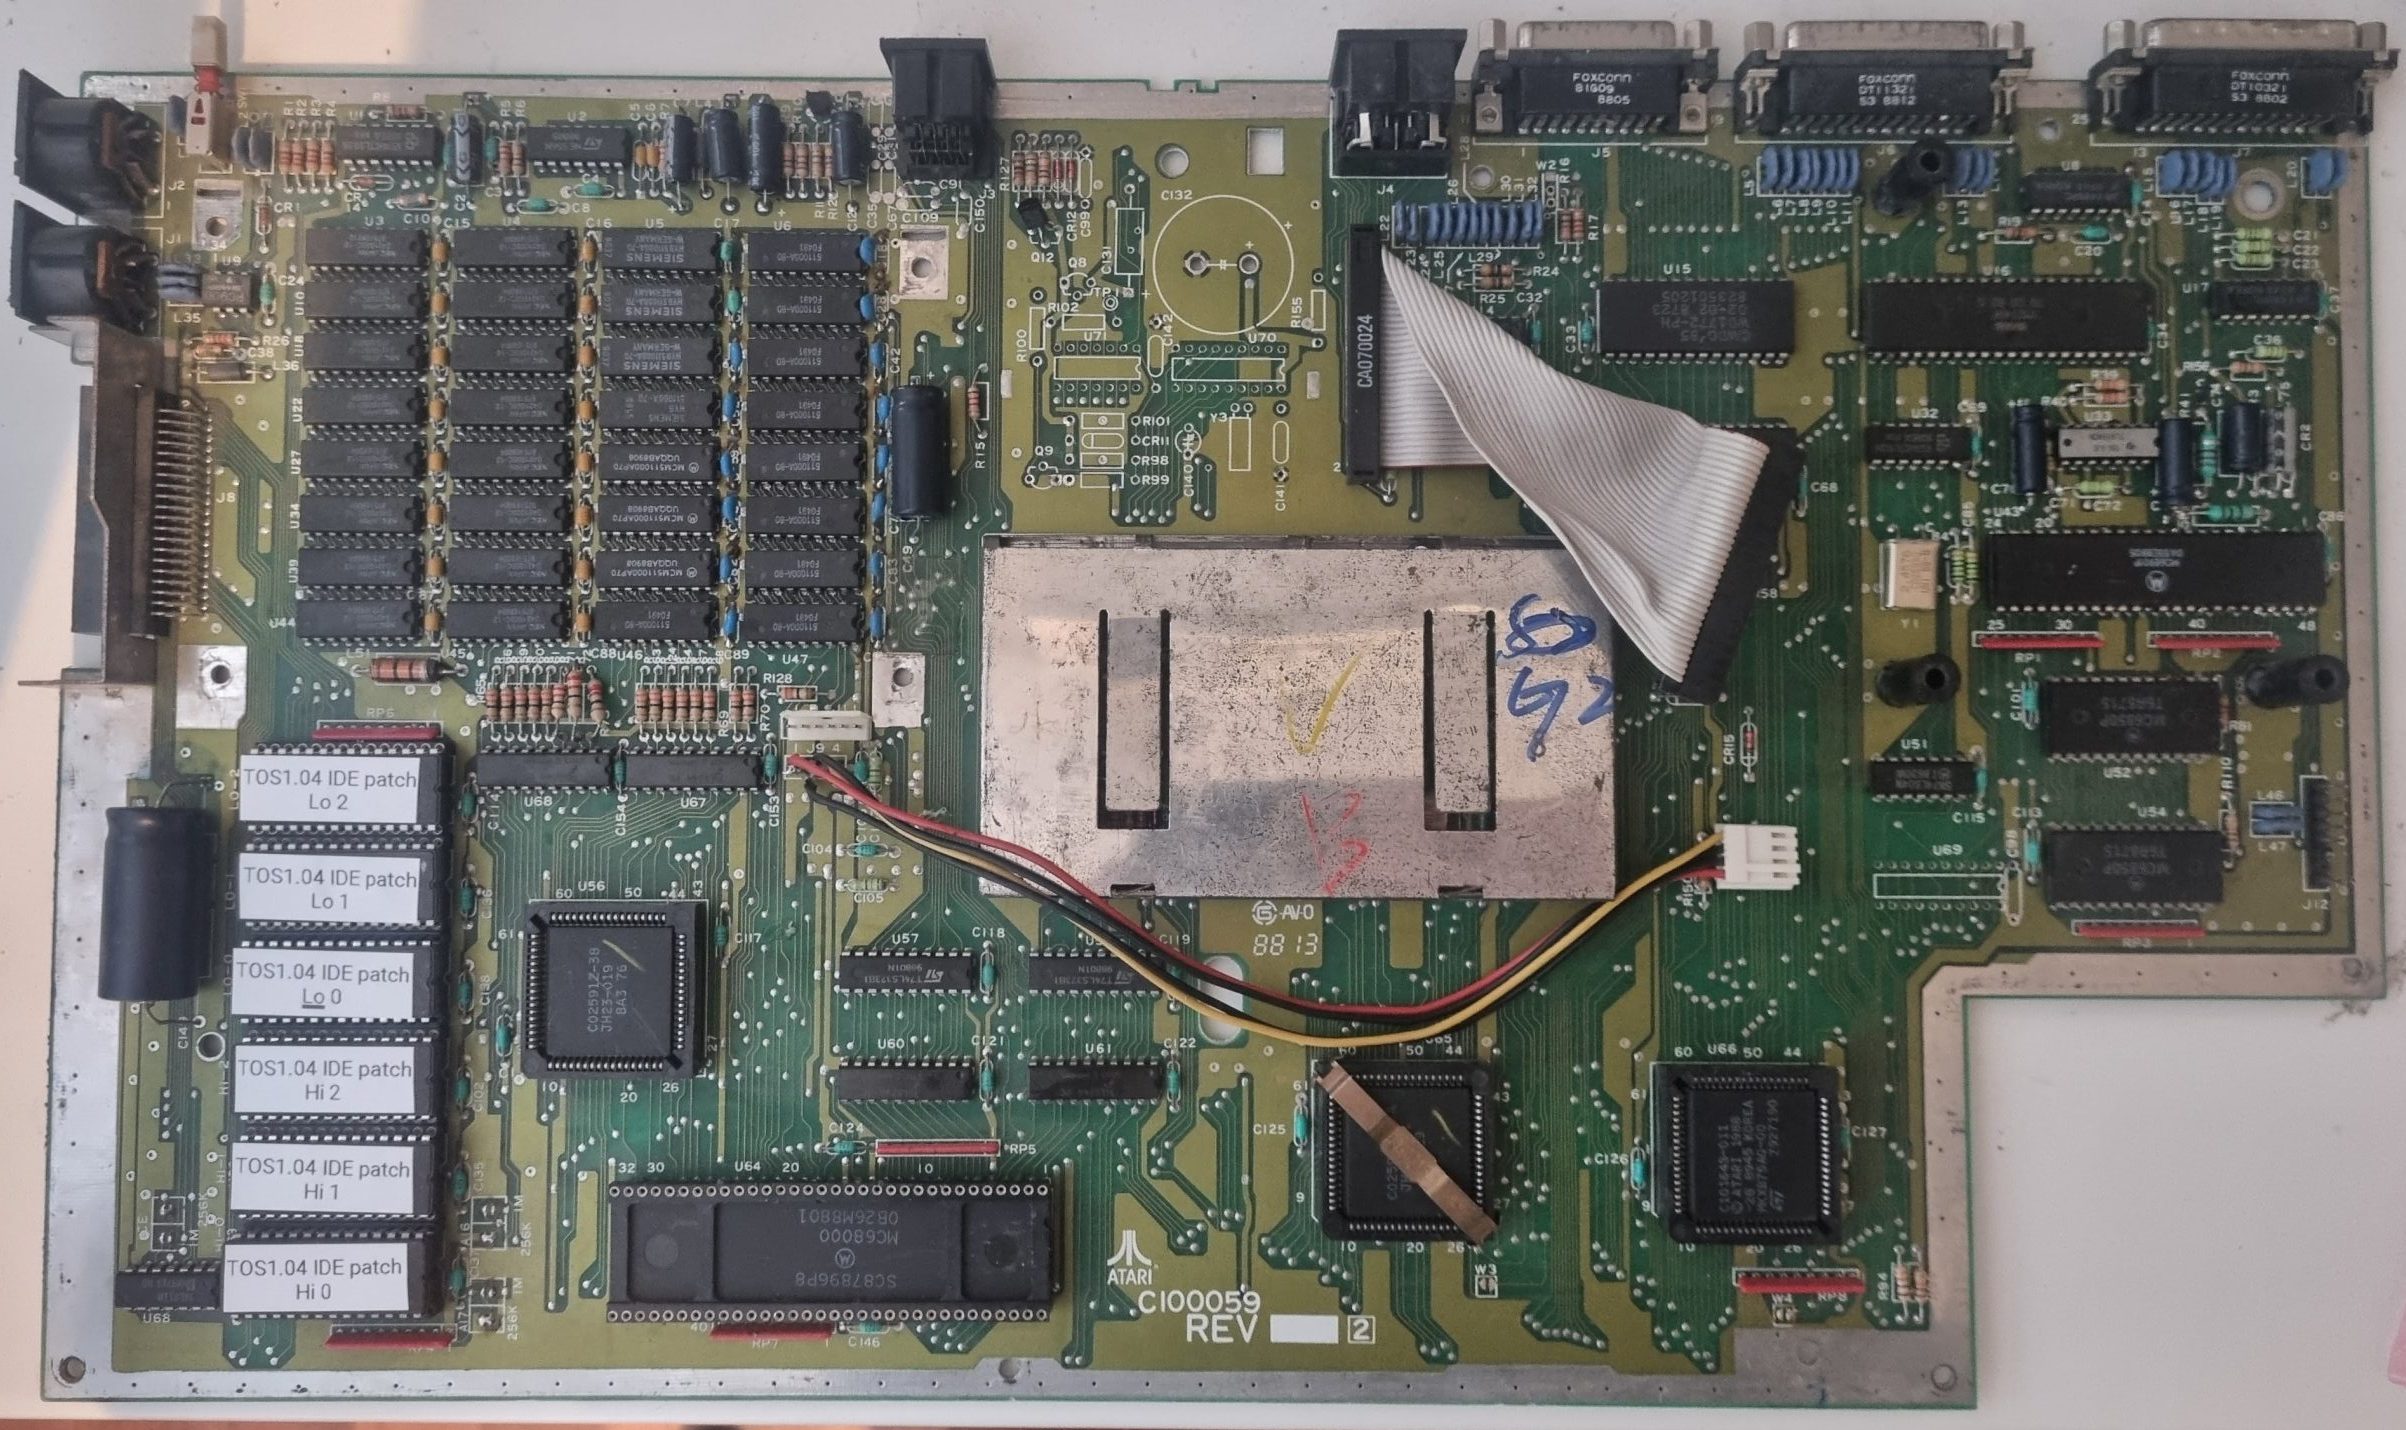
Here’s the bare board (Rev. C100059). I removed the TOS2.06 & IDE interface and the MAG!X ROMs, which I replaced by “contemporary” TOS 1.04 ROMs.

Like some of you mentioned, this prototype board has something very special, no all-in-one ATARI ever had:

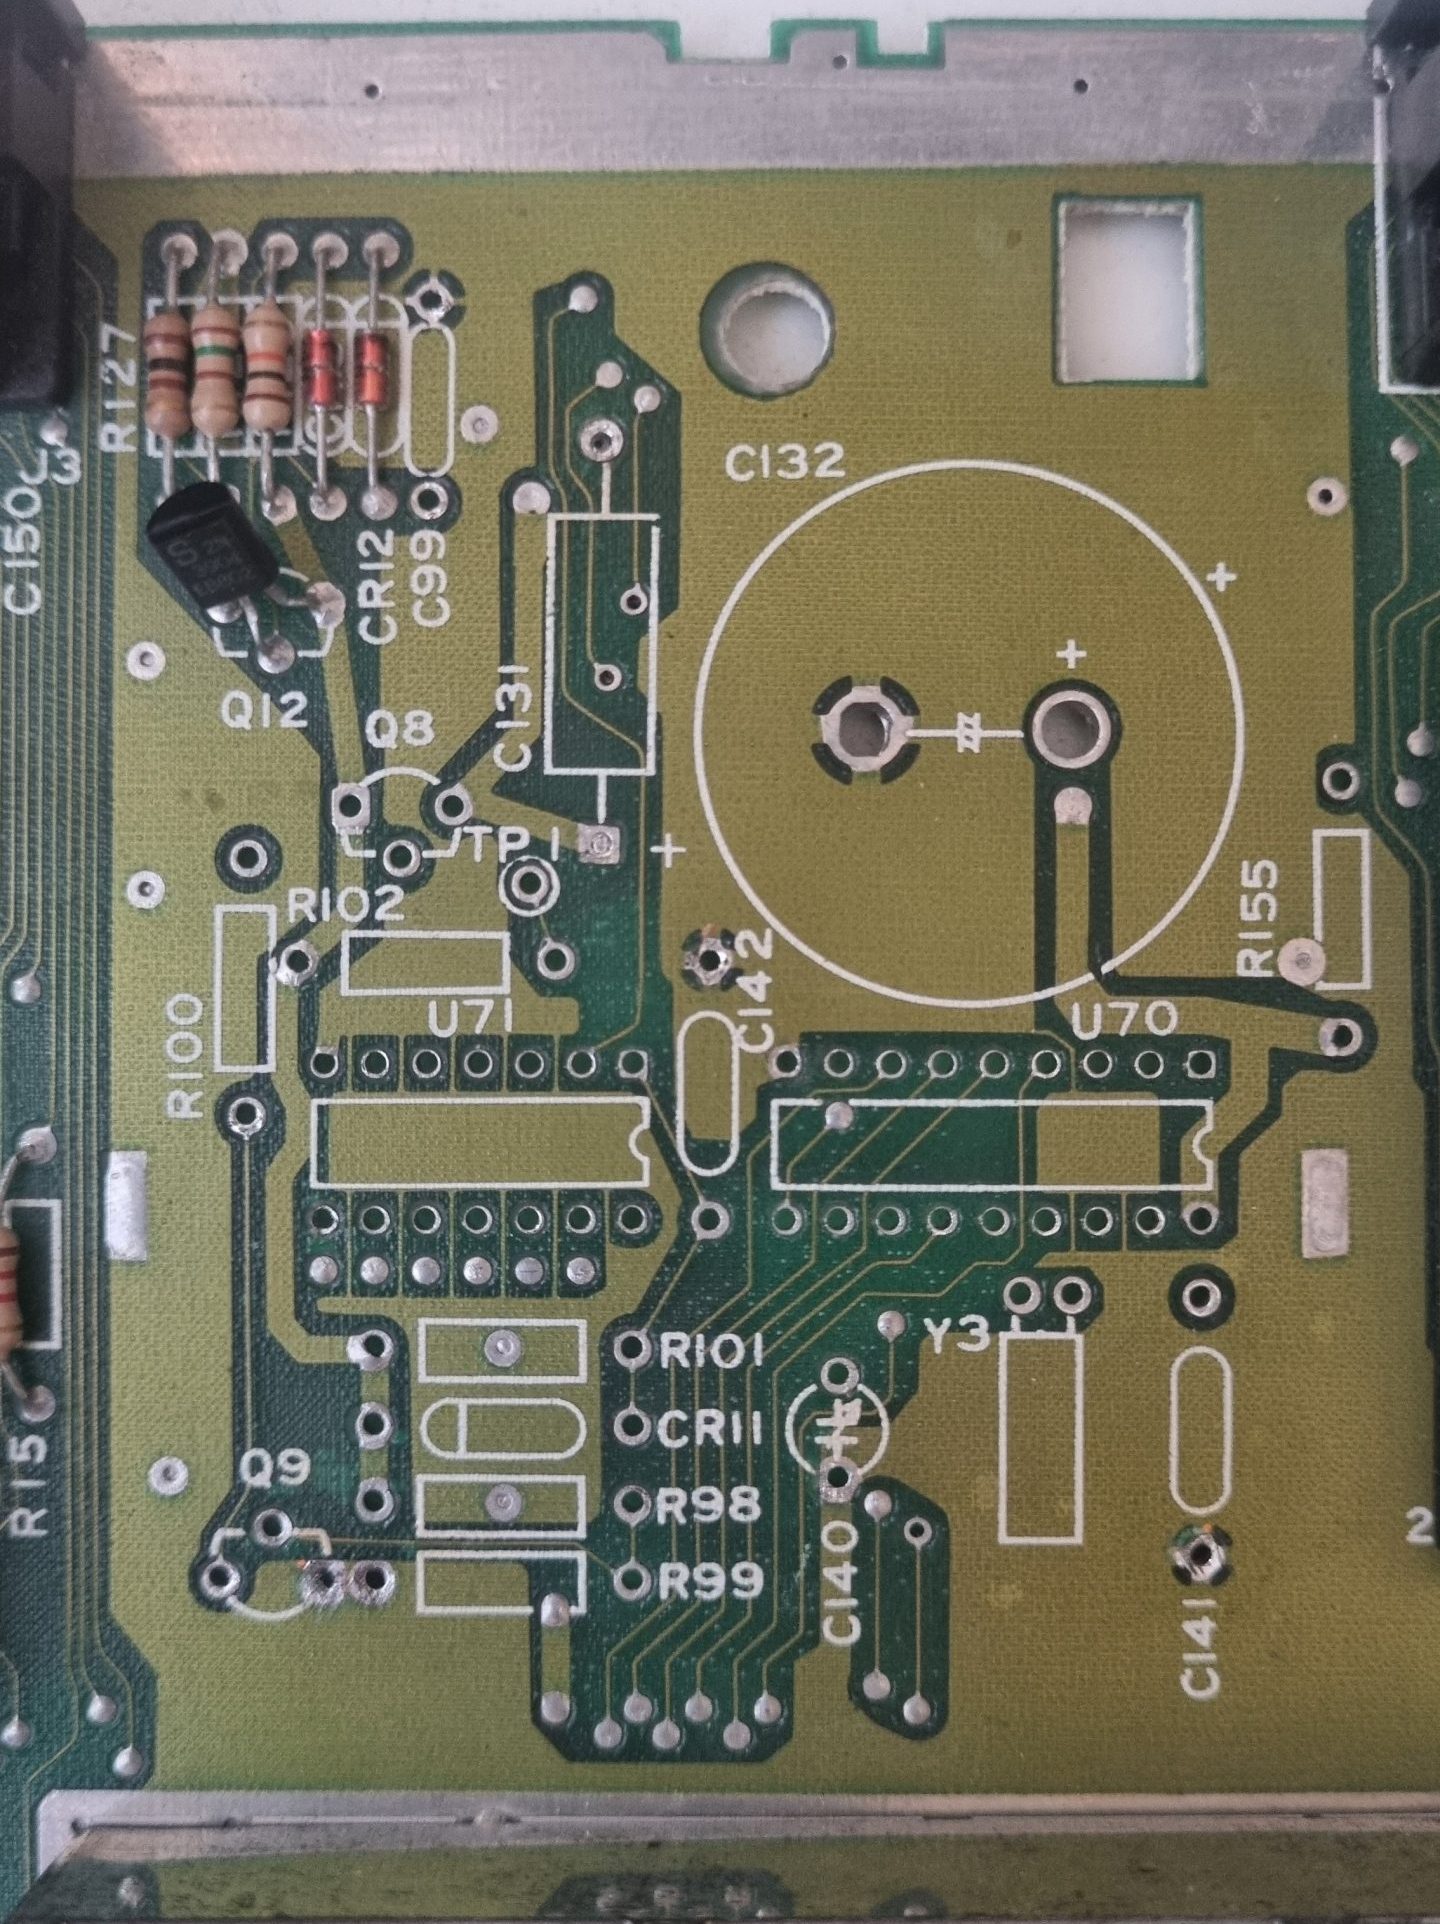
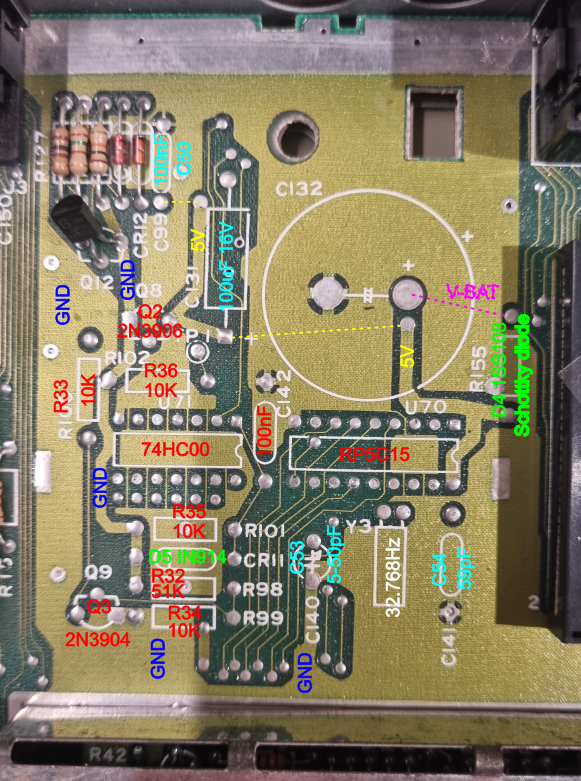
In the top-middle section of the board, where you’ll normally find the TV-modulator in an 1040STFM is an unpopulated space with a very suspicious marking:

[All solder-holes already cleared from solder by me]
The coin-cell battery gives a clear hint: This is the real-time clock you’ll normally find in the Mega-ST series.
So even it’s a rare model, I thought: “Would it work? Was it left empty intentionally or they just hadn’t the time left populating it?”

So I started to check the empty spots and silk-screen printings to the original Mega-ST schematic. All major parts are there… but where’s the RTC-PAL?
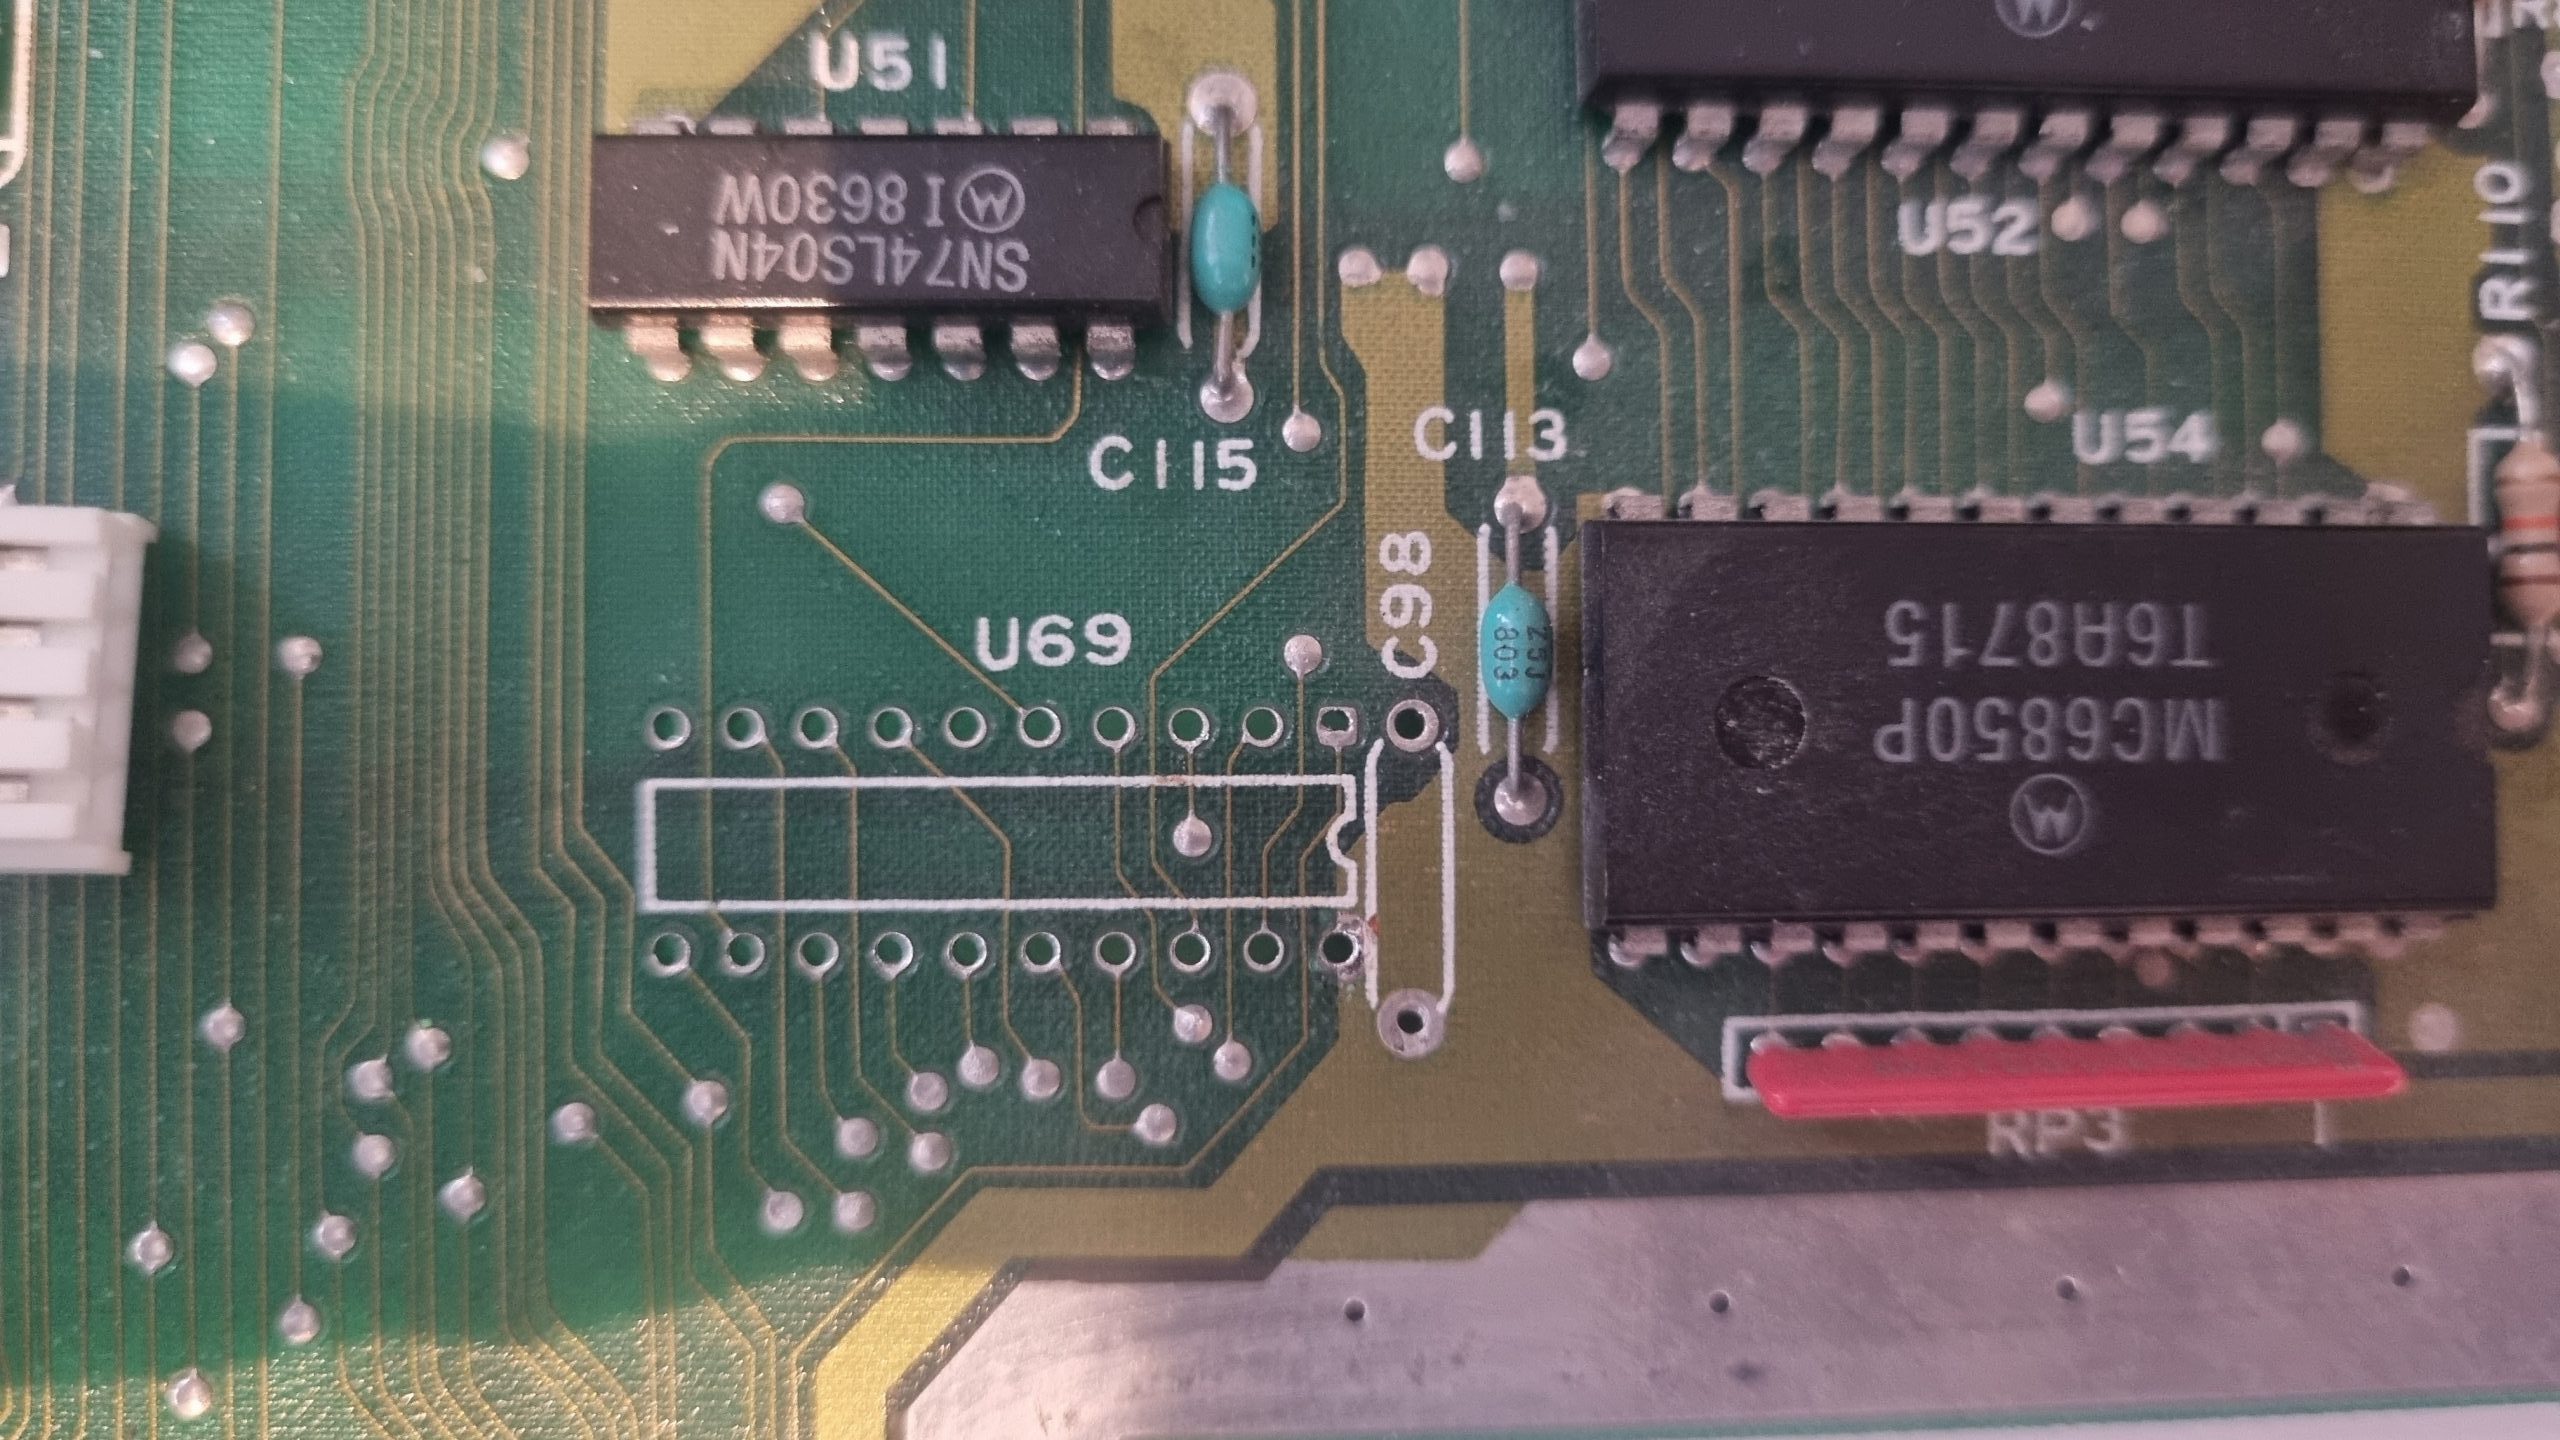
Ah, there it is. In the bottom left corner of the board, next to the two ACIAs where is also sits in a Mega-ST.

Here’s the mapping… the part-markings are different of course.
ATARI would not be ATARI if there wasn’t a mistake in the on-board markings.


“R155” is not a resistor but a Schottky diode.  But everything else was more or less 1:1 Mega-ST design.
With the part name I added the marking of the original Mega-ST schematic.

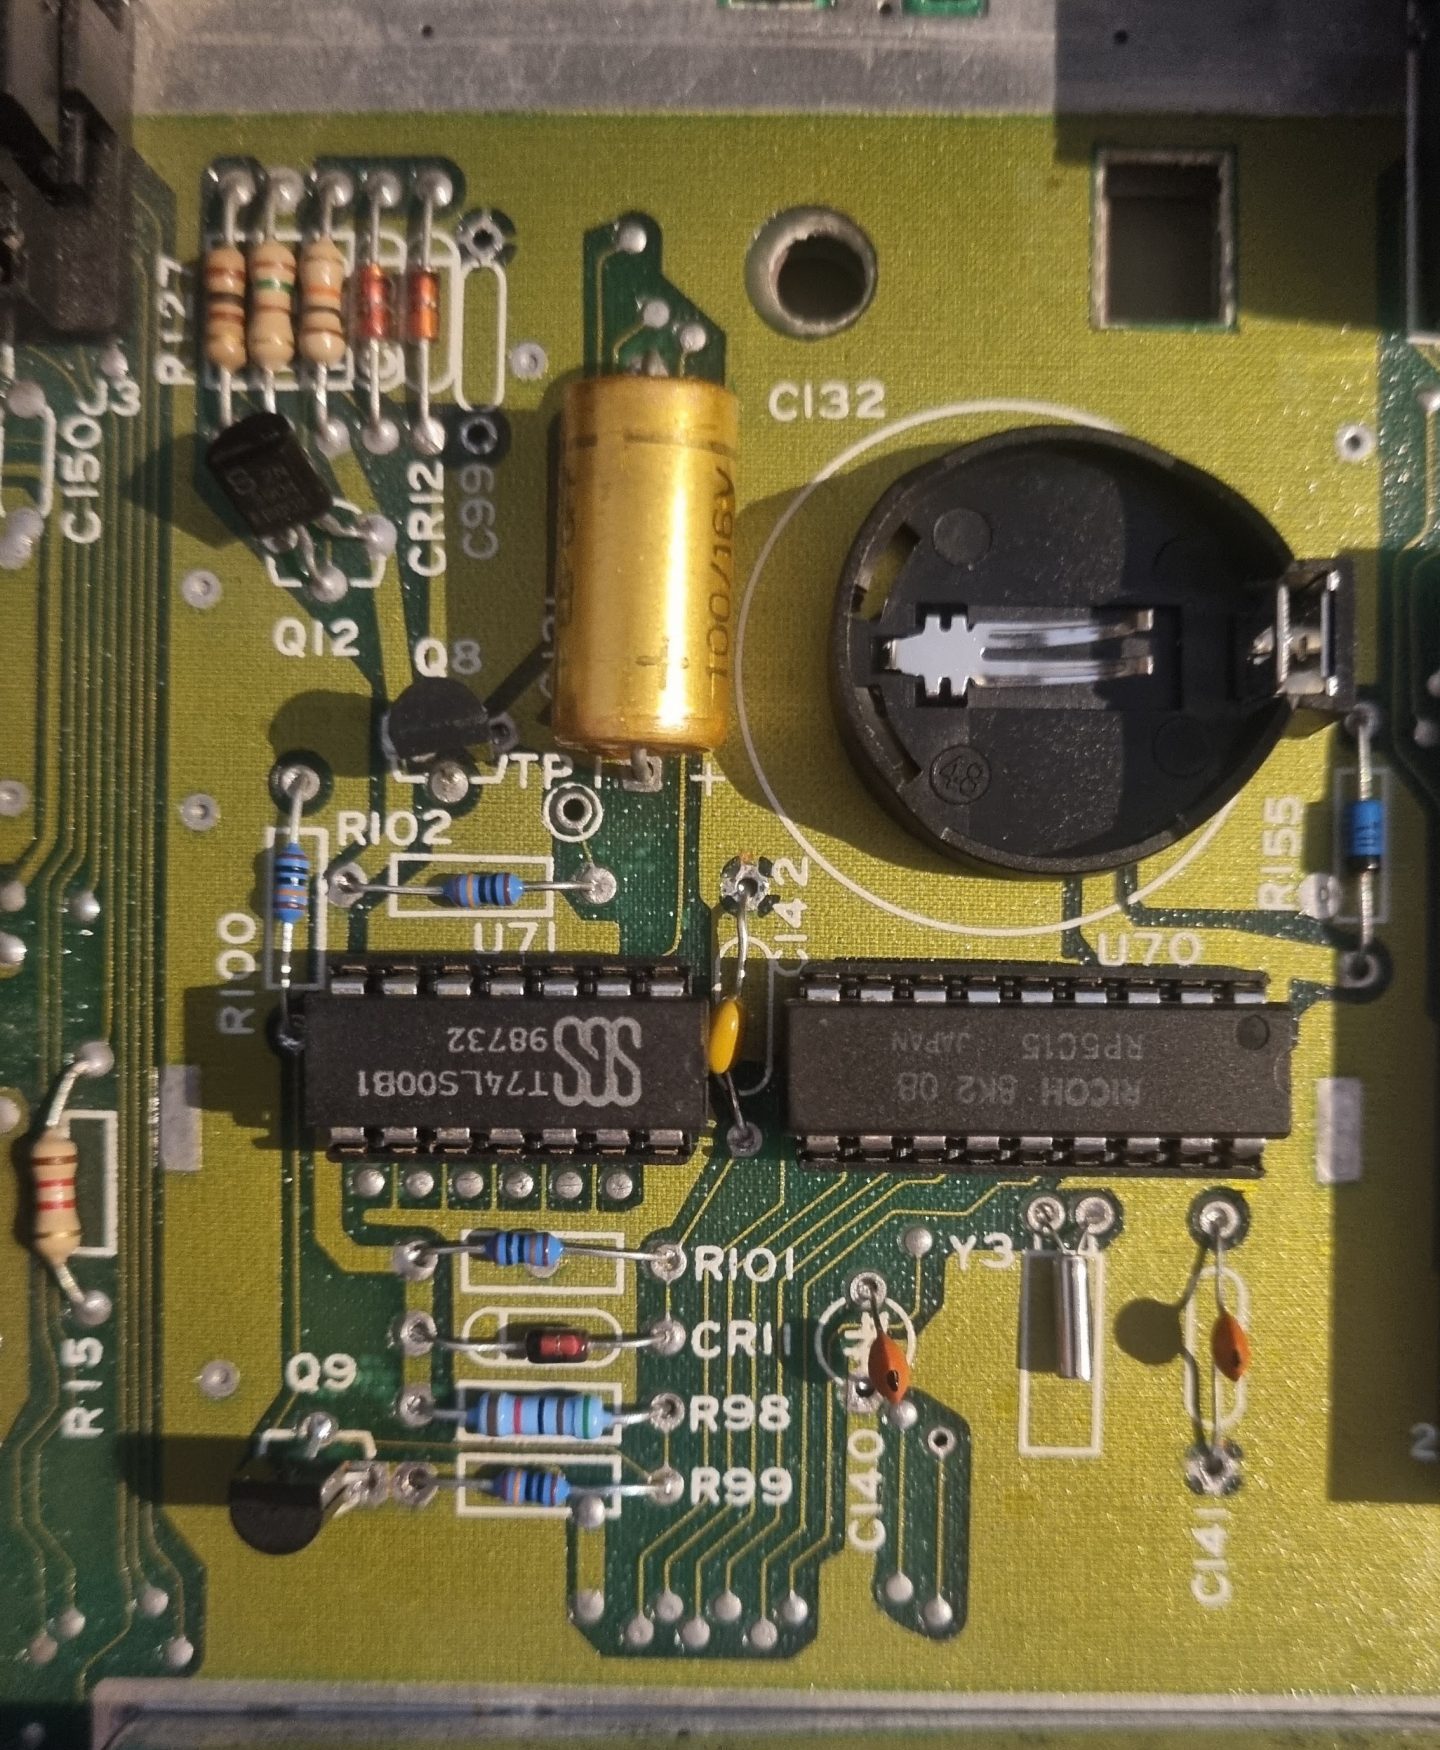
So in went the parts. The almighty internet gave me a JED file fpr the RTC-PAL and reading its specs, it was a good bet that the 32.768Hz I use needs about 22pF caps.
The coin-battery holder was meant for a bigger cell with an unusual pinout – so I mended a CR2032 to fit. All done, it looks like this:

NB: The 74LS00 was inserted for testing only. To save on battery, this has to be replaced by a 74HC00!

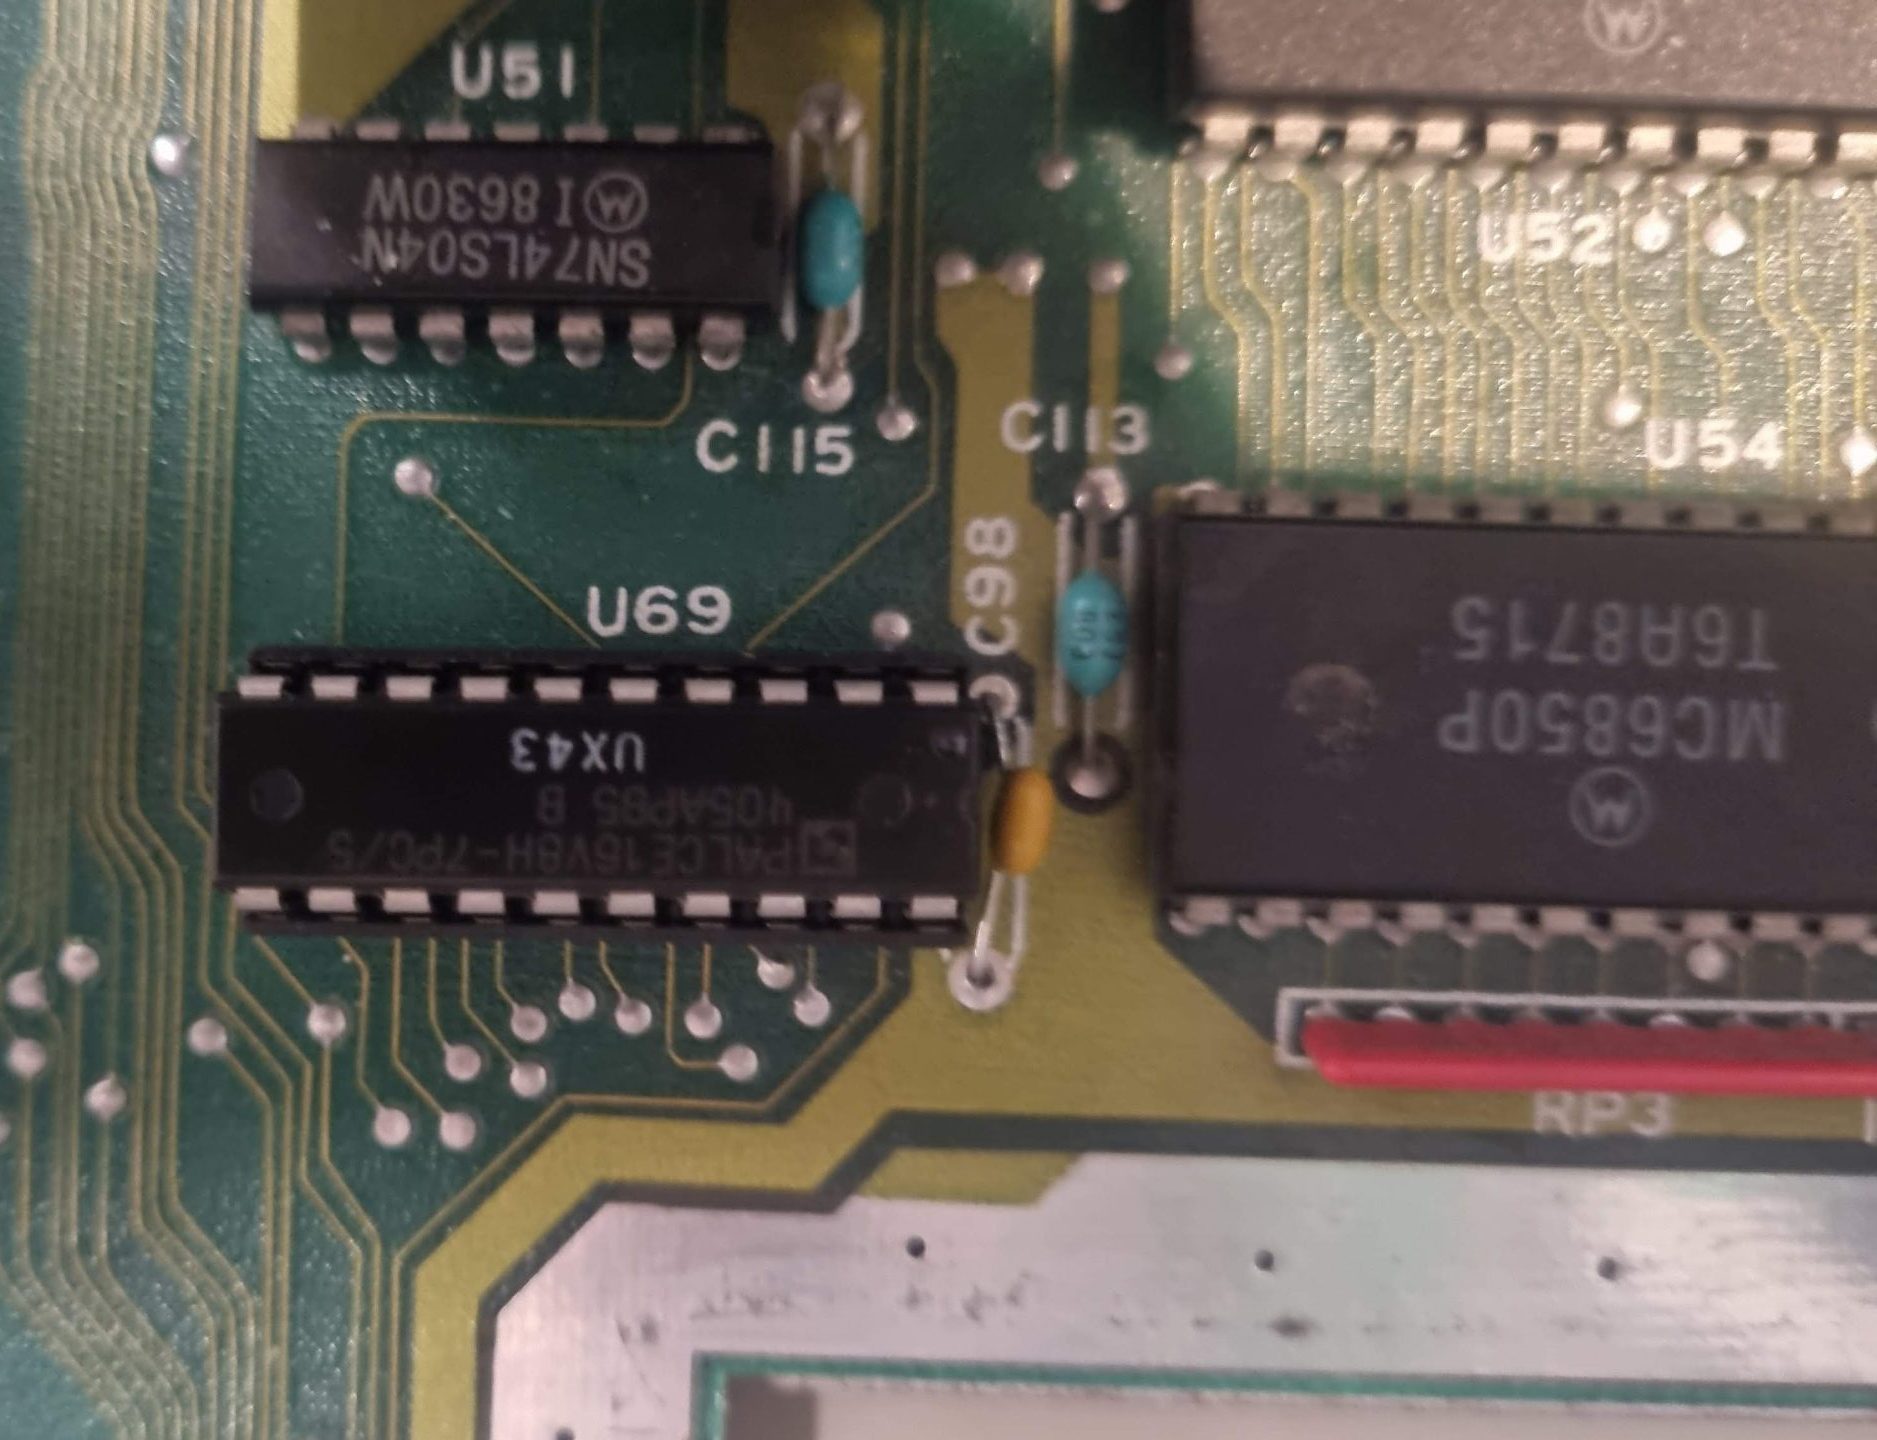
And the GAL (Which is a “more modern” 16V8H PALCE here):

After this – lo and behold – this prototype is even more unique.
Actually, it’s like a Mega-ST4 in a 1040ST case – RTC and Blitter included.

Next up: Clean the case and keyboard real good. But that’s boring, so no documentation here 😉

Carrera in an SE/30 – the code part 3

Ahh, back in cosy main: – looks much easier now after that crazy MMU stuff in the previous part, right?

The next subroutine called is proc32. In the complete source code (reminder: Available at GitHub) I commented that with “works (get some RSC strings)“… and well, that sums it up pretty good.
proc32 loads (i.e. creates handles) from the resource-fork, e.g. the icons used in the menu-bar and several error-messages like “This application must run on the 68030 processor, please quit all other 68040 applications and re-run this application.“. That’s it. Boring…

That boredom instantly changes when we get to the next subroutine proc43located at 0x29DA…

I did it my way…

One fascinating thing about classic Mac OS is how easy it is to patch system calls, aka Toolbox traps. For example in the previous post we came about _BlockMove, which is a Toolbox call to copy an amount of RAM from A to B.
For example you have just read this article about a faster BlockMove method, you’re totally free to patch (read: replace) _BlockMove with your speedier version and automatically use this throughout your application – or even system-wide, if you’ve created an INIT…  [If you want to know all about it… here’s a book for you]

And that’s what proc43 heavily does. Because it’s a long subroutine (230 lines) so I will give you just one example – the inline comments should do…

2BE2:        MOVE    #$A02E,D0     ; BlockMove
2BE6:        _GetTrapAddress newOS ; (D0/trapNum:Word):A0\ProcPtr 
2BE8:        MOVE.L  A0,$270(A5)   ; oldBlockmove
2BEC:        LEA     data42,A0     ; myBlockMove
2BF0:        TST.B   MMU32bit      ; loMem global "current address mode"
2BF4:        BNE.S   lae_70        ; skip if 32bit clean machine else
2BF6:        LEA     data43,A0     ; use a different entry for dirty machines
2BFA: lae_70 MOVE.L  A0,$274(A5)   ; save routine pointer to $274(A5)	
2BFE:        LEA     data41,A0     ; DC.L 0000 0000
2C02:        MOVE.L  $270(A5),(A0) ; save oldBlockmove vector into there
2C06:        MOVE.L  #$A02E,D0     ; BlockMove
2C0C:        LEA     data40,A0     ; aaaand replace it by myBlockmove
2C10:        _SetTrapAddress newOS; (A0/trapAddr:ProcPtr; D0/trapNum:Word)

This is the sum up what else being done:

  • Save all debugger vectors into A5-world locations (suspicious. I sense Macsbug killing…)
  • Load the PACK4 resource, that’s the Floating Point emulation package (aka SANE) if no FPU found
  • Check & read several system Gestalt codes into A5-world (0x2AAC-0x2B44)
  • Patch several Toolbox traps
    • SwapMMUMode replaced by data19
    • VM_Displatch by data22
    • Pack4 by data10
    • Pack5 by data11
    • BlockMove by data40
    • jClearCache by myClearCache
    • GetNextEvent by myGetNextEvent
    • GetResource by myGetResource
    • SCSIdispatch by mySCSIdispatch
    • DrawMenuBar by myDrawMB
    • LoadSeg by data31
    • UnLoadSeg by data32
    • HWPriv by data33
    • vStdExit by data34

So far, so many.  Then there’s some RAM copying going on, of which I’m currently not quite sure what it is good for (0x2CAC-0x2CD8) 💡 .

Finally, the myShutdown routine is installed into the Shutdown Manager, i.e. it will executed before the Mac is powered down/restarting (it simply switches the host back to its own 68030). After that, RTS into main…

“There and back again…”

Barely back in main, a JSR 12(A6) warps us into MacII_4th, the last of the four handlers every supported system has.

This loads specific data from the FPSP into RAM (namely IDs 0x12C and 0x12D).
Finally a special floppy driver is installed (myFloppyDrvr @ 0x954) which IMHO just differs from the original in handling the ‘040 caches correctly. That was that and back to main…

The next sub-routine in line is chkATalkVer. I can rightfully name that routine because it’s short and crystal clear: Figure out if AppleTalk is installed, and if true, return its version in D0 (and also write it into A5-world). C’est ca…

This is the end…

It’s getting ugly (for now)… proc42 will be called – the last subroutine in main before my SE/30 crashes and burns  😥

The first few lines (0x28F4-0x293C) are comparably harmless. They are working around a bug in System 7.1 which was corrected in 2/17/92 according to some dark sources (“Corrected value of timeSCSIDB from 0DA6 to 0B24”).
After that, proc38 (0x293C) is called which again calls proc39 and something’s done with the TimeManager, not really sure what’s exactly going on, but it feels like a timing-benchmark heavily using InsTime, PrimeTime and RmvTime Toolbox calls.

[hold yer breath] Then we’re getting closer to the flat line… The stack is filled with these parameters:

2940:   CLR.L   -(A7)       ;PUSH.L 00000000 
2942:   CLR.L   -(A7)       ;PUSH.L 00000000 
2944:   CLR.L   -(A7)       ;PUSH.L 00000000 
2946:   PUSH.L  #$80008000  ;       80008000
294C:   CLR.L   -(A7)       ;PUSH.L 00000000 
294E:   PUSH.L  #64         ;       00000040
2954:   PUSH.L  #1          ;       00000001

and SpeedProc is called…

…To be continued 😉

P.S: I changed course (again) and started to investigate more into the C040’s hardware. The more I understand of the INIT/CP workings the more I can’t fight the idea that it really might be a hardware timing issue.

Carrera in an SE/30 – the code part 2

3rd handler

Next up is the 3rd handler, MacII_3rd: (0x3F94) in our case. Actually it’s called with JSR 8(A6), but that’s an 8 byte offset to the ‘base-address’ of any handler. Clever stuff, huh (Google for ‘pointer-table’)?

This subroutine contains serious magic and was a real hard nut to crack. Especially because it tricked me into believing that I’ve found the ‘crashsite’… which, to spoil the tension, isn’t.
It just kept on killing  Macsbug, because it’s so low-level.

What this routine does is replacing the Vector Base Register (VBR) which ‘lives’ at address 0x00000000. Evil stuff.

  • After disabling interrupts and switching to 32bit-mode a field with 6 long-words (data107) will be populated with data generated in other routines.
    For now I can only guess what these entries are (Values from my SE/30 given in brackets). We’ll discuss all that further down.
  • 0x3FC6 to 0x3FD8 calculates the size of the chunk of code starting at data106 (0x4008) to the beginning of MacII_4th (i.e. the end of Mac_3rd), which is 180 bytes.
  • Using this length, the routine first saves the current VBR onto the stack using the system call _BlockMove.
    Then the original VBR (+some more) will be replaced by the new version beginning at data106. (Killing Macsbug – more on that later)
  • BSR 53_cmd_1x is been called. This brings the Carrera040 into life most likely using the just copied VBR (This is discussed in much detail further down).
  • Now the contents of the stack (= copy of the original VBR) will be copied back into its place, this time using a classic DBRA loop (0x3FF4). My guess, no Toolbox call possible at the moment.
  • Adjust the stack, back to 16bit mode, restore Registers and return-from-subroutiene. Done.

Here’s the code doing all this:

3F94:MacII_3rd: MOVE    SR,-(A7)     ; 3rd call from MacII handler
3F96:           ORI     #$700,SR       ; Set bit 9-11 of SR (disable Interrupts)
3F9A:           MOVEM.L D0-D2/A0-A2,-(A7)
3F9E:           MOVEQ   #1,D0
3FA0:           _SwapMMUMode  
3FA2:           PUSH.B  D0
3FA4:           SUBA.L  A2,A2         ; faster movea.l #0,a2
3FA6:           LEA     data107,A0    ; Filling the data into the 6x32 field
3FAA:           MOVE.L  96(A5),D0
3FAE:           MOVE.L  D0,(A0)+      ; SE30: 9FE00
3FB0:           LEA     data69,A1
3FB4:           MOVE.L  A1,(A0)+      ; SE30: 9D6E2 (User/Supervisor Rootpointer?)
3FB6:           MOVE.L  $64(A5),(A0)+ ; 807FC040
3FBA:           MOVE.L  $6C(A5),(A0)+ ; 807FC040
3FBE:           MOVE.L  $68(A5),(A0)+ ; 00000000
3FC2:           MOVE.L  $70(A5),(A0)+ ; 00000000
3FC6:           LEA     MacII_4th,A0
3FCA:           MOVE.L  A0,D2
3FCC:           LEA     data106,A0
3FD0:           SUB.L   A0,D2         ; 'distance' from data106 to MacII_4th
3FD2:           SUBA.L  D2,A7
3FD4:           MOVEA.L A2,A0
3FD6:           MOVEA.L A7,A1
	  	; save the current VBR to the stack
3FD8:           MOVE.L  D2,D0
	  	; A0 = SE30: 00000000 (src)  - IIci: $FBB08000
	  	; A1 = SE30: 027ff34c (dest) - IIci: $3BF9FC6
	  	; D0 = B4    (count)   - SAME on the IIci!    
3FDA:           _BlockMove ; (A0/srcPtr,A1/destPtr:Ptr; D0/byteCount:Size) 
	  	; write my own VBR...
                ; This copies 180 bytes into 0x000000000 replacing the original VBR. 
                ; ... and kills Macsbug if not circumvented properly.
3FDC:           LEA     data106,A0
3FE0:           MOVEA.L A2,A1
3FE2:           MOVE.L  D2,D0
	  	; A0 = 9F900 (src)   - IIci 10C4EA (data88)    
	  	; A1 = 00000 (dest)  - IIci FBB08000
	  	; D0 = B4    (count) - IIci same  
3FE4:           _BlockMove ; (A0/srcPtr,A1/destPtr:Ptr; D0/byteCount:Size) 
3FE6:           BSR     53_cmd_1x  ; Bring the C040 to life
3FEA:           MOVEA.L A7,A0  ; SP to A0
3FEC:           MOVEA.L A2,A1  ; SE30: 00000000
3FEE:           MOVE.L  D2,D0  ; the code length (B4 again)
3FF0:           BRA.S   lae_163
3FF2:   lae_162 MOVE.B  (A0)+,(A1)+ ; Write the VBR back from the stack
3FF4:   lae_163 DBRA    D0,lae_162
3FF8:           ADDA.L  D2,A7 ; adjust the stack
3FFA:           POP.B   D0
3FFC:           _SwapMMUMode  
3FFE:           MOVEM.L (A7)+,D0-D2/A0-A2
4002:           MOVE    (A7)+,SR
4004:           MOVEQ   #0,D0
4006:           RTS     
 
; Start of VBR replacement- and 040-Code being copied to 0x0 the by line 0x3FE4 
; /if/ theses are the Vectors 0-17, then their meaning would be:
 
4008: data106:  DC.L    #$00001000 ; Reset initial Stack Pointer
400C:           DC.L    #$00000050 ; Reset initial Program Counter
; - ALL of these Vectors point to addr 4050 (offset 0x48) -
4010:           DC.L    #$00000048 ; Buserror  
4014:           DC.L    #$00000048 ; Adress Error
4018:           DC.L    #$00000048 ; Illegal Instruction
401C:           DC.L    #$00000048 ; Zero Divide
4020:           DC.L    #$00000048 ; CHK, CHK2 instruction
4024:           DC.L    #$00000048 ; cpTRAPcc, TRAPcc, TRAPV instruction
4028:           DC.L    #$00000048 ; Privilige Violation
402C:           DC.L    #$00000048 ; Trace
4030:           DC.L    #$00000048 ; LINE 1010 Emulation
4034:           DC.L    #$00000048 ; LINE 1111 Emulation
 
; THESE are definitely no vectors, they are dynamically written by the code above
; and to be used to setup the 040 MMU registers.
4038: data107:  DC.L    #$0009FE00 ;  
403C:           DC.L    #$0009D6E2; 
4040:           DC.L    #$807FC040 ; 
4044:           DC.L    #$807FC040 ; SE30: 
4048:           DC.L    #$00000000 ; SE30: 00000000 
404C:           DC.L    #$00000000 ; SE30: 00000000 
 
4050:           CLR.L   $53000000  ; Poke 0 to $53000000
4056:           BRA     lae_164    ; This points to itself... I'm lost at the moment.
4058:           LEA     data107,A0 ; SE30: 9F900
405C:           MOVE.L  (A0)+,D1   ; SE30: 0009FE00 (User/Supervisor Rootpointer)
405E:           MOVEA.L (A0)+,A1   ; 0009D6E2
4060:           MOVE.L  (A0)+,D4   ; 807FC040
4062:           MOVE.L  (A0)+,D5   ; 807FC040
4064:           MOVE.L  (A0)+,D6   ; 00000000
4066:           MOVE.L  (A0)+,D7   ; 00000000
4068:           MOVE.L  #$C000,D0
406E$           MOVEC   D0,ITT0   ; Set Instruction Transparent Translation
4072$           MOVEC   D0,DTT0   ; Set Data Transparent Translation
4076$           MOVEC   D1,SRP    ; Set Supervisor Rootpointer
407A$           MOVEC   D1,URP    ; Set User Rootpointer
407E:           MOVE.L  #$C000,D0
4084$           PFLUSHA           ; Invalidates all entries in the address translation cache
4086$           MOVEC   D0,TC 
408A:           LEA     data108,A0
408E:           ADDA.L  #$53002000,A0 ; (=0x530A1900)
4094:           JMP     (A0)      ; JuMP to data108 code (below) in C040 RAM range?     
 
4096:  data108: MOVEQ   #0,D0
4098$           MOVEC   D0,ITT0 
409C$           MOVEC   D0,DTT0 
40A0$           MOVEC   D4,ITT0 
40A4$           MOVEC   D5,DTT0 
40A8$           MOVEC   D6,ITT1 
40AC$           MOVEC   D7,DTT1 
40B0$           CINVA   BC
40B2:           NOP     
40B4:           MOVEQ   #0,D0
40B6$           MOVEC   D0,CACR
40BA:           JMP     (A1)    ; 0009D6E2
 
; END 040 Code being copied to somewhere by line 3FE4 
40BC: MacII_4th: MOVEM.L D1-D7/A0-A4,-(A7)  ; 4th subroutine called my MacII_handler
[...]

The Vector Base Register

I wasn’t precise when I initially said “replacing the VBR”. What actually happens is that this routine uses what I’d call an interim-VBR for the moment it initializes the 68040 on the C040. You’ve probably saw the link referring to what the VBR is in the 1st post of this series, but let me go a bit more into detail.

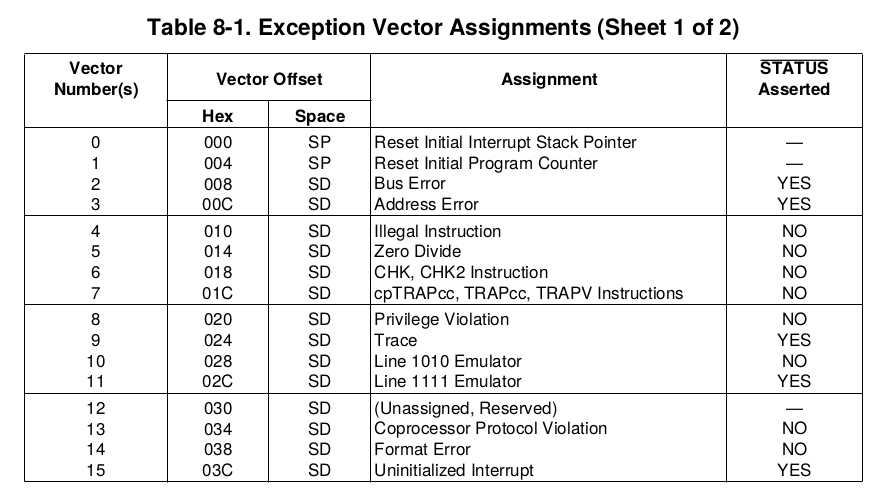
The VBR is a list of addresses (aka vectors) the CPU refers to in case of an exception – and this is true for every 68k system out there, e.g. Mac, SUN, NeXT, Amiga or Atari. Some of them might do some relocation using their MMU, but even the virtual address will be 0x00000000 and the order is the same.  There are 16 basic vectors as listed here:

If for example a divide-by-zero happens, the CPU would call a handler which address is stored in 0x14.  Pretty simple.
So let’s have a look what MacII_3rd left in the VBR (and below that) when the ‘interim VBR’ is in place:

0000: data106:  DC.L    #$00001000 ; Reset initial Stack Pointer
0004:           DC.L    #$00000050 ; Reset initial Program Counter
     ; - ALL of these Vectors point to addr 0x48 -
0008:           DC.L    #$00000048 ; Buserror  
000C:           DC.L    #$00000048 ; Adress Error
0010:           DC.L    #$00000048 ; Illegal Instruction
0014:           DC.L    #$00000048 ; Zero Divide
0018:           DC.L    #$00000048 ; CHK, CHK2 instruction
001C:           DC.L    #$00000048 ; cpTRAPcc, TRAPcc, TRAPV instruction
0020:           DC.L    #$00000048 ; Privilige Violation
0024:           DC.L    #$00000048 ; Trace
0028:           DC.L    #$00000048 ; LINE 1010 Emulation
002C:           DC.L    #$00000048 ; LINE 1111 Emulation
     ; - THESE are definitely no vectors, they are dynamically written by the 
     ;   code above and to be used to setup the 040 MMU registers.
0030:  data107: DC.L    #$00000000 ; SE30: 0009FE00  (12)
0034:           DC.L    #$00000000 ; SE30: 0009D6E2  (13)
0038:           DC.L    #$00000000 ; SE30: 807FC040  (14) 
003C:           DC.L    #$00000000 ; SE30: 807FC040  (15)
0040:           DC.L    #$00000000 ; SE30: 00000000 
0044:           DC.L    #$00000000 ; SE30: 00000000 
 
0048:           CLR.L   $53000000  ; Poke 0 to $53000000 ; C040 off
004C:  blocker3 BRA     blocker3    ; Points to itself... probably a "blocker"
0050:           LEA     data107,A0 ; initial Program Counter (SE30: 9F900)
0054:           MOVE.L  (A0)+,D1   ; SE30: 0009FE00 (User/Supervisor Rootpointer)
0058:           MOVEA.L (A0)+,A1   ; 0009D6E2
005C:           MOVE.L  (A0)+,D4   ; 807FC040
0060:           MOVE.L  (A0)+,D5   ; 807FC040
0064:           MOVE.L  (A0)+,D6   ; 00000000
0068:           MOVE.L  (A0)+,D7   ; 00000000
006C:           MOVE.L  #$C000,D0
0070:           MOVEC   D0,ITT0    ; Set Instruction Transparent Translation
0074:           MOVEC   D0,DTT0    ; Set Data Transparent Translation
0078:           MOVEC   D1,SRP     ; Set Supervisor Rootpointer
007C:           MOVEC   D1,URP     ; Set User Rootpointer
0080:           MOVE.L  #$C000,D0
0084:           PFLUSHA            ; Invalidates all entries in the address translation cache
0088:           MOVEC   D0,TC 
008C:           LEA     data108,A0
0090:           ADDA.L  #$53002000,A0 ; (=0x530A1900)
0094:           JMP     (A0)       ; JuMP to data108 code (below) in C040 RAM range? 
 
009C:  data108: MOVEQ   #0,D0
00A0:           MOVEC   D0,ITT0 ; 0
00A4:           MOVEC   D0,DTT0 ; 0
00A8:           MOVEC   D4,ITT0 ; 807FC040
00AC:           MOVEC   D5,DTT0 ; 807FC040
00B0:           MOVEC   D6,ITT1 ; 00000000
00B4:           MOVEC   D7,DTT1 ; 00000000
00B8:           CINVA   BC
00BC:           NOP     
00C0:           MOVEQ   #0,D0
00C4:           MOVEC   D0,CACR
00C8:           JMP     (A1)    ; 0009D6E2
Farewell, old friend

At this point, my SE/30 always froze and I thought this must be the point where to find incompatibilities between the IIci and SE/30.
But after understanding, what’s really going on, it was clear that overwriting the TRAP exception (Nr.7), Macsbug was simply kicked out of the game as this exception is triggered after every step/trace you do in a debugger…
So to get beyond this point, I had to modify the program counter to skip the point where TRAP is copied-over… which is done inside the Toolbox’ _BlockMove call. So I had to single-step into that and find the right call/time to do a ‘pc=pc+2’ 😉 (Good thing you can define a macro for that).

Okayyyyy. After that’s been written, 53_cmd_1x is called, presumably telling the C040 to come to life.
And keen as it is, it’ll look up the “Reset initial Program Counter” (VBR: 0xC) and starts executing code from 0x50. Any other occurring exception will call the ‘handler’ at 0x48, simply switching the C004 off and sit in an endless loop (0x4C) – probably making the 68030 to take over again.

EmEmYou!

Given everything’s fine, the code at 0x50 will start reading the previously populated data from data107 into several registers.
Then some serious 68040 MMU table setup happens – so this is some kind of ‘040 initialization routine… and the ‘040 is actually running. Woohoo!

Time for some special register explanation:
As we all know, the 68040 has two in-build 4k caches and an MMU. The latter can be programmed how and what to cache. This is defined in 4 registers of which only 2 are of interest here: ITT0 and DTT0, the Instruction and Data Transparent Translation registers, both sharing the same bit-fields following this pattern:

BBBBBBBBMMMMMMMMESS000UU0CC00W00

  • BLogical Address Base – compared with address bits A31-A24. Addresses that match in this comparison are transparently translated
  • MLogical Address Mask – setting a bit in this field causes corresponding bit in Base field to be ignored
  • E – Enable Bit – 1 – translation enabled; 0 – disabled
  • SSupervisor Mode – 00 – match only in user mode 01 – match only in supervisor mode 1x – ignore mode when matching
  • U – User Page Attributes – ignored by 040
  • CCache mode – 00 – Cacheable, Write-through 01 – Cacheable, Copyback 10 – Noncacheable, Serialized 11 – Noncacheable
  • WWrite protect – 0 – write permitted; 1 – write disabled

Here’s an example:

807FC040 = 10000000011111111100000001000000 
           BBBBBBBBMMMMMMMMESS000UU0CC00W00

which means:

  • a bit less than 2GB transparently translated (2032MB)
  • translation enabled
  • Supervisor Mode: ignore mode when matching
  • Cache mode: Noncacheable, Serialized
  • Write permitted

So let’s have a look at the code again:

At 0x70/0x74 the MMU is set to 0xC000, i.e. Enable translation, apply for user & supervisor mode, write-though cache, for logical address space 0x80000000-0x00ffffff (2GB minus the bottom 16MB).
Then Supervisor & User Rootpointer are set to 0x9FE00, then the address translation cache is flushed to finally set the Translation Control register to Enable & 8K page size (0x88)… up to here this was pretty much ‘by the book’ of how to set-up MMU tables.

Having its MMU all set, the 68040 now gets something to chew on:
The address of data108 is added to 0x53002000 and jumped to!
💡  Does 0x53002000 equal 0x00000000 for the C040?

Let’s assume the C040 executes the code at data108 for now. That is:

  • Clear the ITT/DTT registers
  • Set the MMU to 0x807FC040 (see decoding example above)
  • invalidate caches and wait’a’NOP to have that happened
  • then disable all caches
  • and jump to where A1 points to. In my SE/30 that’s 0x9D6E2, previously loaded from data107 in 0x58

Writing all this from the top of my head, I’m not 100% sure where this address is pointing to. I must be somewhat back into MacII_3rd (0x3FEA), because this is where the program execution resumes (Need to check this with Macsbug and will update).

For now, I’m tempted to call MacII_3rd something like ‘C040_MMU_setup‘… but I’d love to have this confirmed  💡 by somebody who knows more than me 😉

Next up will be continuing working further through the main: procedure again… so move over here.

Carrera in an SE/30 – the code part 1

The disassembled code of the Micromac Carrera 040 control panel is quite big: 6000+ lines of 68030/40 assembly…

While these posts might be entertaining and giving you an insight into classic MacOS driver code, they are also meant as a notebook to myself to get into the source quickly – especially after some weeks or months of distraction 😉

That said, I will not discuss each and every line of code. There are many parts which aren’t important (for now) or just not reached yet.
Still, it will take several parts/chapters to cover everything I worked on.

The complete code is available over here on GitHub and will updated every time I’m working on it.
Whenever I’m mentioning addresses I’m referring to this code on GitHub. NB: I will never use line-numbers as these might change during editing the source.
Also, when you’ll see a light-bulb  💡  somewhere, this is where I’m not sure and happy about enlightenment or comments from you 😉

This article is totally work-in-progress closed.
E.g. every now and then my theories about what a certain code does changes, I learn new things and all the sudden whole blocks of code make sense… so this post will change/grow, too.Bolle did a lot of hardware research and in the end it became clear that the INIT/Driver has nothing to do with the non-function of the Carrera in an SE/30. After Bolle modified his adapter, the Carrera 040 is happily running in my ’30 now.But still, this series of posts is definitely worth reading, especially if you’re into reverse engineering 68k assembly code.

Approaching… difficulties.

What’s the main job of this code? From a 30000ft perspective the simple answer is “switching the Carrera040 on and off”, i.e. toggling between the hosts slower on-board 68030 and the insanely fast 68040 on the C040. At boot-time… as well as during the system is running (by user interaction).

Sounds pretty simple, huh? Lowering our flight altitude to 3000ft more things come into play:
Identify the hosting Macintosh. As mentioned in the previous chapter, the C040 was able to run in a Mac II, IIx, IIcx, IIvx, IIvi, IIvm, IIsi, IIci, LC and LCII… all of them different in many places. These differences have to be handled…
Down at 30ft we have to admit that there are differences between a 68030 and his younger brother 68040, mainly concerning caches, FPU and the MMU.
Finally hitting the ground, it’s becoming clear that it is everything but trivial to halt a running processor, save its complete context and start another (slightly different) processor with that. And back again…

Some given things before we start:

  • We will concentrate on the IIx “branch” as this machine is closest to the SE/30 like not-32bit-clean, memory-map, the GLUE chip, two real VIAs with the same register layout etc.
  • I learned from the code that the C040 is memory-mapped at 0x53000000 in some of the supported models, especially the IIx and IIci. This means 32bit addressing is a must (-> need “mode32” INIT or clean ROM)
  • I tried to comment as much as possible/understood inline (i.e in the code) – a good bit of 68k machine language knowledge is still required 😉
  • If something needs more explanation, I’ll try to provide this before the code quote or afterwards.

So this is the main routine (at 0x21FC):

main     MOVEM.L A4-A6,-(A7)
         MOVE.L  D0,D7
         MOVE.L  #$31E,D0    ; need 798 bytes
         _NewPtr ,CL_SY      ; allocate requested amount of memory (D0) in system
                             ; heap (returned in A0) and initialize to zeroes
         TST     D0          ; success?
         BNE.S   lae_6       ; nope, exit.
         LEA     data2,A1    ; else
         MOVE.L  A0,(A1) ; Init A5 world and save into data2
         MOVEA.L A0,A5
         MOVE    #$A89F,D0   ; UnimplTrap
         _GetTrapAddress     ; (D0/trapNum:Word):A0\ProcPtr 
         MOVE.L  A0,$29C(A5) ; save the trap addr into 2 places 
         MOVE.L  A0,$2A0(A5) ; in the A5 world
         BSR     sysDetect   ; Jump to Machine detection routine 
         BNE.S   lae_6       ; success?
         MOVE.L  D7,D0
         JSR     4(A6)       ; We jump to the subroutine set in the detection routine
                             ; for the second time, this time offset 4...
			     ; i.e. we skip the 1st 'BRA' there
         BNE.S   lae_6       ; success?
         BSR     instFPSP    ; Install Motos FPSP
         BNE.S   lae_6       ; success?
         JSR     8(A6)       ; That's the 3rd call in the handler call cascade (needs hack for MacsBug!)
         BNE.S   lae_6       ; success?
         BSR     proc32      ; works (get some RSC strings)
         BSR     proc43      ; install traps
         BNE.S   lae_6       ; success?
         JSR     12(A6)      ; That's the 4th call in the handler call cascade
         BNE.S   lae_6       ; success?
         BSR     proc41      ; works (atalk?)
         BSR     proc42      ; VIA stuff and such - BOOM
         BSR     proc29
         MOVEM.L (A7)+,A4-A6
         MOVEQ   #0,D0

As you can see, there are 10 calls to subroutines- currently it crashes inside the 8th subroutine, currently called proc42… But let’s check these subroutines one by one.

sysDetect

This is the subroutine I had to “patch” to initially make the driver work with an SE/30. It starts at 0x2022 and does these things:

  • Check if the ‘Gestalt‘ trap is available at all (very good style!) else throw an error
  • If it is, read the machines Gestalt code into D0, throw an error if zero
  • Decide which ‘handler’ to choose given the Gestalt code.

Based on their Gestalt codes there are four groups of Macs defined in the following lines (0x204C – 0x20AC):

  • Mac II/IIx/IIcx — “dirty Macs”, not 32bit clean, no PDS
    • “Expansion I/O Space” from 0x51000000 to 0x5FFFFFFF
    •  the C040 installs with an adapter right into the CPU socket in the II/IIx/IIcx
    • SE/30 is also “dirty”, need mode32 or IIsi ROM in slot
    • these machines also use the GLUE chip to emulate the VIA2 like the SE/30
  • Mac IIvx, IIvi, IIvm — special kind of PDS slot
    • there’s no mentioning of support on the MicroMac page
  • Mac IIsi, IIci
    • Kind of interesting because the si has the same PDS slot like the SE/30
    • Uses the RBV (Ram Based Video) controller which emulates the VIA2
    • Therefore totally different memory layout (VRAM at 0x00000000 mapped by the MMU etc.)
  • Mac LC, LCII, Color Classic
    • These share the same LC-PDS slot

If your Mac is one of those (or patched at 0x2058), you’ll branch into sys_check: (0x20BA) which will make sure you run at least System 6.0.5, have virtual memory switched off and jumps into the selected handler code (address saved in A6) at 0x20EA  for the first time.

Here’s the code of what’s discussed above:

2022: sysDetect: MOVE.L  #$A0AD,D0  ; Gestalt
2028:         _GetTrapAddress newOS ; (D0/trapNum:Word):A0\ProcPtr 
202A:         MOVE.L  A0,D2
202C:         MOVE.L  #$A89F,D0     ; UnimplTrap
2032:         _GetTrapAddress newTool; (D0/trapNum:Word):A0\ProcPtr 
2034:         CMP.L   A0,D2
2036:         BEQ     OS_bad
203A:         MOVE.L  #'mach',D0
2040:         _Gestalt ; (A0/selector:OSType):D0\OSErr 
2042:         BNE     bad_conf      ; If we can't read it, fire general Error Msg
2046:         MOVE.L  A0,D0
2048:         MOVE.L  D0,2(A5)
 
; Check for several Mac models which are grouped into 3, each having its own handler routine. 
; 1) Mac II/IIx/IIcx 
; 2) IIvx, IIvi, IIvm 
; 3) IIsi, IIci     
; 4) LC, LCII, Color Classic
 
204C:         LEA     MacII_handler,A6   ; -- The dirty gang
2050:         CMPI.L  #6,D0        ; MacII 
2056:         BEQ.S   sys_check
2058:         CMPI.L  #7,D0        ; MacIIx - we replace this by the SE/30 #9
205E:         BEQ.S   sys_check
2060:         CMPI.L  #8,D0        ; IIcx
2066:         BEQ.S   sys_check
 
2068:         LEA     V_handler,A6   ; -- The "V" Macs.
206C:         CMPI.L  #48,D0       ; IIvx
2072:         BEQ.S   sys_check
2074:         CMPI.L  #44,D0       ; IIvi
207A:         BEQ.S   sys_check
207C:         CMPI.L  #45,D0       ; IIvm
2082:         BEQ.S   sys_check
 
2084:         LEA     IIci_handler,A6   ; -- IIci and IIsi
                                        ; BOTH share the same "Expansion I/O Space" (0x5300 0000)
2088:         CMPI.L  #11,D0       ; IIci
208E:         BEQ.S   sys_check
2090:         CMPI.L  #18,D0       ; IIsi 
2096:         BEQ.S   sys_check
 
2098:         LEA     LC_handler,A6    ; -- The LC-PDS family
209C:         CMPI.L  #19,D0       ; LC
20A2:         BEQ.S   sys_check
20A4:         CMPI.L  #37,D0       ; LCII
20AA:         BEQ.S   sys_check
20AC:         CMPI.L  #49,D0       ; Color Classic
20B2:         BEQ.S   sys_check
 
; Any other Model/Gestalt will bring up an error alert-box 
 
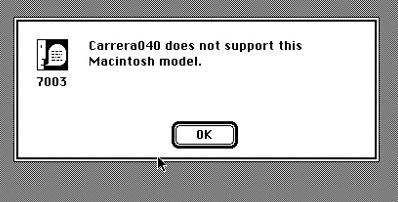
20B4:         MOVE    #$1B5B,D0    ; "Carrera040 does not support this Macintosh model."
20B8:         BRA.S   RET_err      ; -> "TST     D0 & RTS"
 
; We found a supported model, so keep on going checking for the OS version...
 
20BA: sys_check: MOVE.L  #'sysv',D0    ; Check OS version
20C0:         _Gestalt              ; (A0/selector:OSType):D0\OSErr 
20C2:         BNE.S   bad_conf      ; If we can't read it, fire general Error Msg
20C4:         MOVE.L  A0,D0
20C6:         CMPI    #$605,D0     ; System 6.0.5
20CA:         BGE.S   OS_ok        ; or greater
20CC: OS_bad: MOVE    #$1B5C,D0    ; "Carrera040 does not work with this version of the operating system."
20D0:         BRA.S   RET_err      ;
20D2: OS_ok:  MOVE.L  #'vm  ',D0   ; Check for enabled Virtual Memory
20D8:         _Gestalt             ; (A0/selector:OSType):D0\OSErr 
20DA:         BNE.S   bad_conf     ; If we can't read it, fire general Error Msg
20DC:         MOVE.L  A0,D0
20DE:         BTST    #0,D0
20E2:         BEQ.S   VM_ok
20E4:         MOVE    #$1B5D,D0    ; "Carrera040 does not work with Virtual Memory turned on. 
                                   ; Please turn off Virtual Memory in the Memory control panel and restart your Mac."
20E8:         BRA.S   RET_err
20EA: VM_ok:  JSR     (A6)         ; This is the actual HANDLER CALL, been set in $204C-$2098
20EC:         BNE.S   RET_err
20EE:         MOVE.B  34(A5),D0    ; 34(A5) seems to contanin the Jumper settings at the lowest 3 bits and only three of them are valid:
20F2:         CMPI.B  #7,D0        ; 7 -> 111
20F6:         BEQ.S   RET_ok
20F8:         CMPI.B  #6,D0        ; 6 -> 110
20FC:         BEQ.S   RET_ok
20FE:         CMPI.B  #5,D0        ; and 5 -> 101 
2102:         BEQ.S   RET_ok
2104:         MOVE    #$1B5E,D0    ; "Carrera040 does not recognize the jumper settings on the Speedster card. 
                                   ; Please check the settings against the manual.
2108:         BRA.S   RET_err
210A: RET_ok: MOVEQ   #0,D0        ; clear D0 (no errors)
210C:RET_err: TST     D0           ; Set the Z-Flag (D0 contains Err-Code) and
210E:         RTS                  ; return from Subroutine
2110:bad_conf:MOVE    #$1B5A,D0    ; "Carrera040 does not support your system configuration."
2114:         BRA     RET_err

Yes, there’s also stuff after the call to the handler, but let’s check that handler first.
As said in the beginning, I chose to take the “IIx route”. The MacII_handler code is actually just another vector jump-table which will later be used with offsets:

414E:  MacII_handler:  BRA   MacII_1st ; From II, IIx & IIcx
4152:                  BRA     MacII_2nd
4156:                  BRA     MacII_3rd
415A:                  BRA     MacII_4th

Let’s have a look into the first call MacII_1st:

3D14:  MacII_1st  MOVEM.L D1-D3/A0-A2/A6,-(A7) ; 1st call from MacII handler
3D18:           PUSH.L  8
3D1C:           LEA     data105,A0
3D20:           MOVE.L  A0,8       ; Is that the Bus Error Handler at 0x00000008?
3D24:           MOVE    #$1B5F,D3  ; 7007
3D28:           MOVEQ   #1,D0
3D2A:           _SwapMMUMode  
3D2C:           PUSH.B  D0
3D2E:           MOVEA.L A7,A6
3D30:           BSR     read_5300k2
3D34:           MOVEQ   #0,D3
3D36:  data105  MOVEA.L A6,A7
3D38:           POP.B   D0
3D3A:           _SwapMMUMode  
3D3C:           POP.L   8
3D40:           MOVEQ   #0,D0   ; ?
3D42:           MOVE    D3,D0   ; overwriting?
3D44:           BNE.S   lae_153
3D46:           MOVEM.L D1-D2/A0-A2,-(A7)
3D4A:           LEA     53_cmd_0,A0
3D4E:           MOVE.L  A0,6(A5)
3D52:           LEA     53_cmd_1x,A0
3D56:           MOVE.L  A0,10(A5)
3D5A:           LEA     read_5300k2,A0
3D5E:           MOVE.L  A0,14(A5)
3D62:           LEA     53_cmd_5.3,A0
3D66:           MOVE.L  A0,18(A5)
3D6A:           LEA     53_cmd_5.1,A0
3D6E:           MOVE.L  A0,26(A5)
3D72:           LEA     53_cmd_5.3.5.1,A0
3D76:           MOVE.L  A0,22(A5)
3D7A:           MOVEM.L (A7)+,D1-D2/A0-A2
3D7E:           BSR     read_5300k2
3D82:           ANDI.B  #7,D0
3D86:           MOVE.B  D0,34(A5)
3D8A:           MOVEQ   #0,D0
3D8C:  lae_153: MOVEM.L (A7)+,D1-D3/A0-A2/A6
3D90:           TST     D0
3D92:           RTS

As you can see, even in such simple and short subroutines are some things I just don’t get? For example why is the effective address of data105 written to 0x8? Is that replacing the Error Handler in the VBR?
Anyhow, I think I got the overall meaning of the rest of it. What happens is this:

After switching into 32bit mode (_SwapMMUMode) it reads a longword from 0x53000000. As initially mentioned, the C040 is mapped to this address. There are 2 identical functions to read from there, that’s why this one here called read_5300k2.
It looks like reading is sufficient because the result (returned in D7) is immediately overwritten by a pop. Also that BNE after two moves is beyond me (0x3D40)…  OTOH the rest of the code is pretty clear: It’s ‘populating’ the A5-world with subroutines I’d call 53-commands. These commands write a specific byte sequence to 0x53000000, obviously communicating with the C040. For better understanding I’ve named them e.g. 53_cmd_5.3.5.1 meaning writing 5, then 3, then 5 and finally 1 to this address.
At the end, 0x5300k is read again, this time the result is masked to the last bit and written to 34(A5) – this represents the C040 jumper-settings by the way.  Return from Subroutine…

Back in sys_check: this jumper-setting will be checked immediately for three valid settings: 111, 110 or 101 representing the supported CPU types (68040,68LC040,68EC040). If the setting is ok we’re done with sysDetect:and return to main:.

2nd handler

Located at 0x3D94 this is kind of  a ’50/50 subroutine’. One half is totally obvious (check RAM, ROM and addressing mode) and the other half is all greek to me… e.g. what is all that PUSHing about? There’s not a single POP inside this routine (or subroutines call from within).  Here’s a wild guess of mine:
It looks like 1 to 4  ‘RAM range triplets’ being pushed onto the stack and after that gestaltPhysicalRAMSize (#’ram ‘) is called, for example:

    3D9A:          CLR.L   -(A7) ; faster 'PUSH.L #00000000'
    3D9C:          CLR.L   -(A7) ; PUSH.L #00000000
    3D9E:          CLR.L   -(A7) ; PUSH.L #00000000
 
    3DA0:          PUSH.L  #$100000
    3DA6:          PUSH.L  #$50F00041
    3DAC:          PUSH.L  #$50F00000
 
    3DB2:          PUSH.L  #$2000
    3DB8:          PUSH.L  #$53000041
    3DBE:          PUSH.L  #$53000000
 
    3DC4:          PUSH.L  #$2000
    3DCA:          PUSH.L  #1
    3DD0:          PUSH.L  #$53002000
 
    3DD6:         MOVE.L  #'ram ',D0  ; Returns the number of bytes of the physical RAM 
    3DDC:         _Gestalt ; (A0/selector:OSType):D0\OSErr

But the gestaltPhysicalRAMSize call does not take parameters and simply returns the amount of available RAM.

The good thing is, this sub-routine works flawlessly on the SE/30 and we can move on…

instFPSP

instFPSP is the next call in line. I’m not going to discuss this code in detail because it actually doesn’t do much. Still there are many inline comments in this routine if you like to know more. Here’s the background:

The FPU in the 68040 was made incapable of IEEE transcendental functions, which had been supported by both the 68881 and 68882 and were used by the popular  fractal generating software of the time and little else.  The Motorola floating point support package (FPSP) emulated these instructions  in software under interrupt. As this was an exception handler, heavy use of  the transcendental functions caused severe performance penalties.

TLDR; Check for FPU(type) and load the FPSP code from the resource-fork into RAM. Done. Return to main:.

Phew, that’s it for now. In the next post/chapter we’ll touch the 3rd handler, which was really hard to decipher but interesting stuff to learn, too.

Carrera 040 in an SE/30

As promised in my blog entry nearly one year ago, here’s the (monster) post about this project.

Background

Boy, what a ride! This is definitely my most complex (and still ongoing finished) software reverse engineering stunt ever!!
When starting this venture I was a blue-eyed Mac user and just-for-fun programmer and never imagined to learn this much about those machines I loved since 1985… by the way of a very nice guy I was finally able to get an SE/30. Immediately I thought of accelerating the cutie.
This first post will give you an insight about the workflow, hardware and software used. Following posts will then guide you deep into the code…

The MicroMac Carrera040

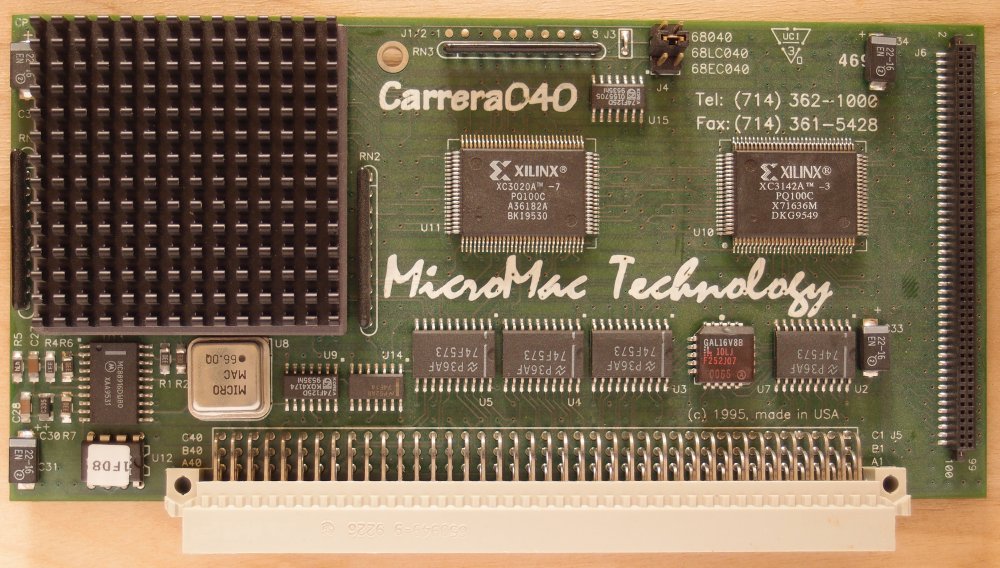
For many years I had a Carrera040 (or C040 for short)  – a Motorola 68040 accelerator for Apple Macintoshes – in my locker which I bought in wise foresight without even owning a Mac to plug it in. The C040 I got was meant for usage in a Macintosh IIci, plugged into its L2 cache-slot. That said, using special adapters, the C040 could also be used in other 68030 Macs like the IIx, IIcx, IIsi, IIvi/vx and the LC/LC II.

Is the Carrera a Speedster?

What’s this question about? Well, you might also have come about notions of an accelerator called the ‘Mobius Speedster‘ which is pretty similar to the C040.
Well, it is and my wild assumption is that at one point MicroMac bought the design from Mobius. There’s even a leftover in the C040’s ReadMe:
Applications that do not work with Quadra or Centris Macs are not likely to work on ‘040 accelerators, including the Carrera040. Generally, these incompatibilities are limited to the ‘040’s copy-back cache, or FAST mode on the Speedster.

So when I had my glorious SE/30 sitting on my desk it immediately came to my mind to make this card running in it.
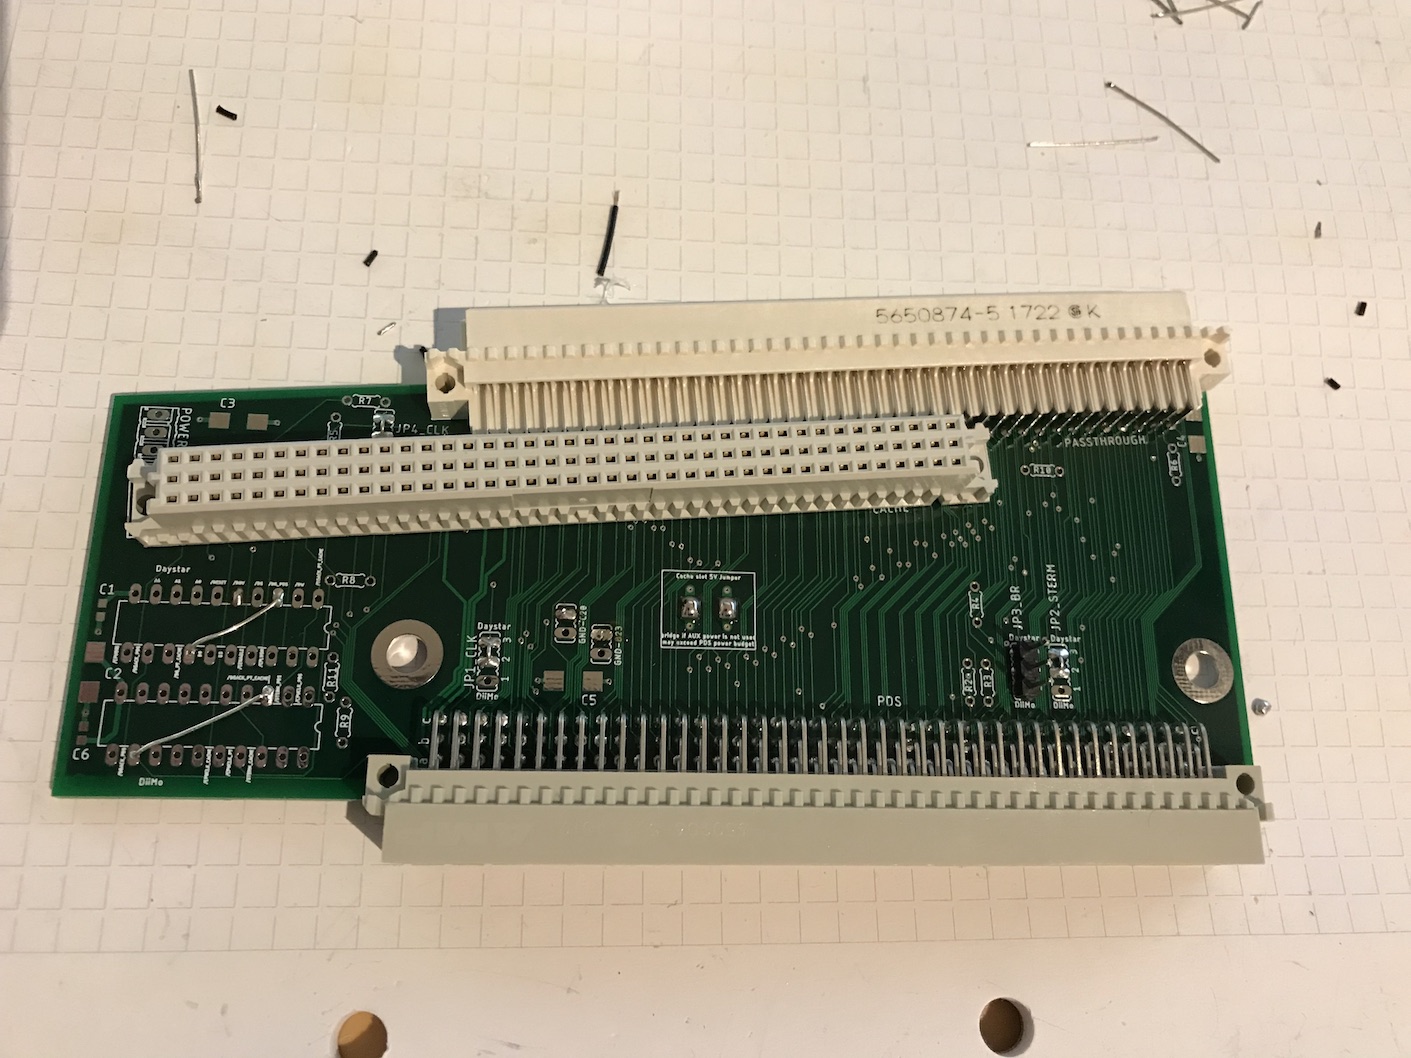
You have to know, that the SE/30 is a somewhat shrinked-down version of a Mac IIx which again is pretty close to the IIci – and there was an adapter in existence to use another popular IIci accelerator in an SE/30 (Daystar Turbo 040). But it’s very rare and there’s next to no chance to find one. Anyhow, it’s doable, so I was hooked.
I stumbled across a cry for help in the 68kmla forum, a user owning such an adapter and a C040 tried to get it running in his SE/30… to no avail. So while still not having the proper adapter (yet) I thought “why not start looking into the driver while waiting for the hardware?”.
So the journey started…

MacNosy – a users nightmare, a hackers heaven.

My natural reflex is to reach deep into my tool-bag, get out my favorite disassembler/hex-viewer and start digging through its output. But for System 7 my bag was empty. Is there any disassembler at all?
While the good thing is, that most software packages which cost plenty of $$$ back then are abandonware today, the bad thing is that many are undocumented and unsupported. After some research it became clear that MacNosy was and still is the best m68k MacOS disassembler around.

Boy, this disassembler is powerful! But it seems to be written by Steve Jasic for, well, Steve Jasic. I know that kind of tools – I’ve written some of those… and never showed it to anybody because it was, erm, special. Prepare yourself for “everything will be different than you’ll expect it”. Steve gave a sh!# about UI or keyboard conventions. Cope with it.

Luckily there’s a very good review and some sort of documentation can be found here.

Same but different – which is where?

Does ‘A5-world’ ring a bell to you? No? Don’t worry, it was the same for me, even I am using Macs for a long time.
Even it’s an 68k system, there are so many things done different than e.g. in Amiga OS or Ataris TOS – so you have to learn a lot.

Because it would absolutely bloat this post, I will link to external pages explaining the used term. So watch for the first mentioning, it’ll be a URL…

The provided Carrera040 “drivers” consist of an INIT/Extension (“Startup Carrera”) and a Control Panel (“Carrera 040 1.8”).
In the provided readme file there’s the line “With version 1.8 we have included an extension which ensures the Carrera040 code to load very early in the boot process.

And indeed, the INIT code does not do much more than loading a specific resource from the control panels resource-fork.
So I concentrated on the control panel (CP for short). Using ResEdit, you’ll find the main detection and control-code in its resource fork called “SPDR’ (SPeedster DRiver, got it?).
While working through the code, commenting whatever I immediately understood (which wasn’t much in the beginning), I stumbled over several things you should also have an idea about before reading the disassembly in the coming chapters – so here’s a growing reading list:

Macsbug reloaded

During all that code-gazing, head-scratching and learning-new-things-every-day great luck struck and I virtually-met ‘Bolle‘. A guy who created a clone of the mystical PDS-to-IIci-slot-adapter. Woohoo!

Even those 120pin DIN connectors are incredibly hard to find.

So after spending some Euros I was finally able to  jump into the ‘the real thing’ and try my patches in-vivo, or watch the code being executed. Thanks again, Bolle!

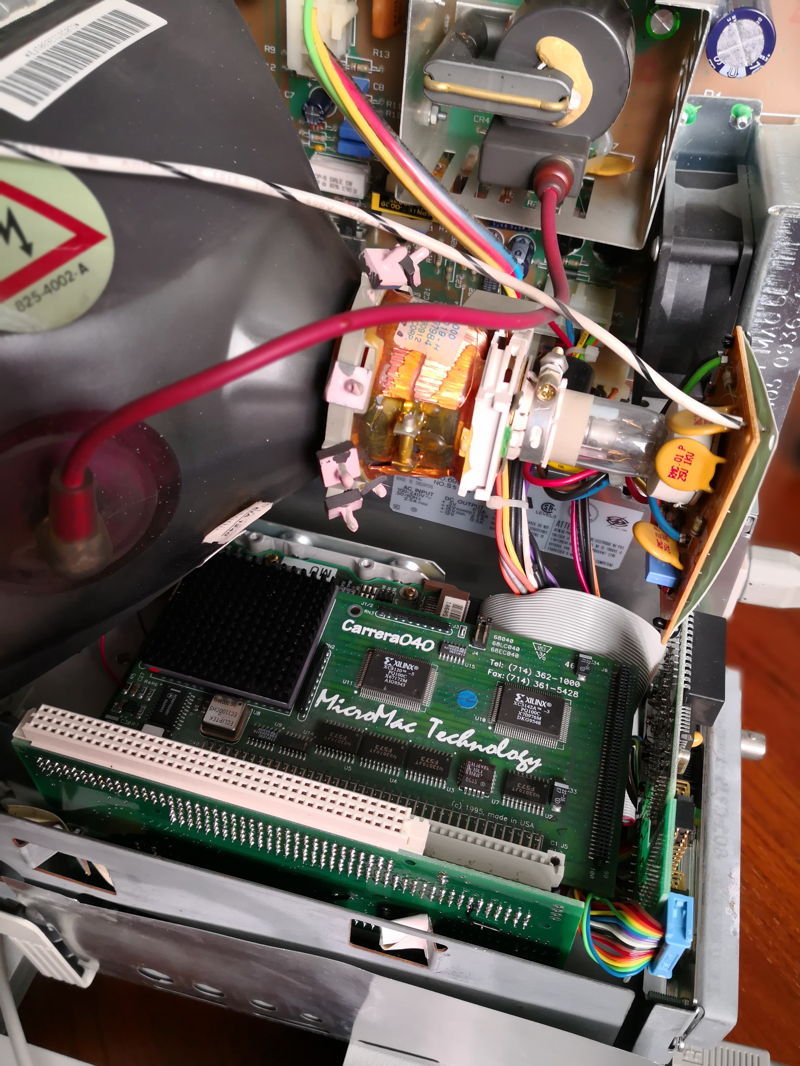
My C040 cramped into my beloved SE/30

The drill

The weapon-of-choice for watching code run is definitely Macsbug, the official debugger from Motorola, heavily modified by Apple through all the years until MacOS 9.2.
Back in the days my contact with Macsbug was very brief. When a program ‘bombed’, I’ve entered “g” (for Go) and hoped the system will somewhat heal and keeps running…

Ok, now I had to be somewhat more serious – and my skills had improved over the last 20 years, so my routine turned into single-stepping and tracing through the code, skip certain instructions which might kill the code, watching all the registers and most important and watch how the Carrera “driver” behaves in an SE/30 vs. IIci.
I even created some macros (which have to saved into Macsbug own resource-fork!) and started an endless try-and-crash drill.

The working drill is tedious: You step through the instructions, while following your steps in the disassembled source, to the point where it crashes. Remember/note the point (address) where it crashed and try again.
This means you have to manually trace closer to “the edge” but try not to fall off the cliff. And when you did – and I did many times – rinse & repeat.
Sometimes you can ‘skip’ complete function calls containing hundreds of instructions (called ‘Trace’), sometimes you have to sit-through (i.e. single-step) a very, very, very long loop just to be sure it works 100%.

The next post/chapters will finally dive into the control panels code.
While it’s all about this specific ‘driver’ I’m sure it’ll help everybody who starts the adventure of understanding pretty low-level 68k Macintosh code.

That said, in Dec. 2019, continuously working with Bolle, we came to the conclusion it has to be a hardware problem and Bolle was able to prove this and most importantly found a way to fix it.
There will be a 4th and final post concluding all of our findings.


Fight obsolescence!

There’s the saying that “The shoemaker’s son always goes barefoot” and looking at my workhorse desktop computers, i.e. those I use for surfing the web, writing stuff and every other creative task, this is very true in my case.

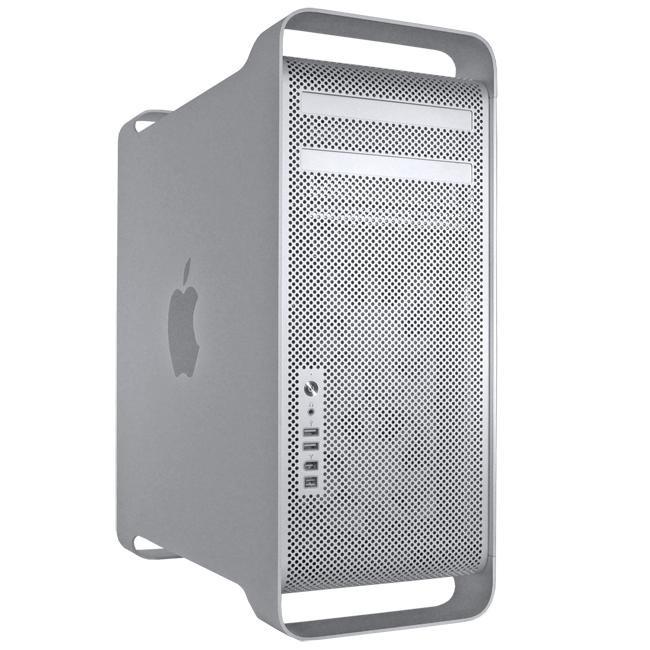
Namely there’s a PC I’ve assembled back in 2011 and an ‘early 2008’ MacPro (= 3,1). And for both I’ve decided to use them to the bitter end… just to fight against the planned obsolescence which comes with ‘innovation’.

The dark side of the force

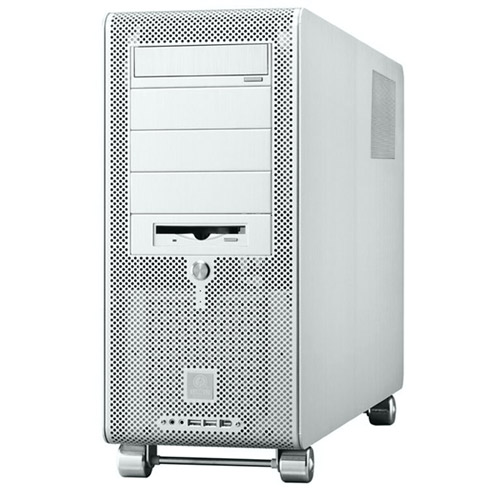
I assembled the PC back in 2011 while working at my ex-company from which I bought it a year later. I have to congratulate myself how wisely I picked the parts for it… even 8 years later, that box is still pretty capable: The Intel i7 2600k (still benchmarked to recent cpus) was very good choice and its 16GB were insane back then and are still appropriate today.
Looking good in a MacPro-a-like case, strongly steaming along on Windows 10 and Linux, it just had its first moment showing its age: An Nvidia GTX 680 could not be detected, no matter what. Even taking the brave step flashing the last UEFI BIOS could not help.

Cheese-Grinder on wheels… and a floppy.

The even darker side…

A new graphics card? Why that? Are you a gamer, Axel?
Well, as we all know, MacOS is free… but it’s tied to hardware which isn’t. And to make you upgrade your old hardware (read: make $$$), Apple has pretty short ‘support tail’. 
So that GTX 680 was meant for my beloved MacPro. A MacPro from 2008 and officially not supported since OS X 10.11.x (aka El Captain). This means no Sierra or any other recent desert-codenamed OS. Well, not if you’re not patching it 😉
While this was relatively easy with Sierra and High Sierra, Mojave is a different thing, requiring a Metal compatible GPU… which my 8800GT was not. Actually it was already slowing down the whole thing (e.g. no WebGL) and so it was about time to replace it.

The real thing – still one of the best cases ever made.

Here’s an important hint, just in case you haven’t read it elsewhere:
If you plan to upgrade to Mojave, do not use an AMD card! This is because the required AMD drivers use SSE4.2 instructions, the early 2008 MacPro Xeon CPUs do not have. So Nvidia it is… and the GTX 680 is the best choice in my humble opinion:

  • Fast – I mean really, really, really fast (~10x compared to the 8800GT)
  • Cuda – speeding up many creative applications
  • Cheap (~60€/$70)
  • Flashable (i.e. you’ll get an Apple boot-screen)

So I got myself a used ‘680 and thought “Hey, just plug it into the good ol’ PC, boot DOS, flash the beast and off it goes into the mighty Mac”… how wrong I was!

Try’n’error darkness

Plugged into my PC did not even output a signal to the display. Nothing but black… is it broken?
Plugged into the MacPro instantly tripped its safety breaker when powered on… can it really be broken?
Then I read that my PCs ‘legacy BIOS’ could be the reason why – so after 8 years I finally had a reason to enter UEFI-land. No difference. It’s probably because of the Z68 chipset which is just too old.

Back (in)to the MacPro. Maybe the power provided by the two motherboard PCIe connectors is too low? (The power-supply itself provides a whopping 900 Watts!)
So I connected the GTX’ two PCIe power-cables to an external power-supply and… ‘tadaaa’ the Mac greeted me with his boot chime, no boot-screen (yet) and finally the desktop. Woohoo! At least the card is fine.

And there was light!

So I had to ‘mod’ the Pro… there’s this so-called ‘Pixlas Mod‘ which is just a simple power-line bypass, directly splicing into the wires after leaving the power-supply. Having done that I was able to run my GTX in parallel with the 8800GT, using a DOS boot-CD (USB isn’t an option) I could flash the GTX and after a final card swapping my Mac Pro is ready for Mojave! Yay, another one or two more years for my workhorse…

And the moral of this post/rant/story?

Don’t give up your old hardware too quickly – put some love and a bit of money into it and fight the marketing-obsolescence!


Vintage Fan replacement

Making some noise

Working with vintage computers has many aspects and one of them, nearly throughout every component, is noise.
Hard-drives whirr, floppy-disks rattle, the CRT emits a high-pitch whistle and on top of it all at least one fan is blowing like a jet-engine. Time for a fan replacement!

Luckily since these days, much quieter fans have been developed during the last 30 years – so let’s just swap the fan and… ahhh, silence. I did that with my Sun Blade 150 and it worked great!

…well, it’s actually not that simple all the time.

Blown by the wind

System cooling was handled a bit different back in the 80’s and 90’s. Practically there were just 3 levels of cooling:

  • None – convection had to do the job.
  • One for all – one fan cooled the whole system
  • Insane – Either huuuuuge Fans (>8″) or some mad-scientist liquid-cooling was used. I won’t touch these in this post…

The “no fan” class were all so-called home-computers and the lower-end models of the early 16-bit machines like the ATARI ST, Commodore Amiga 500 or the first Apple Macintoshes (Steve Jobs was fanatic about convection cooling).

The most prominent “single fan” family members were office PCs up to the 486-class as well as any desktop/deskside 68k Apple Macintosh. All these had one fan sitting in their power-supply, blowing the warm air out to the back of the case.
Please mind the warm air. We’re not talking hot streams of  death-rays here. While CPUs weren’t a big heat-source issue (until the advent of the i486/50) passive heatsinks were sufficient to cool them by the air-flow/draft through the case created by the PSU.
For such Personal Computer systems it can be perfectly fine to replace some old, noisy fans with recent high-tech whirls. Especially if the PSU was also replaced by something more modern (like I did with my Quadra 950) producing less heat than the original one.

This is a totally different story when it comes down to workstations.
An en-vogue (UNIX) workstation back in the days was mostly designed using a relatively small pizza-box sized case, nicely snuggling underneath a monstrous 21″ CRT. To name just a few there were

  • SUN SparcStation 1 to 20
  • SGI Indy
  • Digital VAX/DECstation
  • Many HP PA-RISC 7xx

These boxes were cramped (hard-drives, expansion cards, lots of RAM) and their high-end processors ran much hotter than those x86 and 68k in personal computers.
Surprisingly none of them had a dedicated CPU fan mounted – instead they all relied on the power of the fan installed in the PSU.

Under pressure

Searching the web, you will find many texts recommending to put a quieter PC into your workstation. Vintage-me says: Don’t!

In case of workstations (pun intended!) a new indicator is needed in the game of fan replacement.
While the ‘PC world’ just looks at the CFM value (cubic feet per minute, i.e. airflow) as a performance indicator, workstation owners need to check the static pressure delivered by a fan. This is measured in mm/H20 (millimeter of water) and means how strong is a fan pulling air over obstacles and/or through venting slits etc. – think vacuum cleaner.
In consequence, two fans having about the same CFM value might be completely different when it comes down to static pressure. This is a nice table I found on the web comparing some high-performance fans with standard PC ones and the Papst 8412N is a good example of what I just wrote: The much liked NF-A8  has just 25% less CFM but only half the mm/H20:

Fan Airflow [CFM] Static pressure [mmH2O] RPM Noise [dB]
Panaflo FBA08A12U1A 46.9 4.8 3450 38.2
EBM Papst 8412N 40.6 4 3100 32.0
Noctua NF-A8 FLX 30 1.96 2000 16.1
Noctua NF-R8 31 1.4 1800 17.1
Arctic F8 31 1 2000 20

That power naturally comes at a price: More revs and much more noise… which is inevitable at the given mm/H20 power.

What’s cooking?

So what happens if I chose the wrong fan?
If a low-pressure fan is placed in an airflow path with lots of obstacles, the fan’s airflow will reduce and it will cool only the nearby components, but won’t have enough juice to suck heat from parts further away.
This means it will only cool (parts of) the power supply and the rest of the workstation will be more-or-less cooled by convection and the internal temperature will accumulate. Running such a machine for a longer duration will lead to ‘effects’. From errors to crashes, even smoke and finally destruction.

C’mon, that’s folklore, Axel!” – Not a bit my friend.
I just had this experience when I thought that my MIPS RS2030 workstation could do just fine with a somewhat more silent, recent fan. The original one is/was a Delta AFB0812HH – a hellish loud fan. But even a  Noctua NF-A8 with a mm/H2O of nearly 2 made the small MIPS workstation unstable. First the PSU housing got really warm in the middle (switching regulators are screwed onto it there) and after 30 minutes of torture (compiling code) I got more and more SCSI I/O errors until the system completely froze.
Changing the fan back to the noisy one everything ran rock-solid. Quod erat demonstrandum!

So what should I do?

There’s no general advise to follow. If you want to keep your original PSU it might be possible to use a more silent fan for just the PSU and add one or more fans caring for the case ventilation.
Your milage may vary and multiple modern fans -which also need to be mounted somehow- might add up producing the same amount of noise like the single original did.

The cleanest solution is replacing the original PSU innards by more modern & smaller parts which then draw less power and therefore dissipate less heat, requiring less cooling.
This is especially advisable if you have the feeling that the original PSU gives fist signs of ageing (smell, heat, buzzing). Better safe than sorry!

MIPS 2030 – Home Improvements

This is the last post about improvements for the MIPS RS2030 – but it will be open-ended and updated as time/project goes by.

After the resurrection of this little workstation I still wasn’t totally satisfied. As said, the console is a strange 2/3 box and obviously running in an unaccelerated slow-scrolling graphics mode – every 80286 PC console is faster.
So for starters, I switched to a remote session. Luckily the network-setup was, while yet primitive, very easy. Definitely sufficient for telnet and ftp – remember, we’re roughly in the year 1990 and the world is pretty much black-hat-free… and so is my LAN, so I don’t care.

The X marks the spot!

Hey, we have a mighty frame-buffer, made for 1280x1024x8 pixels, so what’s more natural than running X-Window?!
MIPS actually sold “RISCWindows” separately for mucho $$$. It was an “optimized” X11R4… well, while the frame-buffer (i.e. no acceleration) isn’t anything special I really wonder what had been optimized?

Time for “real men™”, let’s install X11! And just because we can, we pick X11R5 because it fits the time around 1992. Around then I did the same for a SPARCStation 1… memoriiiiiiiies.

So I downloaded the X11R5 sources and very soon some new behaviors kicked in. A 16MHz machine is not the fastest kid on the block. Combined with the RS2030 lame I/O performance file decompression is a drag. So it’s actually much faster to copy an uncompressed tarball over the slow 10mbps line than having a smaller file transferred quickly and then let the 2030 chew on it forever (ah, and there’s no gzip out of the box – you’d have to gunzip & compress it on another machine before).
After the 200MB were moved over I was delighted to find a mips.cf config file being part of the source. Let’s have a check:

make World BOOTSTRAPCFLAGS="Mips" >& world.log

gave an instant error… the crappy RISCos sh does not know about redirection of every output into one file  😐 So I had to make sure it’s using csh… and while were at it: You have to switch the system to BSD mode (vs. System V). This can be done by putting /usr/bsd43/bin into your $PATH before anything else.

Traps and hints

Many makes later I wondered why make always remade all objects.  Reading Imakefile and many Makefiles did not light a bulb. Then there it was –facepalm– all source-files hat a creation date of 2018 because I unzipped and compress‘ed them on my Mac. And while the tools and libs on RISCos aren’t Y2k aware, the filesystem sure is. Doh!
Memo to myself: Touch all source files once before running make! Remember, we’re in 1999 on this system. This is important because a full make of X11R5 takes 6hrs on the RS2030!

Every now and then the Mips cc barfed on some code. From old newsgroup posts I learned that nobody were able to compile R5 out-of-the-box. And nobody who managed it was kind enough to post their changes. So I had to reinvent the wheel…
During this journey I stumbled across a more recent “graphics driver” source from MIPS (ddx in X11-lingo) which I incorporated into the sources – and fixed the bugs which it introduced…

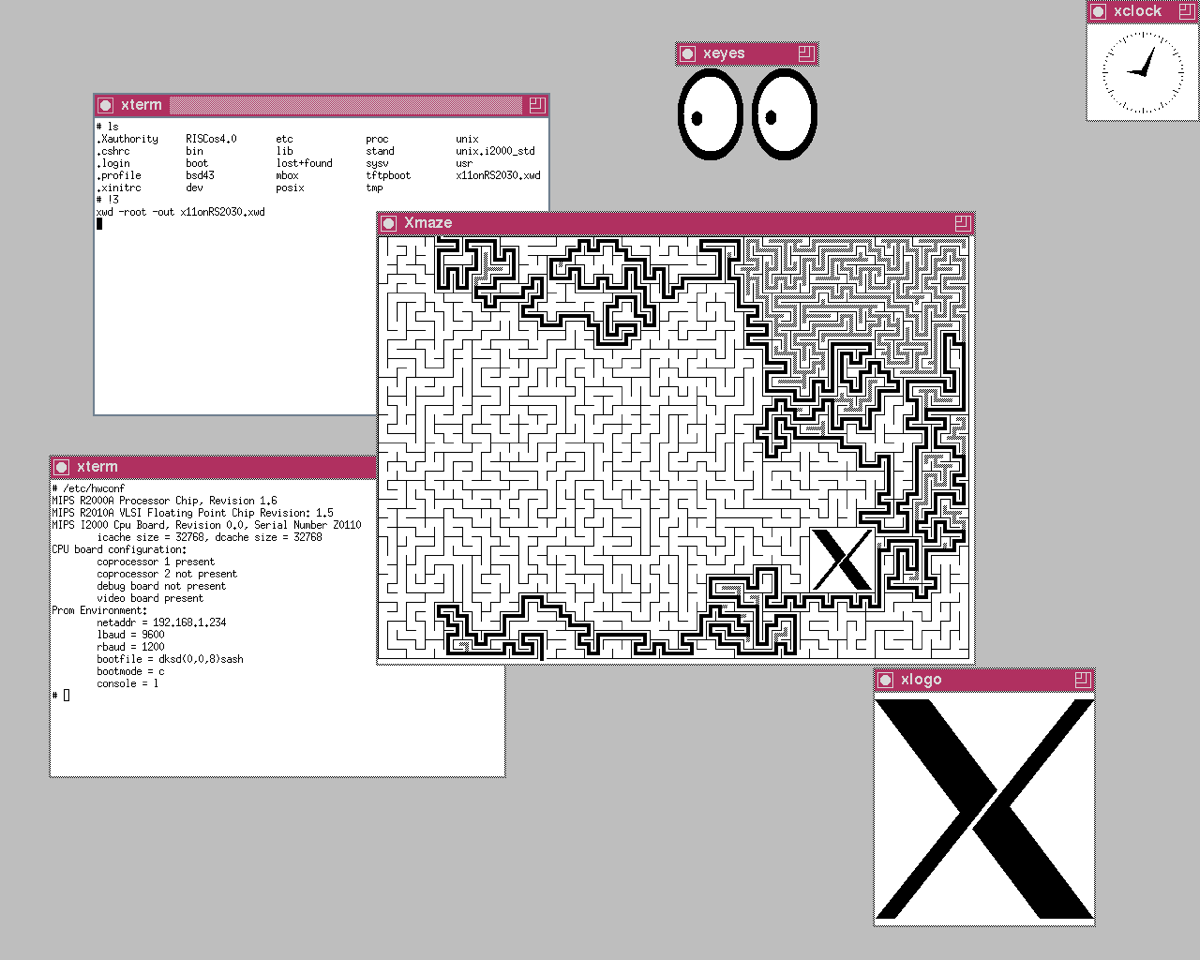
One day (and night) later, the black screen of my RS2030 flickered into white, then grey and… taadaa:

X11R5 as vanilla as it gets, runing the classic twm window-manager. The lower xterm shows hwconf, the grandfather of IRIX’ hinv.
Currently I’m fighting with fvwm – this would be a good window-manager given it’s about the same size as twm but much more versatile.

My complete X11R5 build is available as tarball here – 90MB, ~300MB decompressed. Better have a big hard-drive 😉
Un-tar to/usr/src, make sure your date is set beyond that of the files in the archive. The archive is ‘un-cleaned’, i.e. all binaries and objects are still there. This way you can just call make install to install this build onto your system – or make adjustments to sources without having to wait half a day for the compile run to finish.
Again, you will need a RISCos 4.5x system – it does not make any sense on any other system than a MIPS box!

Make yourself even more comfortable

Many years of Linux and other grown-up UNICES make using RISCos very…. tedious. The standard shell is IMHO a serious pain… the supplied csh makes life better but still, it could be better.

So here’s a (growing) archive of tools I was able to compile or dig out somewhere in the depths of the web. As soon as I got gcc working reliably this archive should grow faster providing more improvements:

  • Mosaic (2.4 & 2.7b4)
  • amd
  • color_ls
  • elm
  • fvwm (2.0.42 – prebuilt for RISCWindows, does not run with “my” X11R5 compile)
  • gcc.2.7.2 & lib
  • htadm
  • htimage
  • httpd
  • in.cfingerd
  • in.pop3d
  • libfpvm3
  • libgpvm3
  • libpvm3
  • lsof
  • make (3.75)
  • nslookup
  • perl (5.004b)
  • pgp
  • pvm
  • pvm_gstat
  • pvmd3
  • pvmgs
  • sendmail (8.9.0)
  • ssh (etc. see the archive README)
  • wu-ftpd (2.4)
  • xpm (3.4g)

You can download the above mentioned binaries as tarball over here. Please mind, they’re totally useless if you don’t have a MIPS RISCos 4.x machine.

Hardware mods

There’s not much to mod here – especially given that replacement parts are hard to get in case something went wrong.

I tried to replace the very loud fan inside the power supply. But this did not work out as well as it did e.g. with my Sun Blade 150.
This is mainly due to the fact that this single fan not only cools the PSU but the whole system and thus needs quite some static-pressure which simply can’t delivered by standard PC fans.
If interested, read more about cooling vintage workstations in this post.

MIPS RS2030 – the resurrection

As mentioned in the first MIPS RS2030 post, I’ve got mine off ePay around 2004 and after some testing its life was about slowly moving through my basement waiting for it resurrection…

Hardware

The long way into the light

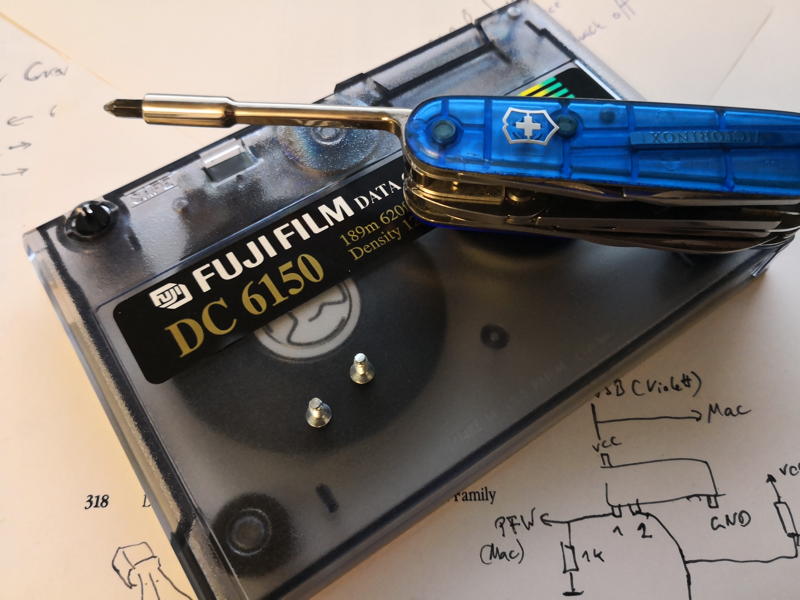
So, in 2004 the RS2030 wasn’t in the best condition: No front bezel, no hard-drive and a flakey DALLAS clock-chip. There were 8MB of SIPP modules plugged in and luckily it came with the original keyboard, a monitor cable and two QIC tapes from 1989 containing RISCos 4.10.
I fiddled around with it for a bit, still having a 21″ CRT on my desk, happily connecting to the BNC cable and the tapes were still readable but I wasn’t able to get things booting without a tiny bit of documentation. At least I added 8 more 1MB SIPPs for small money to fill it to the brim.

This changed 2012, when I got in contact with Julien Noël, who ran no-l.org (wayback-machine link) which pretty well described how to install RISCos. Well, he had a MIPS Magnum 4000 and used a bootp() server, but it described a lot of things I was desperately needing for my resurrection.
Some mails flew back and forth, a BNC-to-VGA adapter was build and little RS2030 saw some daylight again. Sadly my QIC tape-drive disintegrated over the last years and its pressure rollers turned into sticky goo – and I figured this out, when the goo slowly crawled into my precious tapes. Yikes!  😥
I cleaned the tapes as good as possible and everything went back into the darkness of “Zee Vault™” again. I think it was the next month, when Julian sent me a tarball containing RISCos 4.52 tape images. I saved them in a safe place and moved on…

Now or never!

This year (2018) I had more time at hand than usual and plenty of it went into some of my Macs and a comparably vintage SGI Personal IRIS.
During my fight practicing with installing IRIX 5.3 onto a clean drive I felt like prepared for an even older MIPS box. This time it had to be done! I got myself a new-old-stock QIC drive, 2 still sealed QIC-150 tapes and moved everything in front of my LG TFT display, which is able to handle sync-on-green signals.
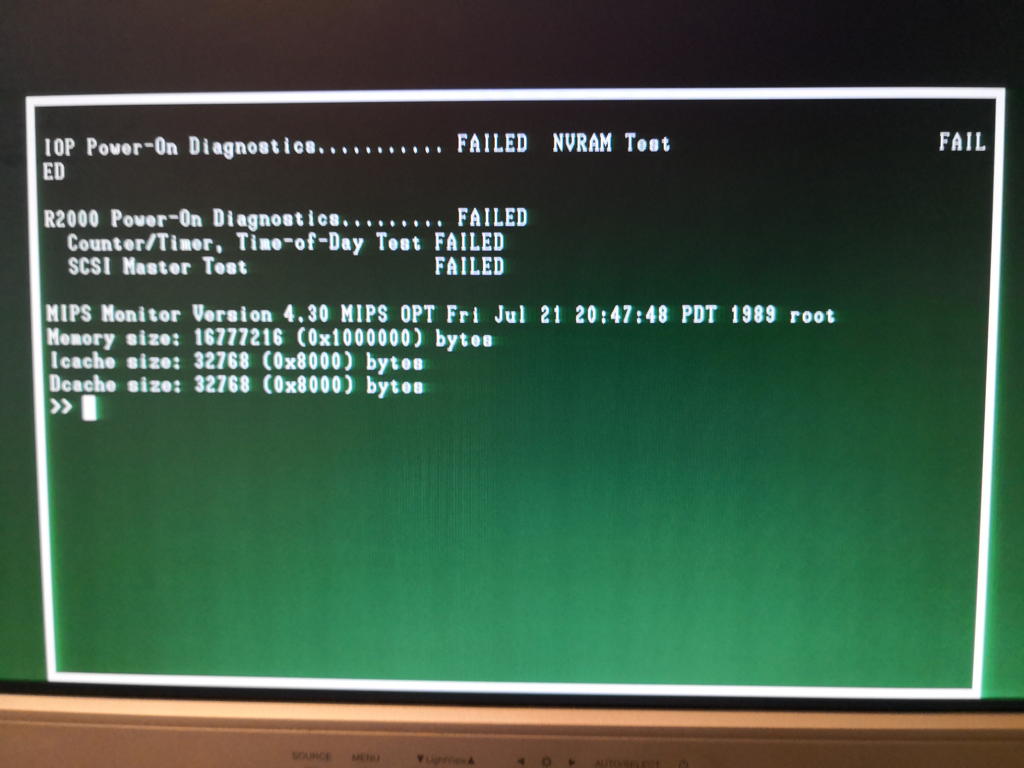
Let’s check if it’s still alive at all – flick the switch, a noisy fan starts blowing and ~45sec and some beeps later the RS2030 is back in business:

Yes, the console looks strange. It just uses 2/3 of the screen and has a frame around it. The green tint is due to my way too long video cable.

Ok, there are many “FAILED” messages but it found all RAM and the ROM monitor (aka BIOS) prompt is happily blinking. Woohoo! I left it running/idling like this for a while just to make sure the power-supply stays stable.
After half an hour I moved on. The fails of the NVRAM and Counter/Timer test showed that the DALLAS DS1287 clock-chip finally went flat. The failed SCSI Master Test gave me a bigger shiver…

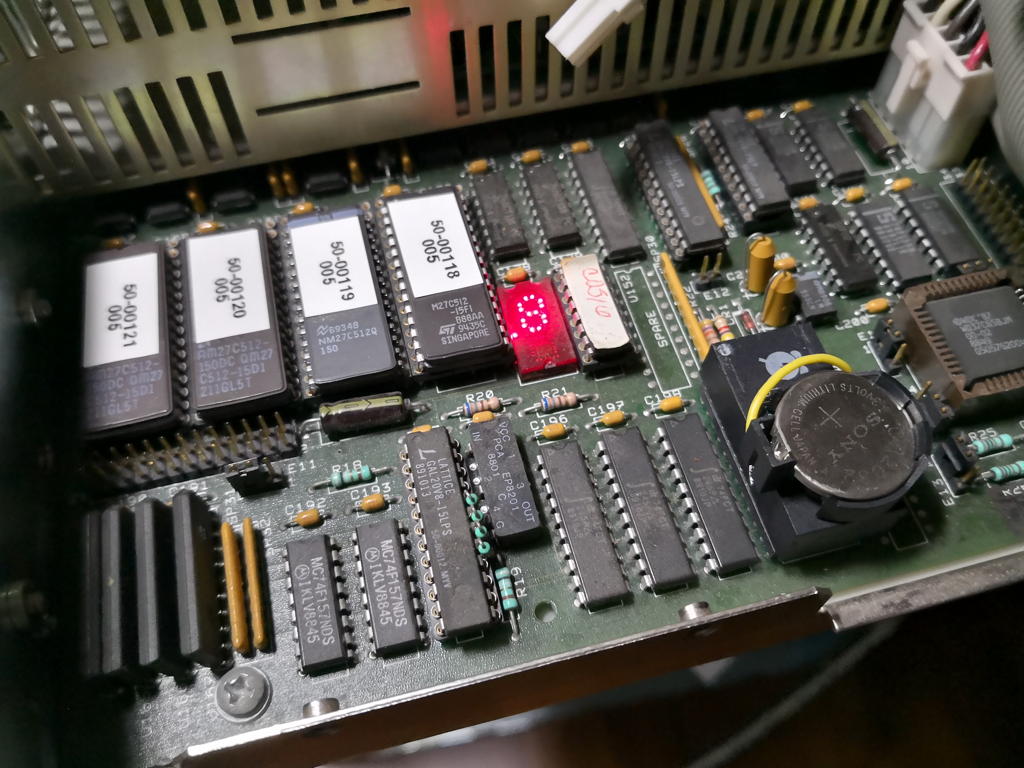
The clock-chip was quickly removed, the ram content saved, cut-open and enhanced with an external 3V button cell. It’s a common drill for all vintage hardware enthusiasts. I think this is the mother of all clock-chip modding posts.
Luckily the SCSI Master Test went away with the modded DS1287. Phew… while I had my beloved EPROM programmer at hand, I also saved the four 27c512 EPROMs and some Googling actually brought up a  more recent version than mine: v4.30 from Jul. 1989 vs. 4.32 from Jan.1991. You can download the binary images here. The most useful difference I found is the added ‘sprobe‘ command, listing all SCSI devices found.

There’s a nice thing all computers should (still) have. A 7-segment display next to the EPROMs giving you some idea of the systems status while booting. Also pictured the modded clockchip.

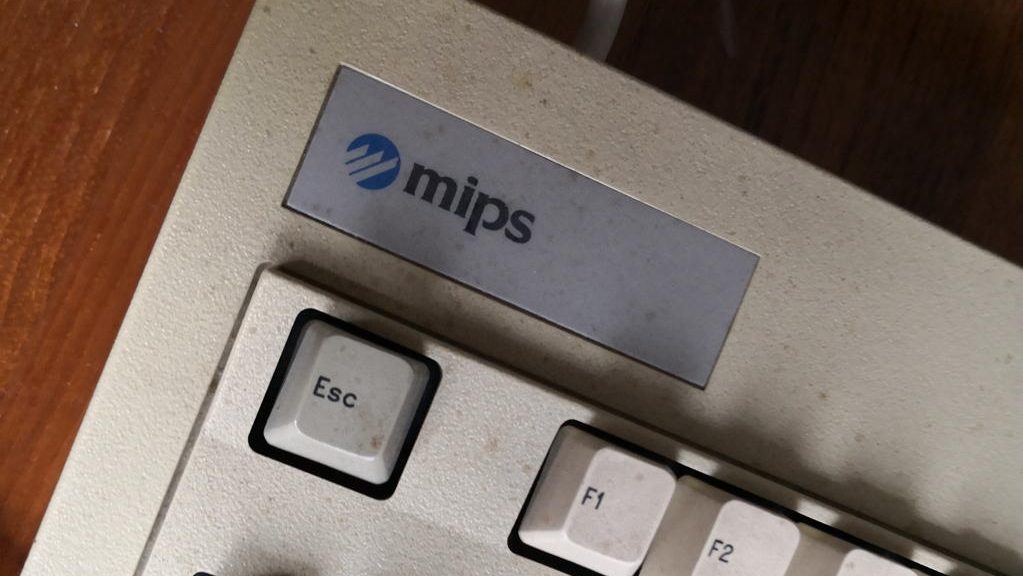
I found an older post of somebody desperately looking for a keyboard. While it looks like an XT-keyboard and weights like an IBM model M, it seems to be somewhat special. As said, I’m lucky to gave gotten mine together with the RC2030.

This was the last step: Check the drives. Find a proper SCSI hard-drive and externally connect my new tape-drive.
Having learned from my “tape disaster” in 2012 I carefully checked my tapes before putting them into my precious new tape-drive. And yes, they had a problem: The the slack retention belt was worn out and lost its elasticity…. resulting in, well, slack. To fix this you need a new(er) tape as ‘belt-donor’ and then do some tape-DJ’ing.

As I wasn’t able to find 2 reliable donor tapes, I decided to not dump the RISCos 4.10 tapes and move on…

Software

It’s getting serious: I took my two best blank QIC tapes and copied the RISCos 4.52 tape-images onto them using Linux on my retro-server (which one day deserves a post for itself). That was the easy part…

Let the game begin

Using Juliens recipe the initial boot from the tapes went smooth. Well, at least for 90’s measurement. Times were different, so it’s definitely not slap in some DVD/USB-stick and let the BIOS do the rest – choose some packages to be installed and baaam!, OS installed.
This is the drill (theoretically):

  • Use the minimal boot command of the ROM Monitor to boot a stand-alone shell (‘sash‘) from the 3rd block of the tape.
  • This sash knows filesystems, so you can use it to temporarily copy a mini-root system from tape block #4 into the swap-partition
  • Then load the RISCos kernel from tape telling him where to find the mini-root filesystem.
  • Finally this kernel loads a full-blown shell which then is able to execute the install script (‘inst’).

But if you’re not owning an original hard-drive you have to format/partition yours first. In this case you have to “boot” the MIPS format tool. It’s the grandfather of SGI IRIX’ fx, just even more basic.
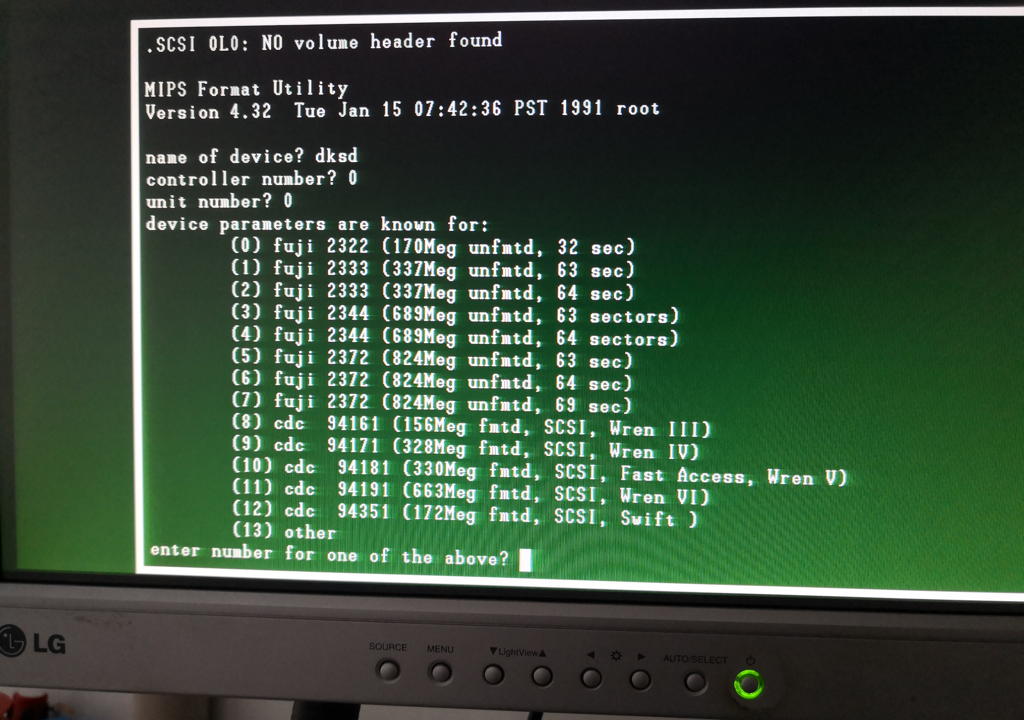
Very 
basic. And confusing. Out of the box, it “knows” 13 hard-drive models, of which 8 aren’t even SCSI. And all of them are very, very, very obsolete. Here’s the printout:

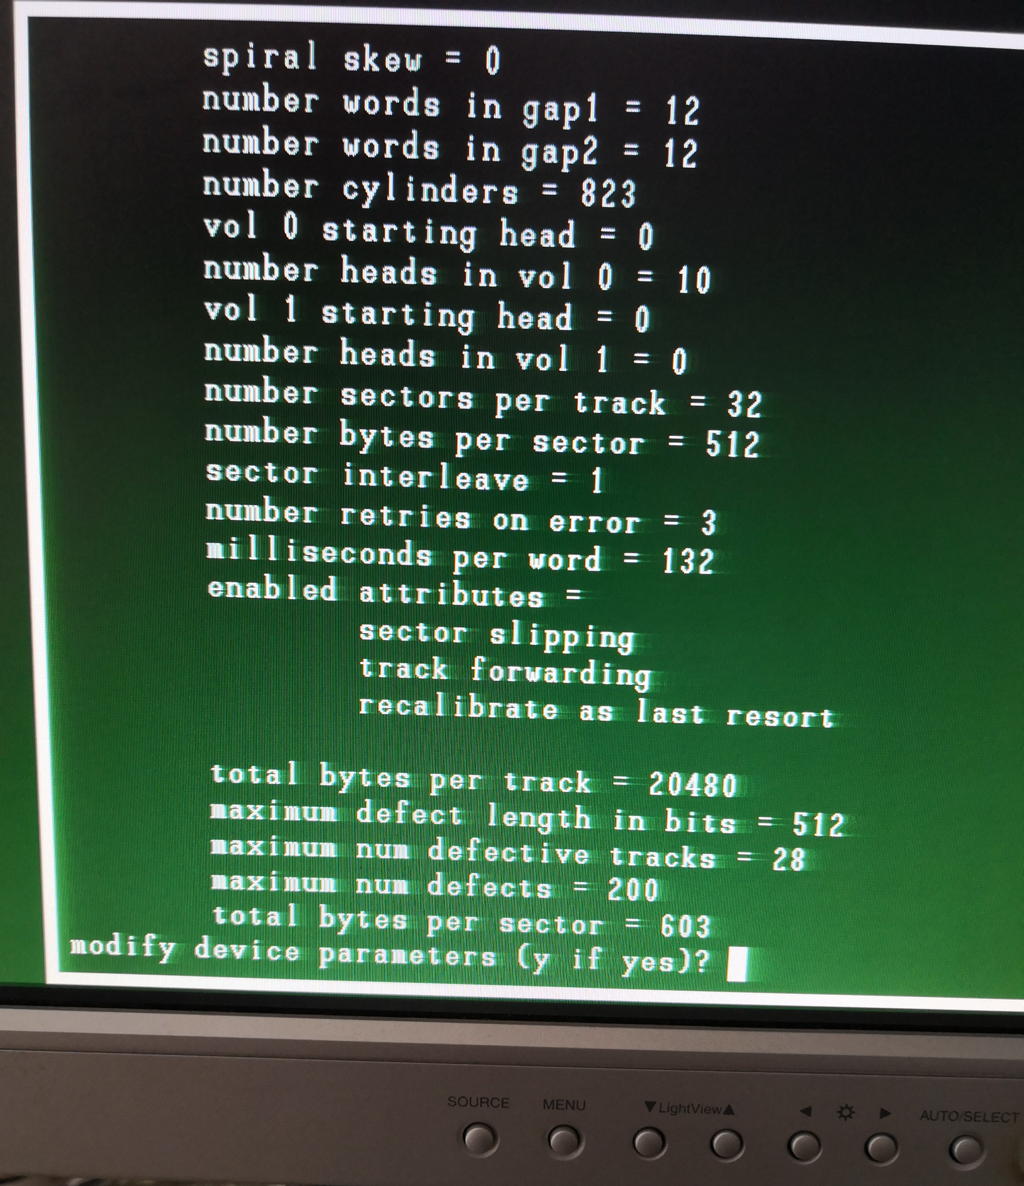
Option #13 gave me some hope… “other” means you can add your own drive – if you have these specs at hand:

Well, I guess you don’t. Neither did I. So I wasted spent 2 days to figure out how to get a partition scheme and whatever else is needed by RISCos onto my disk.
To spare you this experience, bad ideas are:

  • Use the IRIX’ fx tool
  • Use gParted
  • experiment with those wiredo specs

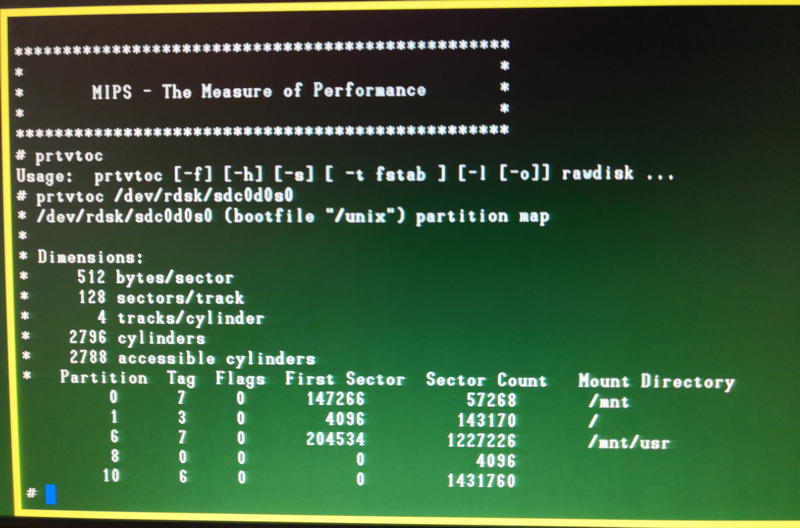
The solution is -as most of the time- simple. Choose some SCSI disk from the menu, answer all questions but deny formatting, so it will write all partitions and the so-called volume header (a partition containing sash and stuff). The tool ‘prtvtoc’ (PRinT Volume Table Of Content) will then show you something like this:

After that you can boot sash, miniroot und finally start ‘inst’. Again a very simple installation tool which creates the EFS filesystem and copies all packages onto the hard-drive. Time for a break… tapes are slow and it’ll take ~2hrs.

So tonight I’m gonna party like it’s nineteen ninety-nine

When that’s done, you have to reboot and your MIPS will boot like a proper workstation… back in the days. It takes some minutes and it greets you with a simple ‘sh’ prompt.

To make your life a bit easier quickly enter ‘chsh’ to switch into ‘csh’ which is a bit more modern.
From there have fun exploring your new, old system. Ah, and don’t forget: RISCos is not year 2000 aware. So set the clock to something before December 1999 😉

Don’t miss the next chapter: Home improvement… making things a bit more convenient.

The MIPS RS2030

Intro: The sleeping beauty

Well, the MIPS RS2030 isn’t really a beauty – but it slept quite a while in my basement. Actually, it’s a mediocre UNIX workstation at best… but there are many things about it, making it a special piece of my collection – and as an returning reader of GeekDot you may know I have a soft spot for those whacky things from back then… and as often with my posts, this one will be the most detailed you’ll be able to find. The RS2030 is yet another lonely system.
Well, if you look like this, you’re not the hottest thing in the Workstation-Discotheque 😉

First things first

MIPS… Even if you have just a dim knowledge about processor history, this name will ring a bell… Founded in 1982 MIPS created the first commercially available RISC CPU and until 1992, they were system manufacturers, too.
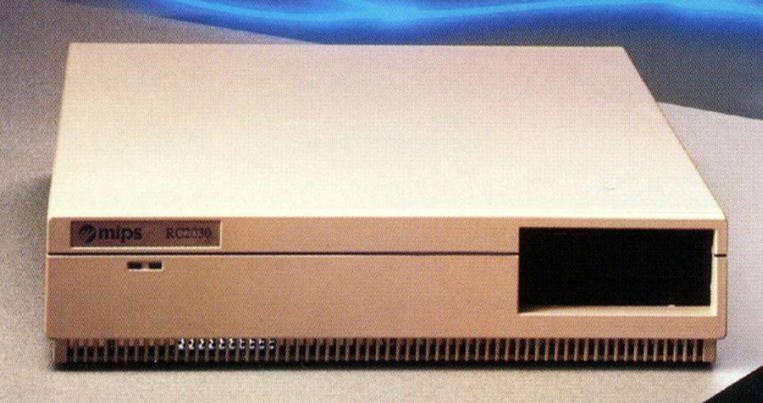
The RS2030 had many “firsts”: It was one of their first models, featuring their first CPU, the R2000, and somewhat paved their way into the market while immediately hurting MIPS’ reputation… more about that later. And last but not least, the used OS was one of the first 32-bit operating systems (1985) for RISC-based workstation-class computers.

So here are the specs:

  • Insane 12 (VAX)MIPS squeezed out of an 16.6MHz R2000 CPU and R2010 FPU. 32KB external Cache should speed things up a bit…
  • Up to 16MB (yes, that’s the max) RAM
  • 10Mbps ethernet… that’s 10base2 or an AUI transceiver.
  • 4MB/s synchronous SCSI interface (internal space for one 3.5″ HD)
  • Two RS232 ports controlled by an NEC V50.
  • Optional monochrome or color frame-buffer
  • Optional 3.5″ floppy drive

Just for the record: There was a 2nd model called RC2030, which only differed by not having the frame-buffer. It was sold as server… that’s why the put the “C” in the name. Errr, no, it’s… not… logical. So I’ll forget about this and move on.

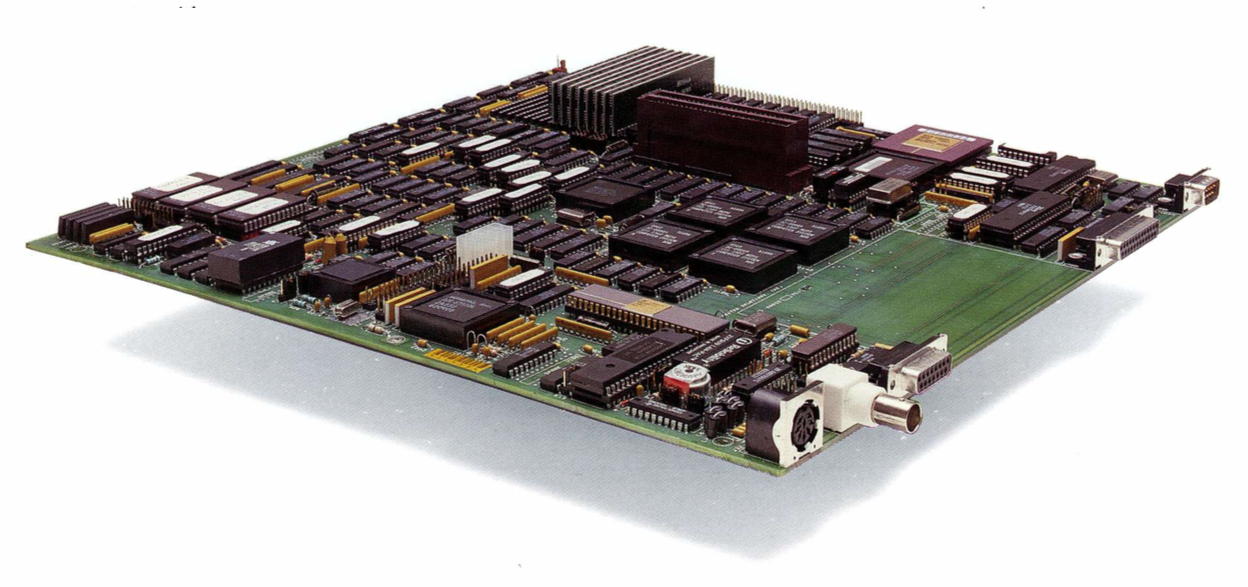
The official brochure pictured all these parts like this:

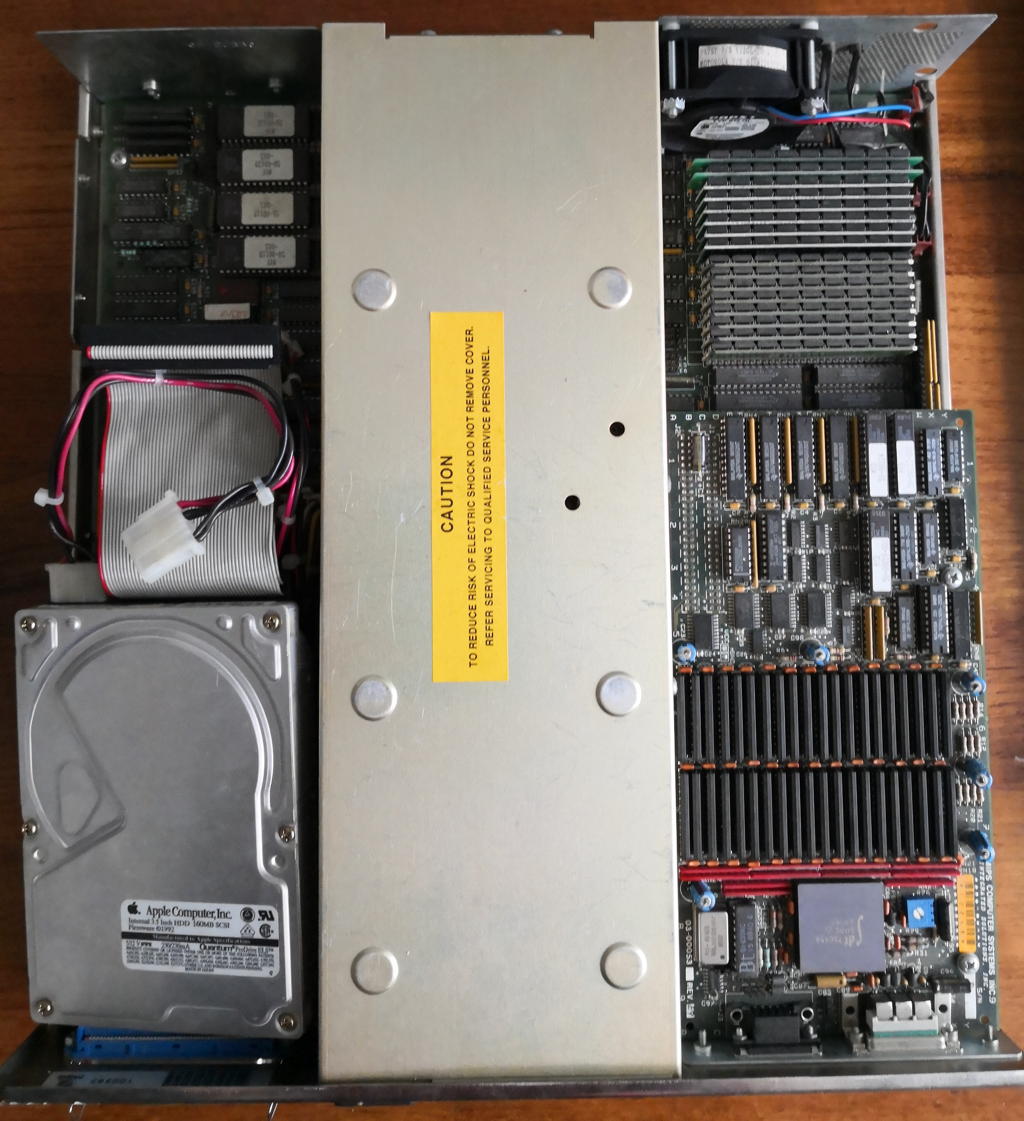
Nice, but missing the power-supply and stuff… in reality, my RS2030 looks like this from the top:

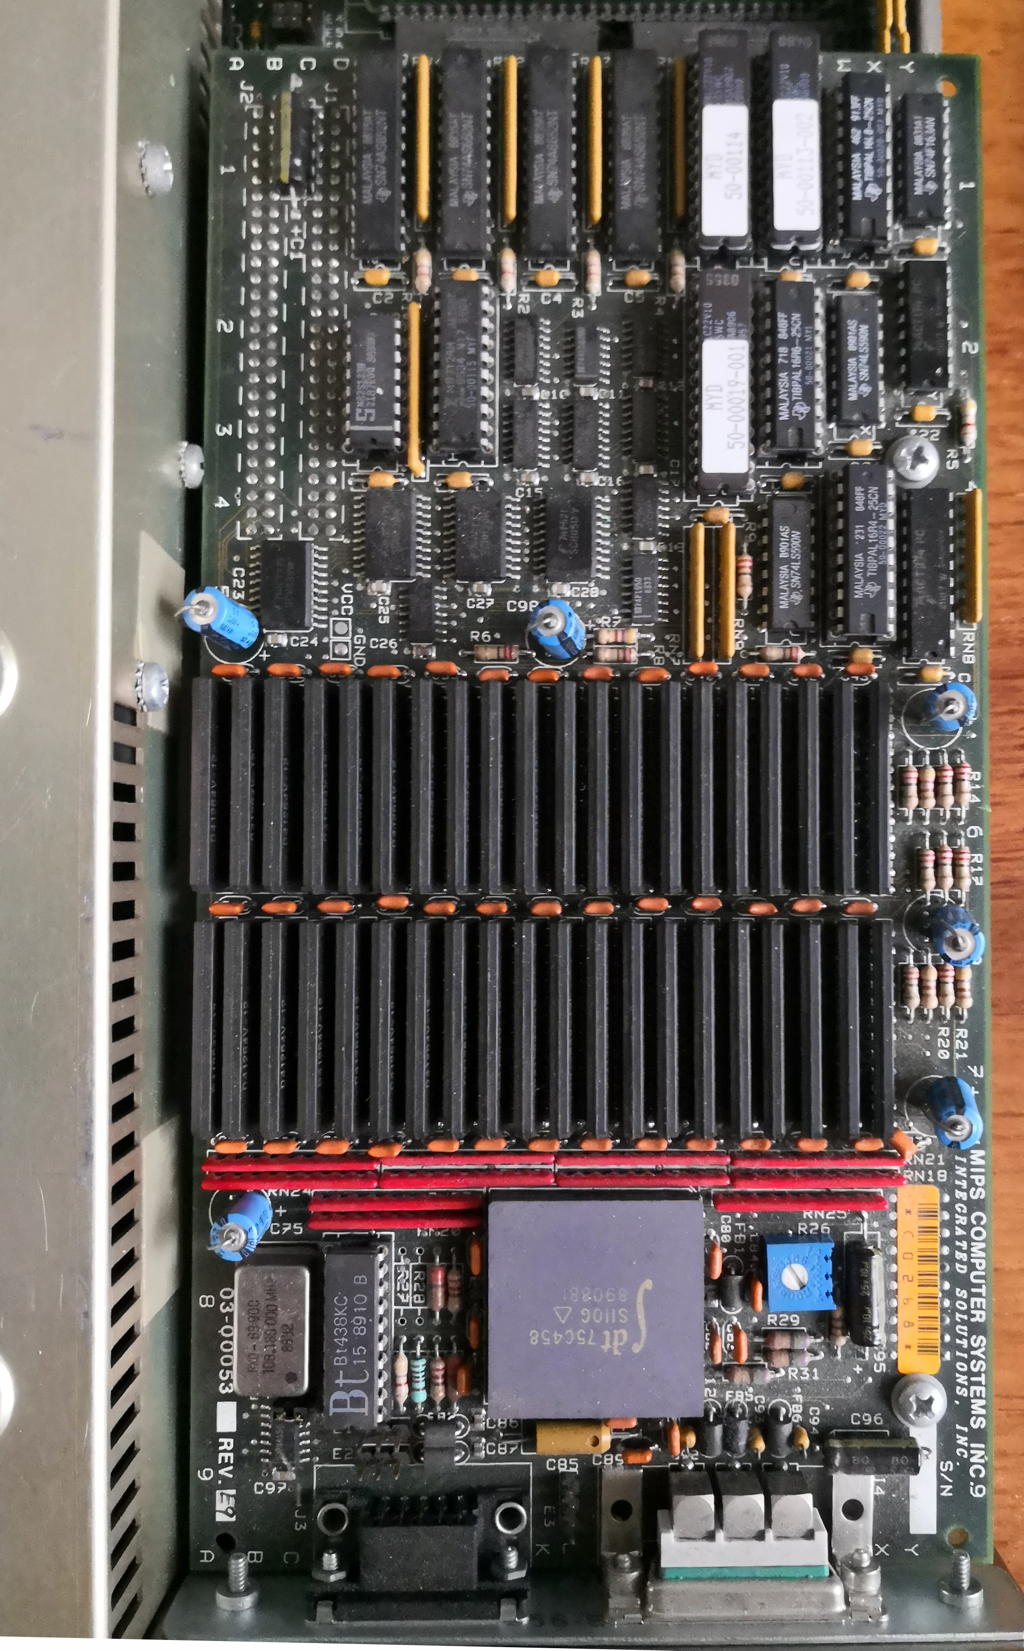
Yeah, I’m missing the the hard-drive carrier – but the same goes for the front bezel, so what the heck… OTOH I have the mighty color frame-buffer, which you can see to the right of the huge power-supply in the middle. It is capable of 1280x1024x8bits/pixel at 60Hz. Here it is in more detail:

Here’s my mainboard having the PSU and frame-buffer removed, revealing the glorious R2000 and his math-bro’ R2010 as well as the V50 “I/O processor” and 4 mysterious MIPS custom chips :

Right behind where the frame-buffer sat, above the CPU/FPU you’ll find the L2 caches and RAM slots. These are SIPP modules and the maximum supported are 16x1MB.
Back in 1989 that was many… not much, but enough for a serious workstation:

Looking closely you’ll notice the cut cables for the 2nd fan (wasn’t me!). A small but very loud one meant to cool the RAM and most important the CPU/FPU underneath the frame-buffer.
Because I currently run the RS2030 without lid, it’s OK. But after some hours it gets quite hot in that region.

To the left of the power-supply (which has another very loud fan) are supposed two carriers for the hard-drive and the floppy-drive. Both were absent when I got this little beast.
Underneath the drives are the ethernet and SCSI controllers as well as the 4 EPROMs containing the “BIOS”, aka monitor.
Like all workstations back then, the RS2030 boots into a monitor, a basic software which gives you some means of setup and options to boot from HD, tape or network. More about this in the next chapter about setting things up.

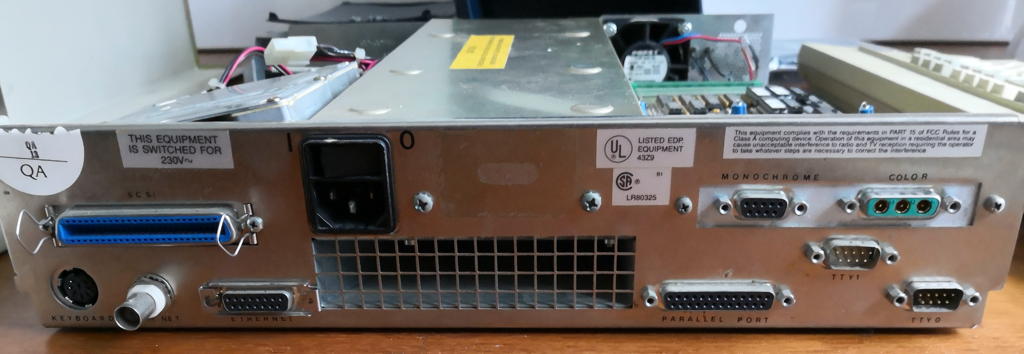
To round things up, here’s the back side – connectors are from left-to-right:
Keyboard (DIN), 10base2 & AUI ethernet, SCSI, one parallel, two serial connectors and on top the frame-buffer. Mind the uncommon “0W3” RGB connector.

The OS with the many names

Finally, the RS2030 -like all MIPS workstations- ran a strange flavour of UNIX called UMIPS or MIPS OS or RISC/os or RISCos (not to be confused with Acorn Ltd.’s RiscOS)… all tree names/notations are used randomly across documents and mails from those times. So Googling stuff is a drag, 99% of the hits are Acorns RiscOS pages.
It seems MIPS’ operating system started out as UMIPS (UnixMIPS) and settled to RISCos around 1990.
As said, in 1992 MIPS gave up making computers… and was sold to Silicon Graphics (SGI). And playing around with early IRIX versions you smell RISCos all over the place – it’s definitely the mother (or father) of IRIX.

Anyhow, like other Unices of those times, RISCos is hard to get used to it as it misses all those comfortable things we got used to in these Linux days. No bash, no editor but vi etc… To make things short, here’s the Wikipedia roundup:
RISC/os was based largely on UNIX System V with additions from 4.3BSD UNIX, ported to the MIPS architecture. It was a “dual-universe” operating system, meaning that it had separate, switchable runtime environments providing compatibility with either System V Release 3 or 4.3BSD.

Rant, rant, rant…

As said in the beginning, the RS2030 wasn’t quite the showpiece for MIPS. During my research I came across many disgruntled posts about this and other MIPS machine(s).
It actually seems that the RS2030 wasn’t even designed by MIPS but taken over from some other company (my assumption is ‘Integrated Solutions Inc.’ given the marking on the frame-buffer) to fill a gap. Here’s the gist featuring replies by someone who obviously worked for MIPS back then:

>>Between the sloppy I/O implementation (the RS2030 was designed by a
>>now-defunct-or-nearly-so workstation company, whose design Mips had to finish
>>to allow the delivery on a large contract; the bozos who did the box used an
>>off-the-shelf NEC V50 chip for I/O and programmed it poorly, causing lame
>>serial and SCSI performance where simply using the R2000 would have worked
>>better), the lack of expandability and the proprietary memory modules…

The options at the time were:
a) Walk away from a deal for a few thousand systems, a large percentage at the time of Mips’ total base
b) Manufacture only the few thousand systems, and make little or no money on each because of economy-of-scale issues
c) Build and announce the 2030, and keep going on the next generation (albeit somewhat delayed)

(a) and (b) would have resulted in no Mips workstation product at all
that year, which would have been dramatically worse for the company.
The strategic direction at the time was to expect most serial i/o to
come in from terminal servers (this was subsequently modified somewhat).
In addition, issues of SCSI performance did not become apparent and reproduceable from quite some time after product launch.

>Surely MIPS could at least provide new ROMs for the V50? Or did the
>bozos solder them in?
There are some reliability fixes available. As for performance, let’s
face it: nobody’s going to spend money to improve the performance of a
system, at no return, years after it has been dropped from the product
line.

Wow, so it was deliver something mediocre and move-on quickly to create something better. IMHO not the best way to build a good reputation.
This probably led to comments like this:

Unfortunately, computers made by MIPS Co. were ill-engineered products. They were error-prone. From my limited experiences, they easily got broken. We had many broken RC2030s (early times RISC desktop with sloooooow R2000, codenamed “Jupiter”) and many broken RC3230s.
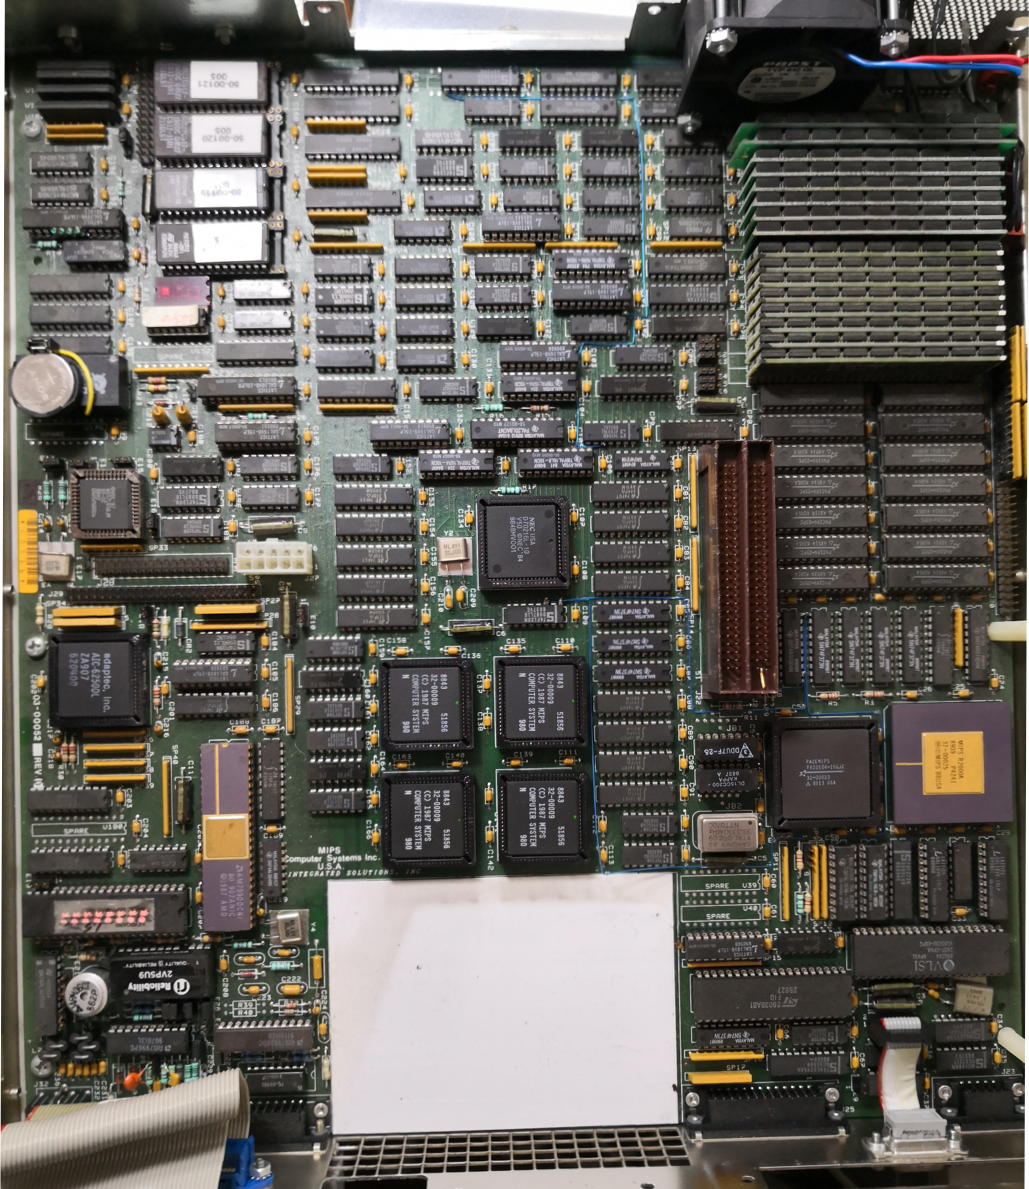
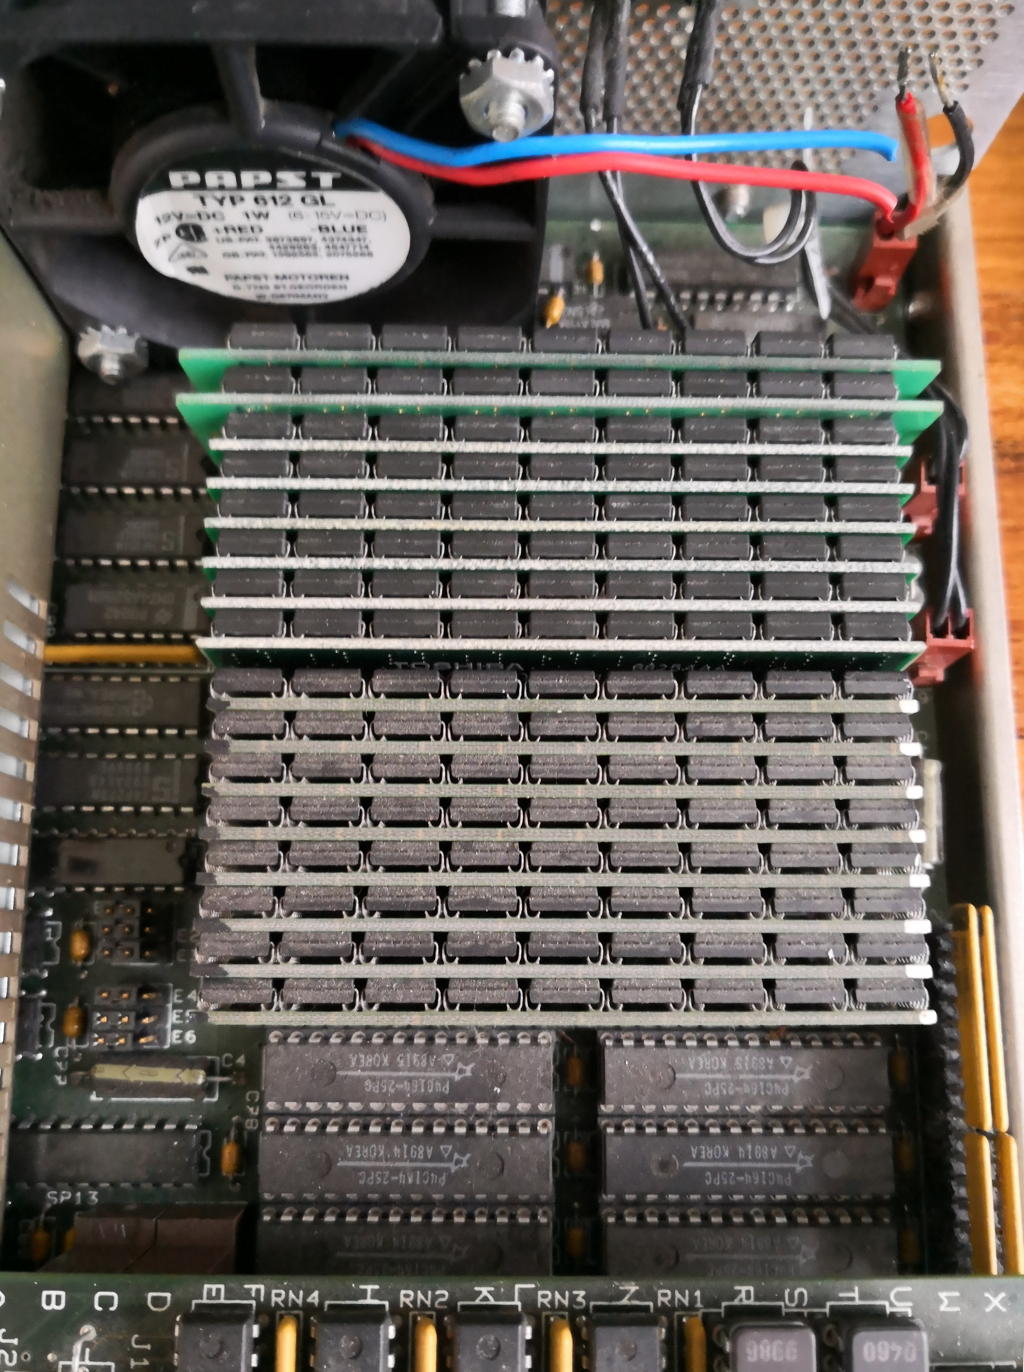
We stock them unwillingly and dumped eventually with disappointments.

Does this make me turning away from this poor little, mediocre thing. Not a bit! It’s an important piece of IT history – and because this is GeekDot, I will make it work for its money.

So follow me to the next chapter: RC2030 – The resurrection.