Tag Archives: Software

ThruView – Software for the DASH!860

With the DASH!860/ShadeMASTER combo came the software package “ThruView” (this is the sales brochure).

Sadly -and usual in those days- it’s protected by one of those nasty dongle keys plugged into the PCs parallel port. If you were into computers in the 80s/90s you surely remember them, most likely full of hate:
They were flaky sometimes, didn’t reliably work with the printer looped through them and there was a 50% chance they refrain from working when upgrading your PC.

Running ThruView

Anyhow, starting ThruView, it greets you with a friendly

TV_no_dongle

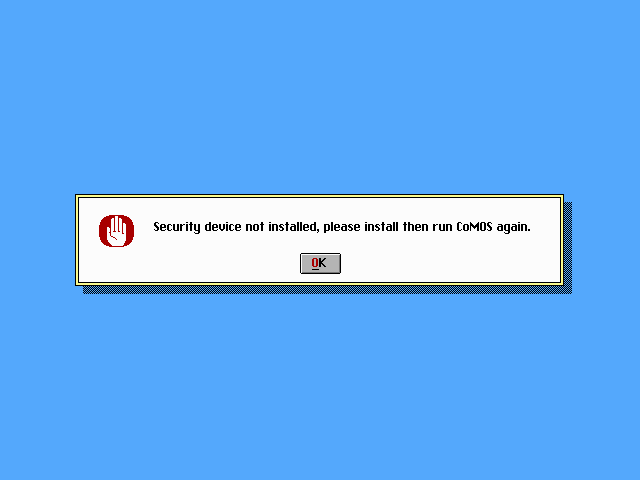
Ok. Thanks for that ma’am. Here we are. 25 years later and the last dongle for it probably went the way of the Dodo.

But you wouldn’t be at “the home of real mens hardware” when you wouldn’t do, what a man has to do in this case…
Out went the Disassemblers. I recommend IDA Pro for comfortable work on your recent Windoze workstation and SoftICE to work on the bare metal itself.
Ahh, finally, cracking time again. Missed that during the last years…
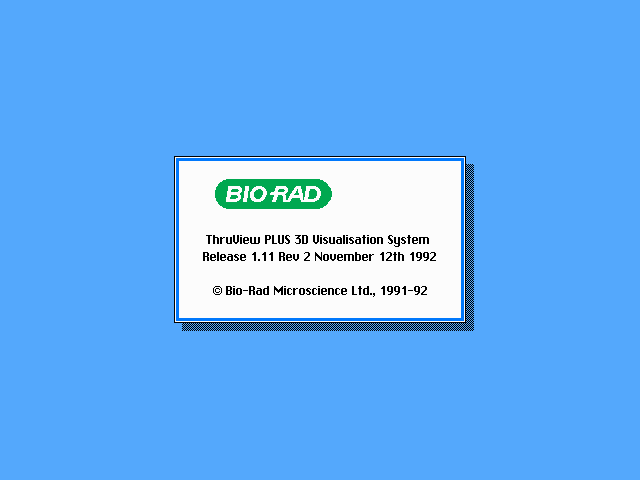
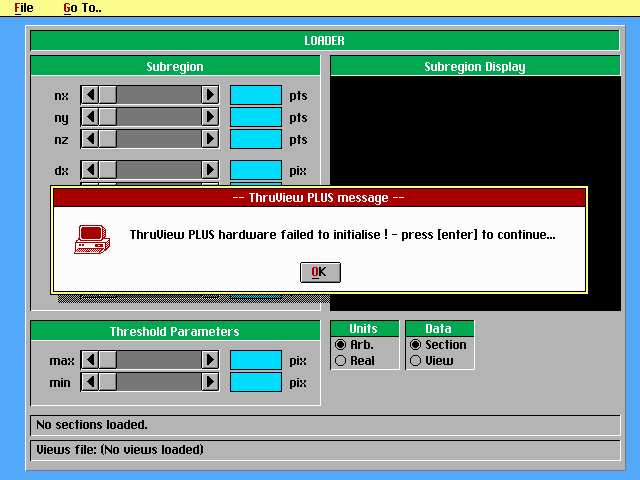
Half a day later, Thru-View greets me with this:

TV_loading

Yay. One hurdle taken… here’s the next one: You have to open an image file. In the ubiquitous PICtor format. doh! (So I thought…)

ThruView_startup

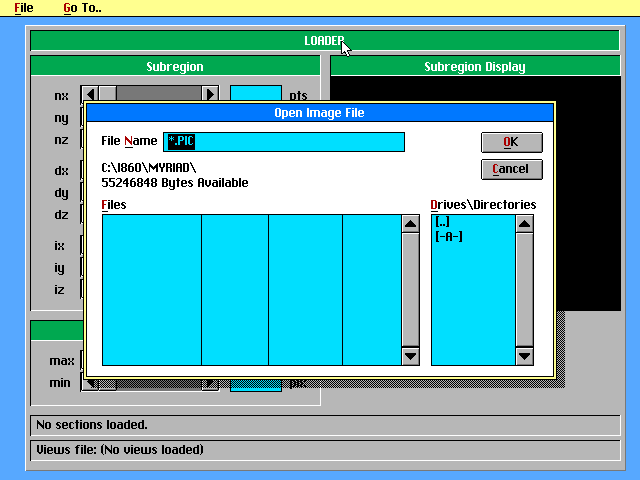
Ok, somewhere I was able to get some sample .PIC files… select that and open the damn thing, click OK and…
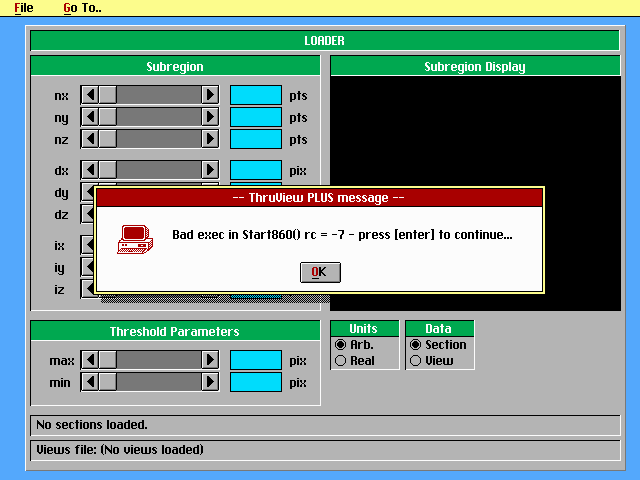
TV_badexec

…followed by…

TV_init_failed

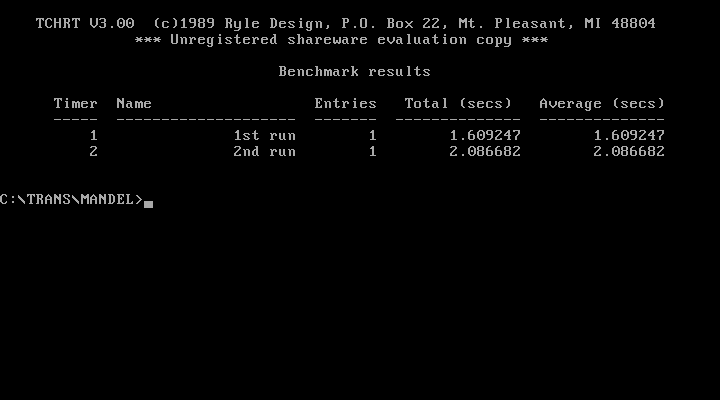
As far as I can see, XNIX is loaded correctly. For now I have the suspicion that there are communication issues with the DASH!860 due to my PC workhorse is a ‘modern’ Pentium 1 MMX… and we all know how lazy programmers were back in the days when it came to delay-loops etc..

So next up: Tow the trusty 80486 system out of the basement and check it with that one.

Two days later…

Ok, on my 486-PC I was able to successfully load the XNIX kernel in real-mode (‘x.exe /r’) and using the debug-flag I saw some errors about config-files not found in C:\TVPLUS… wtf? All paths are set in the .cfg file but it seems some are just ignored and hard-coded.
Ok, so I created that folder and copied everything over and called ‘rstub ___tv1’ again… and this time it worked!
So let’s open that PIC file… it reads and reads and:

TV_invalid_pic

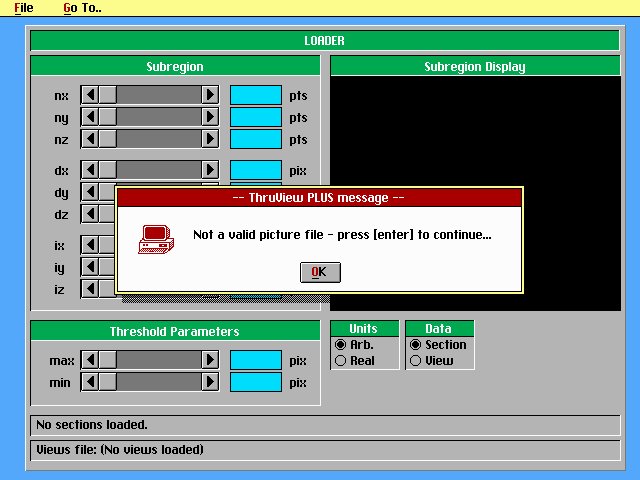
Ohhhh-kayyyy. So my assumption that ‘.pic’ meant a PICtor file was wrong. Some intense Google’ing later I’ve learned that the file format is the “Biorad PIC“. I could have guessed that before. Those times were the times of proprietary formats. How to get such a file to play around with it?
Luckily others had the same problem. ImageJ seems to be the main tool for converting scientific visual data, and it has a native support for reading Biorad PICs. But how to create one?
Well, thanks to this tool, you can create it when creating .raw files before using ImageJ. A bit cumbersome – but hey at least something.

…another day later…

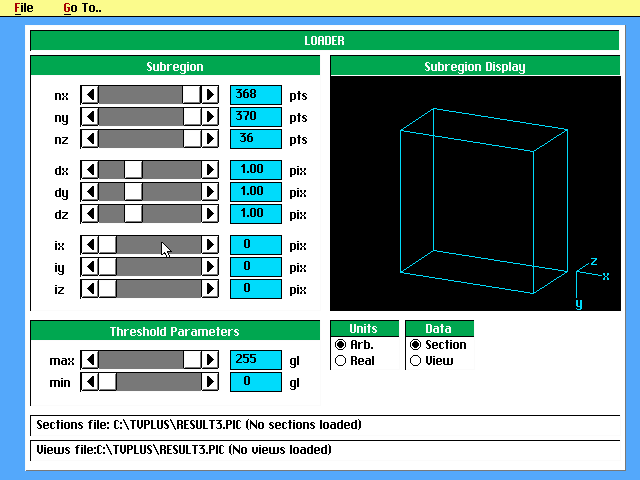
Alrighty – that brought me a bit further: As far I can see, ThruView is working! My self-built file was successfully loaded and I was able to play with all modules. Here’s a slideshow, showing the available modules (loader, builder, animator):

TV_screens

While my file loads fine, I wasn’t able to get a picture on the ShadeMASTER VGA output yet. I can hear the relay switching the outputs and my LCD display catches the signal correctly (dimensions as well as refreshes) but it’s just black.

Here’s another “finally!”: Loading my Z-Stack PIC file takes 4.7MB of the DASH’s RAM… changing back from the builder into the loader module I got this error message:

TV_outOfMem

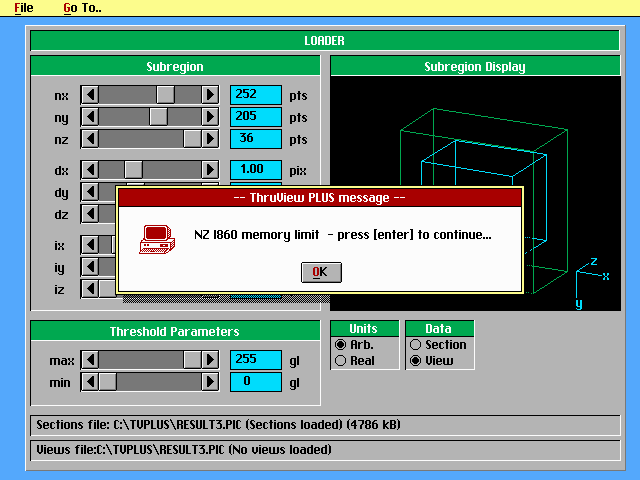
This is a ‘special moment’ for me, as this is the first time that the available RAM of one of my i860 cards was actually filled with meaningful data.
But rest assure: As soon the couple works as supposed the hardware tweaking will begin 😉

Basic Transputer Tools

Ok, so you have your shiny (not so) new Transputer system installed/connected and you really like to know if it works and at least see some results… you’re in need of basic Transputer tools to get started.

First, download the Geekdot “Transputer Tool Kit” from my Transputer software page (New releases are possible, mind the version number).
Each tool introduced here has its own folder in the archive.

ispy/mtest

Even it’s historically not the first application ever developed for Transputers it’s for sure one of the most used.
It started as ‘check‘ and at some point got renamed into ‘ispy‘ – whatever the name is, the technical term would be “network worm”. This means it’s a special piece of code which a) sniffs around in a transputer (what kind, number of links and their speed) and b) replicates itself over all links it previously found.
When done, it outputs a network map like this example:

Using 150 ispy 3.23
 # Part rate Link# [ Link0 Link1 Link2 Link3 ] by Andy!
 0 T800d-25 292k 0 [ HOST   ...   ...   1:0  ]
 1 T425c-20 1.6M 0 [  0:3   2:0   3:0   ...  ]
 2 T400c-20 1.8M 0 [  1:1   ...   ...   ...  ]
 3 T400c-20 1.7M 0 [  1:2   ...   ...   ...  ]

ispy is used on geekdot.com extensively, so any time I write about Transputers you will see some sort of ispy output for sure.
There are several versions of ispy included in this kit. This is because some versions behave more stable than other in certain circumstances. E.g. the most recent version 3.23 does not work very well with the C004 link-switches.

“The other part” of ispy is called mtest. mtest takes ispys output and runs an indepth memory test/report on all Transputers found.

iserver

iserver is part of what INMOS called “itools” – long before Apple discovered the “i” for themselves 😉 – there were many others, mainly development focused (e.g. idebug, icconf etc.).
It is more or less the successor to the godfather of all Transputer booting tools “afserver” (1988). Well, it has to be, being the on INMOS supplied with all their other tools and languages.
The possible options are quite self-explanatory and printed to stdout when omitting any option:

iserver142h

Basically if you see a *.btl, *.b4 or *.b8 file it’s most likely meant to be executed with iserver. Before running successfully iserver need some environment variables set to successfully to be used:

set IBOARDSIZE=#100000
set TRANSPUTER=#150

These two settings tell all itools how much RAM the Transputer has to work with and at which port address it can be found (0x150 is default anyway). The archive contains V1.42h from Nov. 1990 which is the most recent as far as I know.

Mandelbrot

The “CSA Mandelzoom Version” is one of my favorite benchmark tools. I like it so much, that I run it once a while just for fun.. and to extend my benchmark table which I’ve collected over the time using it.

It is nice because it features integer (T4xx) as well as floating point (T8xx) versions of the calculation ‘slave processes’ and scans the network itself. No external tool needed. It’s also possible to let the host (i.e. your PC) calculate the Mandelbrot fractal to get an idea, how much faster/slower your Transputer network is – the archive contains a little benchmark result text file which I accumulated over the years.
Also there are some handy switches available (‘-h’ for help):

  • -v : Use VGA graphics
  • -t : Run on host instead of Transputers
  • -a : Autozoom, loads  a list of coordinates from man.dat and start calculating them without manual interaction.
  • -b : Use a different base address (instead 0x150)
  • -x : Verbose output of the Transputer initialization process (added by me)

After a while I got tired of manually time a calculation run and also ran into problems with large networks which simply became to fast to hand time. So I extended the code of Mandelzoom with a high precision timer (TCHRT, shareware, can’t remove the splashscreen, sorry) which prints out a timer summary when run with the “-a” parameter. I provided my default “MAN.DAT” file, which contains 2 coordinates to calculate (1st & 2nd run) and used for all my benchmarks.

csa_mandel_timerThese are the results of my DOS host system running in VirtualBox.

Caveat: It breaks if there’s a T2xx in the network (e.g. B008/B012) 🙁 And as always: Read the F-ing README.txt!

Since I started to heavily modifying the source, I wrote a post of its own about it as well as put everything on github, so you can join the fun 😉

Other Tools

iskip

iskip can be very handy, when ‘talking’ directly to (externally) connected links, e.g. another network which is connected to your root Transputer. Here’s a good example:
You like to put code directly onto “processor 1” which is connected to link 2 of your root Transputer:

iskip

So you call

iskip 2 /r /e

This sets up the system to direct the program to the target network over the top of the root transputer and starts the route-through process on the root transputer. Options ‘R’ and ‘E’ respectively reset the target network and direct the host file server to monitor the halt-on-errorflag. The program can then be loaded ‘through’ the root Transputer directly onto processor 1 using:

iserver /ss /se /sc test.btl

debug.exe

Yes, I do mean the comes-with-DOS debug.exe. Well, you can use any debugger you like as long it can read/write to port addresses.
Obviously this means [MS|PC|Open|Free]DOS only. You won’t get far with this on Linux, any Windows or OS/2. At least for initial debugging and testing I strongly recommend to use the “bloated interrupt manager” known as DOS.
First of all, you have to know the port addresses the C012 registers are mapped to . There’s a de-facto industry standard which INMOS introduced with the IMSB004. Its been adopted by 90% of all 3rd party products, even with certain ISDN cards using Transputes.

The base address normally is at 0x150 (which can be configured to other addresses in some cases). From this base adress the offset is always the same:

Base Adress Register Comment
+0x00 C012 input data  read
+0x01 C012 Output data write
+0x02 C012 input status register read = returns input status
write = set input interrupt on/off
+0x03 C012 Output status register read = returns output status
write = set output interrupt on/off
+0x10 Reset/Error register write: Reset Transputer & C012 and possibly subsystem (check manual)
read: Get Error status
+0x11 Analyse register  (un)set analyse

So here’s a clean Transputer setup ‘conversation’ using debug (comments are just for clarity, not supported in debug):

c:\>debug
 -o 160 1         # Assert RESET
 -o 161 0         # Deassert ANALYSE
 -o 160 0         # Deassert RESET ... init B004/IMSC
 -o 152 0         # Clear Input  Interrupt enable
 -o 153 0         # Clear Output Interrupt enable
 -i 152           # Read Input Status
 00               # Bit 0 = 0 -> no Data waiting
 -i 153           # Read Output Status
 01               # Bit 0 = 1 -> ready to send 
 -i 160           # Read Error
 00               # Bit 0 = 0 -> ERROR not signaled
-o 151 1          # send POKE
-i 153            # Read Output Status
01                # Ready -> POKE Ack (00 = BAD no Transputer) 
After that you’re fine to send and receive bytes through 0x151/0x150. Doing so, you’re completely free which programming language to use. Here are some examples in AppleSoft Basic or even Python.

Transputer Software

This is my little pool of Transputer software… while my main interest lies in the area of getting them run (and lots of ’em ;-)), you come to a certain point you actually want them to do something.

Don’t expect megabytes of software here… go over to Rams software section, he collected/rescued nearly everything which was available on the market.

iTest

This is a simple DOS tool I’ve written to scan a system for a link-interface (aka C011/012). Similarly to the standard tool ‘ispy’,itest just does a scan on a given port address (default is 0x150) and tries to identify a device behind it (16 or 32 bit Transputer, C004).
Depending on the result, a clear text info and a (DOS) error code is returned, which could be used in a batch file. A sample batch file for scanning the usual ports is included in the archive as well as the source (Turbo-C[++]).

Download itest here

PePo

“PePo” is my very, very simple DOS Peek/Poke Tool, to have a quick look into a Transputers RAM. Actually it can be used with any B004 compatible interface which supports the INMOS protocol.
So it also works fine with the NumberSmasher i860, which is the reason, why it insists on a 32bit alignment. It uses the Port Address of 0x150 by default. Define the environment variable “TRANSPUTER” to change this.
Usage is simple: Just call PePo with either “peek” or “poke” and an address you want to read/write from/to, so to read the first five 32bit lines in a Transputers external RAM enter:
 pepo peek 80001000 5
To write something to it enter
 pepo poke 800010000 deadc0de

Download PePo here

Inmos MMS2 archive

To make things easier configuring your C004 network, I prepared an archive for instant use.
It contains some example soft- and hardwire files, an ISERVER.EXE (the program you need to upload code into your Transputer) as well as a batch file to easily start MMS (RUN_MMS.BAT).
Also you will find a folder with INMOS’ pimped version of ANSI.SYS called BANSI (“Better ANSI”), because all INMOS tools make heavy use of ANSI screen control. So put that into your CONFIG.SYS.

Download the MMS2 archive here

The Transputer Tool Kit (TTK)

This is a collection I’ve put together, providing all essential tools to get you started with your brand new/old Transputer equipment. Read this post to learn more about its contents.

Download the TTK archive here

The Transputer SDK

For a start, I’ve prepared an “Transputer SDK”, well, actually it’s a FreeDOS VM image for VirtualBox containing some of the most commonly used cross-compilers and Transputer software, so you don’t need a Transputer running to host a compiler:

  • INMOS Occam
    • version D7305  (more DOS oriented)
    • and D7405 (comes with many cool optional Windows tools. Windows is not provided.)
  • INMOS C (version D7414)
  • LSC (versions of  ’89 and ’91)

Download the image here.

Documentation for all these compilers are available at the usual place.
AFAIK there’s no complete documentation of all additional features of the D7405 package – a 28 page ‘flyer’ from ST can be found here.

Additionally you’ll find the sources for the occam Mandelbrot demo used for the Apple IIgs, as well as my beloved “Mandel” tool, which runs on DOS only.
Both can be fully compiled in the VM (Borland C is provided, too).

Small Howto:

When using one of the INMOS compilers, you have to set some environment variables first. To do so, execute the batch file inside the corresponding folder.
For example: You want to use the D7305 occam compiler (which I recommend for the first steps) – change into its folder

C: > cd D7305A

and call the identically named batch-file

C:\D7305A > D7305A.BAT   (hint: FreeDOS has auto-completion, so enter “D” and hit TAB)

This sets all paths etc. and you’re good to go. Change into the OCCMANDEL folder, call the make_t8.bat batch and let the magic happen 😉 The binary will placed into the \bin folder.

The DOS “Mandel” program requires a PC with a B004 Transputer interface – but I’ve added it for completeness. To compile it, just call the included nmake inside the DOSMANDEL folder.
It’s a very good example for mixed code, as it uses the LSC C-compiler as well as Borland C.

So have fun fooling around. I know, it’s a steep learning curve, but as soon you dive deep enough into Transputer matters, you’ll be amazed and will ask “why the heck did this technology never made it?!?!

DSM Software

I’m in the lucky position to own the last offically released software package for the DSM860 cards.
That said, it’s a mishmash of different tools, code and compilers not always compatible with the different boards (860/8, 860/16 and 860/32). Still the sources and specifically the assembler and C compiler may be helpful for a kickstart.
I’ve adjusted the installer to create a single-install instead of the original 3 floppies installation. See the readme.txt file for more details.

Download it here.

And if you’re interested, here is the the source & binaries for my Mandelbrot example.