Tag Archives: arduino

T2shield – Arduino to Transputers

[The T2shield is currently a work-in-progress project – the first alpha hardware is operating but lots of coding lies ahead!!]

The idea for the T2shield was born when I thought about getting recent peripherals like SD-cards, Ethernet, displays etc. into a Transputer network.
Sure, there are the old, original TRAMs like the STM228 SCSI controller, the B431 Ethernet TRAM or quite some choice of graphics controllers. But they’re all rare like chicken teeth these days which means unaffordable when they rarely pop up on ePay.
Rebuilding them is also a no-no given the obsolete parts they’ve used… and to be honest: A noisy, vintage SCSI-1 drive isn’t what I thought of.
So after some time I came to the conclusion it will be the easiest and cheapest way to re-use what you can buy for a few bucks from China these days: Arduino shields.
As a lucky incident such a shield perfectly fits onto a size-2 TRAM – Yay!

Without much further ado, here is the T2shield (v0.1) with a shield loosely put on top to get an idea…

t2shield

Arduino shields mainly use the SPI bus for data transfer. With its 10+Mbps SPI is much faster than e.g. I²C (which I used for my T2I2C TRAM) and can cope with fast(er) peripherals.
But this also ruled out a slow IMSC011/12 link-adapter design like the one used on the T2I2C. Also there’s no of-the-shelve SPI master controller to simply glue a bus to it.
So the design turned out much more advanced this time:

  • A 16bit Transputer (with 64KB SRAM) handles the high OS-link speeds as well as the ‘glue’ like File/Ethernet handling.
  • A comparably big CPLD (100pins, 128 marcocells) implements the SPI master controller as well as handles the T2xx memory- and interrupt-handling.
  • All Arduino digital-pins and nearly all analog-pins are connected to the CPLD to adjust to any available shield.

Also this new TRAM design is a “first” for me in many aspects:

  • 1st usage of a 16-bit T2xx Transputer (vs. 32bit)
  • 1st serious utilization of a CPLD (besides the baby-steps taken with the T2A2)
  • 1st Size-2 TRAM

Initial status

Transputer

[wppb progress =100 option=green] 100% done

A T222 Transputer is -after fixing some stupid errors- happily running and has control over his external RAM.
Here’s the first sign of life by RSPY (a brilliant ispy‘ish tool of Michael I really need to write a post about soon):

# Part rt Link0 Link1 Link2 Link3 RAM@cycle
0 T2   20 HOST  ...   ...   ...   4K@1,56K@2|

That means: A T2xx @ 20mbps linkspeed is connected to the host (PC) and has 4K internal and 56K external RAM… wait a second! just 56K? Yes, that’s because the internal 4K overlaps and RSPY leaves the up-most 4K untouched as most peripherals are mapped there and poking there could create unwanted effects…

CPLD

[wppb progress =10 option=yellow] 10% done

All basic Transputer controls are in place, LEDs are controlled by the CPLD

TODO: Implement the SPI master in VHDL. That’s THE biggest challenge for me being a total VHDL noob. Again, I wouldn’t got this far already without the tremendous help from Michael Brüstle, my VHDL Jedi-Master.

Drivers

[wppb progress =100 option=red] 0% done

Write the (Helios) driver to handle file and/or network access. This should be (optimistically) be compatible to existing file- or Ethernet ‘servers’. This will probably be the most time consuming task.

Progress?

This is (also) the first time I’m posting about a project which is not finished. So I will keep you posted about the progress with new posts in this “T2shield” chapter of this wonderful little page.
If you do own

  • a Transputer network
  • a free size-2 TRAM slot
  • a T2xx Transputer
  • some VHDL/Occam/Helios driver skills & knowledge

shoot me a mail and I might provide you a T2shield to join the development.

That said, here’s a first little sign of life:
The Transputer writes numbers to a mem-mapped address (0xFC00) while the CPLD reads the lowest 2 bits and displays them by 2 of the 3 LEDs on the T2shield

T2I2C – The nitty-gritty details

Ok, so you saw the thing in action and now you want to know more – maybe even build an interface yourself because you’re one of the other ~15 guys on this planet still fooling around with Transputers 😉

Good news! This time I created circuit diagram so you can actually make you own T2I2C – and that’s not enough: I’ve already laid out a TRAM-1 size circuit board using SMD parts of the C011 and 8574 making space for piggy-backing an Arduino Uno on top of that board.

But let’s start with the other details I mentioned the chapter before. I’m totally aware that there are many, many things to improve and optimize – and then there are probably even more I’m not aware of.
Here’s the how and why I did things they way I did:

Oneway

For this first version of T2I2C I’m using an C011 in ‘mode 1’ – that means it is offering actually two 8-bit buses, one for receiving (input, I0-7)) and one for transmitting (output, Q0-7). Because it’s quick and easy I don’t use the I-bus and therefor grounded it.
This means there’s no way for the Arduino to talk to the Transputer side of things. But using an extra bus for input would mean using a second 8574 and obviously using another 4 wires on the ATMega.

The elegant solution to this is using the C011 in ‘mode-2’ – it then behaves like a C012 which means it provides a single butbidirectional 8-bit bus. So why didn’t I used mode-2 in the first-place?
Well, while mode-1 just requires 2 lines for data-control, mode-2 needs 4 lines and some more coding in the ATMega ‘firmware’ e.g. handling the 2 registers provided by a C012 – So yes, I was just lazy and wanted results quick. The next release will certainly use mode-2.

Handshaking

So what is that data-control you’ve mentioned? Using 2 converters (C011/8574) in a row there’s obviously a need for all parties to know when data has arrived and needs to be processed.
The C011 as well as the 8574 provide a pin which flags a “hey, we have something here!” signal (QValid in the C011, /INT in the 8574) . But in contrast to the 8574 the C011 also needs an “Ok, got the data, feel free to fetch the next one” – which is called “QAck”. So the ATMega controls the data-flow talking to the C011 and completely ignores the 8574 which makes it somewhat transparent.
The comms protocol of the C011 can be found in its data-sheet here. It’s all about reading, holding and releasing QValid/QAck in the right timing.

First I was using an external interrupt line on the ATMega connected to QValid because it’s so obvious. But somehow the results were flaky – sometimes the ATMega seemed do choke on some bytes which simply didn’t make it through(*). After some cursing and hair-ripping I decided to switch back to polling – again because I was lazy and wanted to get results 😉
Up to now polling QValid just works great, probably because the ATMega is pretty fast and I2C is pretty slow.
(*) Yes, of course I’ve read all the docs about interrupt-programing and its caveats (short routines, volatile vars etc…) didn’t help.

Achtung! Kommando!

So what is actually going on in the ATMega running “Se Fiiiirmwarrre”? As mentioned in the previous chapter, I decided not to send a complete ‘bitmap’ of 128bytes each time an update occurs. Instead I created a simple command protocol, (currently) consisting of 3 bytes:

  • 1st byte: If < 255 it’s the number of the Transputer data. If 255 (0xFF) command flag set.
  • 2nd byte: If 1st-byte < 255, it’s the CPU-load in percent, else it’s acommand.
  • 3rd byte: If 1st-byte < 255, it’s the Memory-load in percent.

This means a single Transputer information update only takes 3 bytes. A command like “clear the display” is just a single byte.

Of course there are downsides. Updating a complete display of 128 Transputer-loads means sending 384 bytes instead of 128 bytes needed for a bitmap (512 pixels, 2 bits each = 1024bits = 128bytes) – But OTOH you could enhance the firmware for just that case: One command initiates a bitmap-transfer and then you send the 128bytes of data. Mind the could, i.e. this command doesn’t exist yet.

What comes on top of the handling/processing is the calculations needed to be done by the ATMega. There’s a command telling the ATMega how to setup the panel according to columns. If there are less than 33 Transputers to be displayed, each Transputers gets its own line of 16 LEDs. To display 64 Transputers, it will be divided into 2 columns with 8 LED each. 96 Transputers have to get along with 5 LEDs and 128 can only use 4.
No matter how many Transputers have to be displayed, poor ATMega first has to calculate the percentage value into 16, 8, 5 or 4 LEDs, then decide into which column this value goes and finally handle the displaying itself – worst case a 128 times. All this could be circumvent with a bitmap-transfer, offloading all those calculations to the sender (a Transputer in this case). But I’m not sure if this is much cleverer…

The Arduino source (.ino file) is available here. I suggest you have the Arduino Software installed.
There’s still debugging code in the source, putting out info on Arduinos USB/Serial port.

These are the commands currently implemented (in decimal):

001 – 015 : Set display brightness (0..15)
031 – 034 : Set the columns to be displayed (1..4)
099 : Clear the panel display
100 : Toggle CPU-load-only vs. CPU & RAM load mode

Hardware

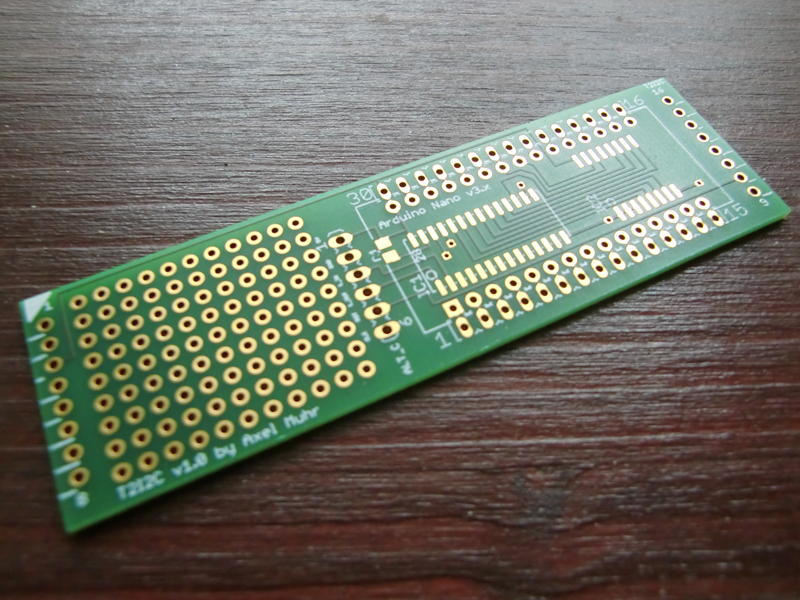
Like you’ve seen in the video, there’s no real circuit board existing yet there wasn’t a real circuit board around back then. But I’ve created a board layout for a TRAM-1 containing an SMD C011 and 8574 which provides the space needed for a socket to plug in anArduino Nano (the small version of an Arduino Duemilanove) – Version 3.x to be precise. You have to use a V3.0 or higher if you want to use my ‘firmware’ out of the box! This is because the analogue pins (A0-A7) have been rotated in V3.x and up – if you plan to use an earlier version of the Nano, you have to adjust the i2c-pin definition in the firmware source.
Anyhow – Using an Arduino Nano is much more flexible -and cost saving- than putting everything incl. the ATMega on the board itself.
The socket is laid out to be “double-row”, so you can still plug wires right next the Arduinos pins – well, actually this is mandatory at least for connecting to the LED panel.

Currently (v1.0) these pins are used/defined by the firmware on Arduino:

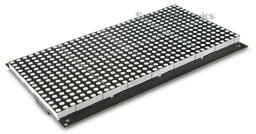
  • Portd: 7, 6, 5 and 4 for connecting the LED panel
  • Analogue input pins 4 & 5 (SDA/SCL) for the I2C bus
  • Portd: Pin 2 connects to QVAL, Pin 3 to QACK on the C011

board

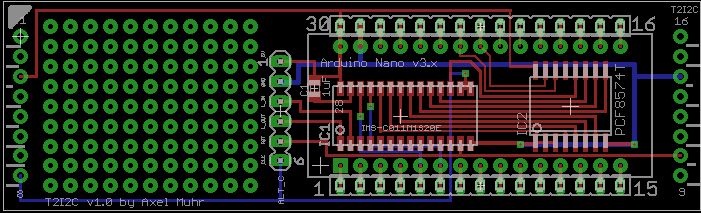
I tried to layout the board in such way that it could also be used as stand-alone, i.e. without being seated into a TRAM slot. Then you would have to provide the Links, 5V, GND, a 5MHz clock and Reset yourself via the alternative connector in the middle of the board, called “ALT_C” . There is still room left which I’ve used for a little breadboard section.

This design is to be considered v1.0 – still things to improve, especially a way to choose the link to be used if the board is actually plugged into a TRAM socket. v1.0 routes LinkIn/Out to the ALT_C socket which needs to be air-wired to the TRAM-pins… not nice but does its job.

If interested, you can download the Eagle CAD files here.

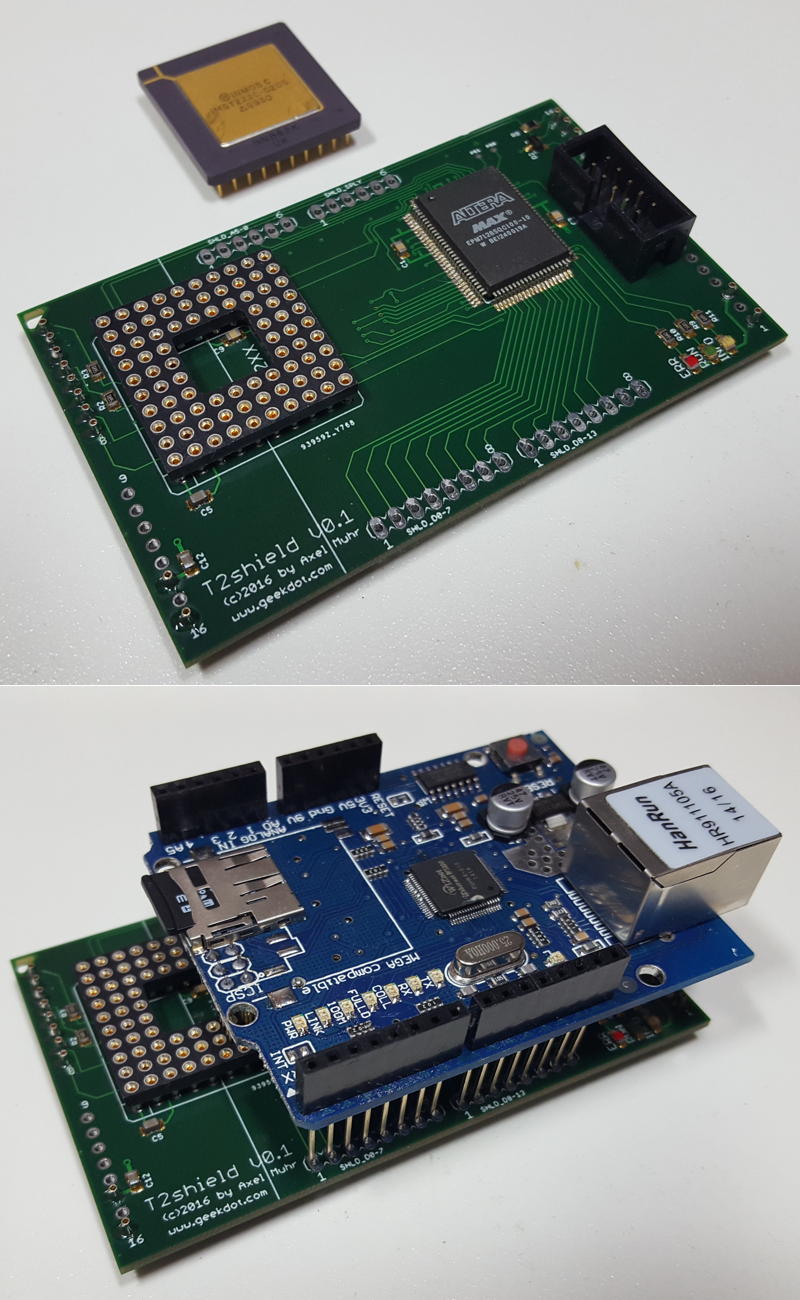
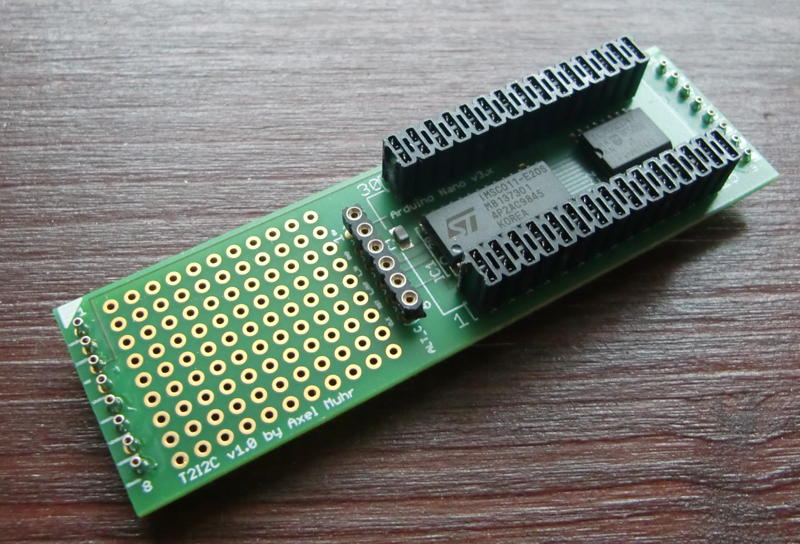
After nearly a year I was able to get a hand full of boards created and populated one using my brand new reflow oven (Reworked pizza oven) and voilá, here’s the T2i2c in flesh, naked:

T2i2c_naked

…a bit more dressed (all parts place)…

T2i2c_dressed

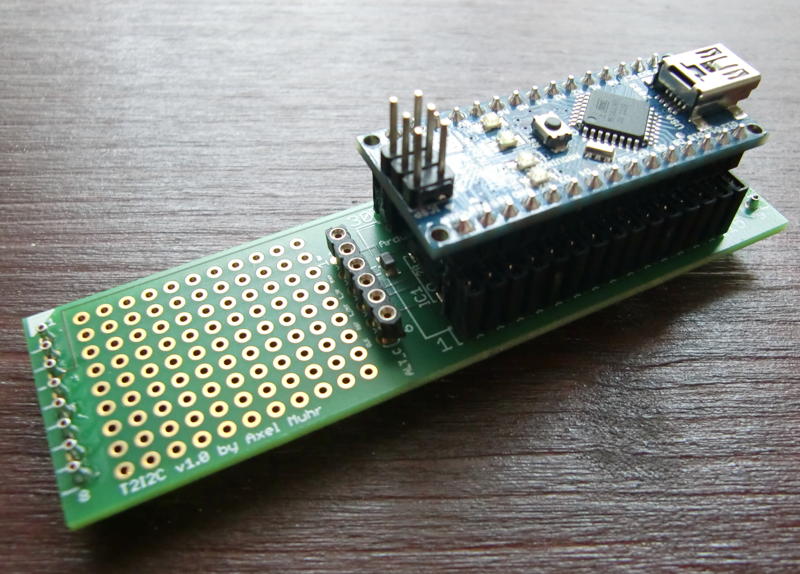
…and finally fully dressed (Nano plugged in):

T2i2c_fullyDressed

So the final question was: Will it actually work? Yes it did! I plugged it into slot 2 of my beloved BOZO, connected the LED panel and adjusted my Helios test-sources a bit, and tadaa:

T2i2c

The cool side-effect of this project is, that you can keep the USB cable connected to your host, while the T2i2c is actually running in a system, giving a perfect  OS-link-sniffer for what’s going on in a Transputer setup.

Also, I reworked my Helios tools for checking the T2I2C functionality. Everthing is now in one single tool, i.e. test-pattern, clearing the panel or manually sending a command. Here’s the source as well as the executableread the source header before using! You can crash your Helios system – you’ve been warned!

Outlook

I won’t say the sky is the limit, but if the T2I2C-TRAM will be full-duplex in the next release (ie. C011 in Mode-2) driving an LED panel would be just one of many other uses this TRAM could fulfill.
Think of all the million things people did with their ATMega/Arduinos: LCD-Displays, SD-Card Interface, Ethernet and then some more. Ok, the speed of I2C will limit that somewhat (I already have made prerequisites in my ‘firmware’ to put I2C into 400kHz/kbps “fast mode”) but still a nice interface for connecting today-tech to your yester-tech.

The T2i2c

Boy, my acronyms are really getting Star Wars’ish now… After the T2C64 and the T2A2, T2I2C sounds like a new protocol-robot but stands for “Transputer to I2C (Bus)”.
The I2C bus is a comparably slow serial bus – even to the Transputers 1990 standards – but in contrast to the Transputer OS-link interface I2C is still alive and kicking… even more since those simple-to-tinker-with controllers like ATMEGA or PIC made there way beneath your soldering gun.

As you might have guessed by now, the I2C bus wasn’t my primary intention to do this interface.
Since I started fooling around with Transputers I was thinking of an LED “CPU load display” like the one the lovely BeBox had… just bigger, a real manly Blinkenlights 😀 It should be at least capable of showing the load of up to 32 Transputers…
So I stumbled across a very nice bi-color 32×16 LED panel (Sure Electronics DP14211 – it seems in 2022 that company was either sold or folded), which is quite easily controllable through one small ATMEGA controller.

LEDPanel

By incident, a friend of mine gave me an surplus Arduino as a present and the decision was made. I’ve build & programmed ATMEL devices before, but Arduino plus breadboard can’t be beaten if you need to get something done quick.

Blinkenlights

It’s quite straightforward to connect the panel (can one say “display”? Nahh.) to the Arduino. To make things even more ‘bus-y’ the ATMEGA talks over just 4 wires to the panel over SPI bus – yet another serial bus, but luckily we don’t have to care about that fact as there’s a library handling this.
So after some days of coding, the “panel firmware” was done. The Arduino is happily talking to the panel over the SPI bus and listening on his I2C bus (another 4 wires) for commands and sends the calculated output to the panel.

Commands? Well, I was thinking about how to handle the data in an efficient manner. The most simple way would have been to have the Transputer sending the complete 32×16 ‘bitmap’. For a bi-color panel (2 bits per pixel) that would have been 1024bits/128bytes each time/interval.
To be more flexible I came up with a 3-byte command structure – for details see the next post.

Old guy speaking new language

So how to connect a Transputer to an IC2 ‘device’? We need two things for that:

  1. The good ol’ C012/11 Link Adapter – turning Transputer links into an 8-bit parallel bus
  2. An 8bit bus-to-I2C converter

We saw the C012/11 in some of my projects already, so piece of cake here. The 2nd converter needed some research and was easily found: A Philips/NXP PCF8574(A). So without control-lines the setup is quite simple:

Transputer → C012 → PCF8574 → Arduino → LED panel

After some hassle with handshaking (see next post “nitty gritty details”) I was able to send bytes to the display using MS-DOS’debug.exe to write bytes to the standard Transputer link IO ports (0x150++, you should know that by now ;-)) using a nice tool called ‘iskip.btl‘ from the INMOS ANSI-C Toolset (also available in my Transputer Toolkit). It simply shortcuts one Transputer link to another, e.g. Link 0 to Link 2. This relieves you from removing your Transputer and put jumper-wires into its socket… very nice and clean solution.

Doing it the right way

Well, while talking to devices through debug is definitely geeky, it’s not what I wanted as a result.
Having more than one Transputer running, watching its CPU and probably RAM load leads to the inevitable target of Helios. At least that’s the No.1 reason I created this interface… but with the command structure of the ‘firmware’ you’re obviously not bound to that OS, e.g. OCCAM programs could control the panel, too.

So the biggest development part was creating a clean way of taking to the panel while running Helios. For debugging and testing I wrote a simple command-line tool which opens a link on the Transputer you have the shell running on, then it sends what ever byte you added as parameter. Fine.
Next was version 2 of that tool, sending 32 fictional CPU-load values (0-100%), version 3 did the same adding RAM-load values.
Then it was time to do it the right way – so I dived into the sources of ‘network‘. network is the Helios tool for examining the Transputer (not IP!) network(s), so it shows the actual load in nice bar charts etc. – pretty much like top does on todays Unices.
While the sources of Helios are available, they seemed to be accumulated from different sources, dumped into an ISO image without caring for symbolic links etc. – in a sentence: They’re a mess.
After some days of try’n’error I was able to compile the sources of network. This made network2 (working name) possible which includes the new parameter ‘led’ followed by the number of the Transputer link to be used, eg. ‘network2 led 2‘ results in displaying the current CPU/RAM load of all Transputers in the network on the panels.
CPU-load is displayed by red LEDs, RAM-load uses green LEDs, overlapping is shown orange. As long as there are up to 32 Transputers each line represents one Transputer (using 16 LEDs). If there are >32 and <65 each line will be split into 2 columns (8 LEDs for each Transputer). This goes on for >64 and <97 (3 columns) and finally 4 columns for up to 128 Transputers – this isn’t very ‘readable’ anymore given there are only 4 LEDs left for one Transputer, but hey! It’s Blinkenlights, who cares!?

So without much further ado, here’s the prototype-beast in action:

For more details, thoughts, outlook and code see the next post.