Tag Archives: Transputer

2nd code example

This example actually puts the Transputer to some sort of use… well, it’s still way beneath him but it does its job as an example.
Two tasks: a) Read the Transputer executable from disk and b) exchange data with the Transputer.

Here we go:

10 PRINT"INIT TRANSPUTER"
20 POKE 56840,0
30 POKE 56844,0
40 POKE 56840,1:POKE 56840,0
50 FOR W=0 TO 1000:NEXT W
60 POKE 56834,0
70 POKE 56835,0
80 REM READ STATI
90 PRINT "I STATUS: ";(PEEK(56834)AND1)
100 PRINT"O STATUS: ";(PEEK(56835)AND1)
110 PRINT"ERROR: ";(PEEK(56840)AND1)
140 PRINT"O STATUS: ";(PEEK(56835)AND1)

Up to here everything should be clear. Init Transputer, read stati -just to be sure.
Now we’re reading the executable (“GRAB”) from floppy and poke the bytes to the Transputer as they come flying crawling in:

150 DIM R(4)
160 PRINT"SENDING PROGRAM TO TRANSPUTER..."
170 REM READ TRANSPUTER BIN FILE
180 OPEN 1,8,2,"0:GRAB,S,R"
190 FOR I=0 TO 1 STEP 0
200 IF ST=64 GOTO 240
210 GET#1,A$:A=ASC(A$+CHR$(0))
220 POKE 56833,A
230 NEXT I
240 CLOSE 1

Ok, the Transputer binary expects us to tell it the number of integers we’re about to send to it (AN), the we send these (X) and finally re-read the results… which should all be X+7.

250 INPUT"COUNT:";AN
255 POKE 56833,AN
260 FOR AA=1 TO AN
270 PRINT"ENTER ";AA:INPUT X
280 POKE56833,X
290 NEXT AA
295 PRINT"GETTING";PEEK(56832);" RESULTS"
300 FOR BB=1 TO AN
310 PRINTPEEK(56832);
320 NEXT BB

Some final words about Transputer executables. There are many kinds depending which development system was used. Some need special loaders or bootfiles before the actual binary will be send to the Transputer. A ‘raw’ upload is only possible with binaries mostly having the extension of “.btl” (BooTfromLink). AFAIK only the OCCAM SDK and the Inmos C-compiler ‘icc’ will create those executables.

For those geeks who actually (still) do know their OCCAM, here’s the source of GRAB:

PROC first(CHAN OF BYTE in, out)
  #USE "hostio.lib"

  BYTE data.in, data.out :
  INT count, temp :
  [1000]BYTE array :

-- {{{ start main SEQ

  SEQ
    in ? data.in
    count := (INT data.in)
    SEQ i=0 FOR count
      in ? array[i]                   

        -- {{{ inner loop
        
            SEQ i=0 FOR count
              SEQ
                temp := (INT array[i])
                temp := temp + 7
                array[i] := (BYTE temp)
        
        -- end of inner loop
        -- }}}
                
    out ! (BYTE count)
    SEQ i=0 FOR count
      out ! array[i]          
    in ? data.in       -- debug only
    CAUSEERROR()

-- }}}
        
:

1st code example

For the fun of it, here’s my first Commodore BASIC v2 program which does 3 things.

  1. Line 1-50: Initialize the Transputer and set/get its status.
  2. Line 69-110: Write (poke) some data into T’s memory and read (peek) it back.
  3. Line 128-240: Send a little program to the T and read its result.

10 PRINT"INIT TRANSPUTER"
11 POKE 56840,1:POKE 56844,0:POKE 56840,0
20 REM CLEAR I/O ENABLE
21 POKE 56834,0: POKE 56835,0
30 REM READ STATI
31 PRINT "I STATUS: ";(PEEK(56834)AND1)
35 PRINT"O STATUS: ";(PEEK(56835)AND1)
40 PRINT"ERROR: ";(PEEK(56840)AND1)

This is the Transputer POKE command (0) which tells the T that the next 4 bytes are an address followed by 4 bytes of data:

45 PRINT"SENDING POKE COMMAND"
46 POKE 56833,0
50 PRINT"O STATUS: ";(PEEK(56835)AND1)
58 :

Mind that were little endian and BASIC is using decimal numbers. So we’re POKEing 0,0,0,128 which is 0x00, 0x00, 0x00, 0x80 in hex which again is the 32bit address of 0x80000000.

59 PRINT"SENDING DATA TO T."
60 POKE56833,0:POKE56833,0:POKE56833,0:POKE56833,128
61 POKE56833,12:POKE56833,34:POKE56833,56:POKE56833,78
70 PRINT"I STATUS: ";(PEEK(56834)AND1)
79 :

Now reading back (PEEK) from 0x80000000 what we just wrote:

80 PRINT"READING FROM T."
90 POKE56833,1:REM PEEKING
100 POKE56833,0:POKE56833,0:POKE56833,0:POKE56833,128
110 PRINTPEEK(56832);PEEK(56832);PEEK(56832);PEEK(56832)

These 4 sequential PEEKs print 12 34 56 78. Yay! A very simple Ram-disk if you want.

Now something more serious. A very small programm is sent to the T and executed. Instead of peek and poke (1/0) the initial ‘command’ is the length of the program (23 in this case), so the T starts executing after he received the 23rd byte.
The program itself is trivial, after some initialisation it writes 0xAAAA0000 to link0out. The use of it is very simple. If the Transputer is working correctly the first 2 bytes will allways be “0xAA”, if it is just a 16bit Transputer (T2xx) there won’t be more than 0xAAAA. A 32bit Transputer returns the full 0xAAAA0000. Voilá, that’s a simple T-detection.
To handle timeouts end error conditions I had to do some ugly things in BASIC. Sorry, don’t blame me, BASIC v2 is just… very basic.

120:
128 DIM R(4)
129 PRINT"SENDING PROGRAM TO TRANSPUTER..."
130 FOR X=1 TO 24
140 READ T:POKE56833,T
150 WAIT 56835,1
160 NEXT X
170 PRINT:PRINT"READING RESULT:"
175 C=0
180 N=TI+50
181 IF C=10GOTO 220
189 IF TI>N THEN ER=ER+1:IF ER=10 GOTO 220
190 IF (PEEK(56834)AND1)=0 GOTO 189
195 R(C)=PEEK(56832)
200 C=C+1
210 GOTO 180
211 REM ------------------------
220 IF C=1 THEN PRINT"C004 FOUND"
230 IF C=2 THEN PRINT"16 BIT TRANSPUTER FOUND"
240 IF C=4 THEN PRINT"32 BIT TRANSPUTER FOUND"
1000 DATA 23,177,209,36,242,33,252,36,242,33,248
1001 DATA 240,96,92,42,42,42,74,255,33,47,255,2,0

Next up a bit more useful example, reading the Transputer executable directly from a binary file instead of having it in-line.

T2C64

So here we go, C64 first. Some moons ago I was at least midwife if not the mother of the 8BitBaby manufactured by the fairies and elves over at individual computers.

This little card features 4 slot-connectors to the most used home-computer systems as well as a CPLD… and makes a perfect basis for my first C64 “cartridge” ever 😉

The schematic was taken from “Das Transputerbuch” by U. Gerlach and being put into the CPLD saving lots of TTL chips. Actually all you need then is an Inmos C012 or C011 link-interface chip, a 5MHz oscillator and some resistors and caps.
I refrained from designing a complete Transputer system but went the easy route by interfacing to a TRAM. A TRAM is a complete “Transputer system on-a-stick”, like those used in my Tower of Power. All you need for a TRAM is an interface to your system. For the C64 you would need the thing I’ve called T2C64 (aka “Transputer to C64”)

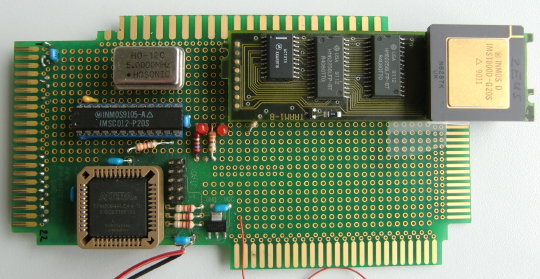
The T2C64 prototype in its full glory:

T2c64

A short overview what’s on the card:

  • The left edge is the connector to the C64s expansion slot (ignore the other edges).
  • The square black chip is the Altera CPLD mainly containing the bus-interface and the Transputer Analyze/Reset/Error signal handling. Ah, and it controls the 2 LEDs.
  • The long black chip above the CPLD is an Inmos C012. This guy interfaces an 8bit parallel bus to the serial Inmos link ‘bus’.
  • The silver thing is a 5MHz oscillator to clock the C012.
  • And finally the longish module at the top edge is a TRAM with 128KB RAM and a mucho-macho T800 Transputer.

The CPLD maps the C012 register into the memory area of 0xde00, using just 6 addresses:

  • Data in       0xde00 (56832)
  • Data out     0xde01 (56833)
  • in-status     0xde02 (56834)
  • out-status   0xde03 (56835)
  • reset/error  0xde08  (56840)
  • analyse      0xde0c  (56844)

So programming it pretty easy, still, you have to read some Inmos manuals about the protocol etc… that said the next chapters will show you some code examples I’ve slapped together just to test the hardware. All sources and binaries (.D64 image) are available in a zip file over here, obviously most of that does not make sense without having a T2C64…

Read on in the next posts for demo-code and even a video. “uuh, videos!”

Networking

Alright, so we have a UNIX’ish OS running on our Transputer(s). After a while staring at the ‘network show’ command, hysterically giggling about soooo much computing power, you might think: Hey, what about real networking?

Yeah, you’re right, being a real man you should be able to telnet into your “Helios box”. And compared to other vintage OSes, it’s pretty easy.
The Helios installation you’re using is already set up for it. The documentation calls it the “Ethernet I” and “Ethernet II” package.

Obviously you’ll need a network interface card (NIC) plugged into your host machine. That NIC shouldn’t bee too recent, because you’ll need a ‘packet driver‘ for it. The packet driver standard was quite common in the DOS hey-days and crynwr.com still offers everything you need: Drivers, programmer reference (if you need ’em) etc..

We seem to be pretty lucky to have a Helios Version 1.31 because if I got the “Ethernet-I” documentation right, earlier versions were supporting just 2 NICs by defining ethertype WD8003 or DLINK in the host.con file. Bummer. But with a packet driver you can even use your high-end Intel 100mpbs PCI NIC.

So get the driver for your card and install it on your host. In my case it’s a 3COM 509 (aka Etherlink III), the best you can get for the ISA slot 😉 Installing the driver in DOS requires you to know some bits about your NIC: The used interrupt and the IO port. So my NIC uses IRQ10 and its port is at 0x300. To install the packet driver call it like this:

C:\> 3c5x9pd.com 0x60 10 0x300

That means: Use interupt vector 0x60 (that’s where applications hook into), IRQ 10 and Port 0x300, please. You’re done on the DOS side of things.

Initially, you need to tell Helios how to use the pc-ether driver. This step needs to be done only one time by booting into Helios entering

% gdi /helios/etc/devinfo.net /helios/etc/devinfo

and quit Helios again (by entering stopio or pressing Ctrl-shift-F9).
Before booting Helios again, make sure “ethernet” is uncommented in your host.con file. If you’re unsure what that is, go back to the second post of this how-to.

If that’s checked & done, go ahead an boot Helios entering “server“.
On the HeliosServer-display (Helios calls it “a window”) you should see a quick “/ether: Ethernet address xx:xx:xx:xx:xx” which is the MAC address of your NIC, before you’ll get to the login screen. So login and enter this command:

% /helios/lib/tcpip myHostname 192.168.1.42 -e pc-ether &

This loads the tcp/ip daemon with its parameters which are:

  • Your hostname – can be anything, be creative
  • Your IP – you should know an unused one (sorry, no DHCP)
  • The driver to be used – in this case the driver provided by the host PC

Don’t forget it to start it into the background (&) as this is a daemon running all the time.
Finally, now that we have the socket running, we need the internet protocol daemon to run. That’s very simple, just call

% /helios/lib/inetd &

and you’re done! So quick, let’s see if everything works! Use you old friend ping:

% ping 192.168.1.1
64 bytes from 192.168.1.1: icmp_seq=1 time=46. ms
64 bytes from 192.168.1.1: icmp_seq=2 time=8. ms
64 bytes from 192.168.1.1: icmp_seq=3 time=8. ms
^C

Hooray! We’re talking to the world! Well, locally at least. Everything else is just like any other UNIX’is OS, so check /etc/hosts and the usual suspects. As you might have guessed already, there’s no way to enter a nameserver as there’s no named… it’s all IPs only.
Ah, and before I forget telnetd is in /helios/lib 😉

Final words of warning: Those two daemons need memory… quite a bit. 380KB to be exact. So it might get a bit tight in your 2MB system. If you have more than one Transputer in your system, you might think about running those on a different one. As mentioned in the previous chapter, you can add them directly in your processor map like this:

processor 3 { ~02, , , ;
run -e /helios/lib/tcpip tcpip myHostname 192.168.50.42 -e pc-ether;
run -e /helios/lib/inetd inetd
}

Also, as far as I’ve tested it, the IP stack isn’t the most robust in the world. I had some crashes here and there. Still investigating whose fault it might be.

Adding more Transputers

Perfect, we have a running Helios system now. But with just one CPU it’s not that exciting as it should be. With just one MB there’s not much you can do with the system, 2MB allows to run some programs and 4MB is what you need for e.g. running the C-Compiler.

So: “More power, Igor!

Some more background

Helios has no idea about how many Transputers are available. That’s not a shortcoming but a feature as you may not want to use all Transputers or you might like to dedicate certain tasks to a specific Transputer or you have a mixed system made of Inmos, Parsytec and Meiko parts which all behave a bit different.

This is why Helios needs a ressource map, which is a text file describing your Transputer network. As a first step, you should use ispy(a network worm tool) to identify the available CPUs in your system. Calling it together with mtest give you a list like this:

c:\> ispy | mtest  [return] Using 150 ispy 3.23 | mtest 3.22
# Part rate Link# [  Link0  Link1  Link2  Link3 ] RAM,cycle
0 T800d-25 280k 0 [   HOST    …    …    1:0 ] 4K,1 1024K,3;
1 T805b-24 1.6M 0 [    0:3    2:0    3:0    4:0 ] 4K,1 4096K,3;
2 T800d-20 1.8M 0 [    1:1    5:0    6:0    … ] 4K,1 1024K,3;
3 T800d-20 1.8M 0 [    1:2    7:0    …    … ] 4K,1 1024K,3;
4 T800d-20 1.8M 0 [    1:3    8:0    …    … ] 4K,1 1024K,3;
5 T800d-20 1.6M 0 [    2:1    9:0   10:0   11:0 ] 4K,1 1024K,3;
6 T800d-20 1.6M 0 [    2:2   12:0   13:0   14:0 ] 4K,1 1024K,3;
7 T800d-20 1.8M 0 [    3:1   15:0   16:0   17:0 ] 4K,1 1024K,3;
8 T800d-20 1.6M 0 [    4:1   18:0   19:0   20:0 ] 4K,1 1024K,3;
9 T805d-20 1.7M 0 [    5:1    …    …    … ] 4K,1 1024K,3;
10 T800c-17 1.7M 0 [    5:2    …    …    … ] 4K,1 28K,3 2016K,4 4K,3;
11 T800c-20 1.7M 0 [    5:3    …    …    … ] 4K,1 1024K,3;
12 T800d-20 1.7M 0 [    6:1    …    …    … ] 4K,1 1024K,3;
13 T800d-20 1.7M 0 [    6:2    …    …    … ] 4K,1 128K,4;
14 T800d-20 1.7M 0 [    6:3    …    …    … ] 4K,1 128K,4;
15 T800d-20 1.8M 0 [    7:1    …    …    … ] 4K,1 1024K,3;
16 T800c-17 1.8M 0 [    7:2    …    …    … ] 4K,1 28K,3 2016K,4 4K,3;
17 T800c-20 1.8M 0 [    7:3    …    …    … ] 4K,1 1024K,3;
18 T805d-20 1.8M 0 [    8:1    …    …    … ] 4K,1 1024K,3;
19 T800d-25 1.8M 0 [    8:2    …    …    … ] 4K,1 28K,3 2016K,5 4K,3;
20 T800d-20 1.8M 0 [    8:3    …    …    … ] 4K,1 1024K,3;

Wow, 21 Transputers, looks my Tower of Power 😉 Ok, so you see how the CPUs are connected to eachother and how much RAM they have, for example this line

1 T805b-24 1.6M 0 [    0:3    2:0    3:0    4:0 ] 4K,1 4096K,3;

says: Transputer 1 is a T805/25MHz has 4K internal and 4MB external RAM. It is connected with Link-0 to Transputer 0 on its Link-3 and with Link-1, 2 and 3 to Transputers 2, 3 and 4 on their Link-0. Phew, lots of colors, but it should help you reading this much easier.
Sadly, Helios cannot read this format… it uses a different one which goes like this:

network /FullTower {
Reset { driver; ~00; tram_ra.d}
processor 00 { ~IO, , , ~01; System; }
processor 01 { ~00, ~02, ~03, ~04; }
processor 02 { ~01, ~05, ~06, ;  }
processor 03 { ~01, ~07, , ; }
processor 04 { ~01, ~08, , ; }
processor 05 { ~02, ~09, ~10, ~11; }
processor 06 { ~02, ~12, , ; }
#~13, ~14; # these only have 128kb – too small for Helios!
processor 07 { ~03, ~15, ~16, ~17; }
processor 08 { ~04, ~18, ~19, ~20;
# ~21;
}
processor 09 { ~05, , , ;
# ~22, ~23, ~24;
}
processor 10 { ~05, , , ; }
processor 11 { ~05, , , ; }
processor 12 { ~06, , , ; }
#    processor 13 { ~06, , , ; }
#    processor 14 { ~06, , , ; }

processor 15 { ~07, , , ; }
processor 16 { ~07, , , ; }
processor 17 { ~07, , , ; }
processor 18 { ~08, , , ; }
processor 19 { ~08, , , ;
run -e /helios/lib/tcpip tcpip henkelmann 192.168.50.33 -e pc-ether;
run -e /helios/lib/inetd inetd
}
processor 20 { ~08, , , ; }
#    processor 21 { ~08, , , ; }
#    processor 22 { ~09, , , ; }
#    processor 23 { ~09, , , ; }
#    processor 24 { ~09, , , ; }

processor IO { ~00; IO }
}

At the first sight this looks a bit complicated, but it’s actually much easier to read than ispy’s output. If we take the last example again (without mtests addition)

1 T805b-24 1.6M 0 [    0:3    2:0    3:0    4:0 ]

the Helios version looks pretty simple:

 processor 01 { ~00, ~02, ~03, ~04; }

As you can see in my above ressource map example, there’s a bit more to it. For all details refer to chapter 2.6.5 of the Helios Manual I’ve mentioned earlier in this article.
In this case, I’ve commented out all Transputers with less than 1MB RAM because the 128K of some of them aren’t enough to even load the Helios mini-kernel (“nucleus”).
Also, you can see one of Helios’ cool features: You can bind a service/program to a Transputer at boot-time. Here are some example:

processor 00 { ~IO, , , ~01; System; }

This is my Gelach-card… with just 1MB it’s just enough for a decent basic system. The processor is reserved for use by the system. It cannot be allocated to users, and hence it is usually impossible to run applications here.

 processor 19 { ~08, , , ;
run -e /helios/lib/tcpip tcpip henkelmann 192.168.50.33 -e pc-ether;
run -e /helios/lib/inetd inetd
}

This is a 2MB T800. It is dedicated to do the TCP/IP stuff (more on IP networking later) as this requires quite an amount of RAM and CPU cycles… nicely offloaded to this Transputer.

Tool Time!

If your transputer network changes as often as mine does, it might become a drag to constantly rewrite your resource map file. This is why I wrote this little parser script in perl. It takes an “ispy | mtest” output and converts it into a Helios resource map (*.rm) file.
Yes I know, perl is not optimal in a DOS environment but I was in a hurry… maybe I’ll rewrite it in C-for-DOS one fine day.

Two more steps…

Now that you edited your resource map (e.g. network.rm) to your needs, you need to generate a binary version of it. This needs to be done running Helios. So make sure the .rm file is inside the /etc folder (below helios root) and boot your single-CPU Helios and create a map file like this:

# cd etc
# rmgen network.rm

This will create a network.map in /etc for you. Now shutdown Helios again.

Now you need to tell Helios to actually use that map file. This can be done inside your initrc file which you edit like this:

# Helios System Configuration File
# This file is interpreted by init to configure the system
# it is NOT a shell script.

# Start up the X server if required
ifabsent /window     run -e /helios/lib/window window

# Option 1
# Run the network software if necessary, and wait for the Session Manager
# to start up. Then create a console window and register it with the
# Session Manager, which will run login automatically
run -e /helios/bin/startns startns -r /helios/etc/network.map
waitfor /sm
console /window console
run -e /helios/bin/newuser newuser

# Option 2
# Run login by itself without any of the networking software. This gives
# a single-processor single-user system
#console /window console
#run -e /helios/bin/login login

This way you can now change between a single- and multi-processor system by (un)commenting either the Option 1 or Option 2block.
Now boot Helios again and you should see its initializing each Transputer while booting. When you (hopefully) get to the shell enter ‘network monitor‘ – that’s like ‘top‘ on UNIX – to indulge yourself by watching your Transputers doing… nothing/something.

Caveat: If you have more than 20 Transputers in your system (lucky you!), you might need another version of startns (copied into /helios/bin) which allows an unlimited number of Transputers to be used.

Booting Helios

Now that we have all config files adjusted to our needs, we should try to boot it.

Normally a simple call to SERVER.EXE should do it, so try now:

C:\TRANS\HELIOS13> server [RETURN]

This should show you the booting process info and results in a bash-like shell. Hooray! You’re running a real OS on your Transputer, congratulations!

You might have stumbled over the many ‘shoulds’… well, there’s a known problem with the server. It uses very simple calibration- and delay-loops (for/next) to determine speeds and setting pauses between each command sent to the Transputer. If you computer is too fast (i.e. built after 1990) those pauses might by too short and server.exe can’t initialize the Transputer correctly resulting in boot errors 🙁

But don’t despair! Michael Brüstle, aka “Mr. T”, came to the rescue and wrote a little ‘helios loader’ which uses more precise timers but is a bit basic – in other words you have to know what you’re doing… which makes this loader a piece of “real men software” 😉
What it does is: Resetting the Transputer, putting the Helios bootstrap-image and nucleus into the Transputers RAM and then quits. So it’s not booting Helios… that’s still left to the server program. To use this tool 3 steps are to be taken:

1) Download HBOOT.EXE from here and put it into your Helios root directory
2) Change your host.con file to prevent SERVER.EXE to overwrite the already loaded bootstrap-image and nucleus. So add/uncomment these lines in your host.con:

no_reset_target  # do not reset the Transputers
no_bootstrap     # don't load nboot.i
no_image         # don't load nucleus
no_check_processor # don't check CPUs as this would need a reset, too

3) [optional] Create a batch file (e.g. START.BAT) in your Helios root folder containing these two lines:

hboot lib\nboot.i lib\nucleus
server

That’s pretty self-explaining, I guess. So enter START and Helios should successfully boot now.

Next up, using more than one Transputer with Helios…

Configuration

Very well, while the filenames are streamlined now, we need to prepare Helios’ configuration files before we get things going.

Host configuration

There’s a central config file for your host, that’s your PC or more generally, the machine connected to the Transputer(s). This file is called host.con and tells the boot-programm everything it should know about your setup.
There is a host.con in your install already, but that most likely won’t fit your setup, so open it in a texteditor and adust it accordingly.
Here’s my setup which should be fine on most PCs using a Inmos B004 compatible host-interface (like the AVM B1 or most ISA-cards). I just quote the settings which might need to be changed to keep this short. The file has some documentation in-line, so read it. My comments are green:

BOGOMIPS=9999999 # This should tell the server that my PC's very fast
host          = AT 
# vs. PC, again a speed info
box           = b004 #
Important! Info about your interface card

helios_directory    = C:\trans\helios13 # adjust to your path if changed!

link_base = 0x150 # Important! Info about your interface card

processor_memory = 0x100000 # Define this if your card is a bit flaky, like the Gerlach :-/
ethernet
# enable this if you plan to use ethernet networking.

Transputer configuration

Ok, we configured the PC-side (host) now for the Transputer side of things. For a simple start we will use just one Transputer, most likely living on your interface card.

BIG caveat: Never forget that Helios is handling text-files the UNIX way, ie. Linefeed is LF, not CR+LF like in DOS! So editinginitrc or any other config-file (besides HOST.CON) needs to be in UNIX format. Don’t use DOS edit.exe! This will change linefeeds even if you use it just for viewing file, ie. not saving them.

The config file for this is ~/etc/initrc. The one that came with the installation archive is way over the top, so you have to edit it… here’s the basic version:

# Helios System Configuration File
# This file is interpreted by init to configure the system
# it is NOT a shell script.

# Start up the X server if required
ifabsent /window     run -e /helios/lib/window window

# Run login by itself without any of the networking software. This gives
# a single-processor single-user system
console /window console
run -e /helios/bin/login login

That should be it. Next step: Let’s boot the system!

Installation

Ok, you really want to get a serious Helios buff. Good!

First, download the Helios archive. I strongly recommend to go for the most recent version, which is 1.3.1. The Archive is a huge 12MB (erm, in 1990-terms) but that’s mainly because it also includes an X11 server. Don’t get too exited about X11 though. It will only work if you have a Transputer driven graphics card!
So, download this archive, save it into a path you can easily access within DOS -8 char limit!- and un-tar/zip it there. I’d suggest something like c:\trans\helios13 (=Helios root).

I assume you’re installing all this on your DOS/Windoze box.
DOS! This is vintage stuff – from days when a i486 was insanely fast and expensive.
Do not expect that any of the programs described here are running on your 64bit, 4GHz, 16GB, Windows 10 box… you will need [MS|PC|Open|Free]DOS, running on a PC preferably clocked below 200MHz. An ISA bus is mandatory for having a Transputer interface card installed (well, there were some MCA/PCI cards).If you’re a happy owner of a Sun SPARCStation or similar UNIX box, you might be able to skip this chapter.

Because this archive was created from a running install on a SunOS machine (I think), you will end up with some file names crippled to the DOS 8.3 file-naming scheme. So we have to do some renaming work in /ETC (c:\trans\helios13\etc in DOS terms) now:

host.equiv -> HOST.EQU
inetd.conf -> INETD.CON
protocols -> PROTOCOL
socket.conf -> SOCKET.CON

Next, change into /users (c:\trans\helios13\users) and remove the dots from the filenames in each folder (root/guest/shutdown) in there:

.cshrc -> CSHRC
.login -> LOGIN

Finally, we need to replace the SunOS binary, which is used to boot Helios, called ‘server’. You will find the MSDOS equivalent (SERVER.EXE) here. Put it into your Helios root folder.

Next up, configuration…

Transputer Software

This is my little pool of Transputer software… while my main interest lies in the area of getting them run (and lots of ’em ;-)), you come to a certain point you actually want them to do something.

Don’t expect megabytes of software here… go over to Rams software section, he collected/rescued nearly everything which was available on the market.

iTest

This is a simple DOS tool I’ve written to scan a system for a link-interface (aka C011/012). Similarly to the standard tool ‘ispy’,itest just does a scan on a given port address (default is 0x150) and tries to identify a device behind it (16 or 32 bit Transputer, C004).
Depending on the result, a clear text info and a (DOS) error code is returned, which could be used in a batch file. A sample batch file for scanning the usual ports is included in the archive as well as the source (Turbo-C[++]).

Download itest here

PePo

“PePo” is my very, very simple DOS Peek/Poke Tool, to have a quick look into a Transputers RAM. Actually it can be used with any B004 compatible interface which supports the INMOS protocol.
So it also works fine with the NumberSmasher i860, which is the reason, why it insists on a 32bit alignment. It uses the Port Address of 0x150 by default. Define the environment variable “TRANSPUTER” to change this.
Usage is simple: Just call PePo with either “peek” or “poke” and an address you want to read/write from/to, so to read the first five 32bit lines in a Transputers external RAM enter:
 pepo peek 80001000 5
To write something to it enter
 pepo poke 800010000 deadc0de

Download PePo here

Inmos MMS2 archive

To make things easier configuring your C004 network, I prepared an archive for instant use.
It contains some example soft- and hardwire files, an ISERVER.EXE (the program you need to upload code into your Transputer) as well as a batch file to easily start MMS (RUN_MMS.BAT).
Also you will find a folder with INMOS’ pimped version of ANSI.SYS called BANSI (“Better ANSI”), because all INMOS tools make heavy use of ANSI screen control. So put that into your CONFIG.SYS.

Download the MMS2 archive here

The Transputer Tool Kit (TTK)

This is a collection I’ve put together, providing all essential tools to get you started with your brand new/old Transputer equipment. Read this post to learn more about its contents.

Download the TTK archive here

The Transputer SDK

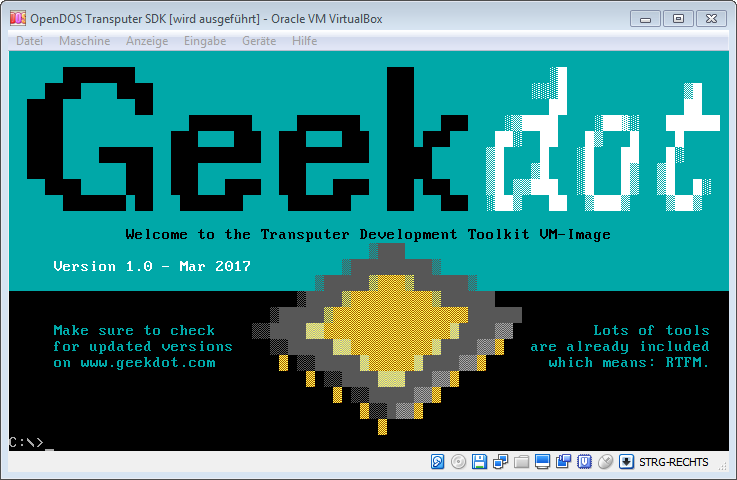
For a start, I’ve prepared an “Transputer SDK”, well, actually it’s a FreeDOS VM image for VirtualBox containing some of the most commonly used cross-compilers and Transputer software, so you don’t need a Transputer running to host a compiler:

  • INMOS Occam
    • version D7305  (more DOS oriented)
    • and D7405 (comes with many cool optional Windows tools. Windows is not provided.)
  • INMOS C (version D7414)
  • LSC (versions of  ’89 and ’91)

Download the image here.

Documentation for all these compilers are available at the usual place.
AFAIK there’s no complete documentation of all additional features of the D7405 package – a 28 page ‘flyer’ from ST can be found here.

Additionally you’ll find the sources for the occam Mandelbrot demo used for the Apple IIgs, as well as my beloved “Mandel” tool, which runs on DOS only.
Both can be fully compiled in the VM (Borland C is provided, too).

Small Howto:

When using one of the INMOS compilers, you have to set some environment variables first. To do so, execute the batch file inside the corresponding folder.
For example: You want to use the D7305 occam compiler (which I recommend for the first steps) – change into its folder

C: > cd D7305A

and call the identically named batch-file

C:\D7305A > D7305A.BAT   (hint: FreeDOS has auto-completion, so enter “D” and hit TAB)

This sets all paths etc. and you’re good to go. Change into the OCCMANDEL folder, call the make_t8.bat batch and let the magic happen 😉 The binary will placed into the \bin folder.

The DOS “Mandel” program requires a PC with a B004 Transputer interface – but I’ve added it for completeness. To compile it, just call the included nmake inside the DOSMANDEL folder.
It’s a very good example for mixed code, as it uses the LSC C-compiler as well as Borland C.

So have fun fooling around. I know, it’s a steep learning curve, but as soon you dive deep enough into Transputer matters, you’ll be amazed and will ask “why the heck did this technology never made it?!?!

Paradico – “The cube”

This is yet another pretty unknown Transputer module. The silkscreen print says “PARADICO – beheer submodule – BOP 1990”. Well, beheer is Dutch for management, so it was the management submodule for… something.

I got myself 4 of those from my Transputer-Bro’ Mike and after a good year of lying in my cupboard it was overdue to do something with them.
Mike was kind enough to do the basic deciphering of all the traces, links and stuff, so it was basically just building & wireing a front- and back-plane to get them working.

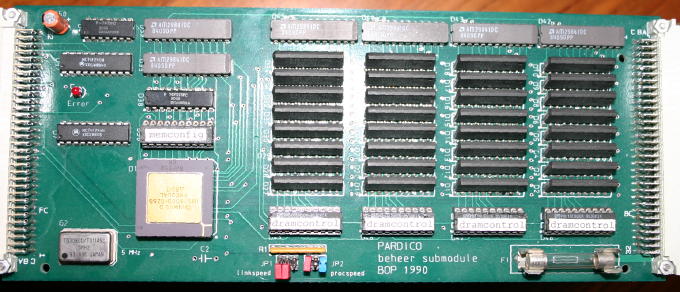
This is how one PARADICO looks like:

Paradico

Not everthing is readable here but it does the job because the PARADICO is a pretty standard Transputer design. More or less a huge TRAM. So nothing fancy about it:

  • One T800-25 Transputer
  • 4MB DRAM (4×256)
  • Some PALs for the memory decoding
  • Buffers for the links
  • A 5MHz oscillator
  • A fuse… just to be safe 😉
  • Handy jumpers for LinkSpeed and CPUSpeed

IMHO this is actually quite a waste of space but in these days you have to take what you get, right? 😉

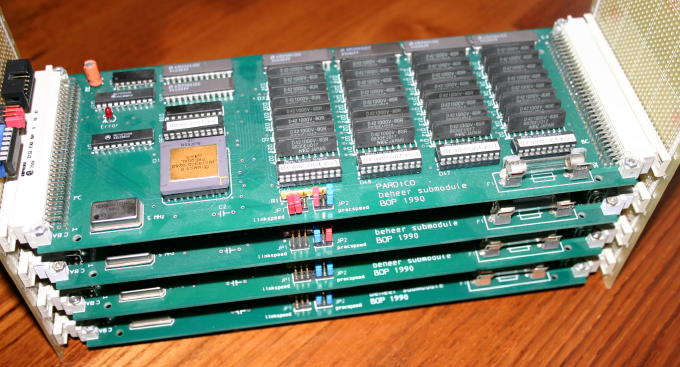
Ok, so I ordered 8 DIN41612 sockets and after a day worth of soldering “The Cube” was finished:

4paradicos

“The Cube? It’s not square at all!” you might say. Yes, true, but the specs are all nicely squared so here’s the proof. The Cube has: 2² Transputers running at 5² Mhz, each has its own 2²MB RAM. Voilà, a cube 😉
For the convenience of connecting the cube to more or less any other system, I’ve added a hex-inverter so notAnalyse, notReset & notError can be converted into their “positive” counterparts (in the upper left corner of the picture, next to 3 red jumpers).

This is the ispy output connected to the “Gerlach Card“:

Using 150 ispy 3.23 | mtest 3.22
# Part rate Link# [  Link0  Link1  Link2  Link3 ] RAM,cycle
0 T800d-24 240k 0 [   HOST    1:0    …    … ] 4K,1 1024K,3;
1 T800d-25 1.8M 0 [    0:1    2:0    3:0    4:0 ] 4K,1 4096K,4;
2 T800d-25 1.8M 0 [    1:1    …    …    … ] 4K,1 4096K,4;
3 T800d-24 1.8M 0 [    1:2    …    …    … ] 4K,1 4096K,4;
4 T800d-24 1.8M 0 [    1:3    …    …    … ] 4K,1 4096K,4;

And if you happen to stumble over a Pradico yourself, here’s the pinout of the front  DIN41612 connectors:

          X  A32 C32   X
        GND  A31 C31  GND
 UpNotError  A30 C30  DownNotError
 UpNotAnaly  A29 C29  DownNotAnaly
 UpNotReset  A28 C28  DownNotError
        GND  A27 C27  GND
         X   A26 C26   X
   LinkOut0  A25 C25  LinkOut1
    LinkIn0  A24 C24  LinkIn1
        GND  A23 C23  GND
        GND  A22 C22  GND
         X   A21 C21   X
   LinkOut2  A20 C20  LinkOut3
    LinkIn2  A19 C19  LinkIn3
        GND  A18 C18  GND
         X   A17 C17   X
        GND  A16 C16  VCC
        GND  A15 C15  VCC
         X   A14 C14   X
         X   A13 C13   X
         X   A12 C12   X

JP1:
1 LinkSpecial
2 Link0Special
3 Link123Special

JP2:
1 ProcSpeedSel0
2 ProcSpeedSel1
3 ProcSpeedSel2

Next up: The Cube moves into the Tower of Power… when other more important things are done.