
As mentioned in the first MIPS RS2030 post, I’ve got mine off ePay around 2004 and after some testing its life was about slowly moving through my basement waiting for it resurrection…
Hardware
The long way into the light
So, in 2004 the RS2030 wasn’t in the best condition: No front bezel, no hard-drive and a flakey DALLAS clock-chip. There were 8MB of SIPP modules plugged in and luckily it came with the original keyboard, a monitor cable and two QIC tapes from 1989 containing RISCos 4.10.
I fiddled around with it for a bit, still having a 21″ CRT on my desk, happily connecting to the BNC cable and the tapes were still readable but I wasn’t able to get things booting without a tiny bit of documentation. At least I added 8 more 1MB SIPPs for small money to fill it to the brim.
This changed 2012, when I got in contact with Julien Noël, who ran no-l.org (wayback-machine link) which pretty well described how to install RISCos. Well, he had a MIPS Magnum 4000 and used a bootp() server, but it described a lot of things I was desperately needing for my resurrection.
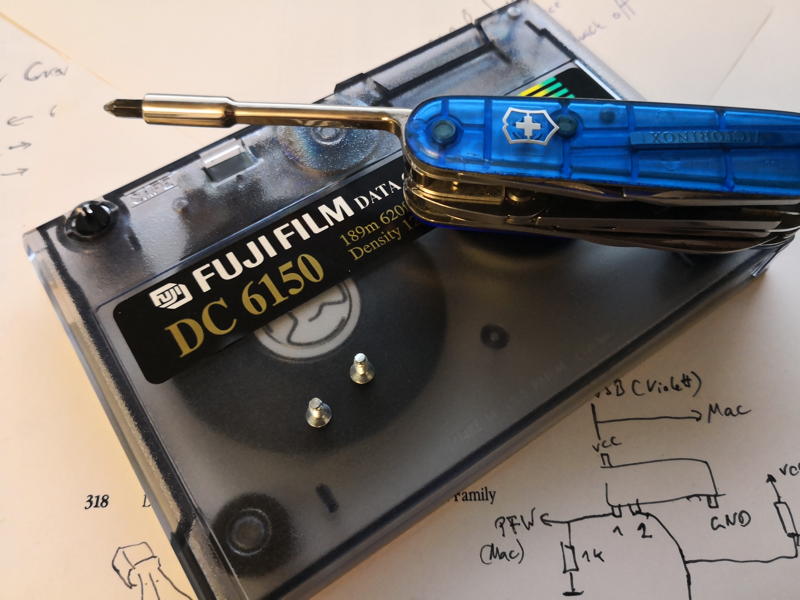
Some mails flew back and forth, a BNC-to-VGA adapter was build and little RS2030 saw some daylight again. Sadly my QIC tape-drive disintegrated over the last years and its pressure rollers turned into sticky goo – and I figured this out, when the goo slowly crawled into my precious tapes. Yikes! 😥
I cleaned the tapes as good as possible and everything went back into the darkness of “Zee Vault™” again. I think it was the next month, when Julian sent me a tarball containing RISCos 4.52 tape images. I saved them in a safe place and moved on…
Now or never!
This year (2018) I had more time at hand than usual and plenty of it went into some of my Macs and a comparably vintage SGI Personal IRIS.
During my fight practicing with installing IRIX 5.3 onto a clean drive I felt like prepared for an even older MIPS box. This time it had to be done! I got myself a new-old-stock QIC drive, 2 still sealed QIC-150 tapes and moved everything in front of my LG TFT display, which is able to handle sync-on-green signals.
Let’s check if it’s still alive at all – flick the switch, a noisy fan starts blowing and ~45sec and some beeps later the RS2030 is back in business:
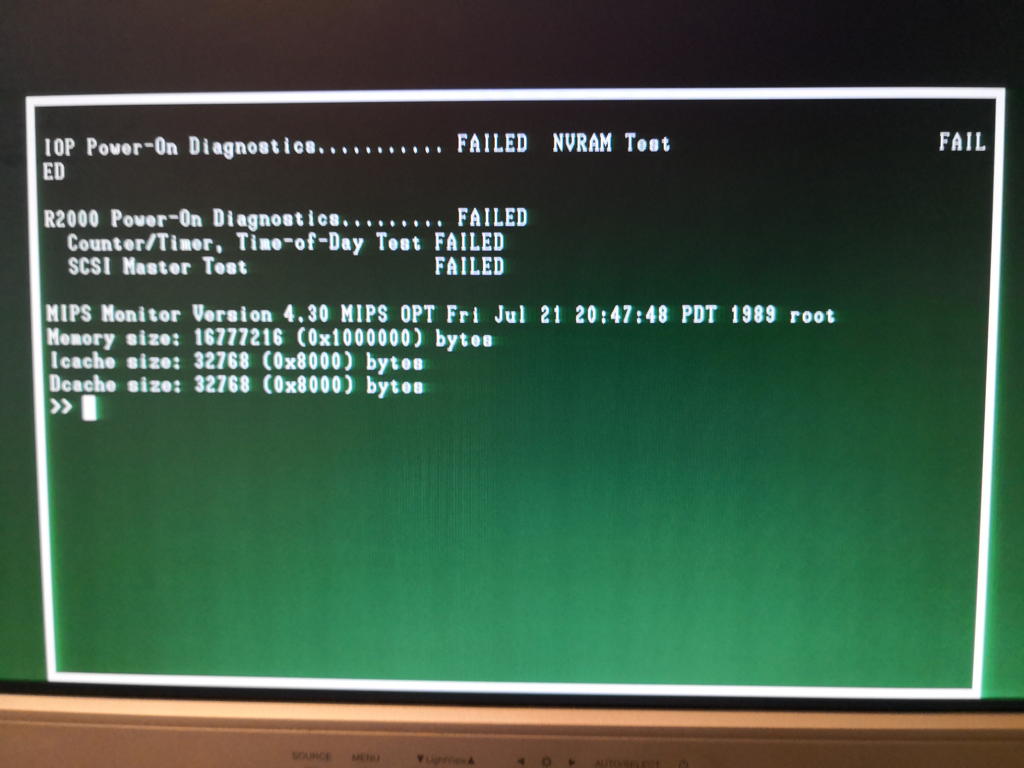
Yes, the console looks strange. It just uses 2/3 of the screen and has a frame around it. The green tint is due to my way too long video cable.
Ok, there are many “FAILED” messages but it found all RAM and the ROM monitor (aka BIOS) prompt is happily blinking. Woohoo! I left it running/idling like this for a while just to make sure the power-supply stays stable.
After half an hour I moved on. The fails of the NVRAM and Counter/Timer test showed that the DALLAS DS1287 clock-chip finally went flat. The failed SCSI Master Test gave me a bigger shiver…
The clock-chip was quickly removed, the ram content saved, cut-open and enhanced with an external 3V button cell. It’s a common drill for all vintage hardware enthusiasts. I think this is the mother of all clock-chip modding posts.
Luckily the SCSI Master Test went away with the modded DS1287. Phew… while I had my beloved EPROM programmer at hand, I also saved the four 27c512 EPROMs and some Googling actually brought up a more recent version than mine: v4.30 from Jul. 1989 vs. 4.32 from Jan.1991. You can download the binary images here. The most useful difference I found is the added ‘sprobe‘ command, listing all SCSI devices found.
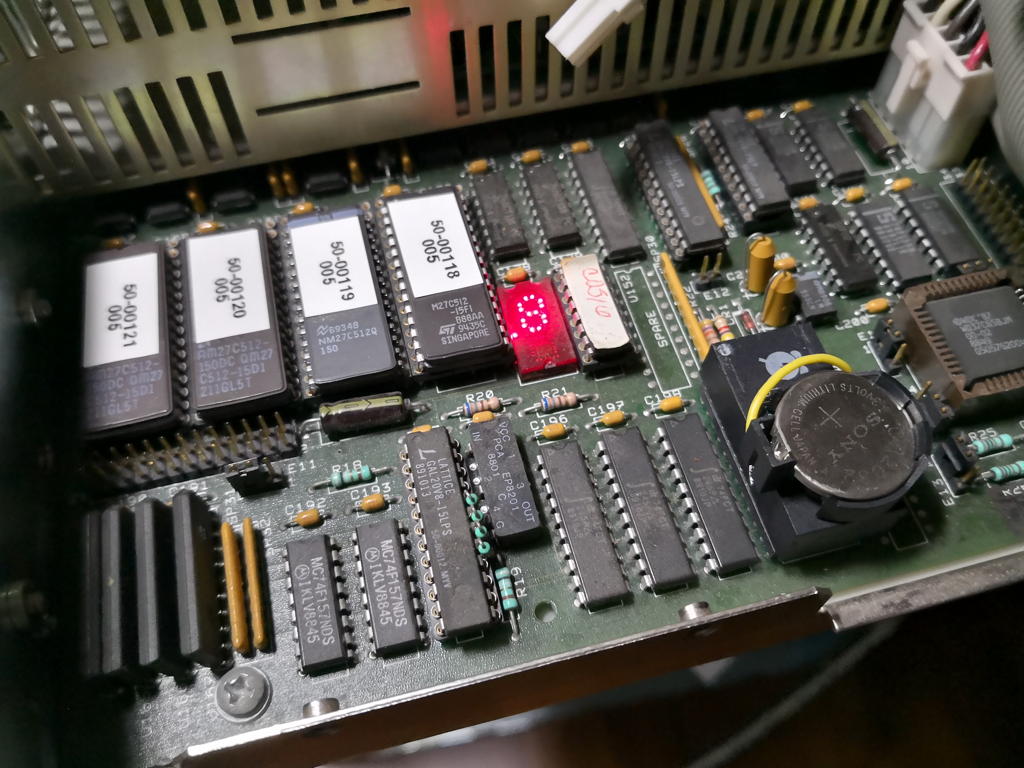
There’s a nice thing all computers should (still) have. A 7-segment display next to the EPROMs giving you some idea of the systems status while booting. Also pictured the modded clockchip.
I found an older post of somebody desperately looking for a keyboard. While it looks like an XT-keyboard and weights like an IBM model M, it seems to be somewhat special. As said, I’m lucky to gave gotten mine together with the RC2030.
This was the last step: Check the drives. Find a proper SCSI hard-drive and externally connect my new tape-drive.
Having learned from my “tape disaster” in 2012 I carefully checked my tapes before putting them into my precious new tape-drive. And yes, they had a problem: The the slack retention belt was worn out and lost its elasticity…. resulting in, well, slack. To fix this you need a new(er) tape as ‘belt-donor’ and then do some tape-DJ’ing.
As I wasn’t able to find 2 reliable donor tapes, I decided to not dump the RISCos 4.10 tapes and move on…
Software
It’s getting serious: I took my two best blank QIC tapes and copied the RISCos 4.52 tape-images onto them using Linux on my retro-server (which one day deserves a post for itself). That was the easy part…
Let the game begin
Using Juliens recipe the initial boot from the tapes went smooth. Well, at least for 90’s measurement. Times were different, so it’s definitely not slap in some DVD/USB-stick and let the BIOS do the rest – choose some packages to be installed and baaam!, OS installed.
This is the drill (theoretically):
- Use the minimal boot command of the ROM Monitor to boot a stand-alone shell (‘sash‘) from the 3rd block of the tape.
- This sash knows filesystems, so you can use it to temporarily copy a mini-root system from tape block #4 into the swap-partition
- Then load the RISCos kernel from tape telling him where to find the mini-root filesystem.
- Finally this kernel loads a full-blown shell which then is able to execute the install script (‘inst’).
But if you’re not owning an original hard-drive you have to format/partition yours first. In this case you have to “boot” the MIPS format tool. It’s the grandfather of SGI IRIX’ fx, just even more basic.
Very basic. And confusing. Out of the box, it “knows” 13 hard-drive models, of which 8 aren’t even SCSI. And all of them are very, very, very obsolete. Here’s the printout:
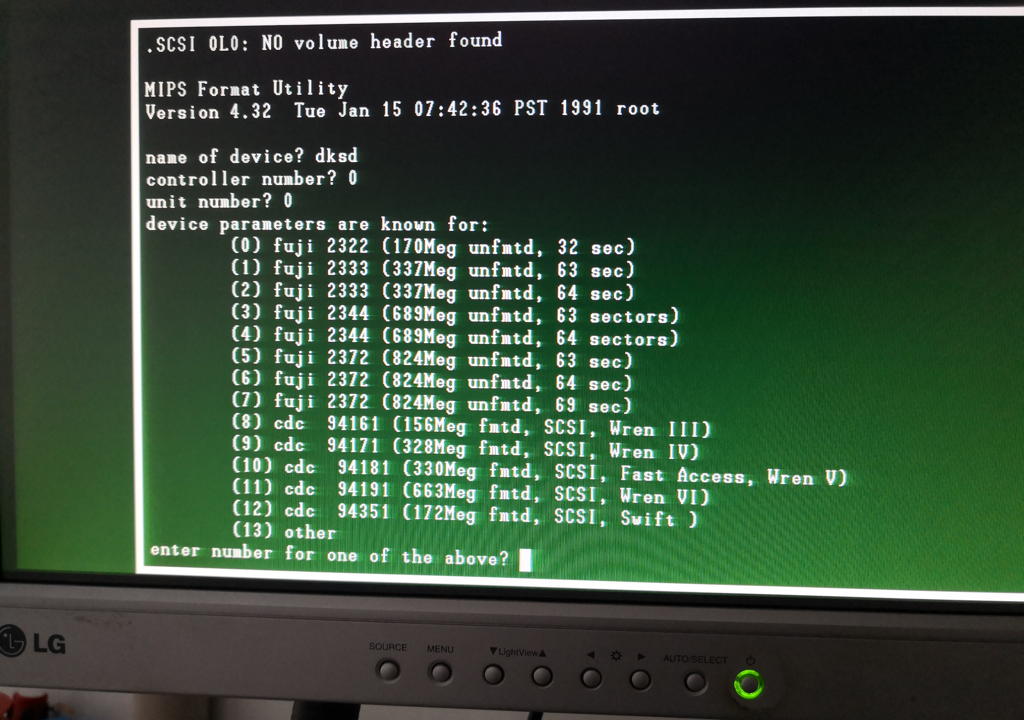
Option #13 gave me some hope… “other” means you can add your own drive – if you have these specs at hand:
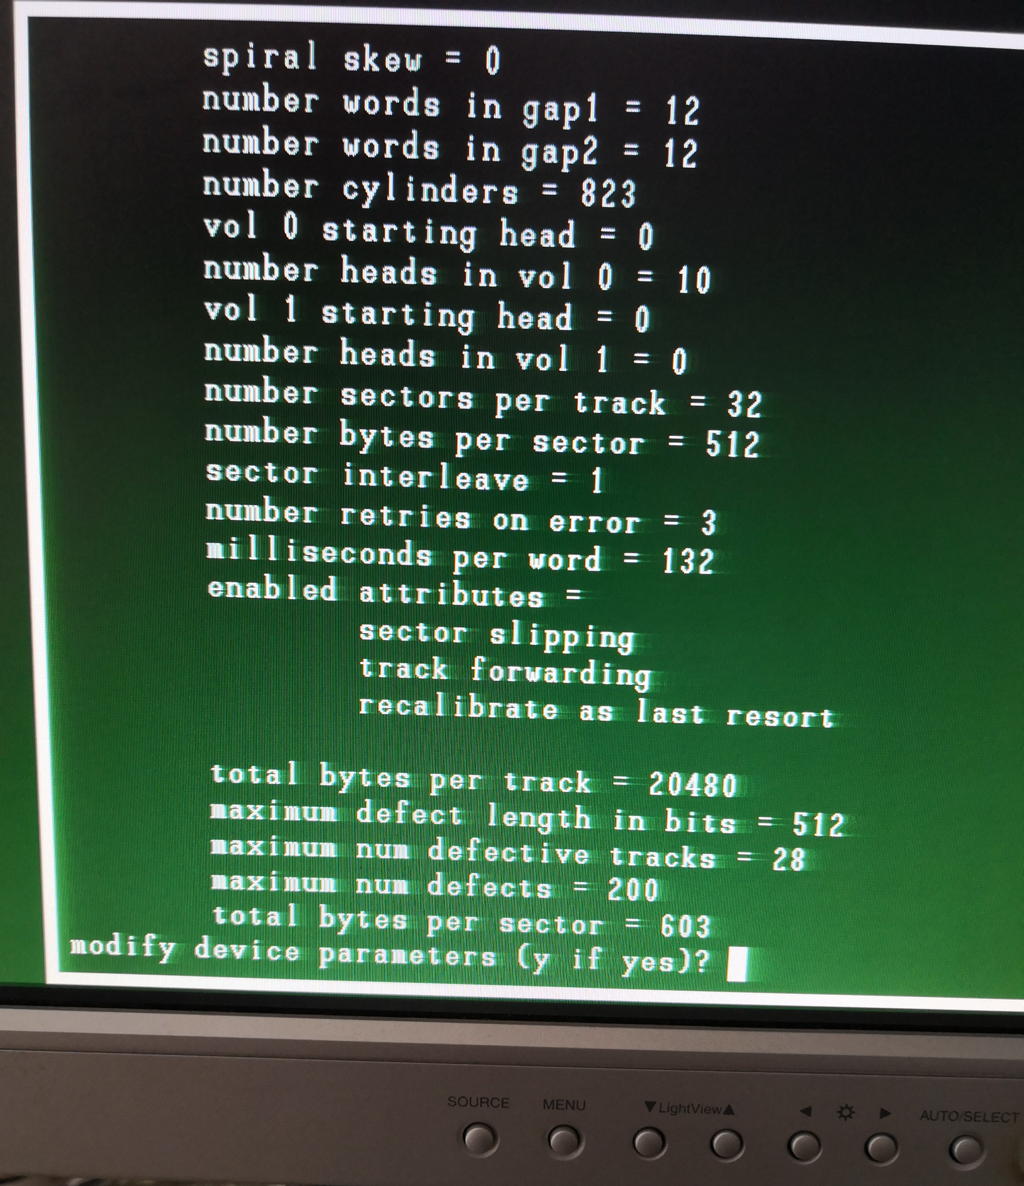
Well, I guess you don’t. Neither did I. So I wasted spent 2 days to figure out how to get a partition scheme and whatever else is needed by RISCos onto my disk.
To spare you this experience, bad ideas are:
- Use the IRIX’ fx tool
- Use gParted
- experiment with those wiredo specs
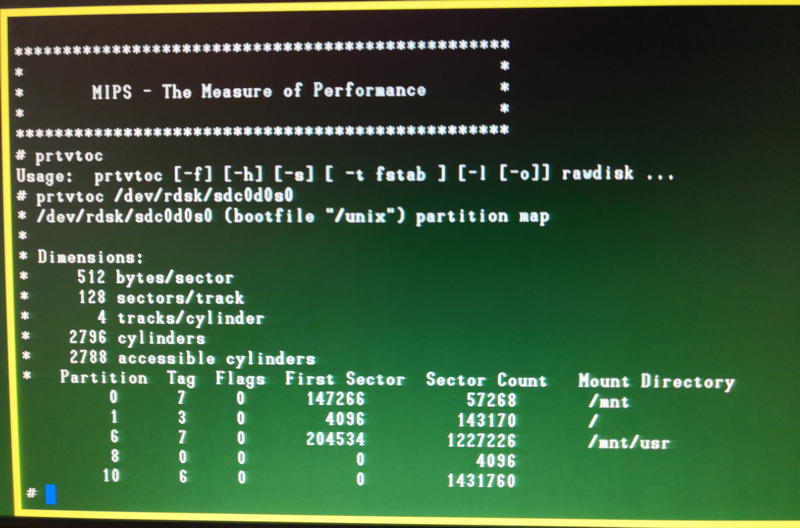
The solution is -as most of the time- simple. Choose some SCSI disk from the menu, answer all questions but deny formatting, so it will write all partitions and the so-called volume header (a partition containing sash and stuff). The tool ‘prtvtoc’ (PRinT Volume Table Of Content) will then show you something like this:
After that you can boot sash, miniroot und finally start ‘inst’. Again a very simple installation tool which creates the EFS filesystem and copies all packages onto the hard-drive. Time for a break… tapes are slow and it’ll take ~2hrs.
So tonight I’m gonna party like it’s nineteen ninety-nine
When that’s done, you have to reboot and your MIPS will boot like a proper workstation… back in the days. It takes some minutes and it greets you with a simple ‘sh’ prompt.
To make your life a bit easier quickly enter ‘chsh’ to switch into ‘csh’ which is a bit more modern.
From there have fun exploring your new, old system. Ah, and don’t forget: RISCos is not year 2000 aware. So set the clock to something before December 1999 😉
Don’t miss the next chapter: Home improvement… making things a bit more convenient.
hi, we are restoring our rs2030 for a film to introduce a talk by Hennesy. its complete, but fails with 5 on led display and puts out lot of closey spaced beeps. any ideas on this?
jim
Hi Jim,
See your inbox for details – it might be that you’re having issues with your SIMMs. Try reseating/cleaning them.
Cheers, Axel