
You might have been in the same situation: Some piece of old hardware could be upgraded (aka pimped) with more RAM, but there’s no place in the world to get that type of RAM needed.
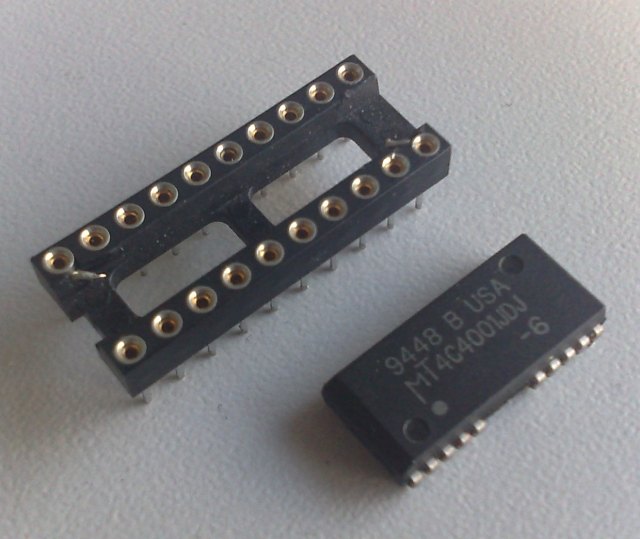
In my case it was 1Mx4 DRAM in a DIL packaging. It’s hard to come by those in a ZIP packaging – sometimes used on AMIGA RAM cards – but DIL is next to impossible.
Well, when 1Mbit RAM chips were introduced, the industry switched to SIMMs anyway… and that’s where you find those. For the DespeRAM, SOJ packaging is what you want. SOJ (sometimes also called J-Lead) means there are short pins on the IC but they’re bend inwards under the chip… pretty much like PLCC pins.
What you need for this stunt:
- Desperation. Lots of it.
- A hot-gun (for getting the SOJ chips off the SIMM module)
- A fine tip on your solder-iron. Very thin solder led (e.g. 0.5mm)
- DIL sockets for your desired piece of crap^h^h^h^h vintage hardware
- Wire, also thin (I used 0.6mm)
Preparation:
Clean desk. Good lighting. A steady hand (no coffee or drugs – I assure you, it won’t work. I tried it ;))
Ok, so first of all get out the hot-gun and carefully get the ICs off the module. Here’s a single chip and the socket it should be mated to
Bend the pins and straighten them. I used a needle to pry the pins upwards a bit and did the rest with tweezers. Now you have the exact spacing of the pins on your chip. Use that for building a “pin aligning tool”. I’ve used a piece of plastic and a fine saw to cut 10 grooves into it. When done, it looked like this:
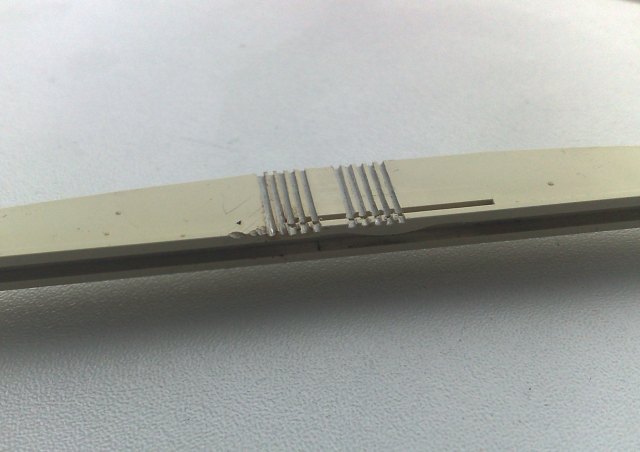
Now find something on which you can fixate the chip to (still being movable). I used a block of wood and a rubber band. This worked quite well. This way, you can always adjust the position of the chip when needed.
It’s time to cut some pins. For the start I went for about an inch long – place them into your self-made tool and fix them with a piece of self-adhesive tape (Scotch in USA, Tesa over here ;)).
Now put some solder on the chip’s pins as well as on the freshly cut DIY-pins.
Carefully position your tool so that the pins do have good contact.
If you did everything right, a short contact with the solder iron tip should be enough to solder the new long pin to the original one. When you’re done with all pins it should look like this
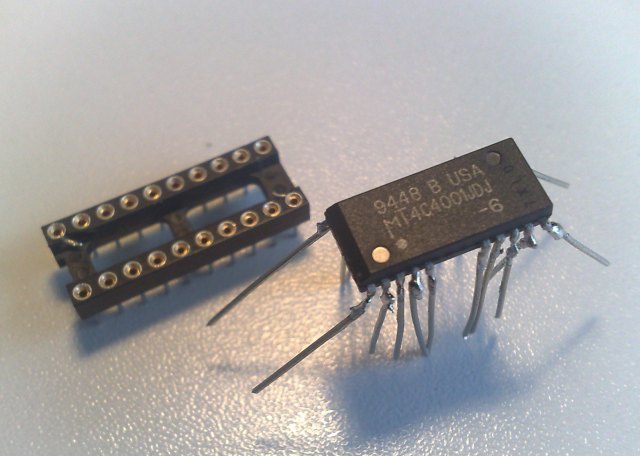
As you can see, I did already start to bend the new pins to fit into the socket. It’s a bit try-and-error to get the right angle. Be careful to avoid the pins touching each other or even break when being bent. Re-fitting a single pin can be a major pain in the a**!
Now you need to cut the pins into a reasonable length. First bend them into position – constantly checking against the socket. When all pins are ok – start cutting from one side to the other, bit for bit until you got the perfect length (Use the first chip as a model for others which might follow).
The seating is a bit difficult as you can’t use maximum force to push them into the socket. I used a fine caliper to actually pull the chip into the socket.
Due to the angle needed, the chip will hover quite a bit above the socket. I guess you can go lower if you go for a 90° bending – I didn’t have the patience.
Double check all connections from the original pin to the one on the socket. Also check for shorts!
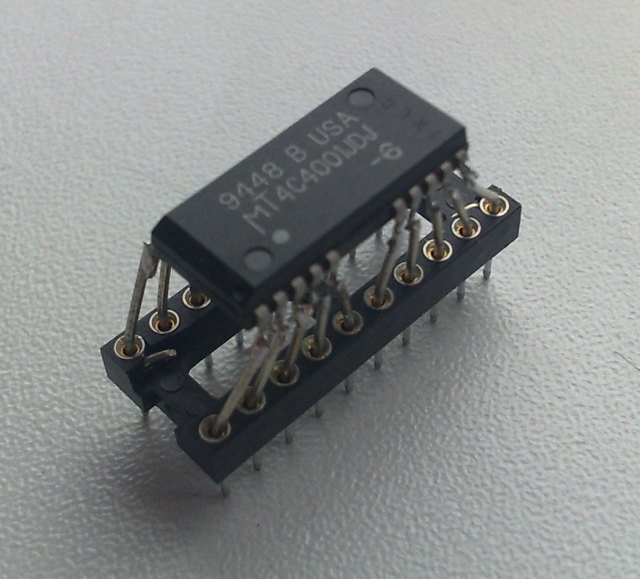
Here you have it, the ugly Franken-Chip. But hey, it didn’t cost me a dime!
That said, after soldering 160 pins, bending them and carefully pulling them into their sockets… I guess I won’t do it again 😉