
Sometimes a man has to do what a man has to do 😉 And this time it got to be an ATW800 Farmcard.
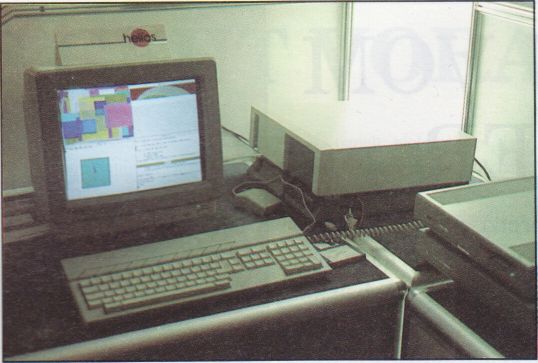
A what? ATW800 stands for ATARI Transputer Workstation – basically an Atari ST and a Transputer subsystem in a tower case (just about 250 were build and sold) and looks like this:

Background
Even I still do not own an ATARI Transputer Workstation (yet), I “know” it from the very first presentation when working at the 1988 CeBIT Atari booth back then. The initial demo version used a standard Atari Mega-ST connected to a blunt Atari-PC3 case which housed the Transputer stuff… and the whole thing ran the Helios Operation System about which you can read quite a lot in this GeekDot chapter. Well, actually that was no wonder given that Perihelion Ltd. was not only the creator of Helios but also the birthplace of the ATW800 (Called ABAQ in the early stages).
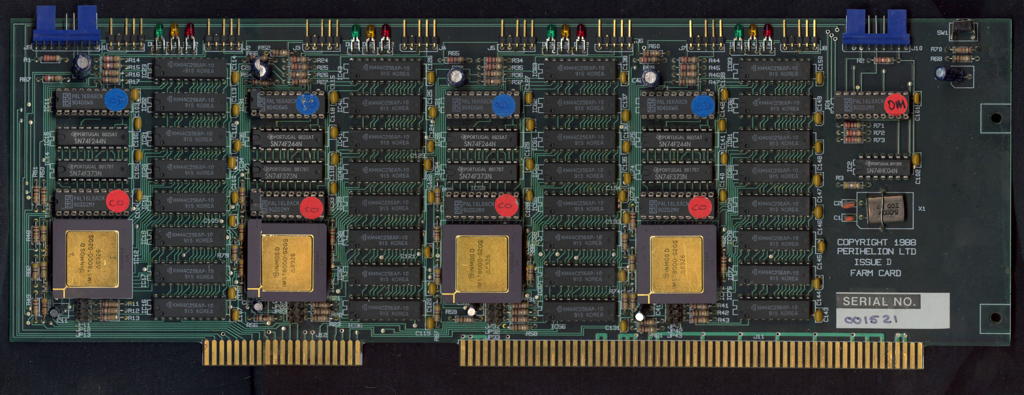
The final version (the one in the tower case) used so-called Farmcards to expand the number of Transputers available to the system. A Farmcard featured 4 fixed Transputers (T425 or T800) with 1MB of RAM each. Here’s a piccy (click to zoom):
That might be plenty back then, but even in those days progress was made quickly and INMOS presented their TRAM Modules at nearly the same time… and these give you so much more flexibility and also save space. Actually, if you closely read the marketing material from Perihelion you will spot the announcement of a TRAM Farmcard. It just never made it…
I did it my way…
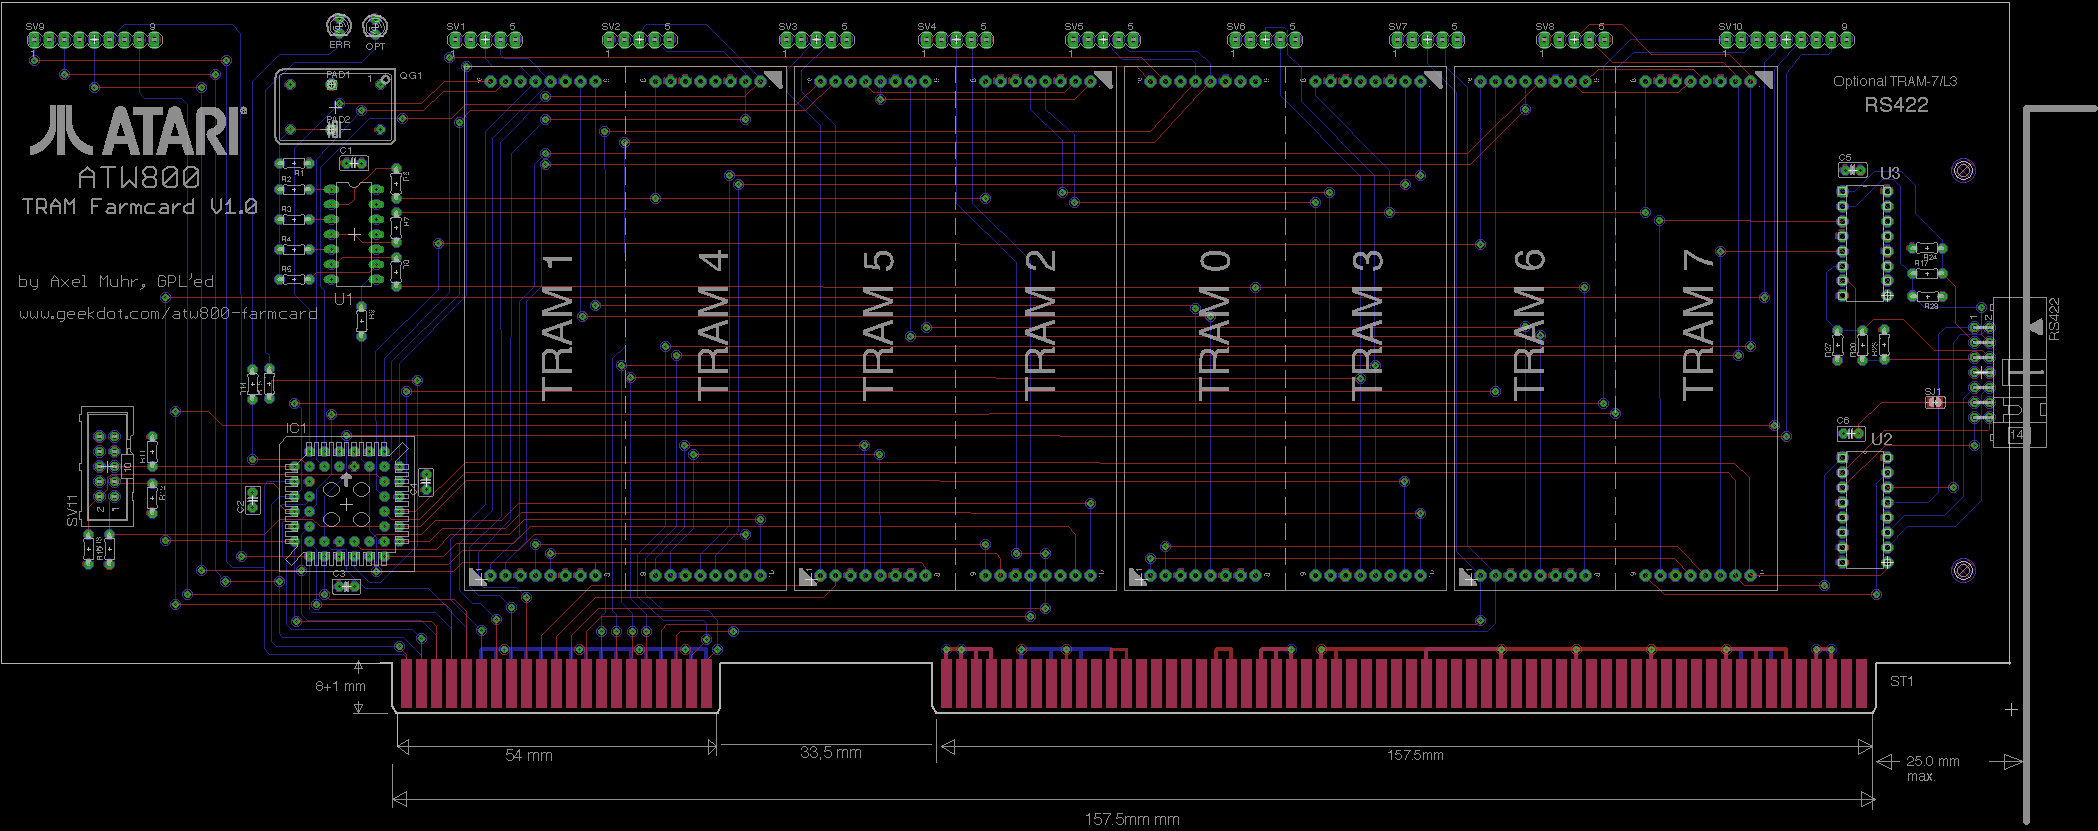
So it was just a question of time until I start to design a TRAM-Farmcard. After many years of unsuccessfully hunting an ATW which is for sale, I at least met shock__ (atari-home.de forum) a lucky ATW800 owner who was happy to help. So using the available documentation and the data provided by shock__ I created this:
Features
So what gives? Well, first of all, there aren’t any original Farmcards available anymore. Even if there were, they’re pretty limited. One Megabyte is enough for a computing slave using pure OCCAM but if you’re using Helios, 300k will already ate up by its core demons. Then there’s space for just 4 Transputers, not many given the size of the card.
That said here’s what this new Farmcard provides:
- 8 TRAM slots. Can be used for anything. Computing, SCSI, Ethernet or graphics TRAMs. Be it size-1 to 8. There were many, many cool modules available. Today you can at least use my AM-B404 TRAM, a super-fast 2MB size-1 compute TRAM.
This would mean twice the CPU oomp, and double the RAM. - Freely programmable Altera EPM7032/64 CPLD. It will implement Perihelions diagnostic-bus, meant for controlling each Transputer separately. Updates can be done in-field.
- An external RS422-link. Using differential transceivers (26LS31/32) one can connect external Transputer networks over a distance up to 20-30 meters (vs. 30cm in pure TTL).
- 4 layer PCB design giving stable power distribution throughout the board. Still, simple layout, easy to patch and only through-hole parts being used to make building as easy as possible.
- 2 LEDs. Just say’in…
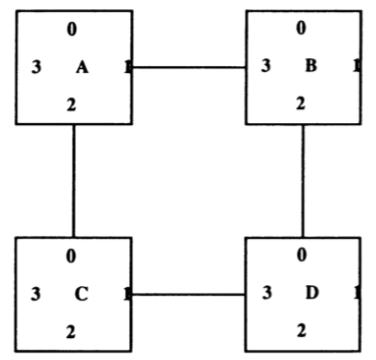
Because of the added Transputer-Slots the network topology looks a bit different than is used to be on the original Farmcard.
This is the “old one”, a simple square, each Transputer has two free links being available at the edge connectors J1-J8:
And this is how the 8 slots are connected:
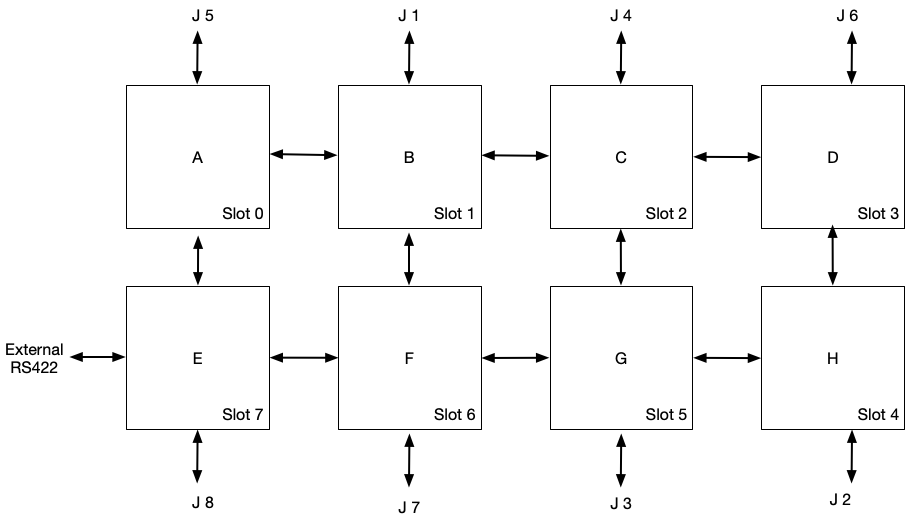
Now each Transputer has just one link connected to the edge-connectors. Slot 7 uses link-3 to connect to the optional external RS422 connector.
Free as free beer!
Because there are probably only two handful of ATW800 owners out there, I made the schematics freely available here under the GPL license. But to make things clear:
This is untested stuff! The card is huge. It is not cheap to have it manufactured. The best price for 10 PCBs I was able to find was about $250.
The hard part
While the cards design was pretty straightforward the “firmware” of the CPLD will be a different beast. As said, Perihelion used a proprietary bus called “diagnostic bus” (DBus) – a two wire bus used to address all or just a single Transputer in a network to either reset or put him into the so-called analyze-state to do some post-mortem debugging. Pretty advanced stuff given that standard Transputer networks simply used a global reset.
Luckily the DBus is documented in the (short) Farmcard Manual (p.8-10). So we have a rough idea what’s going to be expected:
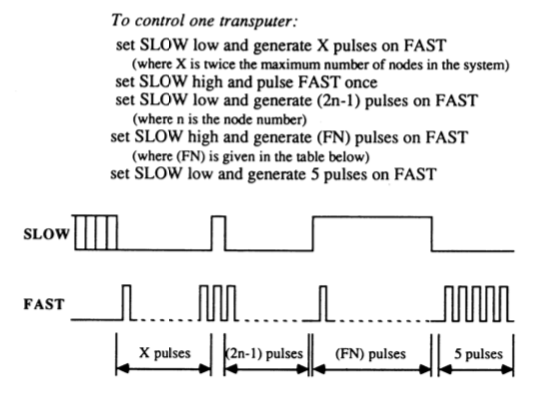
The DBus is daisy-chained through all Farmcards on the slots as well as on the edge-connectors J9 & J10 (in/out). Because I hadn’t had an original Farmcard at hand I wasn’t sure which of these signals are needed to be controlled by the CPLD. So I connected them all using all available I/O ports. This is the pinout:
pin function
04 5_ANA
05 1_RES
06 1_ANA
08 LED1 (Error)
09 L_IN
11 L_OUT
12 FAST_IN
14 FAST_OUT
16 SLOW_IN
17 SLOW_OUT
18 GLOBAL_RESET_IN
19 GLOBAL_RESET_OUT
20 T_ERR_IN
21 T_ERR_OUT
24 LED2 (Opt)
25 4_ANA
26 4_RES
27 2_ANA
28 2_RES
29 3_ANA
31 3_RES
33 7_ANA
34 7_RES
36 6_ANA
37 6_RES
39 0_ANA
40 0_RES
41 5_RES
So, this is it for now… it’s an ongoing project and it depends on you how fast progress will be made.
- Do you own an ATW800? We’re looking for brave testers!
- Are you a VHDL hero? Grab the manual and do your thing!
- Transputer nut? Feel free to check the schematic… I’m not swearing it’s 100% bug-free.
To be continued…