

Welcome to the ATW800/2 page – read that as you like: “ATW800 two” or “ATW800 half”, depending on your expectation.😉
Whatever way, it’s the Atari Transputer card as it was meant to be.

Quick navigation
If you (re)visited and looking for something specific, here’s the fast lane:
- Background
- Features
- Technical background
- FAQ (separate page)
- Wiki
- Discord ATW800/2 User server.
- Software (Nextcloud share – Drivers, Docs, Tools, Helios etc…)
- Reserve or buy one?
| 📰📢 Newsflash: The ATW800/2 made it into HACKADAY! 🥳
And we got our first unboxing video! Thanks for that TJ! Here’s another “happy TJ” 😉 |
Background
Before we go into features & technical details I’d like to talk a bit about motivation and goals of this project.
You might have read about my STG[A]TW card for the ATARI Mega-ST expansion bus. That contained an ET4000 graphics card borrowed from IBM PC ISA-land and an Inmos C011 Link-Adapter to connect to a Transputer CPU.
This showed the direction but was a bit cumbersome. Also, ET4000 cards are getting hard to find, expensive (>100€) and not all of them actually do work in your ATARI – and most important, my intention was to create something affordable – remember: Power without the price ✊
The idea is/was to provide a plug-and-play version of a expansion which brings your ATARI as close as possible to what the ATARI Transputer Workstation (ATW800) provided.
That is: Transputers of course as well as expanded graphics capabilities.
Here are my 6 goals I want(ed) to achieve:
- Be reasonably ‘historically correct’
- Create a design avoiding obsolete parts where possible
- Stay in a affordable price range
- Simple installation
- Integrate/play nice with other peripherals
- Offer flexibility
Goal #1 is a philosophical topic one can discuss for his/her whole retro-nerd life. It’s the same as with e.g. cars. Is it OK to put an US V8 into a Ferrari? Electrifying a 1970 Porsche 911? LED headlights in a vintage car? Trailer Queen or patina? The list and discussion will go to the end of humankind.
The very same goes for vintage computer systems. There’s nearly none left which hasn’t had a Raspberry Pi of some sort slapped into it. Starting with a Pi Nano as WiFi-module and ending with a full blown 1.5GHz Pi 4 in an 8bit machine… for my taste, this is not the way.
So with this project we stay with what would have been possible in the let’s say 90s. It might be reached by using more integrated parts, but no recent high-tech here. Sorry. Which brings us to the next point…
Goal #2 is more or less a financial decision. If you use parts which are long time out of production, you depend on a grey market which is limited and can quickly drain, might be full of fakes and prices explode due to greediness.
So instead of buying the last stock of e.g. ET4000W32 chips and create a redesign of an x86 ISA card kludged onto a 68k bus, it’s wiser to go for a ‘virtual design’ which won’t go EOL and can grow as we go… in this case: FPGA is the way. But following goal #1, don’t overdo.
If there’s (currently) no other option, we obviously have to go with the old parts. The Inmos C011 link-adapter is an example here.
Goal #3 limits #2 in some aspects. It’s relatively simple to pick a recent FPGA which actually would be capable to easily simulate your whole ATARI ST (or two)… but that would be quite expensive – not just the chip but also the design, which requires external RAM, 3-4 voltages and multi-layer PCBs to cope with 200+ BGA connects.
The compromise here is an FPGA board which offers all that already mounted onto it and will be piggy-backed onto our card.
And because cheap is always a challenge, we went for the Chinese Nano FPGA family which has an unreached price/feature ratio and fits the “Power without the price” mantra.
Goal #4 is quite simple: Not everybody is a virtuoso with his/her solder iron. So I tried to avoid as much additional soldering/cabling as possible.
Basically you plug the card into the Mega-ST or VME slot and you’re good to go.
In fact, as of today, there’s just one cable to plug(!) if you want to use one optional feature of the ATW800/2 (ACSI INT). No soldering whatsoever.
Also, you should be able to plug the card in and use it without additional needs. That’s why it offers (optional) TOS ROMs.
This is the way 😉
Goal #5 reflects the awareness that there are mostly souped-up machines out there. I daresay no one who plays with uses his Atari unenhanced in one or the other way.
The ATW800/2 tries to play nice with other common expansions by precisely decoding (previously unused) addresses and even integrate their features like the looped-through USB port of the Lightning-ST.
That said, there are so many old and new peripherals that nobody can guarantee that everything works nicely together with an ATW800/2 – especially on an overloaded bus.
And because of this Goal #6 will be covered by “bespoke ordering“.
Not everybody will be interested in having 2 TRAM slots for hosting real Transputers – so you can leave them out and save some €€.
The same goes for the TOS ROMs. If you already have another ROM switcher, just leave it unpopulated.
Reality kicked in
Having all that planned out, back to the drawing board I went… just to realize that I cannot handle that all by my self.
So it became clear that I have to ask specialists if they like to join the effort.
Let me introduce you to the team aka “The league of extraordinary Transputer gentlemen“:
- Wolfgang ‘Idek’ Hiestand of the Nova drivers fame.
Back around the start of the 2000s, Wolfgang looked into getting his hands on the Nova source code with the intention of preserving knowledge about Nova cards. It took some time, but in the end he succeeded in recreating the original drivers. Since then, he has maintained and extended Nova drivers to support additional VGA cards and ATARI computers. For this project, Wolfgang has created a branch of the Nova drivers to support the FPGA-based card. - Claus Meder. God of all things FPGA and fellow Transputer maniac. So much actually that he wrote a Transputer core in VHDL.
Claus designed and wrote the impressive graphics-core for an FPGA from hell. - André Saischowa. Atari and Transputer fiddler of the earliest hours. He wrote Transputer and Atari ST programs back then and just got into the matters again when we met. Perfect timing!
André ported all INMOS tools as well as the Helios server… plus developing driver .sys files for NVDI. - Honorable mention: Mike Brüstle of transputer.net. The man whose brain natively runs Transputer assembly code.
When you have a question regarding Transputers and he doesn’t know the answer, nobody does.
All four of them have many, many more talents and without them this project would still be just another dream of mine. ❤
Features
Ah, finally… features.
I assume you’re roughly in the picture, what the ATARI Transputer Workstation was all about. Basically, it was a Transputer system running Helios which used an Mega-ST1 as host. The powerful graphics chip (“Blossom“) was connected to the Transputer which ran X11 on it to display graphics in 1280 by 960 pixels (16 colors) or 1024 by 786 pixels in 256 colors, making the most out of its 1MB VRAM.
As said the Atari part was mainly just I/O: Harddisk, keyboard, mouse, serial and parallel interface. No access to Blossom and after booting, there was no way to run Atari software from/in Helios.
Today that’s bugging me, and like said before, I think Atari or Perihelion, the company behind Helios as well as the ATW, took the wrong approach.
The Transputer system should not sit on top of the Atari system but next to it. Both, TOS/GEM as well as the Transputer(s) should have access to all that pixel beauty.
So there you have it, the two main features and ‘raison d’Être’:
High-Res color graphics 👾
The ATW800/2 graphics controller is actually a tiny and cheap FPGA board piggybacked onto the card. While we started out with the Tang Nano9k it soon proved to be unstable as soon you stretched it to the max… as for now, we changed to the slightly more expensive Nano20k which therefore offers more room and faster/bigger RAM.
[NB: This is the prefect proof that it does make sense to keep this part “virtual” – no shortcoming or chip EOL’ing can stop the product itself. All it needs is an adaptor.]
Displays will be directly connected to its HDMI port.
The running core, called “Seurat” (named after the inventor of Pointillism), has access to 2MB of VRAM, which is twice what Blossom had. Thus there are quite some resolutions possible (in 2, 8 and 16 bit colors):
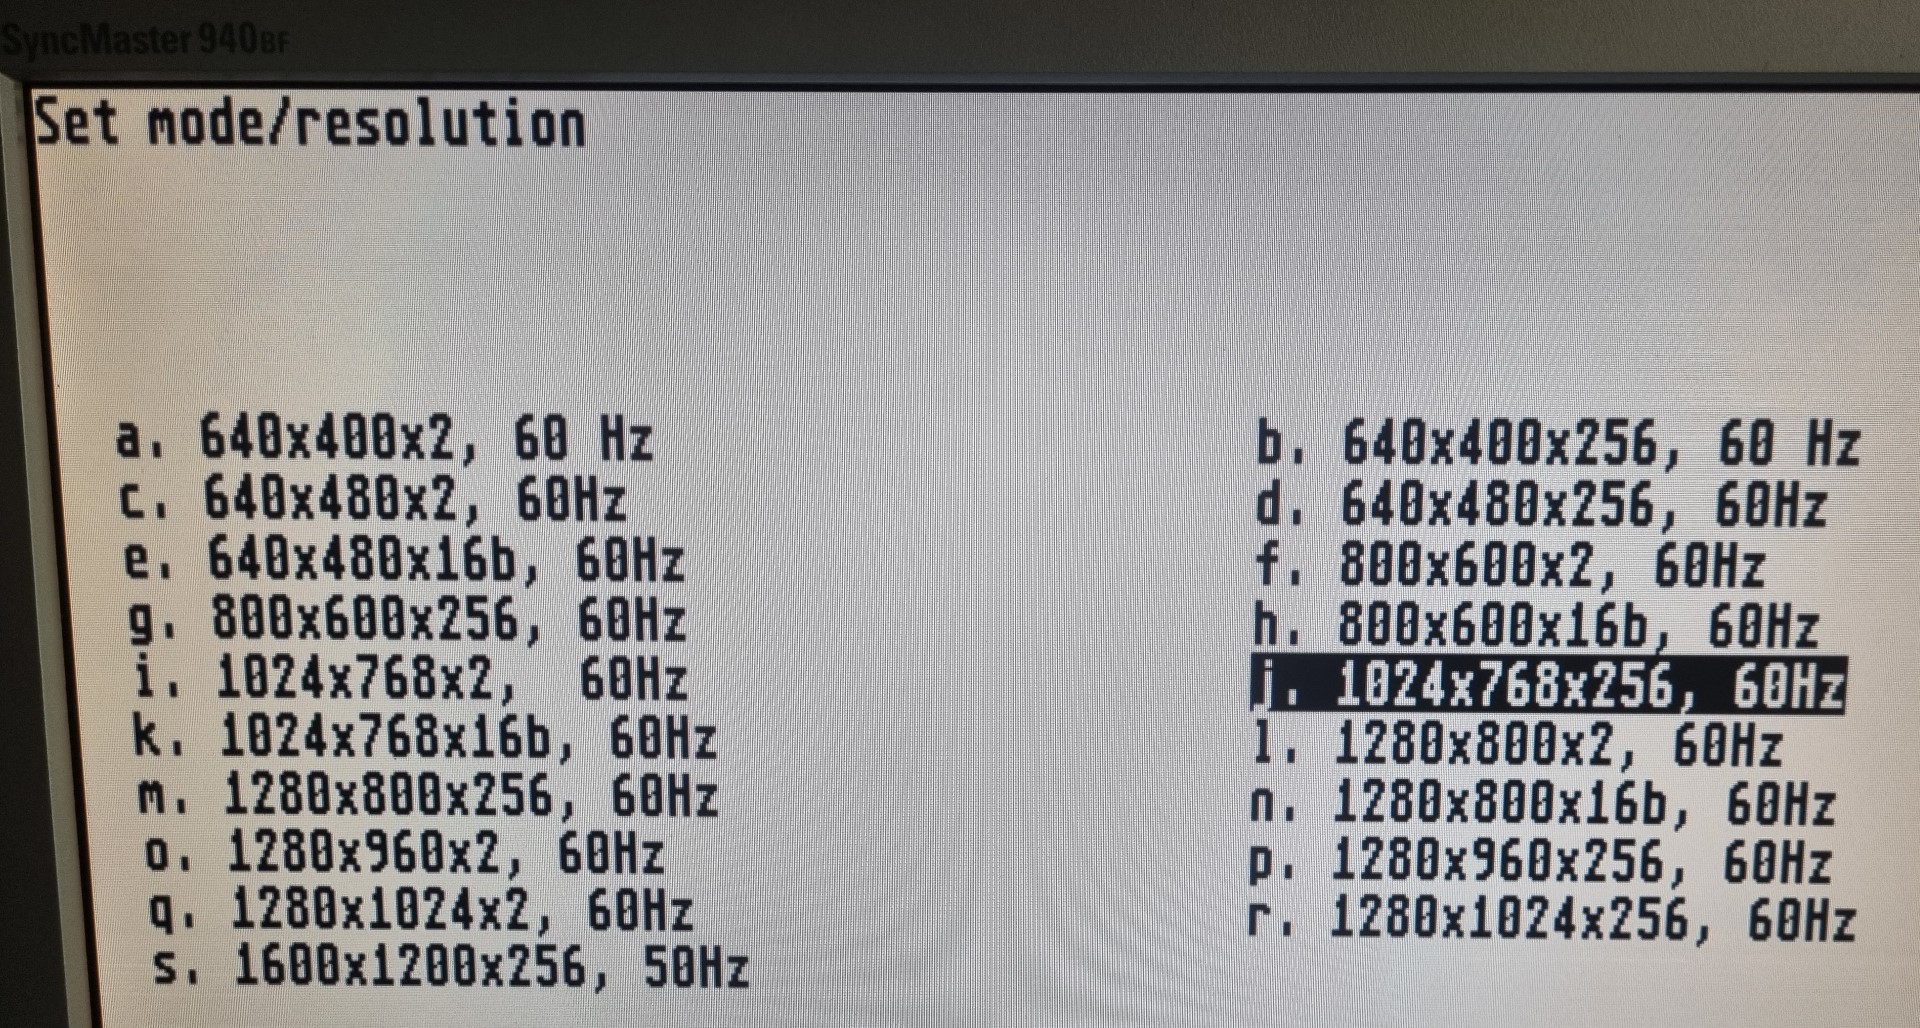
Woo-hoo… holy Bat-Resolution! 🤯 (1600×1200@256)

To cope with such an amount of pixels Seurat features a blitter with is able to push roughly 130MB/s for fast redraws and smooth scrolling.
As of today (July 2024) the current Gembench 6 numbers vs. 640×200 ST-Med (no NVDI!):

Transputer(s)
Yes, they might not be of everybody’s interest, but they were the main actor in the ATW800 and are fascinating beasts when you take a closer look at them.
32bit RISC’ish CPUs, running at 20-30MHz, each having 4 links to directly connect to other Transputers. That way one can create a massive, unlimited parallel system that blew away anything you could run at home back in 1990.
This strictly follows my goal #1: Historically correct. Run things on the real stuff and feel how an ATW800 felt back then.
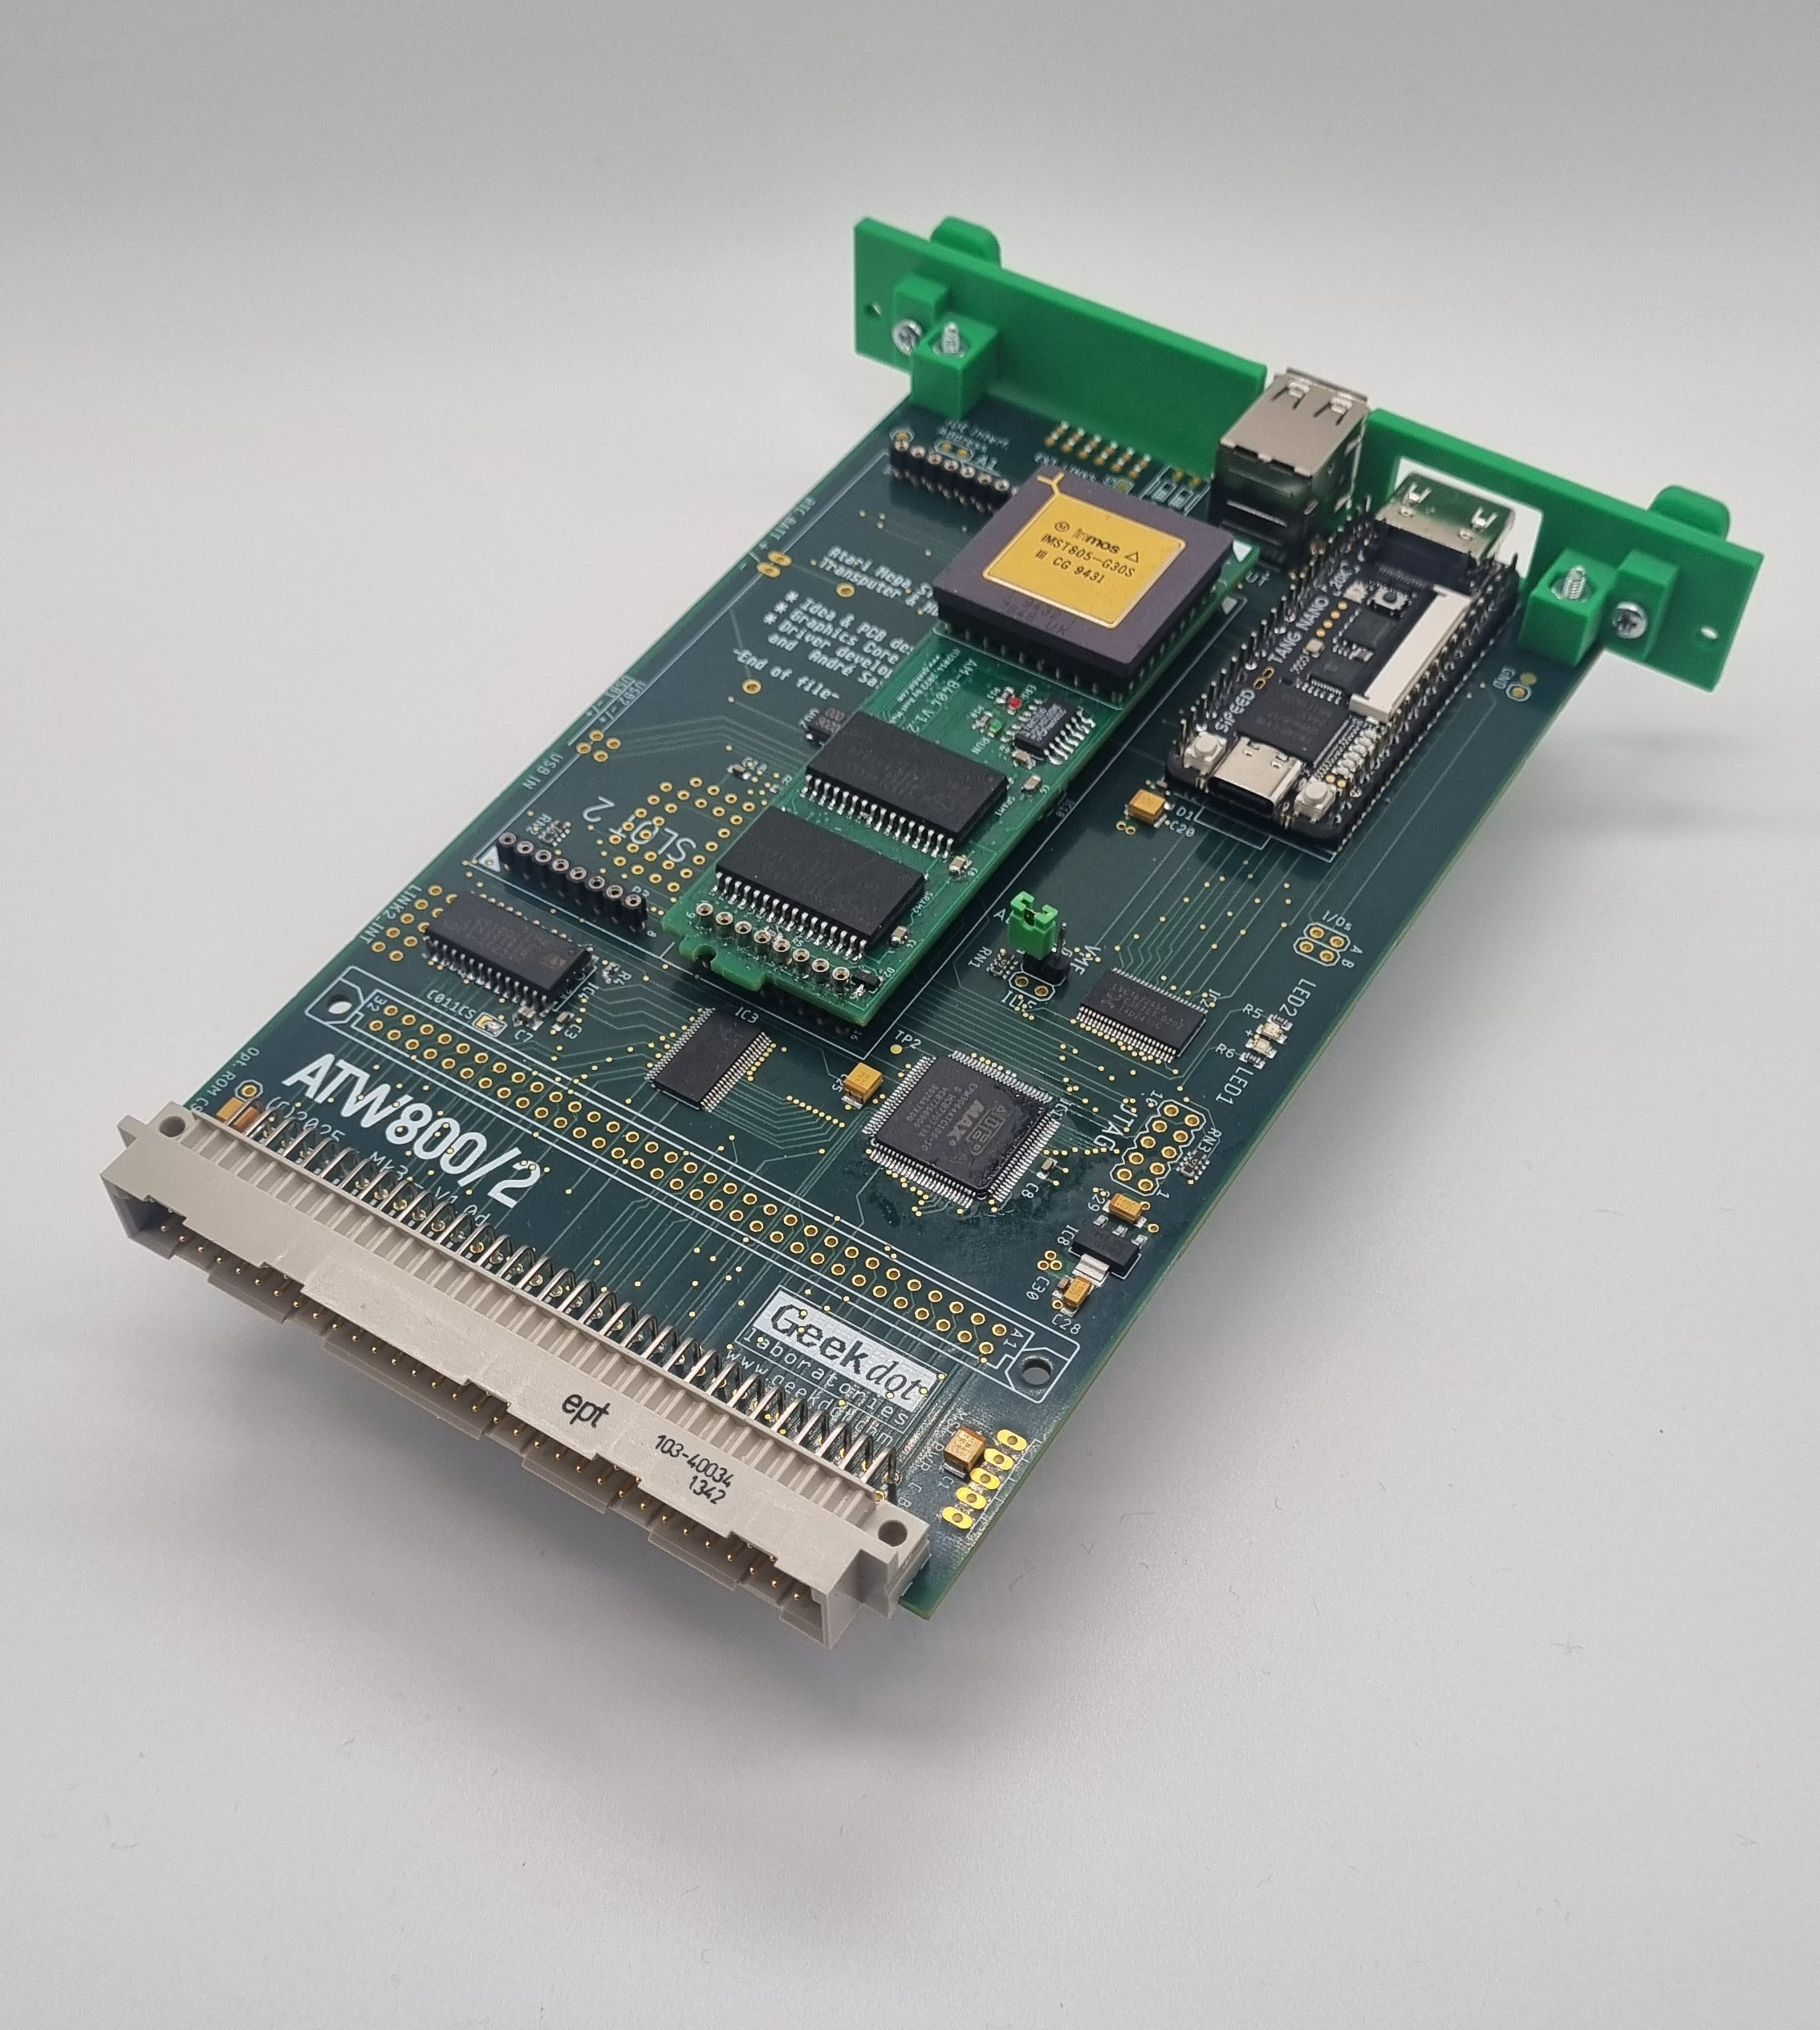
The ATW800/2 features 2 slots for classic size-1 TRAM modules next to the Nano20k. Here’s one size-1 TRAM installed:
TRAMs were/are available in many configurations, for those who want to know more, I made a dedicated page about TRAMs.
But that’s not all. Because Claus isn’t Claus without some sort of magic, he also added a synthetic Transputer core into Seurat.
That core is 100% T425 compatible and can not only access his own RAM (6MB, can be partitioned by the user) but also the Video-RAM… like Blossom did.
To make everything perfect, this synthetic Transputer has a link to the physical Transputers on the ATW800/2 which are also linked and themselves have a link at the edge of the card to connect to the outside world.
To round this up:
Everything is shared with the Atari host. You have access to the physical Transputer(s) and the synthetic ones over the 68k bus.
GEM has access to the VRAM as do the synthetic Transputers… and indirectly over their links, the physical Transputers, too.
Given proper programming, the possibilities are endless. Here are some ideas:
- Accelerate Atari programs using Transputers (send data, let them do the math, collect results)
- Run X windows on Helios (running the X client on a synthetic Transputer).
- Use the synthetic Transputers as GPU. Let them do the VRAM manipulation. Lines, vertices, transformation… you name it.
Additional features (for the Mega-ST)
But wait, there’s more 🤓…
Like I told you in the beginning, I’d like to be this as much plug-and-play as possible. So the ATW800/2 features 1MB in-system programmable Flash ROM. That ROM can host 4 different versions of TOS selectable by two DIP-switches at the back-edge of the card.
Next to that DIP-switch you’ll find a dual USB port. That is a dumb loop-through to the front left edge of the ATW800/2. It is meant to connect an optional Lightning-ST so you have a nice & clean way to lead those connectors to the outside without cutting holes into your Mega-ST case.
Alternatively you can use these port to power external ACSI drives like the ACSI2SD or ACSI2STM etc.
Besides the 3 external Transputer-Links there’s also an internal one at the cards front. Just in case you have my relocator installed…
The ATW800/2 features a battery-holder for a coin battery. Because the original AA battery compartment of the Mega-ST can get in the way with the ATW800/2, this might have to be cut out 😥.
That holder can then replace the original one.
And finally, because the Nano20k has it already on-board, we’re to providing a harddisk interface using the Nano’s Micro-SD feature.
This feature is seen as a free add-on, not a real feature as it is a bit picky about the Micro-SD card used – thus we still consider this feature being at ALPHA stage.
We strongly recommend known brands like SANDISK. No-names will give various results from working up to desaster.
Why “Mega-ST” only?
Well the ATW800/2 is also available for the VME bus, i.e. Mega-STe and Atari TT.
Most of those optional features aren’t needed in those systems. Also VME cards require a 0.5mm unpopulated edge on both sides to slide into its cage.
- ROMs cannot fully served through the VME bus.
- When installed in the VME cage, there’s nearly no way to feed in the USB connector of a Lightning-TT.
- Same goes for internal TRAMs and a battery cable.

There you have it. This is all we’re able to talk about right now. Some smaller details might change until the release – that’s called ‘agile’ 😏
Let’s sum it up again:
The ATW800/2 will be available for the Mega-ST bus as well as VME bus. This is our progress so far. It will be updated every time we think it’s worth doing so.
Technical details
The ATW800/2 basically consists of 3 main devices:
- The FPGA (“Seurat”)
- The CPLD (“Absinth”)
- The Inmos C011 link-adapter
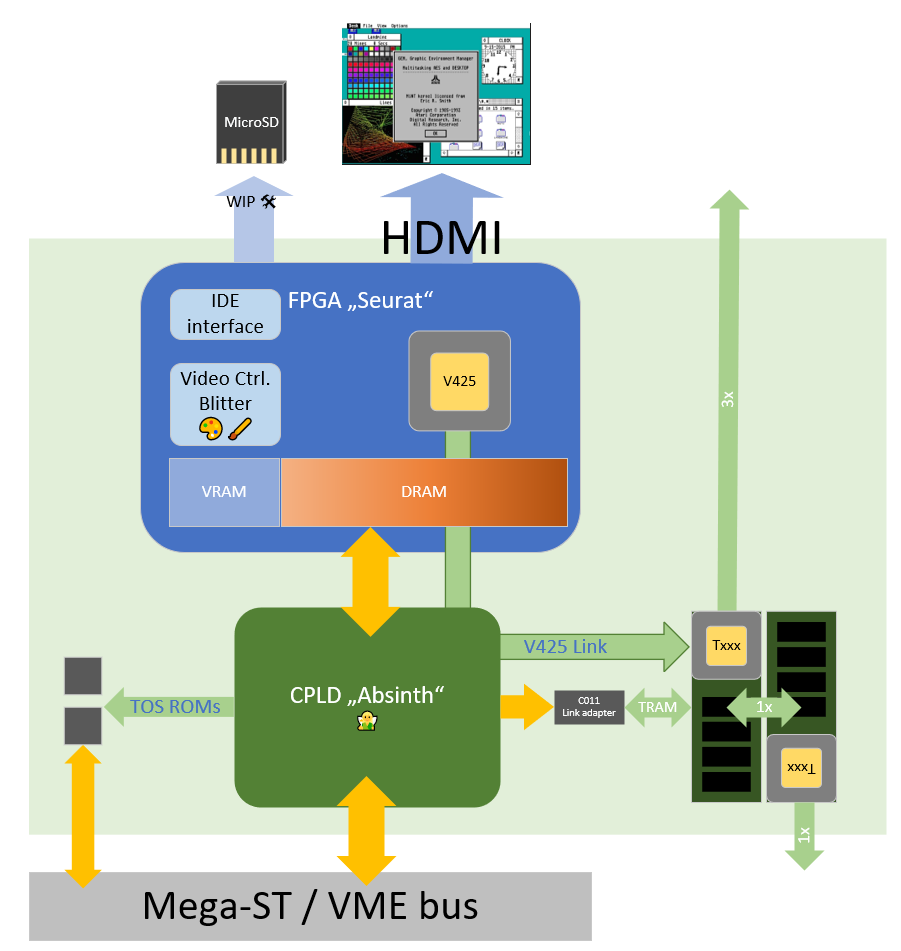
Absinth is the glue to the system-bus. He decodes addresses, manages the different functions on the card and controls the C011. He’s also the gateway between the 5V and 3.3V worlds.
Seurat itself, the core within the FPGA, consist of the Framebuffer controller, a blitter and (currently) two one synthetic T425 Transputer cores. The 2nd core was scarified for more Transputer Memory or VRAM.
This is a schematic representation:
| This was the pre-announcement in July/August 2024
And for those, who haven’t watched it… here’s the hastly made YT video 😅
…and another one showing the card running on the VME bus of an ATARI TT |
Ok, ok shut up and take my money! 💸
Great, you got hooked! 😉 In this case, here’s a dedicated post on how to get one.
I’m building them in batches of 50 pieces. So it’s either an open list for an ongoing batch you can get added to or, if the list is already full, a “subs’ bench” where you can sit and wait if one of the players on the field needs to be replaced…
Hello. Beautiful work. I own upgraded TT030. Had MegaST4. I am very interested.
Thanks, Matej. Just check back once in a while. I will post updates when we’re making repot-worthy progress.
This is great!! It definetely has great potential for being uber-coprocessor (for new software only?) — and at least simple to install gfx card for many users longing for screen real estate… 🙂
And with ROM upgrade for megaST it would be very much all I want from this machine… but for some extra RAM — is „transputer” (synthetic one) memory addressable from 68000 and can be presented as alt-ram? And if not… seriously, some MBytes for old megaST wold sell this baby to me in no time (already I’m almost sold on this)
Yes, it will need new (or adapted) software to use the might Transputer power.
And yes, AltRAM would be another nice feature… but at some point you simply have to stop. Too much redundancy does not make sense in a market where most users have at least one device to cover specific needs (Harddrive, RAM, ROM, etc.). So we decided against that… and a DSP, networking, FPU, flux compensator…
This looks amazing!
I had a thought experiment a little while ago, about whether you could interface a T212 chip in the ST blitter socket (ie. ignoring the Transputer links and using it as a coprocessor), to bring the Transputer architecture into the mainstream (for the time), and get a generation of programmers familiar with SMP, GPU programming etc.
Out of interest, do you think this would be feasible? Not suggesting an actual mod as this board looks to be very flexible with the programming options.
As the Blitter-socket has all signals needed, it should be doable with a bit of control logic.
That said, it’s probably limited and would collide with anything accessing/assuming a real blitter. You would need to write a blitter-Emulator in OCCAM and then what?
A T2xx is very limited with just 64k of RAM. It’s more a controller than a full blown CPU.
I’m interested in this 🙂
Does the Atari ATW800 programms run on this in X?
(with this ugly Helios GUI … 😉
I love the raytracing there … (and that you should restart the computer after using it – as the README says …)
Also Axel from Harzretro
Sure. It will run the same Helios (well, actually a more “recent” v1.3) and X11 like the original ATW800.
The “ugly Helios GUI” is X11 as it was back then. One could port another window manager, but I think we do not have enough (X11R4!) libs to compile one.
Following this closely – very impressive work and see you’ve made more progress since the announcement. VERY much interested in several of these boards for both Mega Bus and VME. Where should I be watching for ordering them? I don’t want to miss out!
Hey Neil,
Just follow the thread on atari-forum.com – I’ll post something there as soon as we’re ready to ship.
Very good.
A small (very big) addition would be nice.
The ability to redirect the ST-Graphic into the graphic card so that only the HDMI connector is needed.
I know this would include the need of digitalizing the Analog signal, but it would make the hole setup so much neater. Even if only “ST MID” or “ST LOW” is supported. You could grab the 9 RGB digital signals with “blank” and from the shifter directly and fill the frame buffer with it. “Only” the length of the blank has to be measured to determine between the end of the page and end of the line.
This is indeed quite a big addition and way beyond my ‘plug and play’ approach. Getting to the analog signals will require attaching wires to the shifter like you’ve described it and would make the thing even more complicated.
At least for this incarnation I’m sorry, won’t happen. But never say never 😉
I don’t think you’d need any analog capture or any hardware modification at all for this as you see all memory access on the mega bus. So you can basically just snoop all access to video related registers as well as memory being used as video memory and mirror this to the HDMI as well. You’d probably be slightly out of sync and things like raster interrupt effects would not work. But it should be sufficient to mirror the desktop and ordinary programs video output properly.
Hi there,
Sorry for the long post, but Im really excited about this!
Ive been waiting to see what matures in the ST scene, as I have a fully functional PC 2D game engine that I am gradually testing on different retro platforms for viability (e.g. see my ‘Mucking around on the DTV’ post @ Exxosforums).
I have a Mega ST with an ET4000 board installed and Im currently looking into that setup GFX-wise (along with possibly TIGA 34010 cards), but unless 1.) I can harness v.blank with an interrupt (rather than polling), 2.) come up with suitable ‘bus avoidance’ techniques to counteract the slow STISA bus speed and 3.) there are more than a handful of Atari ST users with the necessary HW, I dont see any of the above being a viable alternative, unless I find something miraculous.
However, with this ATW800-2 Megabus board, you seem to be creating a similar approach to the TIGA; i.e. process the data onboard the card rather than having to continuously transfer data over the slow bus. It also looks like we can expect to see quite a few built, so thats a great ‘user base’ bonus from my perspective.
BTW, you can put me down for a full ATW800/2-RT when its available. 😉
So the real question Im getting to here is are there any HW reference manuals/documents available yet?
Im hoping there may be and preferably from a programming and HW architecture viewpoint, rather than OS/library function calls, although if either is detailed enough to overlap somewhat, Im more than happy to get my hands on any info!)
If this is indeed available (to members of the general public, like me), I can perhaps start making preparations in my builds for such hardware, so I am at a further stage towards producing something when the HW becomes available.
Lastly, I just wanted to say well done to all involved! This is an absolutely amazing achievement. 🙂 Its about time the Atari scene got something big like this. I wish you good luck! 🙂
Hey There!
While I really appreciate your enthusiasm, as of now the ATW800/2 is not the right weapon of choice for game/demo coding….yet.
The video controller (“Seurat”) is as of today a Framebuffer + simple 2D Blitter. The (synthetic) Transputer can access the VRAM but there’s no coordination with the ATARI-side of things. All that has to be coded…
So as of now, it’s a VDI Graphics card (like you ET4k minus the endian-swapping) and optimized for the 68k bus.
To support things like a v.blank/vsync/VBL/raster Interrupt we would need to provide a signal to the CPU/MFP. The only way I see ATM would be INT3 on the Mega-ST bus. Everything else goes against my initial ‘plug and play’ goal.
Technical docs will be made available when the specs are fixed. Right now, some things are still in flux, so stay tuned for the release.
That said, being an FPGA, features can always be added or changed, so it will probably take some time until things settled to a stable state.
Hi Axel,
Thanks for the reply. However, you may be downplaying your device! 😉
The ET4000 NOVA/VOFA cards are similarly not ideal for demo/game coding either as they also do not have any synchronisation/bus master/ interrupt logic; at least not available to the ST, even if they do actually have the HW interrupt line present on the card itself.
However, there may not be any need for this synchronous co-ordination, provided the internal instructions/bus access timings are constant (i.e. not like the 68030 with caches kicking in at arbitrary moments, beyond what regular human cycle counting skills permit!).
In a similar way to what should theoretically be possible on the ET4000, there *may* be a way of extracting the timing data from the (in the ET4k case, anyway) relevant .BIB files and creating exact timing for MFP timers.
However, unlike the Atari VME/Megabus based NOVA/VOFA cards, which require Wolfgang Hiestand to fashion many different drivers with varying timing characteristics due to the non referential HW configurations of all the various ET4000 cards, this should just need ascertaining just the once on your device with the exact same setup on every card produced, so the timings would be known.
Thanks for the information and I hope to see some further progress soon.
I’m interested for video card for Atari MEGA STE
I am excited to see this happen as I have all 3 computers this can work on, Mega 2 ST, Mega STe, and a TT030. Main reason I want it is for adding better video so I can have more than 640×480 vga on a TT but… tell me more about Transputer. I have heard the name and see your videos about MandleBrots but what else can a Transputer on an Atari do? Just curious as Mandrelbots are cool but what real world things can it do for us? thx
Well, what can such a Transputer do in your ATARI? It’s a CPU running in parallel to your 68000/68030 with which it can communicate.
Given your coding skills, the transputer could en/decode JPEGs, run a chess engine or even a full blown OS (like Helios, as the original ATW800 did)… it’s just limited by your imagination, really 😉
Je suis egalement intéressé pour cette carte video magnifique.
Pour nourrir mon mega ste et il le merite bien 🙂
Jbfou
Any plans to open-source the FPGA VHDL code as well? Thanks!
It’s in the FAQ (hint, hint!) – No, there are currently no plans to open source.
As the FAQ post also states “That said, we – the extraordinary transputer gentlemen – are open for personal request in which you can explain why you need those and if there’s a convincing reason, we might share what we have”.
Indeed I have missed that part of the FAQ, sorry!
I am interested in the video part of the project. The article mentions, that you initially used a Tang Nano 9k?
I got this FPGA board recently as well and started to tinker with it in VHDL ( https://github.com/gfcwfzkm/t9k-baseboard ), but I am struggling with the video part of it. My previous experiences have been with easy adapter modules, that basically take a VGA-like signal and turn it into a HDMI/DVI signal ( https://blackmesalabs.wordpress.com/2017/12/15/bml-hdmi-video-for-fpgas-over-pmod/ ), but using the on-board HDMI of the Tang Nano 9k seems to need quite a different approach. Long story short, do you maybe have an early video prototype, when you were testing the Tang Nano 9k, and would be willing to share it or share some hints/tips? Thanks!
I’m sorry, I’m not the FPGA guy in this team. But I will forward your request to him.
Aaaaa!! This is awesome! I have been wanting the get my hands on the Transputer hardware for my TT030. This is perfect! I cannot wait 😀
Großartiges Projekt !!
Tolle Idee und Super Umsetzung. Hoffentlich gibt es viel User und dann dementsprechend auch mal Software, die das wirklich nutzt – evtl sogar mit externen Rechenknoten. Ich freu mich schon auf die kommenden Demos mit dem Teil.
Really interested. got a TT030 and a mega ST4. any news in 08/2025 ?
Yes: Vacation ⛱
Loving my ATW800/2 so far.
Just installed it today!
TJ
https://youtu.be/z4EBRdlZg1E
TJ, seeing you being so happy about the card is the reason why we made it.
Make Atari Great Again 😉
Been tinkering and see my Reset Button does work and also tinkering with my Xboot to make booting smoother as well for various configs. After I get the basics down I will explore Helios.
Since you already have a FPGA “virtual” Transputer implementation, do you have any plans to build FPGA based TRAMs?
No, not really. Why? Well, while FPGAs are great they are comparably complicated to implement.
All this sums up to quite high (production) costs which can only compensated by mass production – which I certainly will not risk/do.
An alternative is, like we did with the ATW800/2, to use a FPGA module – this is something I’m pondering about…
Yes, I was envisioning a TRAM with a “virtual” transputer or two implemented on a FPGA module, or something along those lines.
Why? Well, mostly in case we run out of transputers now with all the new ATW owners…
“When installed in the VME cage, there’s nearly no way to feed in the USB connector of a Lightning-TT.”
Could you elaborate more on this? What makes it so hard? All that Lightning-TT requires is an 8-pin header to connect to, isn’t it?
Because the ATW800/2 USB loop-through-connector is supposed to either stick out to the left side of the card (no problem in a Mega-ST) or you need to (retro-)fit a 5×2 pinheader pointing up or downwards. The latter solution would prevent the card to be sled into the VME-cage. Pointing upwards means you have to have acable already plugged in, then try to get it out on one side of the cage to route it to the Lightning-TT.
What about 90-degree angled pins facing to the left? I have the Lightning USB connectors routed outside on the VME backplane together with NOVA VME adapter (so the USB and VGA connectors sit next to each other instead of Serial2), it is very easy to put the cable through the horizontal hole in the cage.
I did not say it’s impossible, there’s always a way if there’s a will. But trying to fiddle the a 5×2 header through the standard VME cage can’t be done without modifications.
But if you like to share or discuss you solution, why not join the ATW800/2 Users discord server? There’s a channel explicitly for the VME cards.